DIY: relocating iPod jack to armrest. [[56k beware]]
 07-28-2007, 04:15 AM
#1
Member
Scikotics
SL Member
SL Member
Thread Starter

Join Date: Jul 2007
Posts: 62
I've been wanting to move the iPod jack since the day I bought my xB. I didn't see any DIY yet so here ya go. I've never done one of these before so hopefully it's not too long. Tell me if you see any problems or have questions.
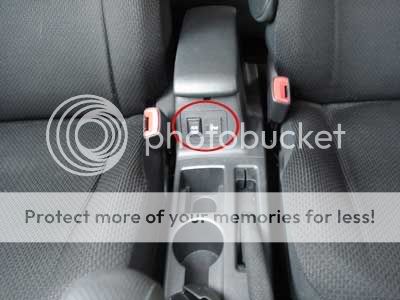
fig. 0.1

fig. 0.2
Tools:
-Screwdriver- phillips and flat
-Socket wrench, extender, and 10mm socket. (if you don't have this use pliers, it will just be harder)
-masking tape or something else to cover the head of the screwdriver
-Dremel power tool to cut holes (or really any other way you would like to cut it)
-Epoxy glue (I used Loctite Gel Epoxy because it's thick and will hold in place until dry.
Part:
-The only part you need for this mod is the covers that will fill the hole where the jacks are originally located
-Part# 55539-52060-B0
-You can order them at your dealership and they cost $3.83 a piece. They may have to order them so go by the dealership a couple days before you plan to do the mod.
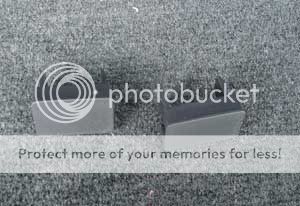
fig. 0.3
Key:
Upwards= up towards the sky
Front= towards the front of the car
Back= towards the back of the car
1. Disassembling the center armrest/console
-First thing is to remove the cup holder tray. If you pull upwards, where the arrow is in the picture, the cup holder tray will pop out pretty easily. This part hinges on the front so it's best to pop it from the back near the arrow first then pull it up and forward. You may have to pull up the parking brake to pull the cup holder tray all the way off.
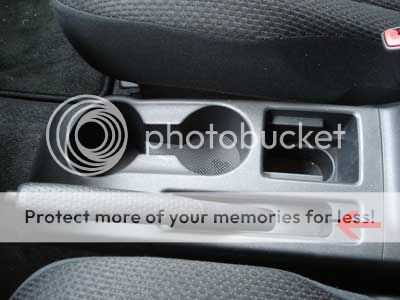
fig. 1.1
-After removing the cup tray you're going to need the socket wrench. Remove the bolt indicated by the arrow in the pic below.

fig. 1.2
-Lift the little carpet piece from inside the armrest to reveal these two bolts, remove these also.
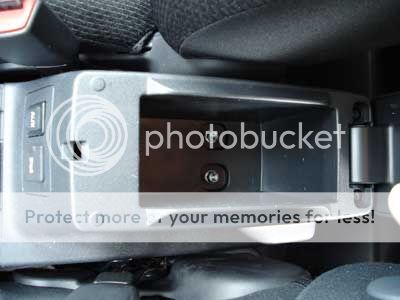
fig. 1.3
-Now push both of the front seats all the way forward and hop into the back of the car. You have to remove the plastic snaps shown in the pic below. There is one on each side of the back part of the center compartment. To remove them use a phillips screwdriver to push in the center piece, the "nail" (you will hear it pop); now use a flat screwdriver to pry the whole plastic snap out, including the nail (it should come out pretty easily). To stop from scuffing up the plastic put some tape on the screwdrivers.
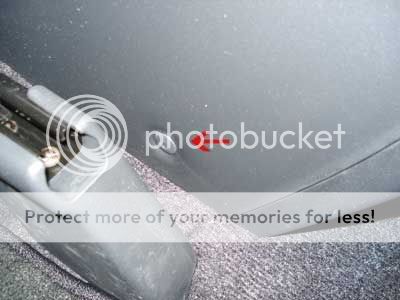
fig. 1.4
-Before the compartment can be removed the wires have to be disconnected. In fig. 1.2 you can see two plugs to the right of the bolt you've removed. These two plugs need to be disconnected there (they're simple locking snap plugs). Now you have to remove the two wire holding snaps that are shown in the two images below; you may need to pry the snaps out with a flat screwdriver if it's too hard to pull out by hand.
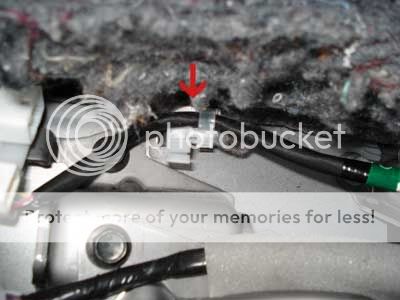
fig. 1.5
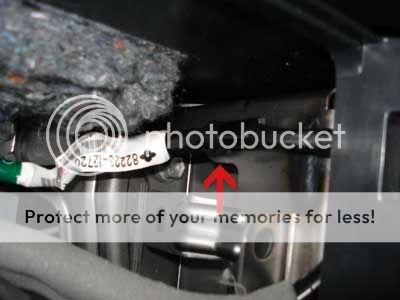
fig. 1.6
-Now the whole compartment can be lifted out of the car. You can bring it inside to work on, it's damn hot outside. Flip the compartment over and you will see the image below; the two arrows point to two plastic snaps. The two snaps are a pain to get out and break easily (I broke one) so just beware.
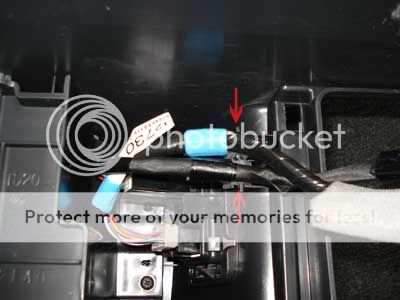
fig. 1.7
-Next push down the two tabs shown in the pic below and the little panel (seen in fig. 0.1) will come out. Pull it and the wires out of the compartment.
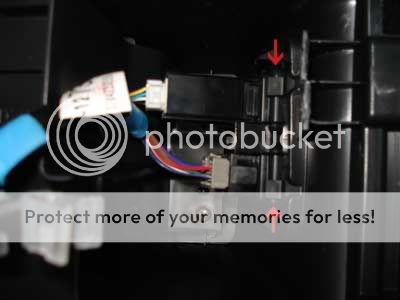
fig. 1.8
-Disconnect the wires from the two plugs and push the two plugs through the little panel.
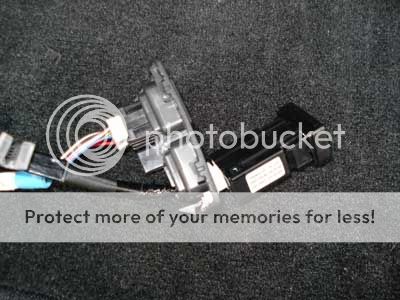
fig. 1.9
-Now you can put the two covers you bought into the little panel.

fig. 1.10
-Below where you just removed the wires you will see two screws, remove them.
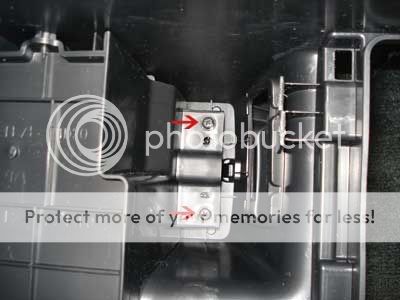
fig. 1.11
-Next flip it back upright and remove the screws shown in the image, there are two on each side. You also need two remove the armrest cover. Open the armrest and you will see the two screws by the hinge; unscrew the two screws. To remove the armrest cover you need to close it and then lift it up... it will not come out while open (unless you break it).
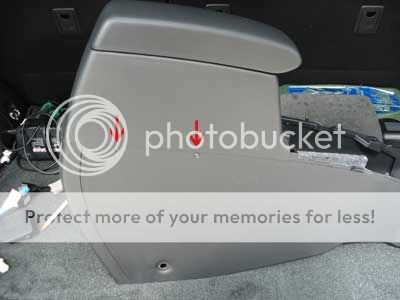
fig. 1.12
-With all the screws removed, the back portion and the inside of the center compartment can be removed (the back portion is just snapped in place, so unsnap it)
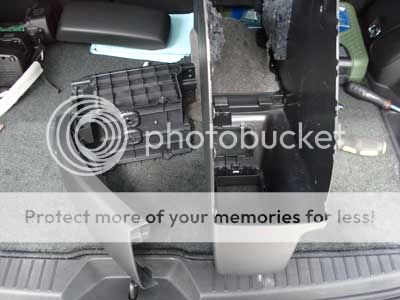
fig. 1.13
-The back part does not have to be removed but it makes it easier cutting the holes and you will not put any gashes in the back part. To remove it open the cup holder, inside the cupholder hole on the top there are two snaps; push them down from the top with a screwdriver and the cupholder will slide out.
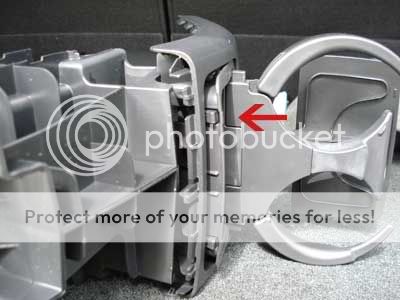
fig. 1.14
-Where the cup holder was you will find two screws; remove them and the back part will come apart from the storage part.
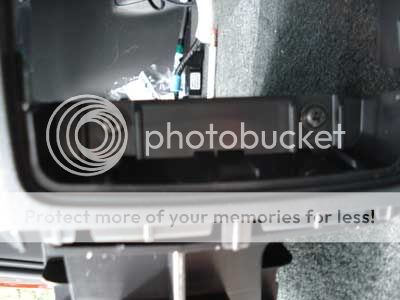
fig. 1.15
-Now you should just have the inside of the storage compartment. It's now time to start cutting.
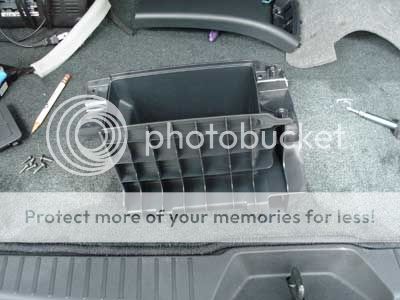
fig. 1.16
2. Cutting the holes and gluing the plugs.
-I relocated my plug to the front of the inside of the armrest but you could also place them on the bottom if you like. I started by tracing the outline of plug, with a marker, on the outside of the box.
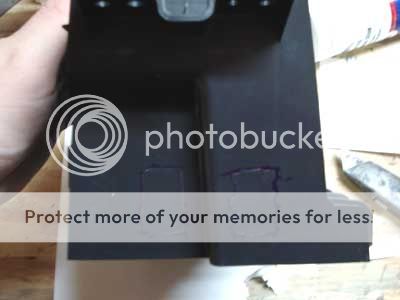
fig. 2.1
-I used a dremel power tool to cut out the holes but you could probably use a heated razor blade or any other thing you can think of. You have to watch were you trace the holes because you don't want to have the holes too low because they will not fit (this being why my holes look like crap, I had to make them bigger). Test fit the plugs and cut away until they fit.
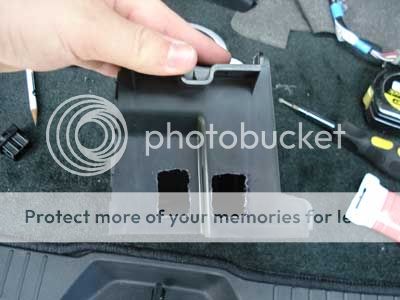
fig. 2.2
-If you can cut a really good hole you may not have to use glue, but I screwed up so I needed to glue them in. I used the epoxy (see tool list) and it worked great; you have to mix it on a piece of cardboard or something and use a stick to apply it to the back of the plug. It will dry hard within an hour (it takes a full day to set completely) and you can start reinstalling everything.
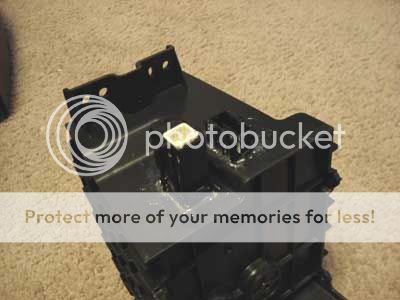
fig. 2.3
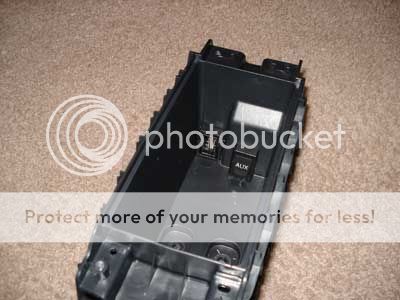
fig. 2.4
3. Reinstalling everything
-Start by reinstalling the back part of the compartment and then slide the cupholder back in until it snaps.
-Snap the two wires into the newly relocated plugs.
-Reinstall the back and inside parts into the top portion of the compartment. Screw in the two screws under the plugs and the four on the sides. Reinstall the armrest cover by pushing the cover down into place, then open it and screw in the screws. You can resnap the two snaps that held the wires under the compartment but I broke them so I left it be.
-Push the compartment back into place and snap the two plugs together (fig. 1.2). Resnap the two wire holding snaps back in (fig. 1.5 and 1.6).
-Screw the front bolt back in.
-Get back in the back seat and put the two plastic snaps back in. To put them in push just the flat part into the hole, once it snaps in push the "nail" into the center of the snap and it will lock in place.
-Now screw in the two bolts inside the armrest and snap the cup holder tray back in place.
-Depending on where you relocated the plugs you may have to cut the little carpet piece; once it's cut put it back it.
-And lastly, snap the little panel (the original location of the plugs) back in place.
-Also, don't forget to release your parking brake if you pulled it up (if you're driving an automatic).
fig. 0.1
fig. 0.2
Tools:
-Screwdriver- phillips and flat
-Socket wrench, extender, and 10mm socket. (if you don't have this use pliers, it will just be harder)
-masking tape or something else to cover the head of the screwdriver
-Dremel power tool to cut holes (or really any other way you would like to cut it)
-Epoxy glue (I used Loctite Gel Epoxy because it's thick and will hold in place until dry.
Part:
-The only part you need for this mod is the covers that will fill the hole where the jacks are originally located
-Part# 55539-52060-B0
-You can order them at your dealership and they cost $3.83 a piece. They may have to order them so go by the dealership a couple days before you plan to do the mod.
fig. 0.3
Key:
Upwards= up towards the sky
Front= towards the front of the car
Back= towards the back of the car
1. Disassembling the center armrest/console
-First thing is to remove the cup holder tray. If you pull upwards, where the arrow is in the picture, the cup holder tray will pop out pretty easily. This part hinges on the front so it's best to pop it from the back near the arrow first then pull it up and forward. You may have to pull up the parking brake to pull the cup holder tray all the way off.
fig. 1.1
-After removing the cup tray you're going to need the socket wrench. Remove the bolt indicated by the arrow in the pic below.
fig. 1.2
-Lift the little carpet piece from inside the armrest to reveal these two bolts, remove these also.
fig. 1.3
-Now push both of the front seats all the way forward and hop into the back of the car. You have to remove the plastic snaps shown in the pic below. There is one on each side of the back part of the center compartment. To remove them use a phillips screwdriver to push in the center piece, the "nail" (you will hear it pop); now use a flat screwdriver to pry the whole plastic snap out, including the nail (it should come out pretty easily). To stop from scuffing up the plastic put some tape on the screwdrivers.
fig. 1.4
-Before the compartment can be removed the wires have to be disconnected. In fig. 1.2 you can see two plugs to the right of the bolt you've removed. These two plugs need to be disconnected there (they're simple locking snap plugs). Now you have to remove the two wire holding snaps that are shown in the two images below; you may need to pry the snaps out with a flat screwdriver if it's too hard to pull out by hand.
fig. 1.5
fig. 1.6
-Now the whole compartment can be lifted out of the car. You can bring it inside to work on, it's damn hot outside. Flip the compartment over and you will see the image below; the two arrows point to two plastic snaps. The two snaps are a pain to get out and break easily (I broke one) so just beware.
fig. 1.7
-Next push down the two tabs shown in the pic below and the little panel (seen in fig. 0.1) will come out. Pull it and the wires out of the compartment.
fig. 1.8
-Disconnect the wires from the two plugs and push the two plugs through the little panel.
fig. 1.9
-Now you can put the two covers you bought into the little panel.
fig. 1.10
-Below where you just removed the wires you will see two screws, remove them.
fig. 1.11
-Next flip it back upright and remove the screws shown in the image, there are two on each side. You also need two remove the armrest cover. Open the armrest and you will see the two screws by the hinge; unscrew the two screws. To remove the armrest cover you need to close it and then lift it up... it will not come out while open (unless you break it).
fig. 1.12
-With all the screws removed, the back portion and the inside of the center compartment can be removed (the back portion is just snapped in place, so unsnap it)
fig. 1.13
-The back part does not have to be removed but it makes it easier cutting the holes and you will not put any gashes in the back part. To remove it open the cup holder, inside the cupholder hole on the top there are two snaps; push them down from the top with a screwdriver and the cupholder will slide out.
fig. 1.14
-Where the cup holder was you will find two screws; remove them and the back part will come apart from the storage part.
fig. 1.15
-Now you should just have the inside of the storage compartment. It's now time to start cutting.
fig. 1.16
2. Cutting the holes and gluing the plugs.
-I relocated my plug to the front of the inside of the armrest but you could also place them on the bottom if you like. I started by tracing the outline of plug, with a marker, on the outside of the box.
fig. 2.1
-I used a dremel power tool to cut out the holes but you could probably use a heated razor blade or any other thing you can think of. You have to watch were you trace the holes because you don't want to have the holes too low because they will not fit (this being why my holes look like crap, I had to make them bigger). Test fit the plugs and cut away until they fit.
fig. 2.2
-If you can cut a really good hole you may not have to use glue, but I screwed up so I needed to glue them in. I used the epoxy (see tool list) and it worked great; you have to mix it on a piece of cardboard or something and use a stick to apply it to the back of the plug. It will dry hard within an hour (it takes a full day to set completely) and you can start reinstalling everything.
fig. 2.3
fig. 2.4
3. Reinstalling everything
-Start by reinstalling the back part of the compartment and then slide the cupholder back in until it snaps.
-Snap the two wires into the newly relocated plugs.
-Reinstall the back and inside parts into the top portion of the compartment. Screw in the two screws under the plugs and the four on the sides. Reinstall the armrest cover by pushing the cover down into place, then open it and screw in the screws. You can resnap the two snaps that held the wires under the compartment but I broke them so I left it be.
-Push the compartment back into place and snap the two plugs together (fig. 1.2). Resnap the two wire holding snaps back in (fig. 1.5 and 1.6).
-Screw the front bolt back in.
-Get back in the back seat and put the two plastic snaps back in. To put them in push just the flat part into the hole, once it snaps in push the "nail" into the center of the snap and it will lock in place.
-Now screw in the two bolts inside the armrest and snap the cup holder tray back in place.
-Depending on where you relocated the plugs you may have to cut the little carpet piece; once it's cut put it back it.
-And lastly, snap the little panel (the original location of the plugs) back in place.
-Also, don't forget to release your parking brake if you pulled it up (if you're driving an automatic).
 07-28-2007, 04:40 AM
#2
Senior Member
SL Member

Join Date: May 2007
Location: NorCal - East Bay - (925)
Posts: 249
Cool! Nice Job. I had a really tough time getting the center console to come apart in two pieces. I never could find those screws behind the cupholders. Smart man!
Came out great...and looks very nice. Should help lots of guys.
-Mike
Came out great...and looks very nice. Should help lots of guys.
-Mike


 07-30-2007, 01:44 AM
#11
Senior Member


SL Member
Join Date: Dec 2004
Location: Atlanta, GA
Posts: 4,971
Originally Posted by Ricetoaster
Thanks everyone. Max, how did you cut your holes and how did they come out? Mine were kinda shabby.
However I mock up a lot of plastic parts at work and I would recommend a disc over a rotating bit (think cutoff wheel over a drill bit type cutter.) That is, unless the console is polypropylene, which I assume it is, in which case a good result is tough for anyone. I would still recommend a disc, which you can clean up with a sharp knife.
07-30-2007, 01:41 PM
#13
Member
Scikotics
SL Member
SL Member
Thread Starter
Join Date: Jul 2007
Posts: 62
Originally Posted by Max
Originally Posted by Ricetoaster
Thanks everyone. Max, how did you cut your holes and how did they come out? Mine were kinda shabby.
However I mock up a lot of plastic parts at work and I would recommend a disc over a rotating bit (think cutoff wheel over a drill bit type cutter.) That is, unless the console is polypropylene, which I assume it is, in which case a good result is tough for anyone. I would still recommend a disc, which you can clean up with a sharp knife.

 11-02-2007, 04:50 PM
#18
Senior Member
SL Member
Join Date: Oct 2007
Location: San Diego, CA
Posts: 615
I want to flip my jacks to the inside as well. I'm really happy that there is a tutorial for this, but I can't see the pictures. Would you be so kind as to re-host the pics. Or is there something I'm doing wrong on my end? Thanks.
---edit---
nevermind. I see the pics now. Beautiful job!
---edit---
nevermind. I see the pics now. Beautiful job!

