
*DIY* Headlight removal/install


Thread Starter
Senior Member
SL Member
Joined: Jan 2008
Posts: 232
From: Tucson, AZ
so, i was searching around and never found a diy for a headlight install. after no such luck i decided to wing it and do it on trial/error, and in the process i took pictures. hope it helps somebody. the pictures are pretty generic, but i have circled the areas im talking about. NOTE: steps are for drivers side of veh, but are the same for the passenger side. if anybody has questions feel free to ask. only tools that are needed are metric sockets and 1 small screwdrivers.
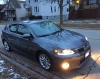
before!

i decided i was going to do the diy after i did the grille, so im assuming you can get the grille off, if not its 3 black snap tabs, you just need to pop them off with a small screw driver. now, on the picture: theres 2 snap tabs and 1 bolt that needs to be removed on the bumper. theres also 2 bolts ontop of the headlights that may be removed too.

2 more black snap tabs, and 2 nuts holding the outter part of the dust guard that need to be removed.

note, unless your box is dropped, you do not need to raise it. theres (i believe) 7 finger looking pieces that stick out on the bottom, remove the nuts that are on them. also, on the outside of the bumper there is a clip that can be rotated to let the edge of the bumper come off.

ok, i had a frustrating time with this part. but after calming down, the bumper SLIDES forward from under the headlight. after that, theres 2 nuts on the outside of the lights that need to be removed. at this point, the headlight should be able to come off, minus the bulb that is still attached. simply turn the bulb harness and it should pop right out.

you should be left with the headlight out and the bumper off. now, just put the new headlight in and repeat steps backward.
and the final product.

total time was about 1.5 hours, not knowing what i was doing.
good luck guys! just holler if you got any questions.
jay
before!
i decided i was going to do the diy after i did the grille, so im assuming you can get the grille off, if not its 3 black snap tabs, you just need to pop them off with a small screw driver. now, on the picture: theres 2 snap tabs and 1 bolt that needs to be removed on the bumper. theres also 2 bolts ontop of the headlights that may be removed too.
2 more black snap tabs, and 2 nuts holding the outter part of the dust guard that need to be removed.
note, unless your box is dropped, you do not need to raise it. theres (i believe) 7 finger looking pieces that stick out on the bottom, remove the nuts that are on them. also, on the outside of the bumper there is a clip that can be rotated to let the edge of the bumper come off.
ok, i had a frustrating time with this part. but after calming down, the bumper SLIDES forward from under the headlight. after that, theres 2 nuts on the outside of the lights that need to be removed. at this point, the headlight should be able to come off, minus the bulb that is still attached. simply turn the bulb harness and it should pop right out.
you should be left with the headlight out and the bumper off. now, just put the new headlight in and repeat steps backward.
and the final product.
total time was about 1.5 hours, not knowing what i was doing.
good luck guys! just holler if you got any questions.
jay
Senior Member
SL Member
Joined: Feb 2006
Posts: 1,235
From: Slimey Valley, SoCal
nice write up! good pics!
1 thing to note in addition...
1st if all you are doing is swapping headlights, the bumper does not need to be completely removed, only the "top" half of the bumper needs to be removed - the part directly under the headlights, in your #3 pic, only the bolt that screws into the bumper - the one furthest to the left in your pic, need be removed, not the additional push fastners that attach the dust cover. As noted above, the bumper slides out from under the lightd allowing access to the lower headlight screws. this will not stress the bumper as you only need to pull it back a touch to gain access to the lower HL mount locations.
if you are doing other mods at the same time, lower grills, louder horns, radiator swap, then remove the whole bumper.
^---the lights look sick!
Thread Starter
Senior Member
SL Member
Joined: Jan 2008
Posts: 232
From: Tucson, AZ
Originally Posted by IH8ONYU
nice write up! good pics!
1 thing to note in addition...
1st if all you are doing is swapping headlights, the bumper does not need to be completely removed, only the "top" half of the bumper needs to be removed - the part directly under the headlights, in your #3 pic, only the bolt that screws into the bumper - the one furthest to the left in your pic, need be removed, not the additional push fastners that attach the dust cover. As noted above, the bumper slides out from under the lightd allowing access to the lower headlight screws. this will not stress the bumper as you only need to pull it back a touch to gain access to the lower HL mount locations.
if you are doing other mods at the same time, lower grills, louder horns, radiator swap, then remove the whole bumper.
^---the lights look sick!
1 thing to note in addition...
1st if all you are doing is swapping headlights, the bumper does not need to be completely removed, only the "top" half of the bumper needs to be removed - the part directly under the headlights, in your #3 pic, only the bolt that screws into the bumper - the one furthest to the left in your pic, need be removed, not the additional push fastners that attach the dust cover. As noted above, the bumper slides out from under the lightd allowing access to the lower headlight screws. this will not stress the bumper as you only need to pull it back a touch to gain access to the lower HL mount locations.
if you are doing other mods at the same time, lower grills, louder horns, radiator swap, then remove the whole bumper.
^---the lights look sick!
and thanks on the props, they look better with my new grille too. and im working on a piece that fits evenly in the middle with a little piece of fiberglass and some bondo.. and elbow grease. we will see howi t looks.
jallamas- thanks.
and im gong to check to see if anybody has done a writeup on springs. i didnt take pix but i can do some lenghty written steps.
thanks again guys.
jay


Senior Member
SL Member
Joined: Feb 2006
Posts: 1,235
From: Slimey Valley, SoCal
there is also a couple "clear corners" write ups in the Tech section that tells you what to do once your headlights are out, either by bake method - if you want to black out the inside of the housing, or the reflector crush method. both require the headlights to be removed.
Senior Member
Fail, INC
SL Member
Joined: Oct 2006
Posts: 11,312
From: Forest Park, IL
Originally Posted by Metro273
Thanks for the DIY. I need to remove my headlights so that I can clear the corners.

Senior Member
SL Member
Joined: Apr 2005
Posts: 1,721
From: San Clemente, CA
Originally Posted by burstaneurysm
Originally Posted by Metro273
Thanks for the DIY. I need to remove my headlights so that I can clear the corners.
Thx
John

Senior Member
SL Member
Joined: Apr 2005
Posts: 1,721
From: San Clemente, CA
Originally Posted by burstaneurysm
Sigh.
Sigh
John

Thread
Thread Starter
Forum
Replies
Last Post
vi3tb0i09
PPC: Engine / Drivetrain
2
Sep 23, 2015 08:32 PM