Big 3/Grounding Kit Write-Up
 10-27-2008, 06:50 AM
#1
Senior Member
SL Member
Thread Starter

Join Date: Feb 2008
Location: Honolulu, HI
Posts: 750
So, I already did the Big 3 for my stereo build. I neglected to take build pics, so I went back and shot some pictures that should help you. 
The Big 3 should do pretty much the same thing that those so called "grounding kits" claim to do, and more. Note that what I did also upgrades the Positive wire from the alternator to battery, allowing the alternator to charge more efficiently.
I am not responsible for you blowing anything up. If you are unsure of something, please ask! This writeup assumes you know some basics about automotive wiring. (Negative = Ground, etc.)
Okay... brief overview.
-The Big3 consists of three wires. (Wow, really?)
First is from the Alternator (Pos.) to the Battery (Pos.).
Second is from the Chassis (Neg.) to the Battery (Neg.).
The third can be done two ways. Its from the engine block (Neg.) to either the Chassis (Neg.) or the Battery (Neg.). The way I did it goes from the engine block to the battery.
If you do it the other way, the wire from chassis to battery carries the current from both the chassis and engine block. Probably a very negligible difference, but its only about a foot more wire.
-For every connection, take some sandpaper and take off whatever paint/corrosion might be there. Get down to the fresh bare metal!
-Leave the stock wires there, they will help carry current too.
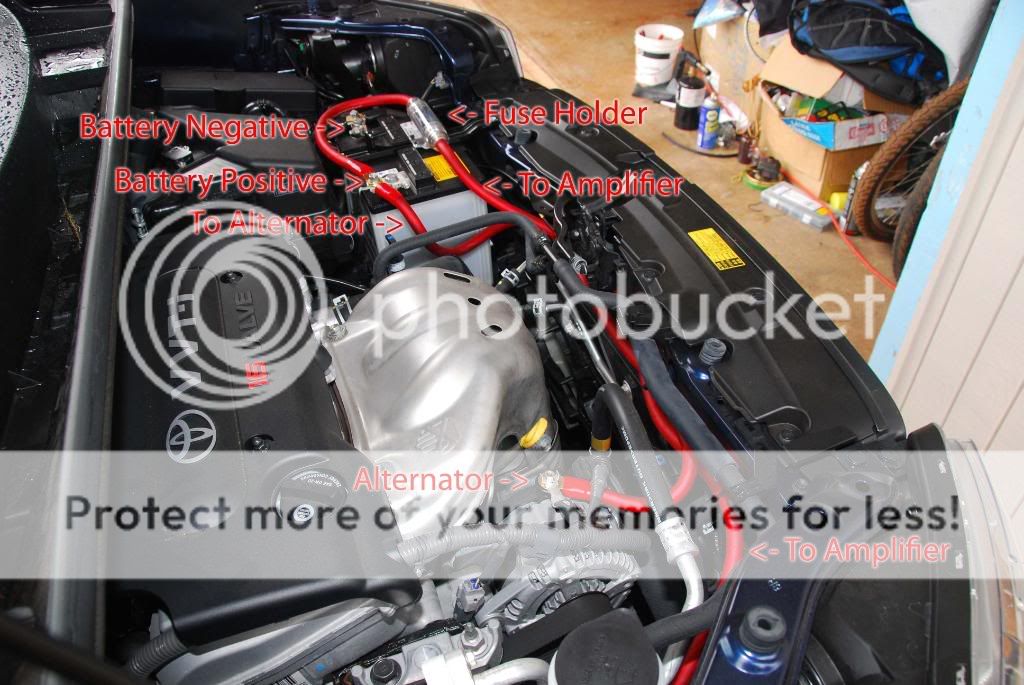
As you can see, I have added two positive runs, and two negative runs. The one run that loops around and goes to the fuse holder is the run that continues back to the amplifier in the trunk. It is important to fuse this, because if at any point, the wire insulation is cut through,
and touches any metal part of the car, a short circuit would be created. The fuse should blow, preventing any major problems... The run to the alternator is not fused because of how short it is. (Just make sure its not near anything hot/abrasive, and it is secure)

Okay, lets take a look at the alternator first. Here's a wide shot, to give you an idea of what we're working on... You see the things poking up? That's the stock alternator power wire. Those two tabs go into the alternator to keep the wire from rotating. I did took the old wire and flipped it over because I wanted my larger wire to have the most direct contact with the alternator (Obviously you cant have the tabs downwards ontop of the new conenction). You could just add your wire ontop of the old connection and not have to rotate it if you wanted to. I just wanted to make the most of the connection. Ensure you leave enough slack for the engine to move around. As you should know, under hard acceleration/deceleration the engine moves around on its motor mounts.

Next is the Grounds! The first ground we'll look at is from Chassis to Battery. This one is relatively simple. Pull the battery out, and it should be right there on the wheel well.
It's a bit tricky to find the way you want to route the wire. I routed it toward the front of the vehicle, and brought it up right on the side of the battery.
The Second one is a bit more tricky. You have to take off the air cleaner box. No big deal. First, loosen up the hose clamp (10mm) that attaches the rubber pipe to the air cleaner. Unplug the MAF sensor. Then, flip up the three tabs and take the top of the air cleaner off.
Take out the filter and put it in a clean safe place, along with the air cleaner. Inside, you'll see three bolts. These are 10mm bolts as well. Once the bolts are out, the air cleaner should just slide out. (Look out for the air intake pipe on that feeds into the box).


Once tha'ts out of the way, you'll notice where the stock grounding wire goes. This is the point we're going to use for the new wire. You may also notice that space is really tight down there. To make more room, there are a few harnesses that we can move. There's a clip that secures one of the wire bundles
to the engine block. As you can see in the picture, if you lift outwards on the tab, the clip will pull straight up. The same type of fastener is on the left side of the plastic conduit that runs right behind the battery. If you undo that one and slide the conduit backwards, you can pop the right side up and out.

Now, we can do the engine block ground! Look at this overview to see what we're dealing with...

Okay, here's close up. You can kinda see how the old terminal has a tab like the alternator. Once again, I just flipped it upside down, no problems.

Once thats all done, you can hook up the wire on the battery. Just secure the ring terminals to the top of the stock battery terminals.
That should be it! Make sure you resecure all the clips you took off, and reconnect the MAF sensor.
The Big 3 should do pretty much the same thing that those so called "grounding kits" claim to do, and more. Note that what I did also upgrades the Positive wire from the alternator to battery, allowing the alternator to charge more efficiently.
I am not responsible for you blowing anything up. If you are unsure of something, please ask! This writeup assumes you know some basics about automotive wiring. (Negative = Ground, etc.)
Okay... brief overview.
-The Big3 consists of three wires. (Wow, really?)
First is from the Alternator (Pos.) to the Battery (Pos.).
Second is from the Chassis (Neg.) to the Battery (Neg.).
The third can be done two ways. Its from the engine block (Neg.) to either the Chassis (Neg.) or the Battery (Neg.). The way I did it goes from the engine block to the battery.
If you do it the other way, the wire from chassis to battery carries the current from both the chassis and engine block. Probably a very negligible difference, but its only about a foot more wire.
-For every connection, take some sandpaper and take off whatever paint/corrosion might be there. Get down to the fresh bare metal!
-Leave the stock wires there, they will help carry current too.
As you can see, I have added two positive runs, and two negative runs. The one run that loops around and goes to the fuse holder is the run that continues back to the amplifier in the trunk. It is important to fuse this, because if at any point, the wire insulation is cut through,
and touches any metal part of the car, a short circuit would be created. The fuse should blow, preventing any major problems... The run to the alternator is not fused because of how short it is. (Just make sure its not near anything hot/abrasive, and it is secure)
Okay, lets take a look at the alternator first. Here's a wide shot, to give you an idea of what we're working on... You see the things poking up? That's the stock alternator power wire. Those two tabs go into the alternator to keep the wire from rotating. I did took the old wire and flipped it over because I wanted my larger wire to have the most direct contact with the alternator (Obviously you cant have the tabs downwards ontop of the new conenction). You could just add your wire ontop of the old connection and not have to rotate it if you wanted to. I just wanted to make the most of the connection.
Ensure you leave enough slack for the engine to move around. As you should know, under hard acceleration/deceleration the engine moves around on its motor mounts.Next is the Grounds! The first ground we'll look at is from Chassis to Battery. This one is relatively simple. Pull the battery out, and it should be right there on the wheel well.
It's a bit tricky to find the way you want to route the wire. I routed it toward the front of the vehicle, and brought it up right on the side of the battery.
The Second one is a bit more tricky. You have to take off the air cleaner box. No big deal. First, loosen up the hose clamp (10mm) that attaches the rubber pipe to the air cleaner. Unplug the MAF sensor. Then, flip up the three tabs and take the top of the air cleaner off.
Take out the filter and put it in a clean safe place, along with the air cleaner. Inside, you'll see three bolts. These are 10mm bolts as well. Once the bolts are out, the air cleaner should just slide out. (Look out for the air intake pipe on that feeds into the box).
Once tha'ts out of the way, you'll notice where the stock grounding wire goes. This is the point we're going to use for the new wire. You may also notice that space is really tight down there. To make more room, there are a few harnesses that we can move. There's a clip that secures one of the wire bundles
to the engine block. As you can see in the picture, if you lift outwards on the tab, the clip will pull straight up. The same type of fastener is on the left side of the plastic conduit that runs right behind the battery. If you undo that one and slide the conduit backwards, you can pop the right side up and out.
Now, we can do the engine block ground! Look at this overview to see what we're dealing with...
Okay, here's close up. You can kinda see how the old terminal has a tab like the alternator. Once again, I just flipped it upside down, no problems.
Once thats all done, you can hook up the wire on the battery. Just secure the ring terminals to the top of the stock battery terminals.
That should be it! Make sure you resecure all the clips you took off, and reconnect the MAF sensor.
Last edited by MR_LUV; 12-22-2020 at 10:51 AM. Reason: Awarded 10 Yr Badge

 10-27-2008, 07:10 AM
#3
Senior Member
SL Member
Thread Starter
Join Date: Feb 2008
Location: Honolulu, HI
Posts: 750
Glad it might be able to help you out! All the pictures were shot on with a Nikon D80, 18-200mm f/3.5-5.6 VR lens, and a SB-600 Speedlite. The only photo I retouched is the one on the engine block. Part of the terminal was in the shadow, so I Photochopped it so you can see it.
 10-28-2008, 07:38 AM
#5
Senior Member
SL Member

Join Date: Apr 2005
Location: San Clemente, CA
Posts: 1,721
Nice write up, that wire is the same I purchased for my xB. Its is as flexible as a noodle. 
John
__________________
John
__________________
Last edited by MR_LUV; 12-22-2020 at 10:28 AM. Reason: Awarded 15 Yr Badge

 10-29-2008, 04:03 AM
#11
Senior Member
SL Member
Thread Starter
Join Date: Feb 2008
Location: Honolulu, HI
Posts: 750
4 gauge would work just fine for a grounding kit. I would order about five or six feet of black wire and maybe six or seven feet of red wire. Best bet is to go out and measure. Better to have extra!
 12-05-2008, 05:22 AM
#13
Senior Member
SL Member
Thread Starter
Join Date: Feb 2008
Location: Honolulu, HI
Posts: 750
Yep, but thick cables allow you to make long runs with minimal voltage drop. This wire should be able to handle at least a 3000W system, if I decided to upgrade my alt and stick some bigger batteries in. Better to have bigger wire then too small!
Better to have bigger wire then too small!
07-09-2012, 02:51 AM
#14

I realize this is a SUPER old thread. But perchance is there an update version on the forums for us xB2?
With photos. I'm thinking about doing it just because it will give me something to do.
__________________
With photos. I'm thinking about doing it just because it will give me something to do.
__________________
Last edited by MR_LUV; 12-22-2020 at 10:32 AM. Reason: Awarded 10 Yr Badge
09-20-2012, 03:46 AM
#15
Member
SL Member

Join Date: Jun 2011
Posts: 72
Thought I'd bring this back from the dead as I just finished the big 3 upgrade. Well worth it IMO. I installed some nice stereo gear I had from previous cars and thought I must have done something wrong, or the XB just isn't a good platform for building a stereo in, as the results didn't sound nearly as good as my gear sounded in my previous cars. Fiddled with settings, crossover points, etc., to no avail for months.
Did the upgrade and, FINALLY. The SQ is back. IMO, if you're going to put some nice speakers and amplifiers in your xB, it's not worth doing unless you upgrade the big 3. Side perk is that the car doesn't stumble as much accelerating from a stop.
Did the upgrade and, FINALLY. The SQ is back. IMO, if you're going to put some nice speakers and amplifiers in your xB, it's not worth doing unless you upgrade the big 3. Side perk is that the car doesn't stumble as much accelerating from a stop.
09-20-2012, 04:29 AM
#16
Senior Member
SL Member
Thread Starter
Join Date: Feb 2008
Location: Honolulu, HI
Posts: 750
Thought I'd bring this back from the dead as I just finished the big 3 upgrade. Well worth it IMO. I installed some nice stereo gear I had from previous cars and thought I must have done something wrong, or the XB just isn't a good platform for building a stereo in, as the results didn't sound nearly as good as my gear sounded in my previous cars. Fiddled with settings, crossover points, etc., to no avail for months.
Did the upgrade and, FINALLY. The SQ is back. IMO, if you're going to put some nice speakers and amplifiers in your xB, it's not worth doing unless you upgrade the big 3. Side perk is that the car doesn't stumble as much accelerating from a stop.
Did the upgrade and, FINALLY. The SQ is back. IMO, if you're going to put some nice speakers and amplifiers in your xB, it's not worth doing unless you upgrade the big 3. Side perk is that the car doesn't stumble as much accelerating from a stop.
10-21-2012, 08:53 AM
#17

Big 3 has many advantages more than those that apply to the audio realm. Most factory wiring is 8-10awg on the power/ground wires opening that up to at least 4 will free up some restrictions in the electrical system. Picture trying to pump water through a small hose.
Definately should fix the images though. DIY thread is useless without pics.
 11-07-2012, 04:23 AM
#19

Bigger batteries? They are all 12v. Not really necessary upgrade your alternator will be your best bet.
Big 3 has many advantages more than those that apply to the audio realm. Most factory wiring is 8-10awg on the power/ground wires opening that up to at least 4 will free up some restrictions in the electrical system. Picture trying to pump water through a small hose.
Definately should fix the images though. DIY thread is useless without pics.
4awg should suffice, but it wouldn't hurt to have it at 1/0awg.
11-07-2012, 05:51 AM
#20
Senior Member
SL Member
Thread Starter
Join Date: Feb 2008
Location: Honolulu, HI
Posts: 750
1/0 won't hurt, but 4ga would work for 1500W. Make sure you have a good battery in the front and you'll be solid. The stock wire is probably something like 8 or 6ga, quite inadequate if you're running anything more than a couple hundred watts.