
Presidential Detailed: 2006 Mercedes SL65 AMG


Thread Starter
Junior Member
Joined: May 2009
Posts: 24
From: Tampa, FL
It has been a while since I have last posted any detail write-ups, this only means one thing though...Ive been busy and have lots of SWEET cars/details to share with you guys! This car is one of the nicest Mercedes that I have ever laid my eyes on, I was contacted for a full correction on both the owners SL65 AMG AND E55 AMG. I will post the E55 later tomorrow evening. When I first saw this car it was evening and even I was like, how can I make this look nicer?? haha! Well, as the owner insisted under certain lighting conditions there was a faint haze over the surface of the entire car. I took his word for it and he was definitely right, it seems as though a hack may have gotten a hold of this thing at some point in its short life(maybe even the dealer). The owner of the car already had it washed and it only need a very mild spot claying before I began to polish.
Here, you see some RIDS as well as the very faint haze over the surface.


Some special lighting, and it becomes quite evident there was some major improvement to be had! I was excited at this point! :D


The hood was my test area, so it was completed first. Some final shots after M105/PFW via rotary followed by M205/Orange via G110.


Here, you see some RIDS as well as the very faint haze over the surface.
Some special lighting, and it becomes quite evident there was some major improvement to be had! I was excited at this point! :D
The hood was my test area, so it was completed first. Some final shots after M105/PFW via rotary followed by M205/Orange via G110.
Thread Starter
Junior Member
Joined: May 2009
Posts: 24
From: Tampa, FL
Next, I had a look at the fender..not so perfect.


After a couple passes of polishing, our end result!

Did I say love black cars? :D

The smaller bits of the intricate bumper were carefully taped off and polished to perfection using a special 3" PFW pad.


The bumper finished.

I also polished the custom grill by hand with Zaino AIO.

Driver Side Finished.

Passenger Side Finished.

After a couple passes of polishing, our end result!
Did I say love black cars? :D
The smaller bits of the intricate bumper were carefully taped off and polished to perfection using a special 3" PFW pad.
The bumper finished.
I also polished the custom grill by hand with Zaino AIO.
Driver Side Finished.
Passenger Side Finished.
Thread Starter
Junior Member
Joined: May 2009
Posts: 24
From: Tampa, FL
Since the sun shines into the garage towards the end of the day, I decided to skip to the rear of the car to get it done while there was still some shade, oh yeah its been well into the 98-105 degree range here in FL the last week and the humidity is through the roof!
This is what we were dealing with on the trunk lid of the SL65.


After M105/PFW, no finishing polish.

Just to remind you what the trunk used to look like..

It doesnt get any better than this! :D

The flash came out funny in this one due to the trunk curvature, its not a hologram I promise!

Most of the roof was glass, so I taped off the pillars so they could be corrected as well..

Next up was the rear deck spoiler, which also needed some correction work. I carefully taped off anything I did not want the buffer to touch to prevent a burn.

I did the same for the lower regions of the trunk..

Lower Trunk Finished.


This is what we were dealing with on the trunk lid of the SL65.
After M105/PFW, no finishing polish.
Just to remind you what the trunk used to look like..
It doesnt get any better than this! :D
The flash came out funny in this one due to the trunk curvature, its not a hologram I promise!
Most of the roof was glass, so I taped off the pillars so they could be corrected as well..
Next up was the rear deck spoiler, which also needed some correction work. I carefully taped off anything I did not want the buffer to touch to prevent a burn.
I did the same for the lower regions of the trunk..
Lower Trunk Finished.
Thread Starter
Junior Member
Joined: May 2009
Posts: 24
From: Tampa, FL
Next up were the doors and rear 1/4 panels. I was running out of time, so I forgot to take some before shots, but its the afters we all want to see anyways right??

Driver Rear 1/4 Panel.

Passenger Rear 1/4 Panel.

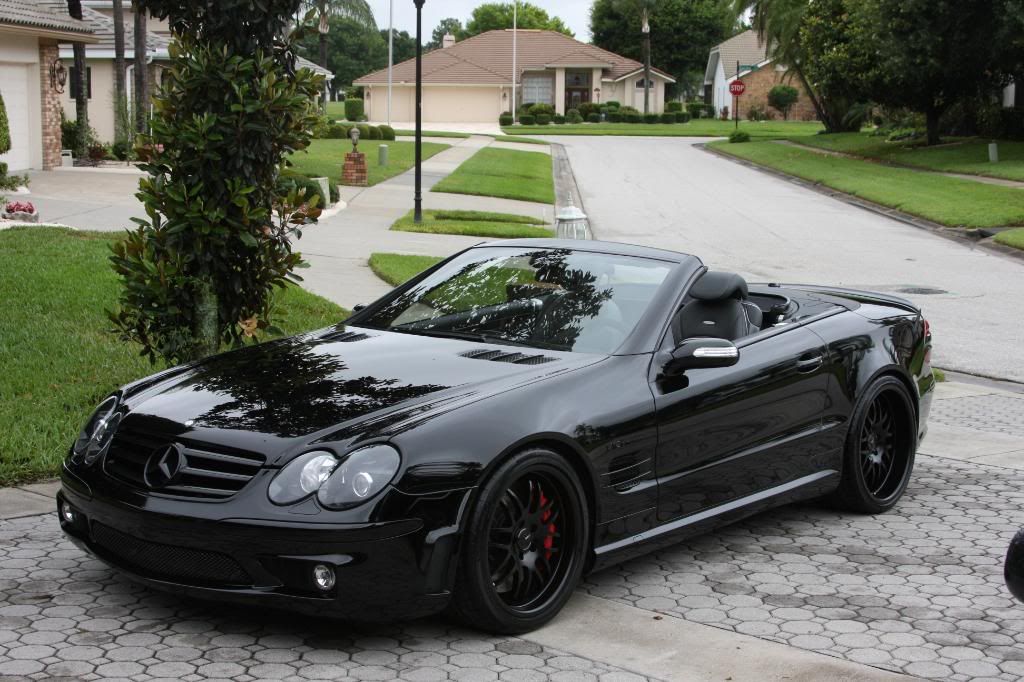
Now I get to grace you guys with some beautiful reflections and some full sun shots to close! Thanks for looking! :D


Driver Rear 1/4 Panel.
Passenger Rear 1/4 Panel.
Now I get to grace you guys with some beautiful reflections and some full sun shots to close! Thanks for looking! :D


Thread Starter
Junior Member
Joined: May 2009
Posts: 24
From: Tampa, FL
Originally Posted by Owner
First of all, I would like to thank Billy for his services. My E55 and SL65 look better now than when they were at the dealership. (SIDENOTE: The dealership is the worst place to have your car washed, detailed, or even wiped down.)
Here are a couple more exterior pics and some interior pics...


These are some pics before it was detailed. Shiny and nice from far away, but...


Interior Shots


Here are a couple more exterior pics and some interior pics...
These are some pics before it was detailed. Shiny and nice from far away, but...
Interior Shots

Thread
Thread Starter
Forum
Replies
Last Post
rmz489
Scion xA/xB 1st-Gen Suspension & Handling
0
Sep 16, 2015 08:19 PM