
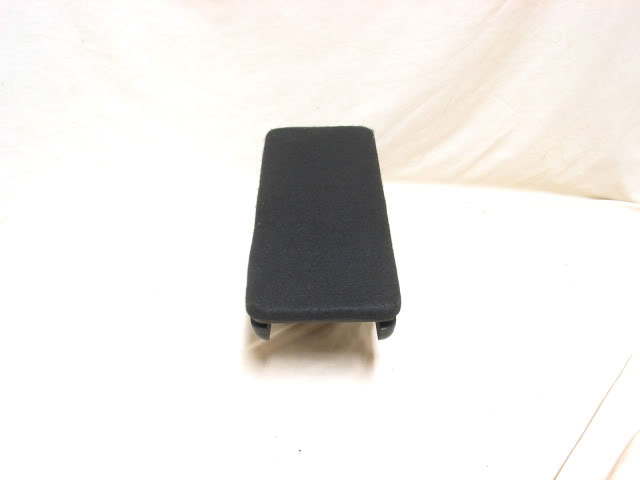
Finally completed my arm rest :)!


 ! Purely for the purpose of protecting the seat upholstery. I looked around and decided the nicer one's were just too expensive for my level of interest.
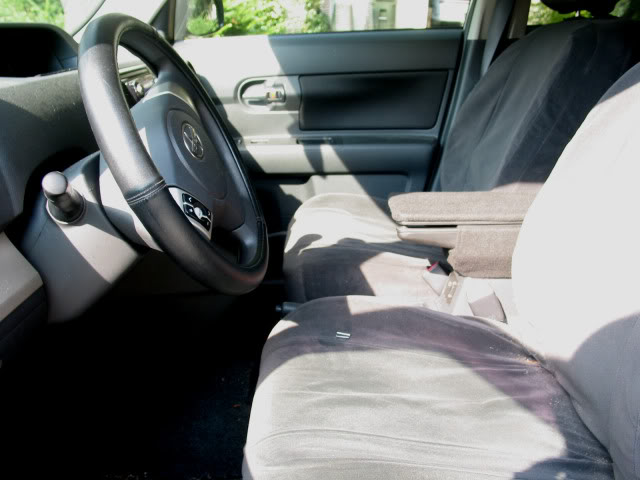
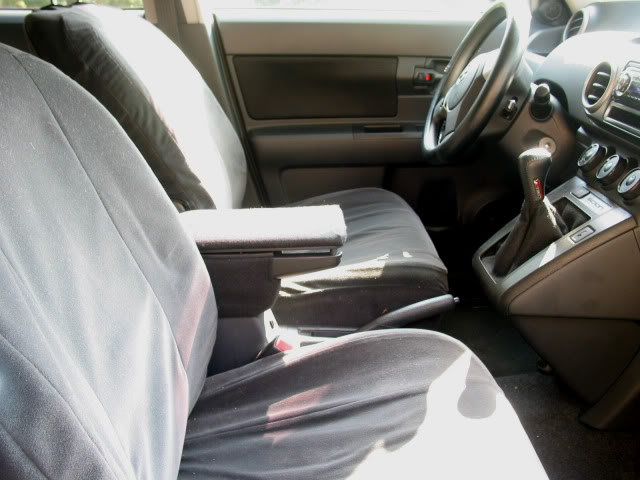
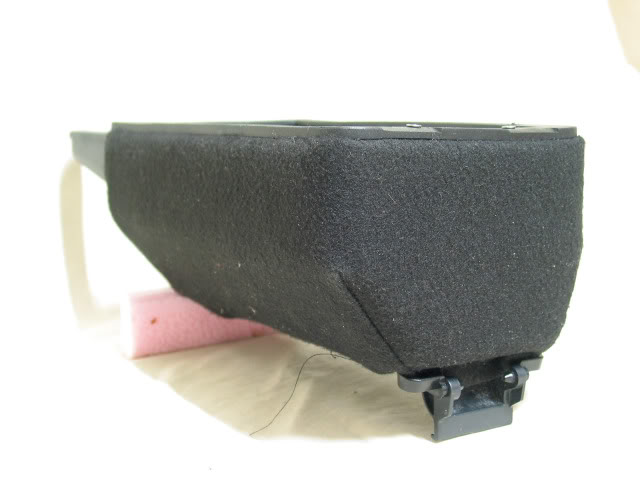
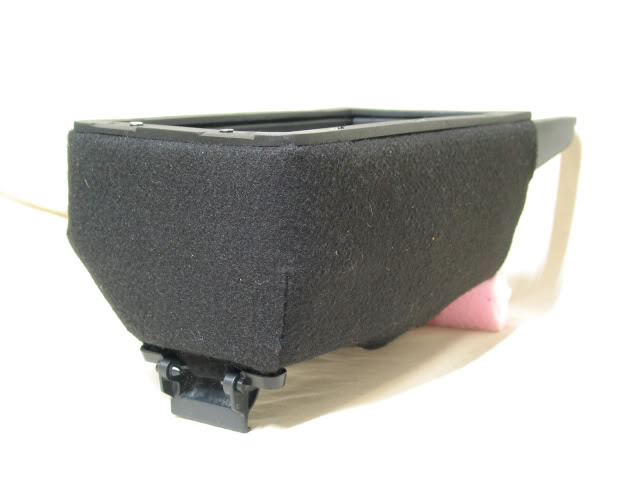
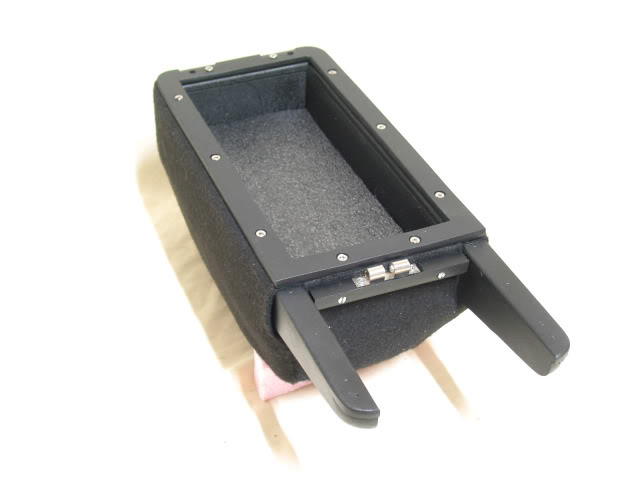
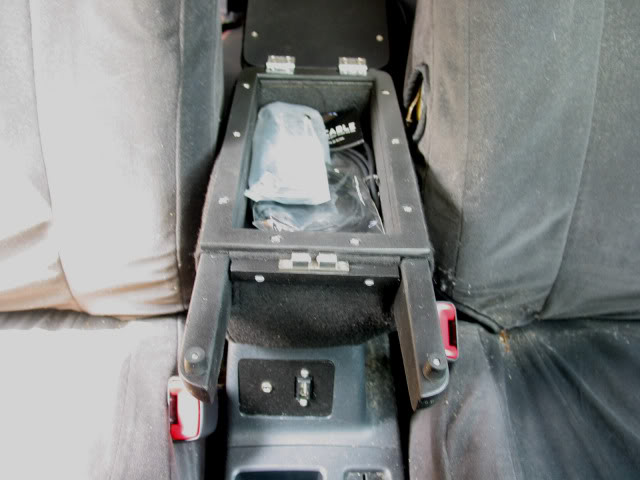
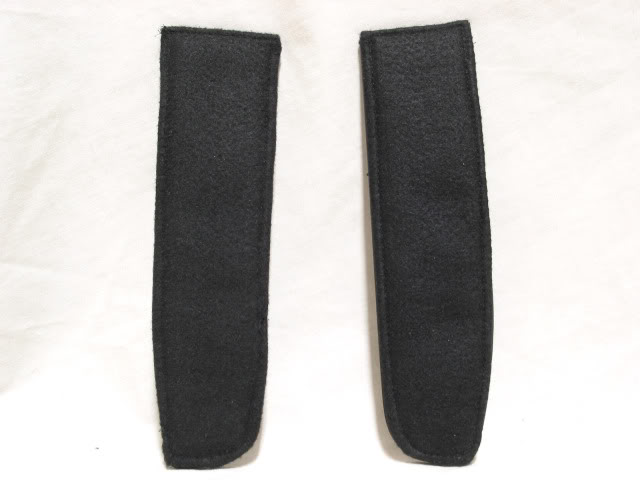
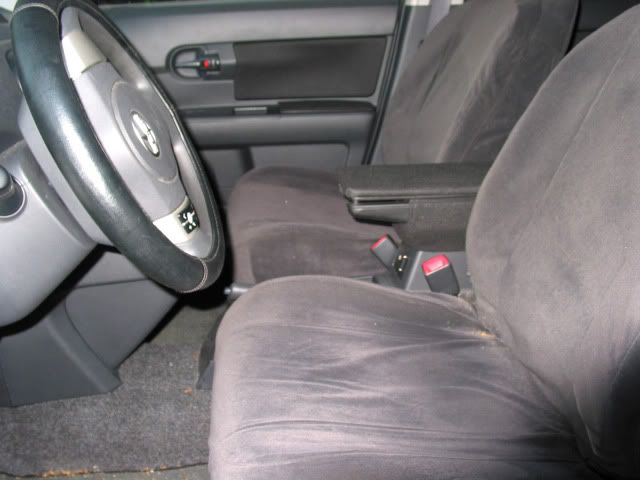
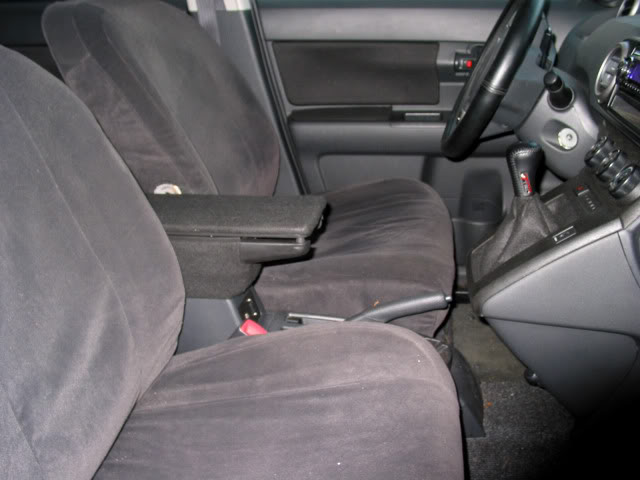
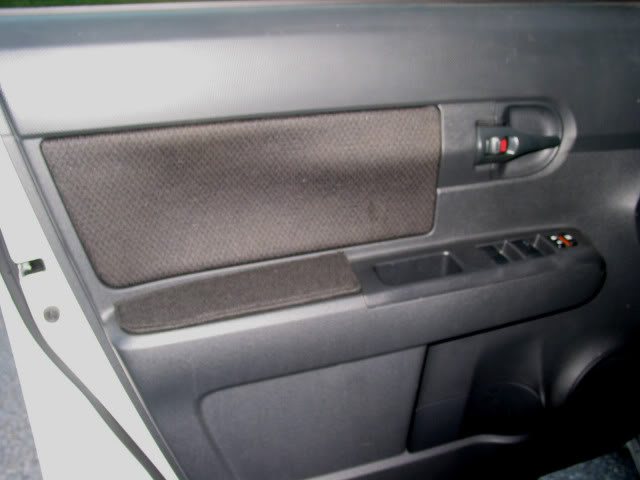
Thanks . Relative to the factory arm rest, yes it is lower. I find the factory rest unusable -- too high. This one is the right height for me, very comfortable. The only problem was the upholstery raised the final height enough that I needed to add door armrest pads to even it out. Finished them last night and installed them this morning (height feels matched now). Here are some photos (finally got some good shots ).
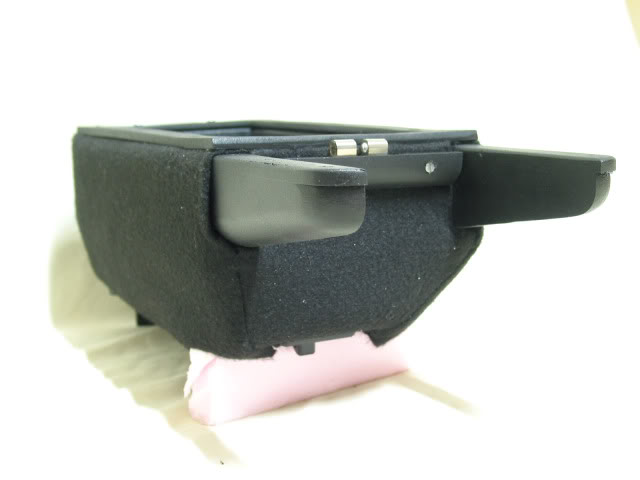
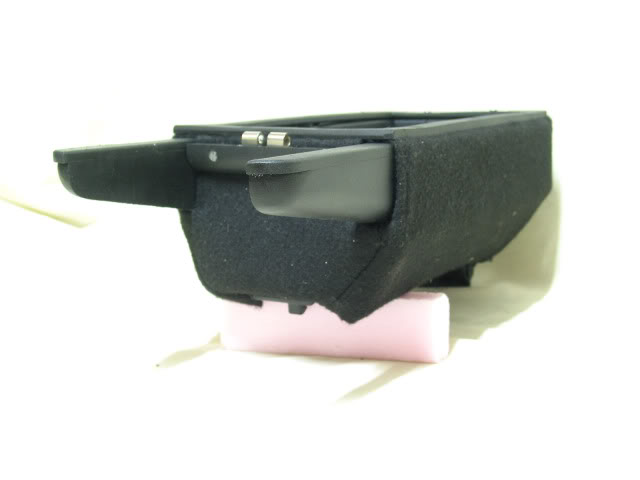
Not quite built from scratch, I reused the original lid frame. I started it last November/December, did other things for about six months, and went back to it in July. It took me quite awhile to think out the design, and there were a few adjustments en-route, but I'm quite happy with the way it worked out and I like the look in the car.
. Relative to the factory arm rest, yes it is lower. I find the factory rest unusable -- too high. This one is the right height for me, very comfortable. The only problem was the upholstery raised the final height enough that I needed to add door armrest pads to even it out. Finished them last night and installed them this morning (height feels matched now). Here are some photos (finally got some good shots ).Not quite built from scratch, I reused the original lid frame. I started it last November/December, did other things for about six months, and went back to it in July. It took me quite awhile to think out the design, and there were a few adjustments en-route, but I'm quite happy with the way it worked out and I like the look in the car.
Last edited by TrevorS; Aug 9, 2010 at 12:15 AM. Reason: added photo and updated text
!
How'd you go about making it? I have no experience in any form of machining or construction on this level.
When I have a general picture in mind, I can start refining it with a focus on simplicity (the more complex something is, the more difficult it will be to fabricate and the less likely it will turn out right.) At some point, I start sketching to help the thinking process. It's important to plan the details as early as practical in order to minimize dead ends (no detail is too small to pre-consider). It's almost certain some adjustments will be needed during construction, but you don't want them to be impactful on what has already been built. When I have the object and likely materials pretty well defined, it's necessary to measure, measure, and measure again. Usually, the very act of measuring spurs further insight into what is needed and possible complications. I try hard not to make assumptions during this process, they have a tendency to come back and bite me
!After all that's done, I collect the materials and start ccnstruction. Main requirement at this stage is to transfer measurements accurately and take the time necessary to avoid as many mistakes as possible. If something takes three or more tries to get it right, then so be it. Patience is key!
My particular project was fundamentally woodworking, though I also used Plexiglass, miscelaneous hardware, dense foam rubber, and a little tailoring
! It's imagination that brings it all together. Just attack it as a series of individual questions that have to be answered one at a time. If you're anything like me, you'll probably still be resolving questions at project completion !

Senior Member
SL Member
Joined: Mar 2009
Posts: 2,059
@TrevorS: Nice break down. I suspect that my question was too broad and general. What I really meant to ask is how you actually fabricated it, since I would like to emulate a similar concept to that effect. Bear in mind that I lack the appropriate skills for fabrication, but would be willing to engage this endeavor for similar results.
Oops!
Relative to planning, turns out I did manage to overlook something kind of basic. The arm rest lid has to be prevented from opening too far and possibly doing damage. Fortunately, it didn't take too long to identify a reasonable solution. Here it is!
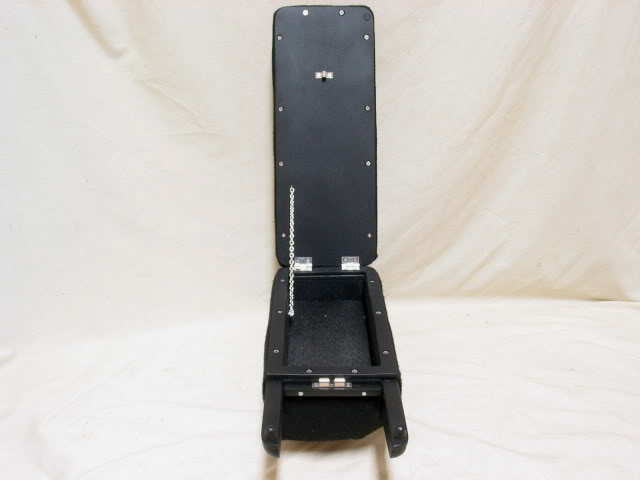
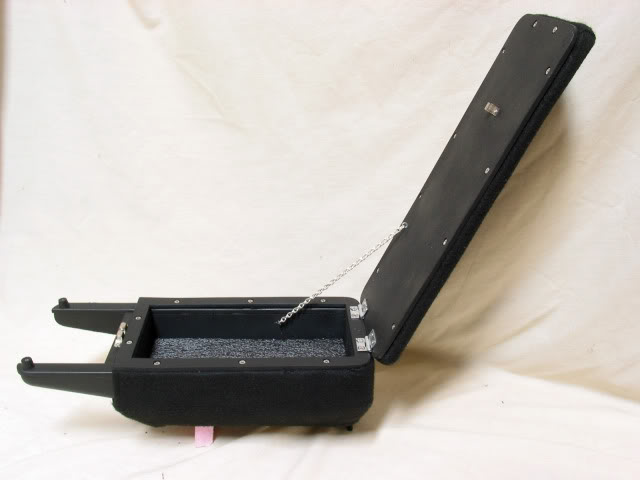
Also relative to planning, it turns out the center arm rest being slightly higher than anticipated was a lucky break. Having arm rest pads on the doors hugely improves their feel and the slight additional height feels very natural. I heartily recommend them!
Relative to planning, turns out I did manage to overlook something kind of basic. The arm rest lid has to be prevented from opening too far and possibly doing damage. Fortunately, it didn't take too long to identify a reasonable solution. Here it is
!Also relative to planning, it turns out the center arm rest being slightly higher than anticipated was a lucky break. Having arm rest pads on the doors hugely improves their feel and the slight additional height feels very natural. I heartily recommend them
!
Senior Member
SL Member
Joined: Mar 2009
Posts: 2,059
Originally Posted by TrevorS
Pyroman131 -- PM sent
Hmm... could you possibly manufacture this entire set for a willing customer like myself? lol
What did you do about the stock armrest? Did you integrate that into your current one?
What did you do about the stock armrest? Did you integrate that into your current one?
Last edited by TrevorS; Aug 11, 2010 at 10:24 PM.
Senior Member
SL Member
Joined: Mar 2009
Posts: 2,059
Originally Posted by TrevorS
The stock lid consists of two components, an inner frame (includes the latch and hinge) and the outer shell. I just used the frame.
When I contemplated the construction of my own armrest, I explored different avenues of integrating a type of fold-down armrest that would slip onto the driver's one. Granted, it would probably hinder access to the center console, but I never planned this in-depth. I figured that it would not be able to support another arm on the rest or something of that nature, because the support would only come from the anchor that affixes it to the driver's seat.
In my mind, it all comes down to features and what armrest solutions can provide for them. My primary target feature set was:
Comfortable
Armrest for both front occupants
Maximum allowable forward projection (increases comfort)
Good ease of access to cup holders and patch panel area
Even height with the door armrests (increases comfort)
Minimal wasted vertical space (lends to adding storage)
Reasonably sturdy (avoid adding weakness)
Good ease of access to original storage compartment
Complementary appearance
The only attractive possibility to me was to build on the stock pedestal.
Last edited by TrevorS; Aug 12, 2010 at 05:33 PM. Reason: minor adjustments
Senior Member
SL Member
Joined: Mar 2009
Posts: 2,059
For future readers of this topic, a second segue topic is constructed that gauges possible interest of mass-producing these:
Any interest in having an armrest similar to this available?
https://www.scionlife.com/forums/sho...d.php?t=191606
Any interest in having an armrest similar to this available?
https://www.scionlife.com/forums/sho...d.php?t=191606

Thread
Thread Starter
Forum
Replies
Last Post