Ebay: a review.
 03-19-2011, 07:18 AM
#1

I am creating this thread to give a detailed example of the quality of items you can purchase from ebay(good OR bad). I recently purchased a cold air intake, header, axle back exhaust and blank remote key from ebay. The purpose of this thread is to review the items, and give feedback on many items that are often deemed "junk" for those who are curious.I will provide updates if ANYTHING happens with these items, good or bad. (I understand many people think that anything bought off ebay for a vehicle is complete trash, and respect your opinion. However, I respectfully ask that you keep your opinion to yourself, the purpose of this thread is to install, test and give updates on the said items performance and condition over the course of their use).
For all audio/video I will be using a Nikon d7000 with hotshoe mounted rode video mic.
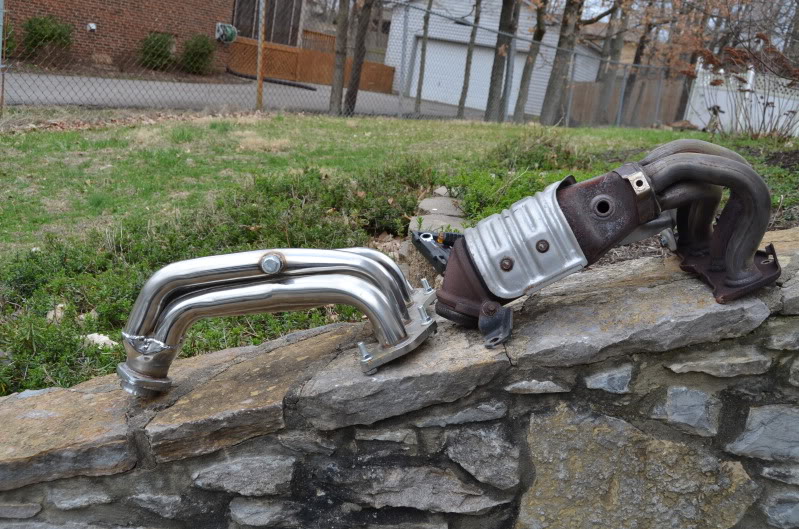
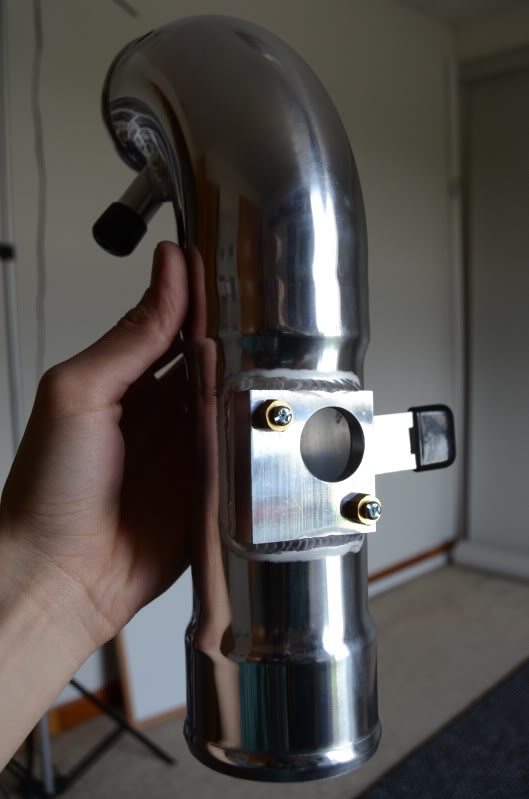
The first item up is the infamous "ebay header". I purchased it for $100.00, with $25.00 shipping, and it arrived within four days! From california to ky!
The good:
1)It IS stainless steel. (Yes, I did test it with a magnet.)
2)The welds look fairly solid, I had a friend who makes custom headers/exhausts look at them for approval before installing.
3) Fitment is great, requiring only "adjustment" of the oil dipstick.
4) No leaks with supplied gasket.
5)If you keep greasy hands off of it, it turns a very lovely color, unless you
WANT a blue"ish" header.
6) It isn't loud. in fact, I put this on my stock car this afternoon, and literally
couldn't hear a difference until I stood behind it while it was revved to
red line. Even then, it sounded very close to stock. If anything, it has a
very slight growl under heavy acceleration in the low end, and is slightly
louder after 5k (please note, slightly louder, NOT raspy.) I imagine the
noise level may change with the intake and axleback.
The bad:
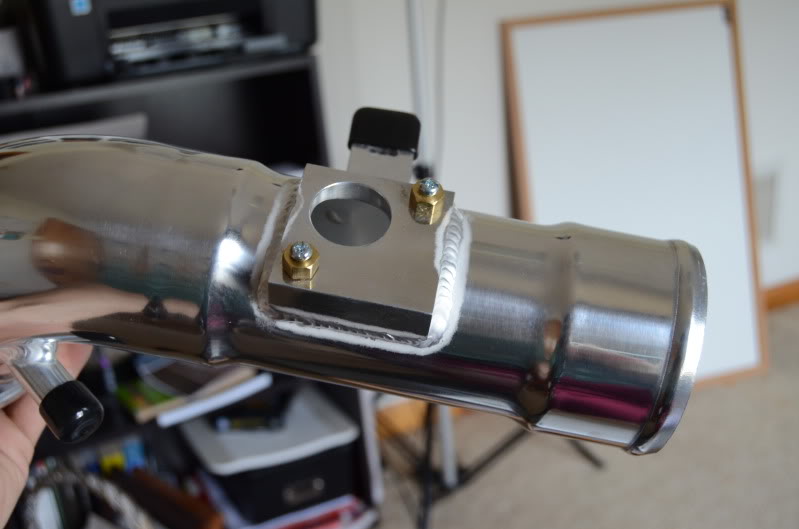
1)It isn't the prettiest thing in the world, there was a small bit of slag on it
from the welder, and there were a few a few dark marks on the mounting
plate.
2) The holes to bolt the header to the exhaust are blank, not threaded. Luckily it comes with five bolts (to hold the gasket to the manifold during shipping). Two of these work nicely to accommodate this problem.
3) You must relocate the oil dipstick (I did this by flattening the lipped
edge to allow me to turn it further left, behind the alternator. Three
minutes, a hammer and a bit of phenagling.
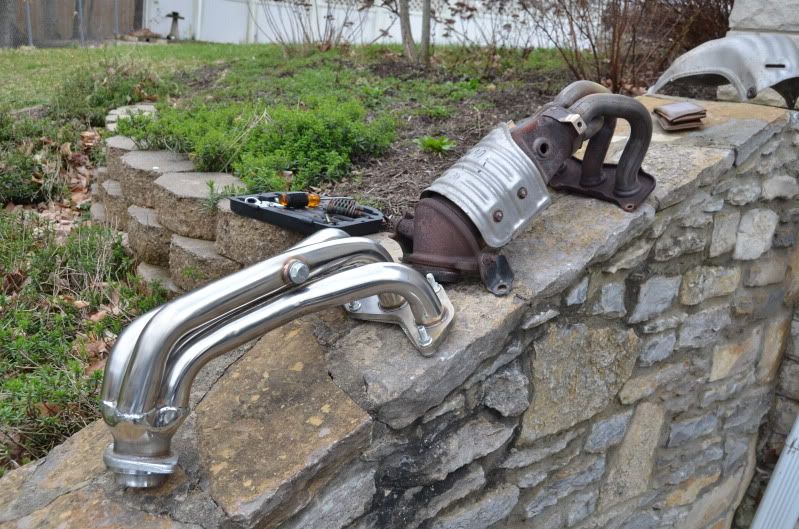
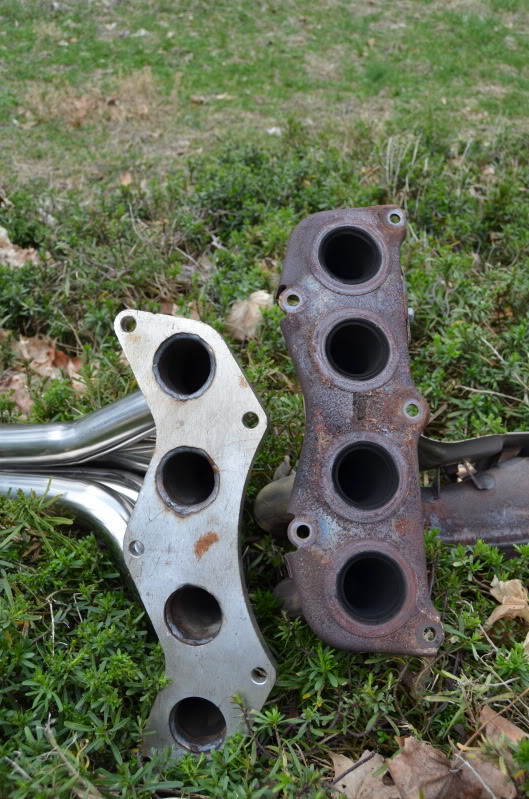
A few oem vs header shots
Oem exhaust video for comparison:
After header installation :
Header and CAI:
Header and CAI from in cabin during driving and WOT(all legal speeds):
Full ebay intake, header and axle back (was very windy, had to play with mic settings to avoid nothing but wind noise). I will get a recording of the car driving for comparison(sounds much deeper).
Like before, it is still extremely quiet when under 3500rpm, which I personally love, but after 3500rpm, it really opens up, luckily no rasp :D.
All in all....I must say I was actually impressed with this piece. It doesn't look bad, it does what it is supposed to, and it was a bargain. I am currently awaiting photo bucket to upload photos and videos (danged 1080p!), and will post an "after" video tomorrow.
I used the weapon R CEL eliminator, great product, was shipped INSANELY fast from fastscions.com
Hopefully my cold air intake and axle back will arrive on Monday.
Update: Since installing, they have done their job extremely well. I can feel a fair increase in power (mainly in first and 2nd gear after 4k, 3rd gear in the auto is enorous).
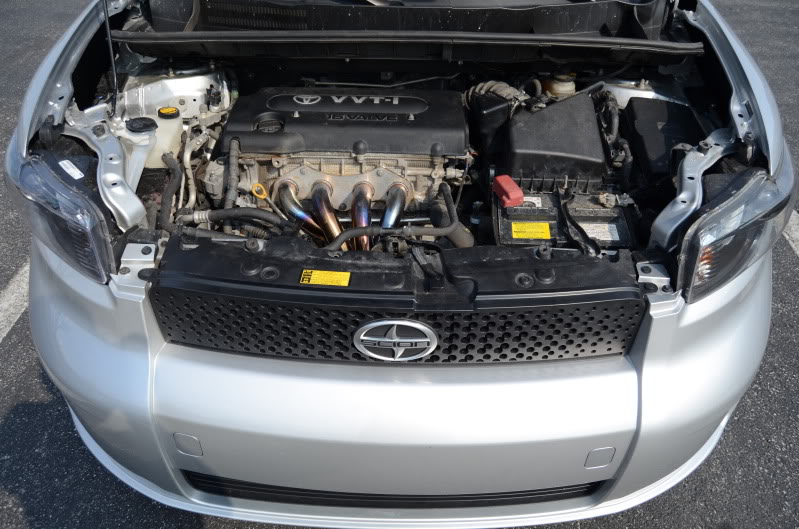
No leaks or breaks, and I will soon try washing the header with an sos pad to reduce the blueing from the oil on my hands and give it a nice overall finish.
Here are a few images of the installed header after 3 days of driving (I didn't have any brake cleaner to clean them off before starting the car). Please don't mind my dirty engine bay, I don't have a lower splash shield, so it gets dirty after 10 feet or so.

Just a quick FYI on the ebay remote keys: If you don't KNOW someone at lowes, they probably won't cut the key for you. Lowes and a local locksmith refused to cut my key, saying it was a "chipped" key and that they couldn't be held responsible for cutting it, even after I took the remote housing apart and told them it was a blank with a remote (not an ignition enabling chip like they were thinking) for the unlock feature built into the car. They told me to go to the dealer and that no one else would do it either.
Solution? Sweet talk your way into getting it cut at a local walmart auto section when only one employee is there. Tell them you need a copy, then say you already have a blank and KNOW it will work without damaging their equipment. It didn't hurt that I offered to purchase a blank key anyway, and to donate $5 to whatever charity was available to donate to from her register. Took all of 12 seconds and works like a charm, despite her saying "you KNOW this won't start your car sweetie". Already programmed the key per the .pdf file that is floating around this site and love it!
Hoping to have an intake, axle back exhaust and motor mount(not from ebay) to install/review when I get home tomorrow!
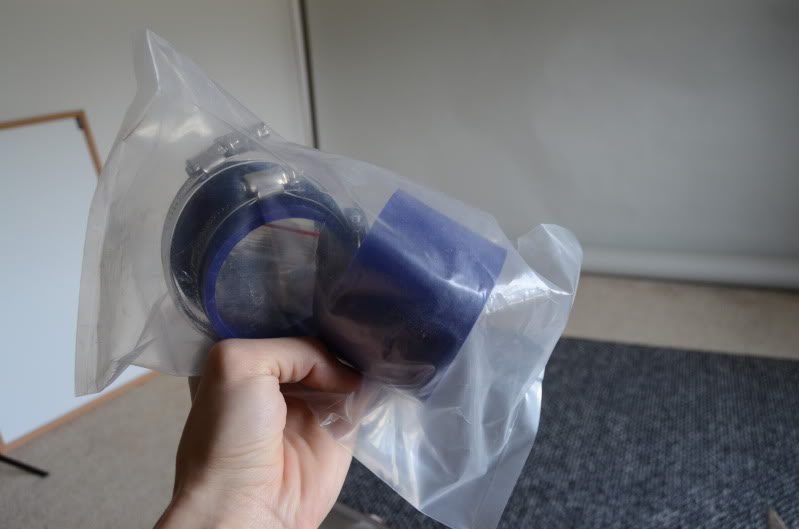
Update: The intake just arrived before I left for class!
The intake...wow.....it looks leaps and bounds better than I expected it to for $75.00. It actually looks on par with the tenzo R I saw on a friends xb2.
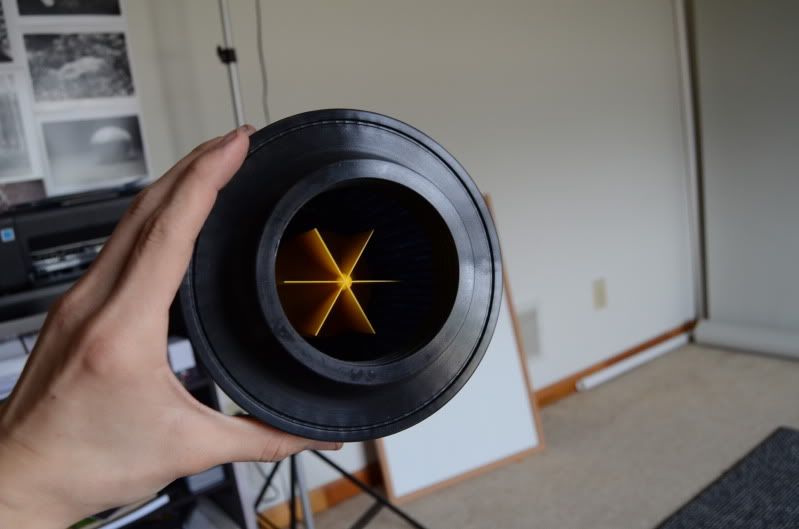
After inspecting the piece, the filter is similar to the cone filters you can pick up at autozone. The "air turbine" is attached to the inside of the filter, and after tinkering with it, I am just going to leave it on(dont feel like breaking something on a brand new piece).
Here are the obligatory pictures! (more to come once installed, plus a video of intake noise, and change in exhaust).
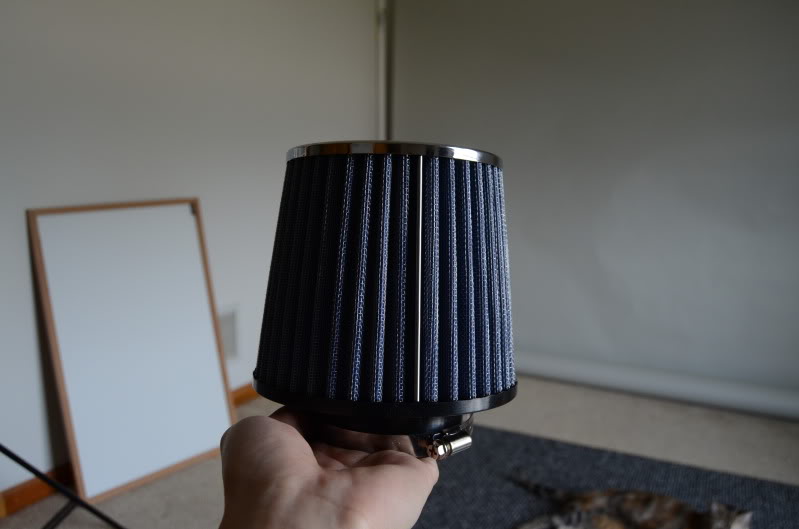
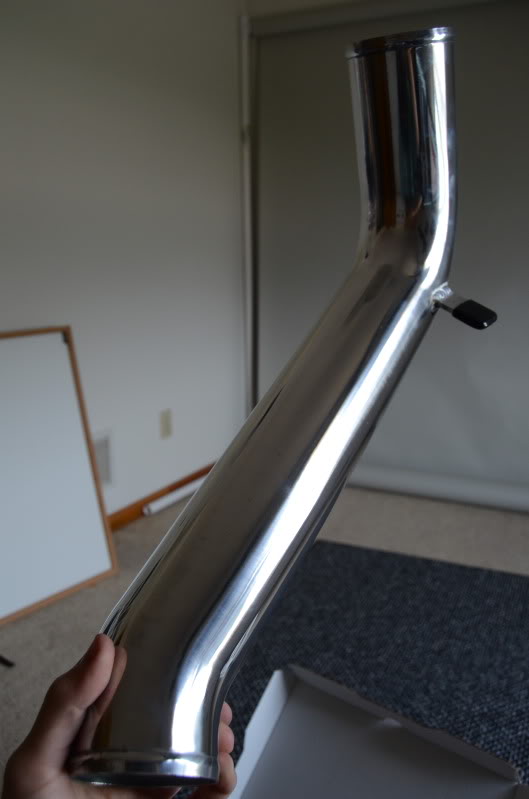
Installed:
First impressions on ebay cold air intake. I was skeptical of the small plastic piece to "direct" airflow at first, but after looking, each blade is no thicker than a guitar pick. It really doesn't seem to inhibit airflow at all.
The good:
1) sounds amazing, definitely added some top end power.
2) easy installation, same as every other CAI for our cars.
3) $75.00 to the door.
The bad:
1) had to remove the battery to install (not really a "bad" if I'm honest).
2) slight vibration at idle in drive, a small amount of tape where the pipe contacts the frame will fix it.
3) If you don't want your vehicle to sound MUCH more aggressive (only under WOT, sounds stock at idle and putting around town), do not install any of the parts I am reviewing.
4) I now look for a reason to dip into the throttle every time I drive the car.
First drive: wow. Under WOT, the engine sounds VERY deep and throaty(almost reminds me of my 02 spec v). During normal driving (I usually never give it more than 1/4 throttle while putting around town, I cannot tell a difference at all as far as noise. At 1/2 throttle from 2000-3500rpm, it sounds a bit deeper, but the real fun begins at 3500rpm! It literally starts growling! 2nd gear(which seems to be the autos power gear since it will reach 77mph) is a whole new experience! Fitment was spot on, no cel's. I will post an in cabin video to let you all experience the sound from the engine after 4k, it sounds like the engine is trying to climb out through the hood!
All in all, a great buy for the price. It REALLY livened up the engine (I imagine it didn't hurt that the header was already on, which is still doing great), and I would recommend it to anyone. If you are interested, pm me and I will send the sellers ebay name!
I may paint the entire intake pipe with crinkle black grill paint for a less "look at me" appeal and a slight thermal insulation....still not sure.
Installed pics to come in the daylight!
So far, the amount of parts installed on the car (Intake and header) is $275 to my door. for I/H/E(axleback)
Asa far as MPG's go, they have dropped around town, but on the highway ( I drive 70-73), they dip into the low to mid 30's. Previously I would stay around 25-27mpg highway.
Got the axle back on, sounds great! Nice and quiet until you really step on it. All in all, I am EXTREMELY impressed with how much more I enjoy the car after all my mods. Ebay I/H/E, hotchkis springs and swaybars, and a poly motor mount make it feel like a completely different car.
For all audio/video I will be using a Nikon d7000 with hotshoe mounted rode video mic.
The first item up is the infamous "ebay header". I purchased it for $100.00, with $25.00 shipping, and it arrived within four days! From california to ky!
The good:
1)It IS stainless steel. (Yes, I did test it with a magnet.)
2)The welds look fairly solid, I had a friend who makes custom headers/exhausts look at them for approval before installing.
3) Fitment is great, requiring only "adjustment" of the oil dipstick.
4) No leaks with supplied gasket.
5)If you keep greasy hands off of it, it turns a very lovely color, unless you
WANT a blue"ish" header.
6) It isn't loud. in fact, I put this on my stock car this afternoon, and literally
couldn't hear a difference until I stood behind it while it was revved to
red line. Even then, it sounded very close to stock. If anything, it has a
very slight growl under heavy acceleration in the low end, and is slightly
louder after 5k (please note, slightly louder, NOT raspy.) I imagine the
noise level may change with the intake and axleback.
The bad:
1)It isn't the prettiest thing in the world, there was a small bit of slag on it
from the welder, and there were a few a few dark marks on the mounting
plate.
2) The holes to bolt the header to the exhaust are blank, not threaded. Luckily it comes with five bolts (to hold the gasket to the manifold during shipping). Two of these work nicely to accommodate this problem.
3) You must relocate the oil dipstick (I did this by flattening the lipped
edge to allow me to turn it further left, behind the alternator. Three
minutes, a hammer and a bit of phenagling.
A few oem vs header shots
Oem exhaust video for comparison:
Header and CAI:
Header and CAI from in cabin during driving and WOT(all legal speeds):
Full ebay intake, header and axle back (was very windy, had to play with mic settings to avoid nothing but wind noise). I will get a recording of the car driving for comparison(sounds much deeper).
All in all....I must say I was actually impressed with this piece. It doesn't look bad, it does what it is supposed to, and it was a bargain. I am currently awaiting photo bucket to upload photos and videos (danged 1080p!), and will post an "after" video tomorrow.
I used the weapon R CEL eliminator, great product, was shipped INSANELY fast from fastscions.com
Hopefully my cold air intake and axle back will arrive on Monday.
Update: Since installing, they have done their job extremely well. I can feel a fair increase in power (mainly in first and 2nd gear after 4k, 3rd gear in the auto is enorous).
No leaks or breaks, and I will soon try washing the header with an sos pad to reduce the blueing from the oil on my hands and give it a nice overall finish.
Here are a few images of the installed header after 3 days of driving (I didn't have any brake cleaner to clean them off before starting the car). Please don't mind my dirty engine bay, I don't have a lower splash shield, so it gets dirty after 10 feet or so.
Just a quick FYI on the ebay remote keys: If you don't KNOW someone at lowes, they probably won't cut the key for you. Lowes and a local locksmith refused to cut my key, saying it was a "chipped" key and that they couldn't be held responsible for cutting it, even after I took the remote housing apart and told them it was a blank with a remote (not an ignition enabling chip like they were thinking) for the unlock feature built into the car. They told me to go to the dealer and that no one else would do it either.
Solution? Sweet talk your way into getting it cut at a local walmart auto section when only one employee is there. Tell them you need a copy, then say you already have a blank and KNOW it will work without damaging their equipment. It didn't hurt that I offered to purchase a blank key anyway, and to donate $5 to whatever charity was available to donate to from her register. Took all of 12 seconds and works like a charm, despite her saying "you KNOW this won't start your car sweetie". Already programmed the key per the .pdf file that is floating around this site and love it!
Hoping to have an intake, axle back exhaust and motor mount(not from ebay) to install/review when I get home tomorrow!
Update: The intake just arrived before I left for class!
The intake...wow.....it looks leaps and bounds better than I expected it to for $75.00. It actually looks on par with the tenzo R I saw on a friends xb2.
After inspecting the piece, the filter is similar to the cone filters you can pick up at autozone. The "air turbine" is attached to the inside of the filter, and after tinkering with it, I am just going to leave it on(dont feel like breaking something on a brand new piece).
Here are the obligatory pictures! (more to come once installed, plus a video of intake noise, and change in exhaust).
Installed:
First impressions on ebay cold air intake. I was skeptical of the small plastic piece to "direct" airflow at first, but after looking, each blade is no thicker than a guitar pick. It really doesn't seem to inhibit airflow at all.
The good:
1) sounds amazing, definitely added some top end power.
2) easy installation, same as every other CAI for our cars.
3) $75.00 to the door.
The bad:
1) had to remove the battery to install (not really a "bad" if I'm honest).
2) slight vibration at idle in drive, a small amount of tape where the pipe contacts the frame will fix it.
3) If you don't want your vehicle to sound MUCH more aggressive (only under WOT, sounds stock at idle and putting around town), do not install any of the parts I am reviewing.
4) I now look for a reason to dip into the throttle every time I drive the car.
First drive: wow. Under WOT, the engine sounds VERY deep and throaty(almost reminds me of my 02 spec v). During normal driving (I usually never give it more than 1/4 throttle while putting around town, I cannot tell a difference at all as far as noise. At 1/2 throttle from 2000-3500rpm, it sounds a bit deeper, but the real fun begins at 3500rpm! It literally starts growling! 2nd gear(which seems to be the autos power gear since it will reach 77mph) is a whole new experience! Fitment was spot on, no cel's. I will post an in cabin video to let you all experience the sound from the engine after 4k, it sounds like the engine is trying to climb out through the hood!
All in all, a great buy for the price. It REALLY livened up the engine (I imagine it didn't hurt that the header was already on, which is still doing great), and I would recommend it to anyone. If you are interested, pm me and I will send the sellers ebay name!
I may paint the entire intake pipe with crinkle black grill paint for a less "look at me" appeal and a slight thermal insulation....still not sure.
Installed pics to come in the daylight!
So far, the amount of parts installed on the car (Intake and header) is $275 to my door. for I/H/E(axleback)
Asa far as MPG's go, they have dropped around town, but on the highway ( I drive 70-73), they dip into the low to mid 30's. Previously I would stay around 25-27mpg highway.
Got the axle back on, sounds great! Nice and quiet until you really step on it. All in all, I am EXTREMELY impressed with how much more I enjoy the car after all my mods. Ebay I/H/E, hotchkis springs and swaybars, and a poly motor mount make it feel like a completely different car.
Last edited by Roller_Toaster; 08-26-2011 at 03:43 AM.


 03-20-2011, 03:24 AM
#4

I will upload my pics of my ebay cai here and post a review of it since there is a thread for ebay specific items now. I will try to take a video with my hd camera for sound as well, im supposed to be off most of the week so I will get it up asap.
 03-23-2011, 07:56 PM
#9
Hopefully the weather cooperates and I can get video of the exhaust with intake/header, as well as intake/header/axleback, and intake/header/vibrant resonator/axleback (if necessary, the scuba IS kind of a giant resonator) this weekend.
So far, it looks like rain, rain and more rain....
Edit: and now...SNOW?
Last edited by Roller_Toaster; 03-24-2011 at 12:13 PM.
03-26-2011, 08:09 PM
#11

I've decided to check out an eBay sourced header with target price aprox $100 plus ship. Any inputs regarding these two?
http://cgi.ebay.com/ebaymotors/SCION-XB-BB-2AZFE-2AZ-FE-RACING-STAINLESS-STEEL-HEADER-/130495900032?pt=Motors_Car_Truck_Parts_Accessories&fits=Year%3A2008|Model%3AxB&hash=item1e62296980
http://cgi.ebay.com/ebaymotors/08-09-10-TOYOTA-SCION-XB-RACING-STAINLESS-STEEL-HEADER-/250785196039?pt=Motors_Car_Truck_Parts_Accessories&fits=Year%3A2008|Model%3AxB&hash=item3a63f66807
I also looked for a CEL delete fitting, but don't see any !
!
http://cgi.ebay.com/ebaymotors/SCION-XB-BB-2AZFE-2AZ-FE-RACING-STAINLESS-STEEL-HEADER-/130495900032?pt=Motors_Car_Truck_Parts_Accessories&fits=Year%3A2008|Model%3AxB&hash=item1e62296980
http://cgi.ebay.com/ebaymotors/08-09-10-TOYOTA-SCION-XB-RACING-STAINLESS-STEEL-HEADER-/250785196039?pt=Motors_Car_Truck_Parts_Accessories&fits=Year%3A2008|Model%3AxB&hash=item3a63f66807
I also looked for a CEL delete fitting, but don't see any
 03-27-2011, 12:16 AM
#13
I've decided to check out an eBay sourced header with target price aprox $100 plus ship. Any inputs regarding these two?
http://cgi.ebay.com/ebaymotors/SCION-XB-BB-2AZFE-2AZ-FE-RACING-STAINLESS-STEEL-HEADER-/130495900032?pt=Motors_Car_Truck_Parts_Accessories&fits=Year%3A2008|Model%3AxB&hash=item1e62296980
http://cgi.ebay.com/ebaymotors/08-09-10-TOYOTA-SCION-XB-RACING-STAINLESS-STEEL-HEADER-/250785196039?pt=Motors_Car_Truck_Parts_Accessories&fits=Year%3A2008|Model%3AxB&hash=item3a63f66807
I also looked for a CEL delete fitting, but don't see any!
http://cgi.ebay.com/ebaymotors/SCION-XB-BB-2AZFE-2AZ-FE-RACING-STAINLESS-STEEL-HEADER-/130495900032?pt=Motors_Car_Truck_Parts_Accessories&fits=Year%3A2008|Model%3AxB&hash=item1e62296980
http://cgi.ebay.com/ebaymotors/08-09-10-TOYOTA-SCION-XB-RACING-STAINLESS-STEEL-HEADER-/250785196039?pt=Motors_Car_Truck_Parts_Accessories&fits=Year%3A2008|Model%3AxB&hash=item3a63f66807
I also looked for a CEL delete fitting, but don't see any
Also, REMEMBER to keep at least two of the bolts and nuts that hold the gasket on during shipping to attach the manifold to the exhaust pipe!
I ordered the Strup CEL eliminator from fastscions.com, but had to get the weapon R one instead due to backordering issues. It was one of the last items I ordered, and the FIRST to arrive.
03-27-2011, 01:39 AM
#14
Thanks, guess I'll go with that one since not only is the price OK, but it apparently worked out well for you (just the dipstick issue ). Have to see what I can come up with on the eliminator, but there's no rush  !
!
!
03-27-2011, 04:56 PM
#15
^ Look at the last picture in my post, the dipstick has had no problems there :D
While the manifold is off, just flatten out the lip on the piece that is attached to the dipstick itself(I used a small hammer), then turn it about 90 degrees like mine. Presto!
For the eliminator: If you don't want to buy one, I have heard of people using spark plug de-foulers, but did not try it. I "heard" that over time, they may work less and less, and eventually cause a CEL, but that is total mechanic hearsay.
Best of luck with whichever you use, let us know how it turns out! (Oh, and GET A CAN OF BRAKE CLEAN and spray off the header before you start your car!)
03-27-2011, 06:09 PM
#16
I plan to paint the header with high temp flat black, preferably with a ceramic suspension. Probably have to see what PepBoys or maybe Autozone has. I'll definitely go over the header with Isopropyl alcohol or solvent before painting.
03-27-2011, 06:27 PM
#17
Be careful with hi temp header paint, It MUST cure for the max recommended amount of time on the can, otherwise it bubbles, chips and..well...looks like junk. Ask me how I know....
After trying a few times, we let my brothers motorcycle headers sit for 1 week to cure, and after that, no problems.
After trying a few times, we let my brothers motorcycle headers sit for 1 week to cure, and after that, no problems.
03-27-2011, 09:28 PM
#18
Be careful with hi temp header paint, It MUST cure for the max recommended amount of time on the can, otherwise it bubbles, chips and..well...looks like junk. Ask me how I know....
After trying a few times, we let my brothers motorcycle headers sit for 1 week to cure, and after that, no problems.
After trying a few times, we let my brothers motorcycle headers sit for 1 week to cure, and after that, no problems.

Wow! It says seven days to cure, I was thinking a couple
My rear pipes killed one can, wonder if one is enough for the header? Probably should pick up a second. Expect it'll be tricky trying to get a reasonable coating between the pipes -- hmm! Maybe I should use black header wrap for where the four pipes travel down together and below, just use the paint on the uppermost section.
03-27-2011, 11:16 PM
#19
Looked at the can more closely and it has instructions for curing both on and off the vehicle. The on vehicle procedure doesn't take all that long at all, but you have to follow it. I'm thinking a day to allow the paint to thoroughly dry, then install, and finally, cure per instructions. Still may need to pick up another can though.
03-27-2011, 11:24 PM
#20
With a header, you can use one of the manifold bolt holes to hang it with a metal hanger so you can paint it. Definitely wait the full 7 days...like I said...I didn't and had to go back and to it again(AND sand off the old paint that hadn't cured, but had melted/turned to goo). The heat is so much more intense on the header than the exhaust itself, 7 days seems about right if you do a fair amount of coats.
Derp, my brother used a very different type of paint for his bike header, one that required a 7 day curing period.
Derp, my brother used a very different type of paint for his bike header, one that required a 7 day curing period.
Last edited by Roller_Toaster; 12-12-2011 at 07:13 PM.