
DIY-04 xA /xB Front Wheel Bearings Step by Step


Thread Starter
Junior Member
Joined: Oct 2011
Posts: 6
Any interest on a photo step by step on this job? I am replacing both my front tomorrow morning.
I know there isn't a write up here on this and it is quite costly if done at a dealer or shop.
____
I know there isn't a write up here on this and it is quite costly if done at a dealer or shop.
____
Last edited by MR_LUV; Jul 27, 2020 at 03:57 PM. Reason: Awarded 5 Yr Badge


Thread Starter
Junior Member
Joined: Oct 2011
Posts: 6
This job took me 2 � hours including the time to take pictures and to keep getting more tools. I had a lot of tools available to me that you may or may not have access to.
The auto shop on base had everything I needed so the majority of the work was done with air tools. So for starters lift the car in the air and remove the wheels.
Then remove the brake calipers, there are 2 bolts holding the piston part of the caliper. Remove those and set the pads aside.
Remove the other 2 bolts holding the caliper to the spindle and secure the caliper out of the way.
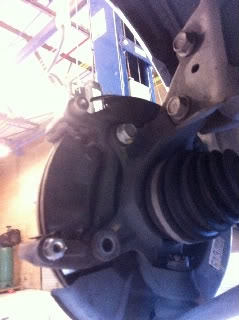
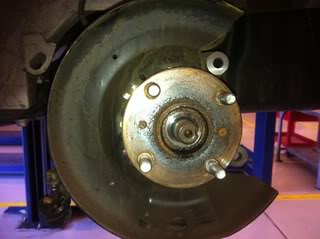
Remove the rotor; you may need to smack it on the backside with a mallet to break it free.
Mine was rusted on and I needed to thread 2 bolts into the small holes to break it free.

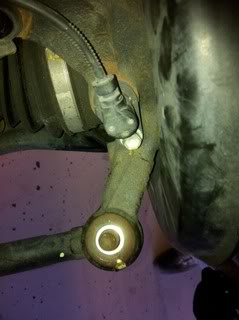
With the rotor off locate the outer tie rod and take the cotter pin off the bolt and remove the nut.
This is a ball joint and will require you to either press it out or give it a good whack with a mallet to break it free.
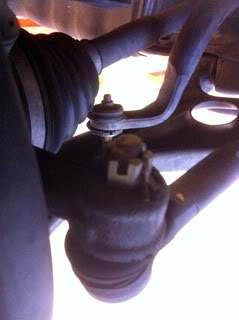
On the bottom of the spindle, the lower control arm connects with a ball joint.
Remove the cotter pin and nut and break the ball joint free.
Take the 2 nuts on the strut bolts off and leave the top bolt in until you are ready to remove the spindle.
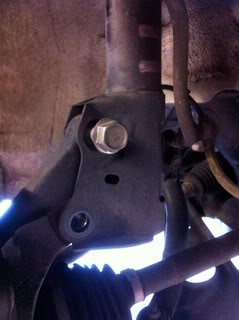
VERY IMPORTANT take the ABS line off (this is a $200+ part to replace).
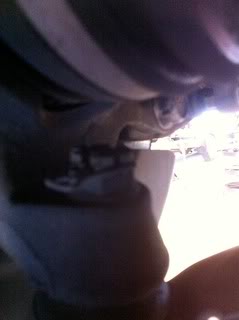
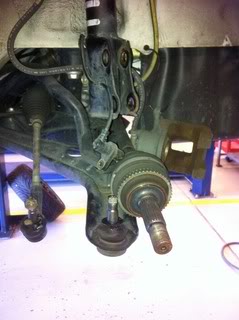
Remove the axle nut and hammer the axle through the spindle.
Now we can take the bolt out of the strut and pull the spindle off the car.
Remove the C clip from the bearing (needle nose pliers work well).
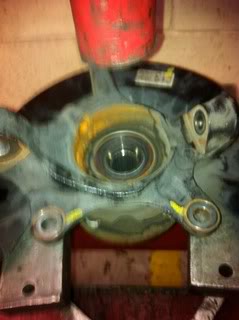
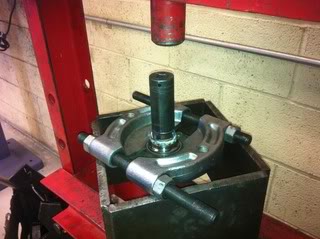
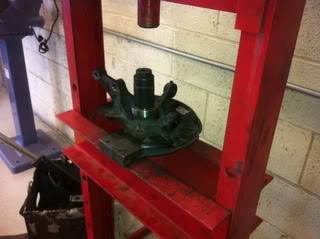
Position the spindle assembly on the press with the stud side down,
use a socket to apply the pressure to hub and press hub out.
This will separate the hub assembly from the spindle.
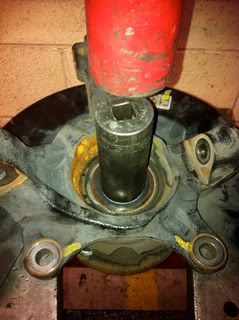
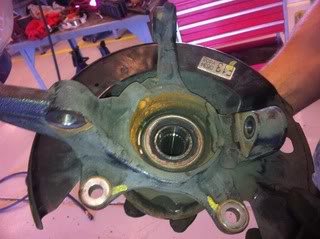
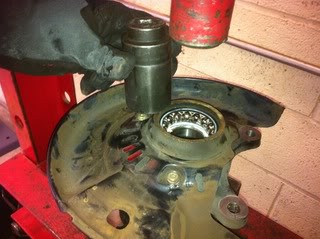
Place the hub assembly stud side down on the press and secure with a holding fixture.
The fixture should fit snug around the bearing itself.
Use a socket to apply the pressure to the hub and press the hub out of the inner bearing race.
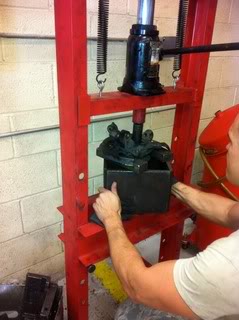
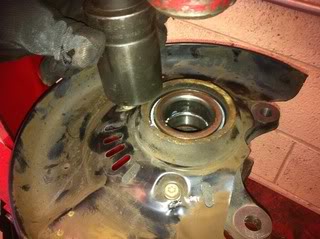
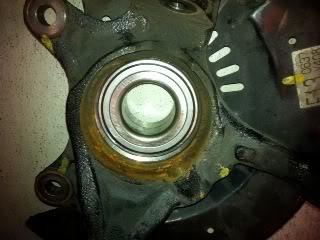
Place the spindle on the press with the outboard side up. Put the inner race that was pressed off the hub over the exposed ball bearings.
Then use a socket to apply pressure to the bearing and press the bearing out of the spindle.
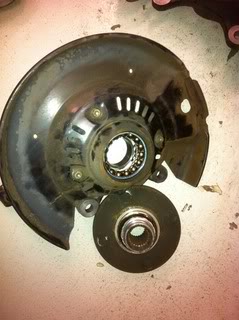
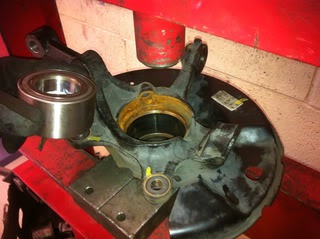
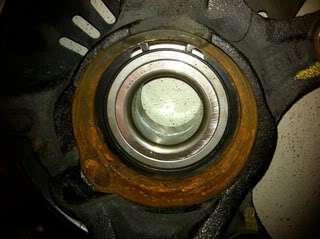
You should be left with a bearing, hub, and spindle. Now it’s time to press in the new bearing. There is no need to grease the bearings at all
and it will actually create problems if you grease them. Position the spindle on the press with the inboard side up.
Use a socket to apply the pressure to the outer rim on the bearing and press the bearing down until you feel it seat completely.
Install the C clip to the inboard side of the bearing.
Now place the hub, stud side down, onto the press. Set the spindle with bearing on top of the hub, inboard side up. Use a socket to apply the pressure to the inner race of the bearing and press the bearing and spindle onto the hub. Be careful not to go too far and blow the C clip out.
You should be left with a complete spindle/hub assembly. Use the same process for the other spindle/hub assembly. To re-install the spindle, seat the lower control arm stud and let the axle shaft slide into the hub. Use a pry bar if needed to apply downward force to the lower control arm to get the bolts through the strut.
Be careful not to pull the inner axle shaft out of the inner CV joint. Secure the axle nut, lower control arm nut w/ cotter pin, and strut bolts. Seat the tie rod stud to the spindle and secure with the nut w/ cotter pin. Re-install the ABS line, rotor and brake caliper and pads. Put the wheels on and drop the car down.
You shouldn’t need an alignment after this job.
Now take the car for a spin and enjoy the smooth quiet ride. I hope this will help anyone who attempts this job. Please use this as a guide and not a technical manual; every car will have its own slight differences.
The auto shop on base had everything I needed so the majority of the work was done with air tools. So for starters lift the car in the air and remove the wheels.
Then remove the brake calipers, there are 2 bolts holding the piston part of the caliper. Remove those and set the pads aside.
Remove the other 2 bolts holding the caliper to the spindle and secure the caliper out of the way.
Remove the rotor; you may need to smack it on the backside with a mallet to break it free.
Mine was rusted on and I needed to thread 2 bolts into the small holes to break it free.
With the rotor off locate the outer tie rod and take the cotter pin off the bolt and remove the nut.
This is a ball joint and will require you to either press it out or give it a good whack with a mallet to break it free.
On the bottom of the spindle, the lower control arm connects with a ball joint.
Remove the cotter pin and nut and break the ball joint free.
Take the 2 nuts on the strut bolts off and leave the top bolt in until you are ready to remove the spindle.
VERY IMPORTANT take the ABS line off (this is a $200+ part to replace).
Remove the axle nut and hammer the axle through the spindle.
Now we can take the bolt out of the strut and pull the spindle off the car.
Remove the C clip from the bearing (needle nose pliers work well).
Position the spindle assembly on the press with the stud side down,
use a socket to apply the pressure to hub and press hub out.
This will separate the hub assembly from the spindle.
Place the hub assembly stud side down on the press and secure with a holding fixture.
The fixture should fit snug around the bearing itself.
Use a socket to apply the pressure to the hub and press the hub out of the inner bearing race.
Place the spindle on the press with the outboard side up. Put the inner race that was pressed off the hub over the exposed ball bearings.
Then use a socket to apply pressure to the bearing and press the bearing out of the spindle.
You should be left with a bearing, hub, and spindle. Now it’s time to press in the new bearing. There is no need to grease the bearings at all
and it will actually create problems if you grease them. Position the spindle on the press with the inboard side up.
Use a socket to apply the pressure to the outer rim on the bearing and press the bearing down until you feel it seat completely.
Install the C clip to the inboard side of the bearing.
Now place the hub, stud side down, onto the press. Set the spindle with bearing on top of the hub, inboard side up. Use a socket to apply the pressure to the inner race of the bearing and press the bearing and spindle onto the hub. Be careful not to go too far and blow the C clip out.
You should be left with a complete spindle/hub assembly. Use the same process for the other spindle/hub assembly. To re-install the spindle, seat the lower control arm stud and let the axle shaft slide into the hub. Use a pry bar if needed to apply downward force to the lower control arm to get the bolts through the strut.
Be careful not to pull the inner axle shaft out of the inner CV joint. Secure the axle nut, lower control arm nut w/ cotter pin, and strut bolts. Seat the tie rod stud to the spindle and secure with the nut w/ cotter pin. Re-install the ABS line, rotor and brake caliper and pads. Put the wheels on and drop the car down.
You shouldn’t need an alignment after this job.
Now take the car for a spin and enjoy the smooth quiet ride. I hope this will help anyone who attempts this job. Please use this as a guide and not a technical manual; every car will have its own slight differences.
Last edited by DannoXYZ; Mar 24, 2022 at 04:10 AM. Reason: Awarded 5 Yr Badge


Junior Member
Joined: May 2013
Posts: 4
My gosh, I bet a lot of people "love" you for doing this. I am going to show my husband your pics, so when my 05 xA needs it,
he will know what to do-well, he may be happy to know this OR he may not! But I thank you anyway!
B.
___
he will know what to do-well, he may be happy to know this OR he may not! But I thank you anyway!
B.
___
Last edited by MR_LUV; Apr 4, 2019 at 03:31 PM. Reason: Awarded 5 Yr Badge


Member
Joined: Mar 2010
Posts: 33
From: Maryland
I know it was a while ago, but thank you for the write-up. It's same as my Subaru. I've done that twice now and am looking to doing first on my xB (243,000 miles) front passenger side.
I do everything myself but press bearing out/in. I pay local shop $50 to do that. Also I break the axle nut loose before lifting wheel up all the way. that way no pressure on the axle into transmission.
Same when tightening to specs.
______
I do everything myself but press bearing out/in. I pay local shop $50 to do that. Also I break the axle nut loose before lifting wheel up all the way. that way no pressure on the axle into transmission.
Same when tightening to specs.
______
Last edited by MR_LUV; Jun 1, 2019 at 05:24 PM. Reason: Awarded 5 Yr Badge

Junior Member
Joined: Jan 2014
Posts: 5
Thank you for this. A great step by step. It showed that I can't tackle this one right now...sold my press in my last move (kicks self, quite hard  )
)
Will be doing this one in a bit. Have 2 xAs.
____
Will be doing this one in a bit. Have 2 xAs.
____
Last edited by MR_LUV; Jul 27, 2020 at 03:59 PM. Reason: Awarded 5 Year Badge

Administrator

SL Member
Administrator
Joined: Dec 2007
Posts: 2,583
From: State of Confusion: CA
Excellent DIY 04 Front Wheel Bearing article.
Basically, the same for the xB 1st Gen.
Copied over to the DIY-Tech Section
MR_LUV
Basically, the same for the xB 1st Gen.
Copied over to the DIY-Tech Section
MR_LUV
Last edited by MR_LUV; Apr 4, 2019 at 03:40 PM.


Moderator
SL Member
Moderator
Moderator
Joined: Sep 2016
Posts: 759
From: Mesa, AZ

Junior Member
SL Member
Joined: Sep 2020
Posts: 7
I have an issue with your write up.
In the disassembly section you detail removing the bearing by pressing on theINNER bearing race while tight in a recess.
In the reassembly section you detail installing the bearing by pressing on the OUTER bearing race.
It is ALWAYS recommended to press on the OUTER bearing race when such bearing is a tight fit INSIDE OF a recess.
It ia ALWAYS recommended to press on theINNER bearing race when such a bearing is a tight fit ONTO a shaft.
The primary reason for these rules is to avoid damaging bearings, a secondary reason is to establish the correct way so that it becomes a habit.
The problem with pressing out any bearing from a recess via direct pressure on the INNER race almost guarantees damage to the bearing and complicates the repair by requiring a tool switch when pressing the new bearing in by its OUTER race.
Introducing such an unnecessary change makes it very easy for an installer to ruin the new bearing when not paying close attention, or if one gets interrupted mid-repair.
It also lessens the possibility of parts reuse if necessary, as sometimes when new parts arrive they are incorrect.
Introducing such an unnecessary change makes it very easy for an installer to ruin the new bearing when not paying close attention, or if one gets interrupted mid-repair.
Moderator
SL Member
Moderator
Moderator
Joined: Sep 2016
Posts: 759
From: Mesa, AZ
I have an issue with your write up.
In the disassembly section you detail removing the bearing by pressing on theINNER bearing race while tight in a recess.
In the reassembly section you detail installing the bearing by pressing on the OUTER bearing race.
It is ALWAYS recommended to press on the OUTER bearing race when such bearing is a tight fit INSIDE OF a recess.
It ia ALWAYS recommended to press on theINNER bearing race when such a bearing is a tight fit ONTO a shaft.
The primary reason for these rules is to avoid damaging bearings, a secondary reason is to establish the correct way so that it becomes a habit.
The problem with pressing out any bearing from a recess via direct pressure on the INNER race almost guarantees damage to the bearing and complicates the repair by requiring a tool switch when pressing the new bearing in by its OUTER race.
Introducing such an unnecessary change makes it very easy for an installer to ruin the new bearing when not paying close attention, or if one gets interrupted mid-repair.
It also lessens the possibility of parts reuse if necessary, as sometimes when new parts arrive they are incorrect.
You're thinking of installing bearings when you say:
Last edited by DannoXYZ; Dec 4, 2022 at 07:43 PM.
Junior Member
SL Member
Joined: Sep 2020
Posts: 7
Aparently damaging bearings is not considered to be a factor here, so I have a question.
Why not press the hub directly out of the spindle bearing?
In the article, a fixture is shown supporting the spindle from the outboard side with the hub unsupported and suspended from the bearing, while pressing the inner race of the bearing along with the hub out. If the spindle's support is strong and secure enough to do that, it ought to be up to pressing out the hub directly, which might save steps and time.