
Custom Switch Panel for xA ~ homemade


Thread Starter
Senior Member
SL Member
Scion Evolution
Joined: Dec 2003
Posts: 875
From: Orange, California


Thread Starter
Senior Member
SL Member
Scion Evolution
Joined: Dec 2003
Posts: 875
From: Orange, California
yea, i got the ignited switch panel coming in, but i just wanted to screw around and see if i could make something... i'll take some pics of it installed when i get some switches to fill the holes, lol... the holes look all fugly cause i used a drill as a saw, lol... i'm gonna do another but use a small jigsaw next time so they come out square. it's a nice spot to put switches cause they're out of the way and no one will really notice them down there, unless you got the lighted ones, which i'm getting from ignited. got the ignited panel, engine start, and flip lit switches coming in. just waiting on them. i'll take some pics tomorrow of it installed while i'm at the toxa meet. :D
Senior Member
SL Member
Joined: Feb 2004
Posts: 137
Originally Posted by tbblizzard
http://www.imagestation.com/album/?id=4287138039
lemme know what you guys think.
lemme know what you guys think.
PEACE

Thread Starter
Senior Member
SL Member
Scion Evolution
Joined: Dec 2003
Posts: 875
From: Orange, California
Originally Posted by got_xA
looks cool, but I think it'd be better f u get rid of the seams..just a suggestion 
PEACE
PEACE
Originally Posted by XBman
2 things
#1 whats it for?
#2 maybe get some illuminates swiches?
#1 whats it for?
#2 maybe get some illuminates swiches?
Thread Starter
Senior Member
SL Member
Scion Evolution
Joined: Dec 2003
Posts: 875
From: Orange, California
here's some pics of a piece i just grinded down to fit flush with it... just would need to be bondo'd in... don't want to bondo it in yet because i would rather use the ignited panel that i paid for. but if one of you guys with an xa wanna try it out just get a 8"x3.5" 1/8" panel of lexan cut, you can get it at home depot, its like 3 bucks for a small piece and it makes 2 of these pieces... you then take out the piece that this is fitting to and take an exacto knife and cut into the top of the panel, there are little arcs in the back, you need to cut them to make the piece fit in all the way. after that just cut your slots and then doubleside tape the bottom and the sides, the top has nothign to stick to, but since you cut the arcs it has something holding it up a little. the sides and bottom are enough to hold it on there good. i had trouble getting the one i put on there off... stuff is strong. anyways that's the easy way of doing it... even though my holes in the picture were all fugly, when you put switches in them you cant see the hole anyways... i would spend more time on it and do it right though with a jigsaw. if you wanna do it the flush way, just get that same piece of 8"x3.5" and stick it behind and trace the hole on to the lexan with a pen then get out the jigsaw or grinder and trim it down to size. it will fit perfectly in there, then just bondo it in. i'm not at the bondo stage so can't give you any pointers there.
can someone actually give me pointers on bondo, i hate the stuff, turns into a mess everytime i touch it.
http://www.imagestation.com/album/?id=4287130667
can someone actually give me pointers on bondo, i hate the stuff, turns into a mess everytime i touch it.
http://www.imagestation.com/album/?id=4287130667
Senior Member
SL Member
Joined: Feb 2004
Posts: 137
Originally Posted by tbblizzard
here's some pics of a piece i just grinded down to fit flush with it... just would need to be bondo'd in... don't want to bondo it in yet because i would rather use the ignited panel that i paid for. but if one of you guys with an xa wanna try it out just get a 8"x3.5" 1/8" panel of lexan cut, you can get it at home depot, its like 3 bucks for a small piece and it makes 2 of these pieces... you then take out the piece that this is fitting to and take an exacto knife and cut into the top of the panel, there are little arcs in the back, you need to cut them to make the piece fit in all the way. after that just cut your slots and then doubleside tape the bottom and the sides, the top has nothign to stick to, but since you cut the arcs it has something holding it up a little. the sides and bottom are enough to hold it on there good. i had trouble getting the one i put on there off... stuff is strong. anyways that's the easy way of doing it... even though my holes in the picture were all fugly, when you put switches in them you cant see the hole anyways... i would spend more time on it and do it right though with a jigsaw. if you wanna do it the flush way, just get that same piece of 8"x3.5" and stick it behind and trace the hole on to the lexan with a pen then get out the jigsaw or grinder and trim it down to size. it will fit perfectly in there, then just bondo it in. i'm not at the bondo stage so can't give you any pointers there.
can someone actually give me pointers on bondo, i hate the stuff, turns into a mess everytime i touch it.
http://www.imagestation.com/album/?id=4287130667
can someone actually give me pointers on bondo, i hate the stuff, turns into a mess everytime i touch it.
http://www.imagestation.com/album/?id=4287130667

PEACE
PEACE
Thread Starter
Senior Member
SL Member
Scion Evolution
Joined: Dec 2003
Posts: 875
From: Orange, California
oooo... nice.. yea, i'm not using the tape, that was just to test it... i measured the slot and it is big enough to fit a standard din into it, so the ignited panel will go in there and i will use the lexan to border it then bondo it flush. should look like factory when i'm done hopefully.
todd
todd
Thread Starter
Senior Member
SL Member
Scion Evolution
Joined: Dec 2003
Posts: 875
From: Orange, California
k, been a long time but i finally got it where it's acceptable. LOTS OF PICS! Took pictures of the process of bondoing it, i fogot to take pictures while i was fiberglassing it. used wrinkle paint to match the cars plastic texture. came out pretty nice :D wiring gets done this weekend.
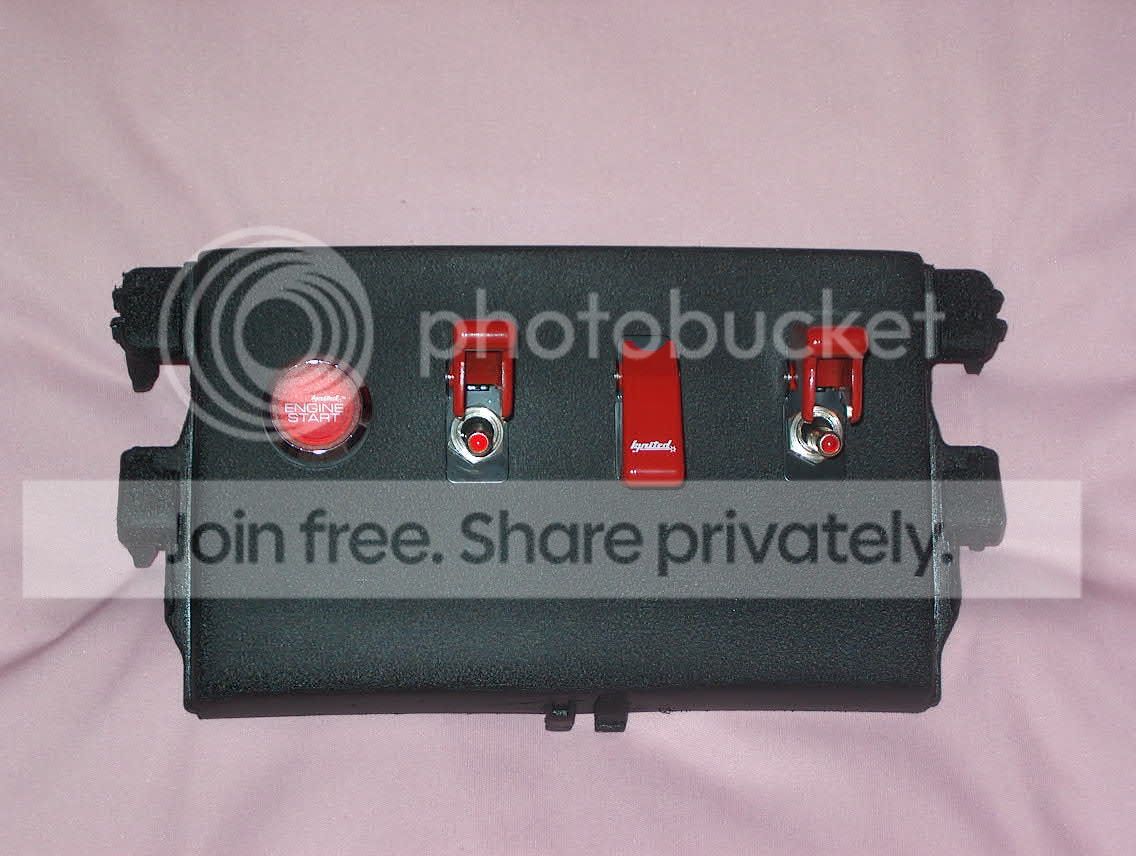
Engine Start -> 1st Rocker (Power Engine Start) -> 2nd Rocker (Interior Lights) 3rd Rocker (Underbody)


Engine Start -> 1st Rocker (Power Engine Start) -> 2nd Rocker (Interior Lights) 3rd Rocker (Underbody)
Thread Starter
Senior Member
SL Member
Scion Evolution
Joined: Dec 2003
Posts: 875
From: Orange, California
nah... hahaha 
i'm going to take out the cigg lighter and ash tray and figure something to put there... that's why my ash tray looks all textured, i was practicing the paint on it. dunno what i could put there but i know that storage box up above i'm going to mold in a super afc when i get the money for it.
i think that ash tray/cigg lighter is going to be my new home for a radar detector :D
fiberglass is funnnn stuff... thought it was hard to use at first cause i didn't read the instructions and messed around with a panel off an old car and it came out fugly... read the instructions and bought some more cloth and it came out clean. got a crap load of bondo and fiberglass left so gotta use the rest
thanks for the thumbs up... took me a long time but got it done. not good with painting, lol... always try to rush it, i screwed up the paint like 3 times and had to sand it back down. this was before i used the fiberglass. i get the paint looking nice and shiny clear coated like 10 times then i see that the seams are starting to crack a little, guess the bondo isn't strong enough, so i used 3 layers of fiberglass. and went with the wrinkle paint, matches pretty close.
hey, just curious, how do you get your molds for that when you fiberglass it? that little pushed out touchpad looked awesome. :D do you just bondo a shape then fiberglass it?


Senior Member
SL Member
Joined: Feb 2004
Posts: 137
Originally Posted by tbblizzard
hey, just curious, how do you get your molds for that when you fiberglass it? that little pushed out touchpad looked awesome. :D do you just bondo a shape then fiberglass it?
- used styrofoam (mah ghetto set-up
- only used resin at first and after it dried I carved out the styrofoam from the inside and then glassed it for strength
- body filler, and the usual priming, sanding and paint
( BTW if u want a smooth finish i recomend the glazing putty too )
PEACE
Thread Starter
Senior Member
SL Member
Scion Evolution
Joined: Dec 2003
Posts: 875
From: Orange, California
they're not hooked up yet... they're getting wired this weekend by my friend since i'm wiring illiterate... don't trust myself with wiring stuff, i tried to do the engine start button but i blew the fuse, so i'ma let him do it, if he messes up at least i can blame him. :twisted:
ahhhh... styrofoam... i was thinking that you were using that.. that's what they use on houses to get trim shapes when they stucco, and bondoing is like stuccoing a house... thought it would work but wasn't sure, didn't know what the process was... awesome... i'll keep that in mind when i do the radar detector next.
huh?
descriptions are below the image...
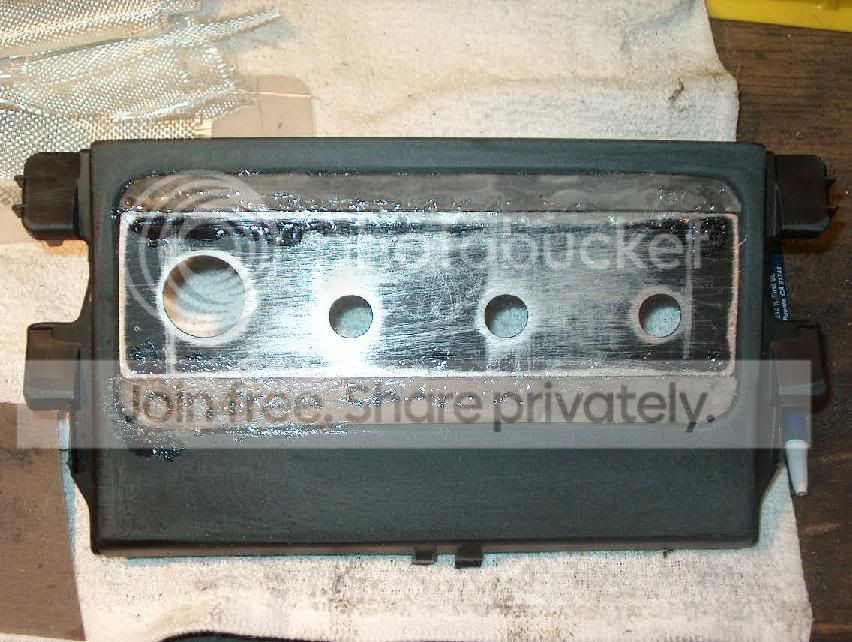
Sanded down with 80 grit to give a rough surface the bondo would stick to.
Traced opening onto lexan piece, cut to size and cut out the middle... i didn't know how big the ignited panel was when i did this, i just cut it to get it ready.
Lexan fitted into panel.
Trimed lexan to fit the panel... had to grind down the sides of the ignited panel to fit inside the window. Ended up only needing a top and bottom of the lexan as a border. Used adhesive to hold it in place. Don't ask why I used it on the front of the panel, i don't know why I did that, i had to sand that crap off and adhevise doesn't sand down very good. Used the adhesive on the back to hold the pieces together. Let it dry for about an hour.
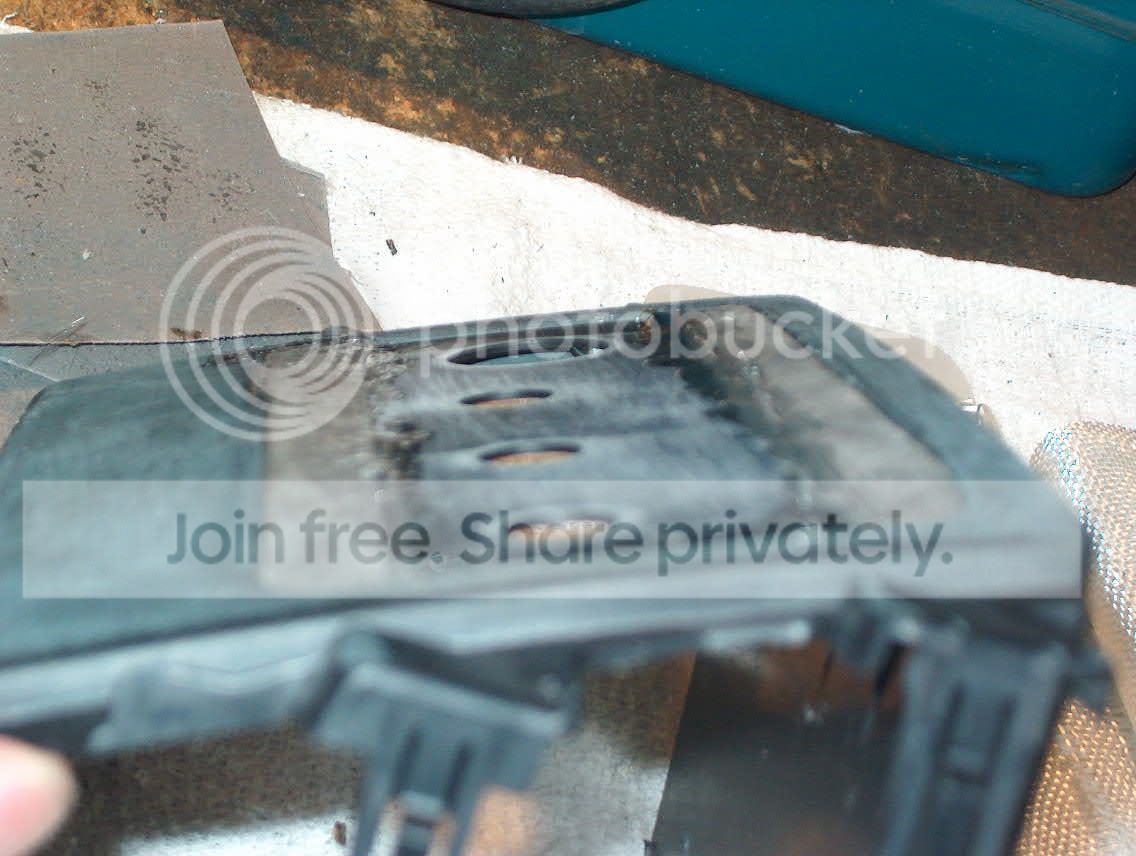
Side shot of the pieces together... notice how mine pieces are a little below the window, that caused me to do a lot of extra bondoing that wasn't necessary.. if you guys are gonna do this make sure everything fits almost flush before you start bondoing. Other than that, you can see that the seams are flush.
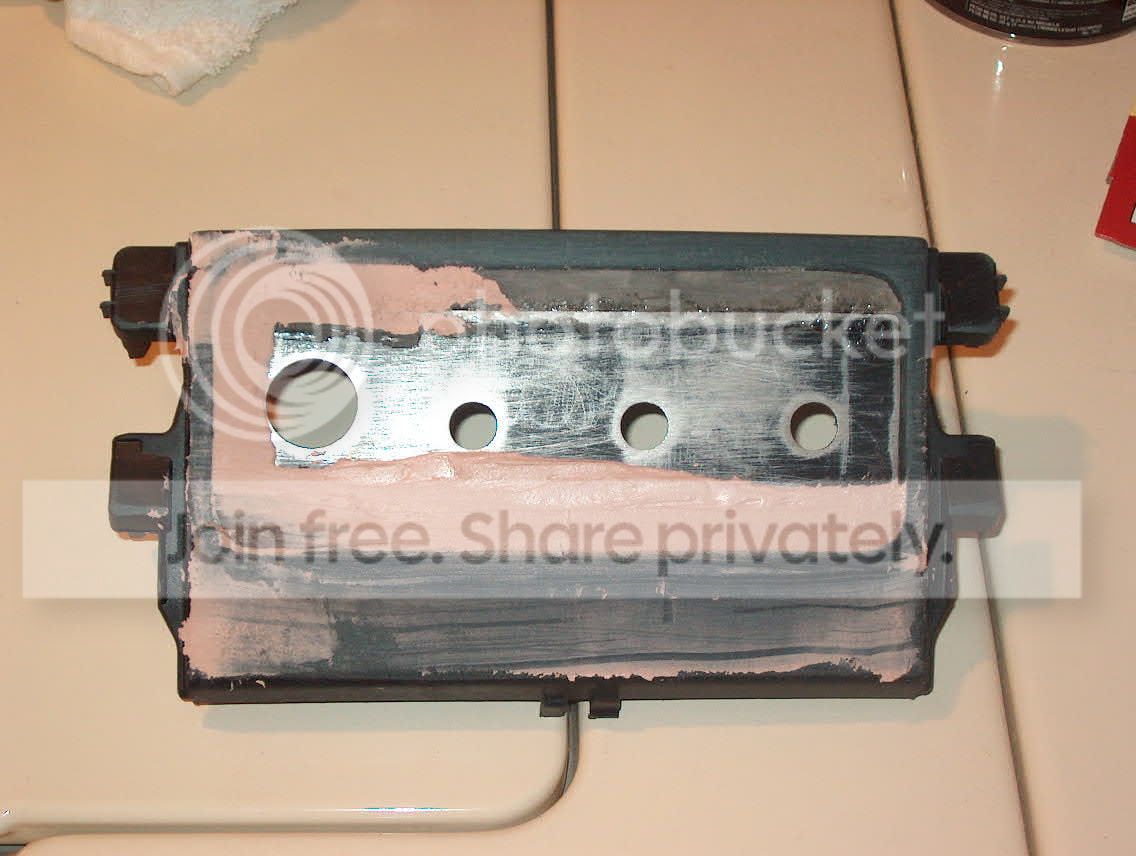
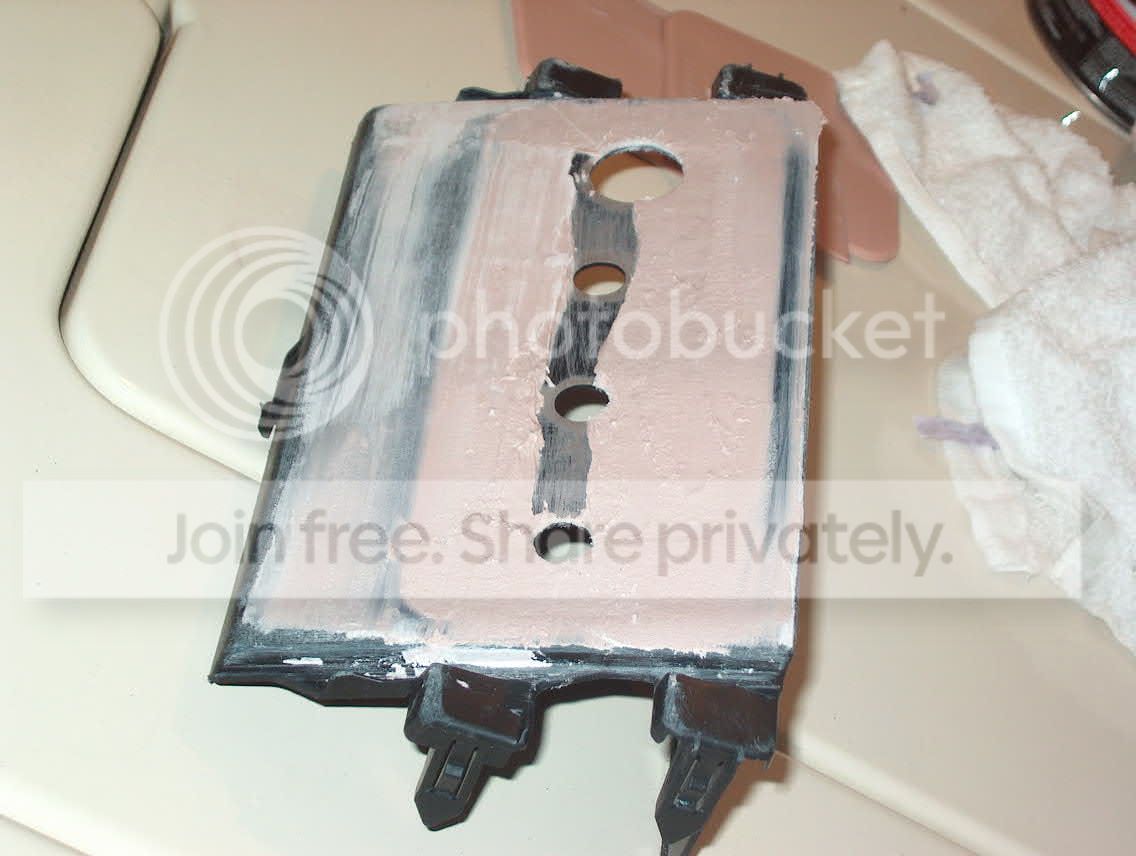
First run of bondo on the panel. Rubber scrapers and a popsickle stick will make a world of difference on how easy bondo is to use. The less hardener you use, the more time you have to play with it, it also takes longer to harden, but this gives you more time if this is your first time like it was mine.
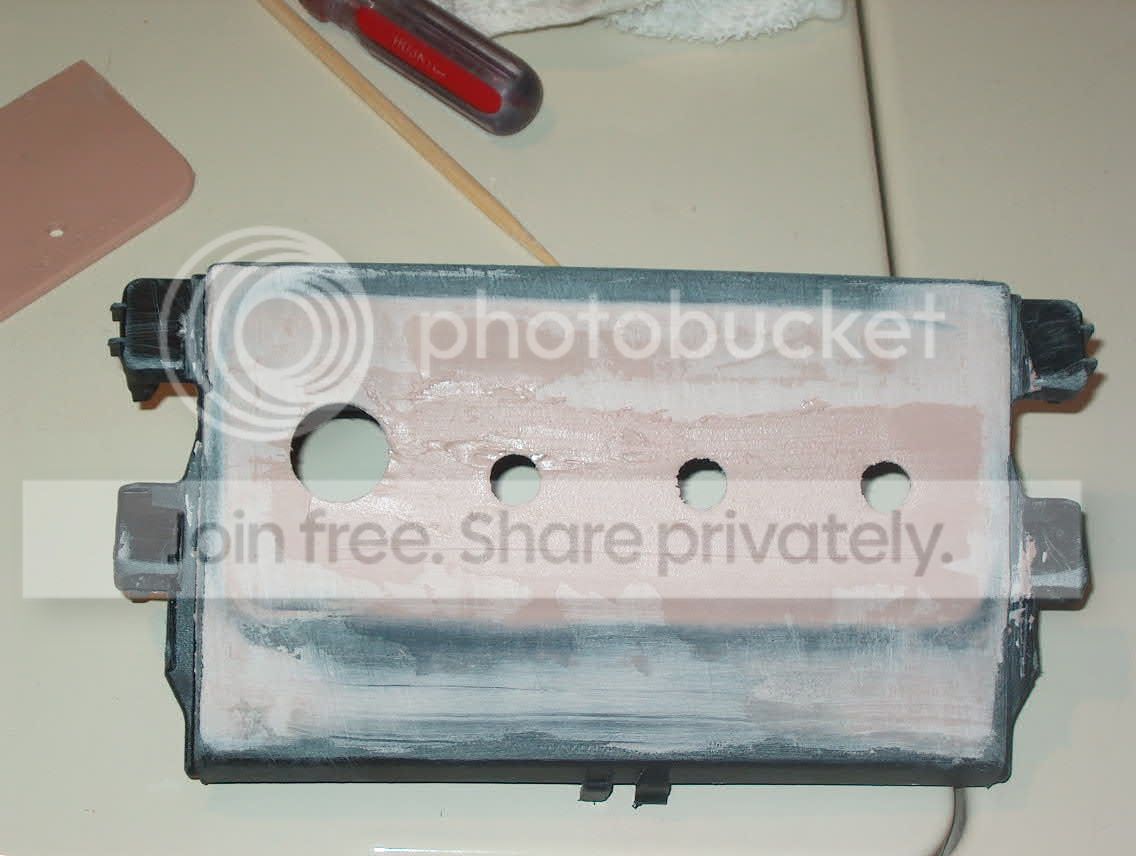
Second run of bondo on the panel. Sanded down the first layer of bondo to even out the bumps then filled in the bondo with the popsickle stick and then used the rubber scraper. I had a package of scrapers, came in 3 sizes... used the small for the seams to get them smooth, then used the large one to go over the panel to get it all even.
Side shot of the bondo. You can see how thick the bondo is getting because my pieces were laid in too deep. Made it stronger in the end though, piece is heavy though. When you get around the holes, just let the bondo go in them, when the bondo starts getting stiff poke out the holes.
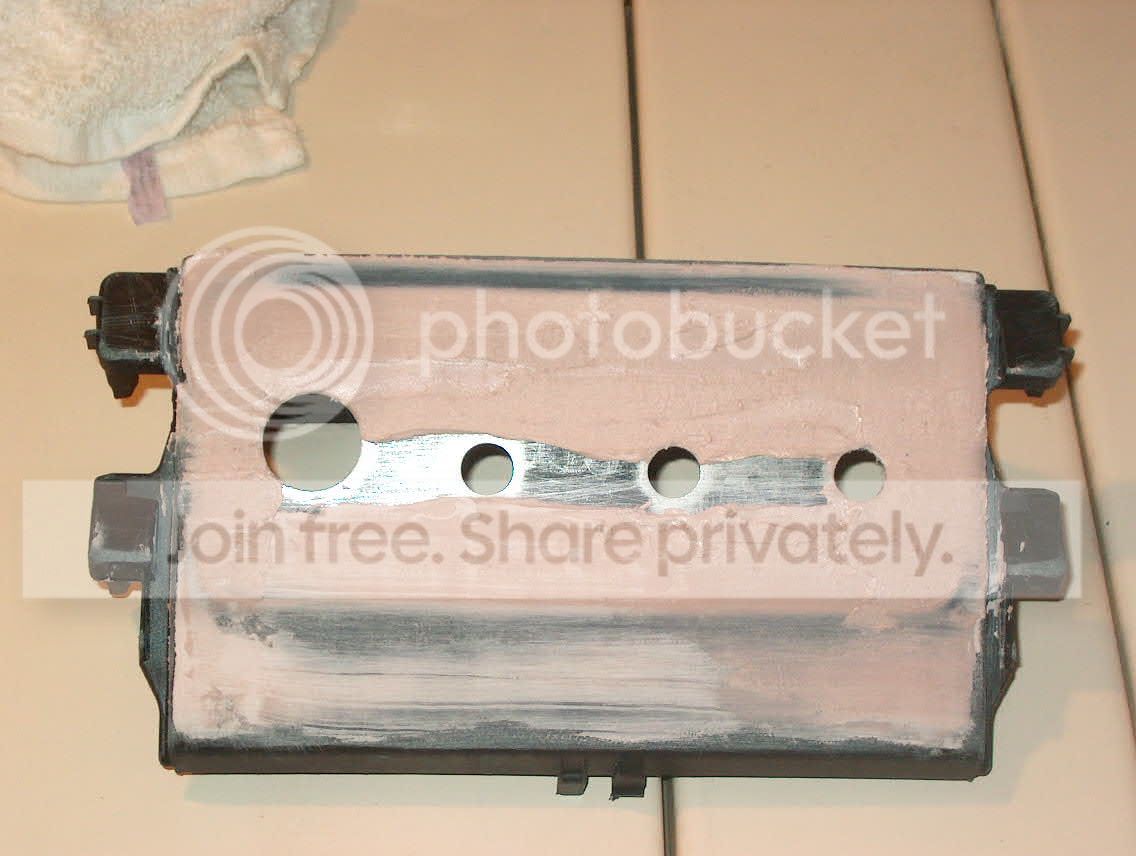
Third run of bondo on the panel. Started filling in the center and evened out everything. The problem with this panel is that it's not straight across, its got a slight slight curve to it.. it'll make sense when you start sanding it, you'll notice in the next picture.
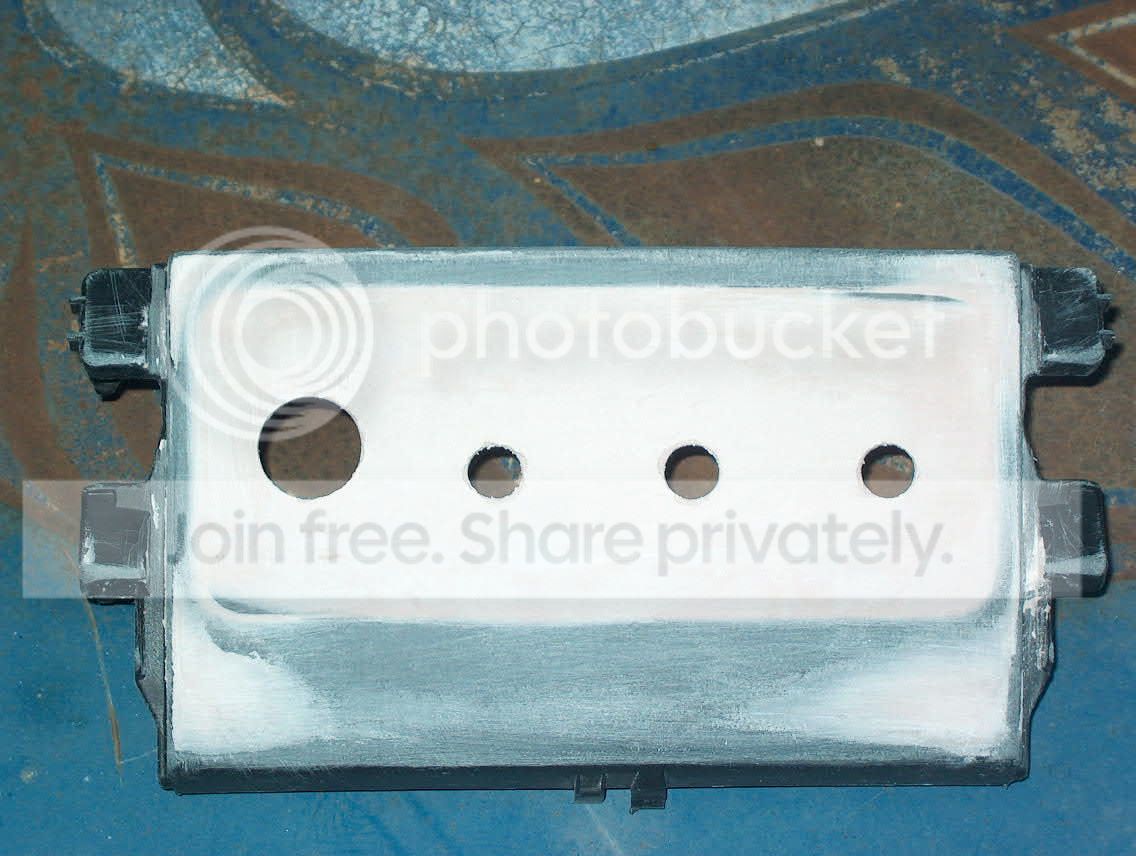
This is the final run of bondo on it and sanded down with 80 grit. I blocked sanded it and power sanded it. You can tell what I mean by the panel not being perfectly flat cause it has a curve to it naturally from the corners of the panel. They still have bondo in them while the middle doesn't at the top and bottom. Anyways, left out the pictures of the fiberglassing because i forgot to take pictures of it
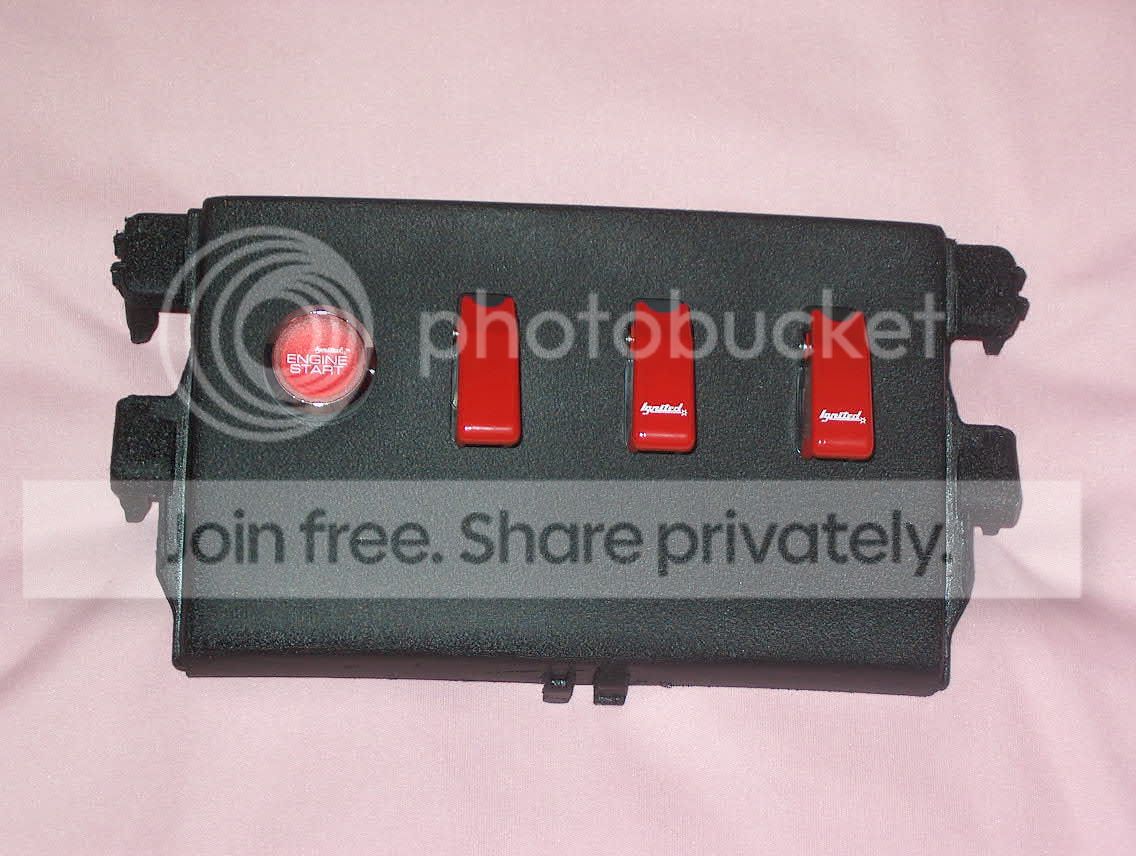
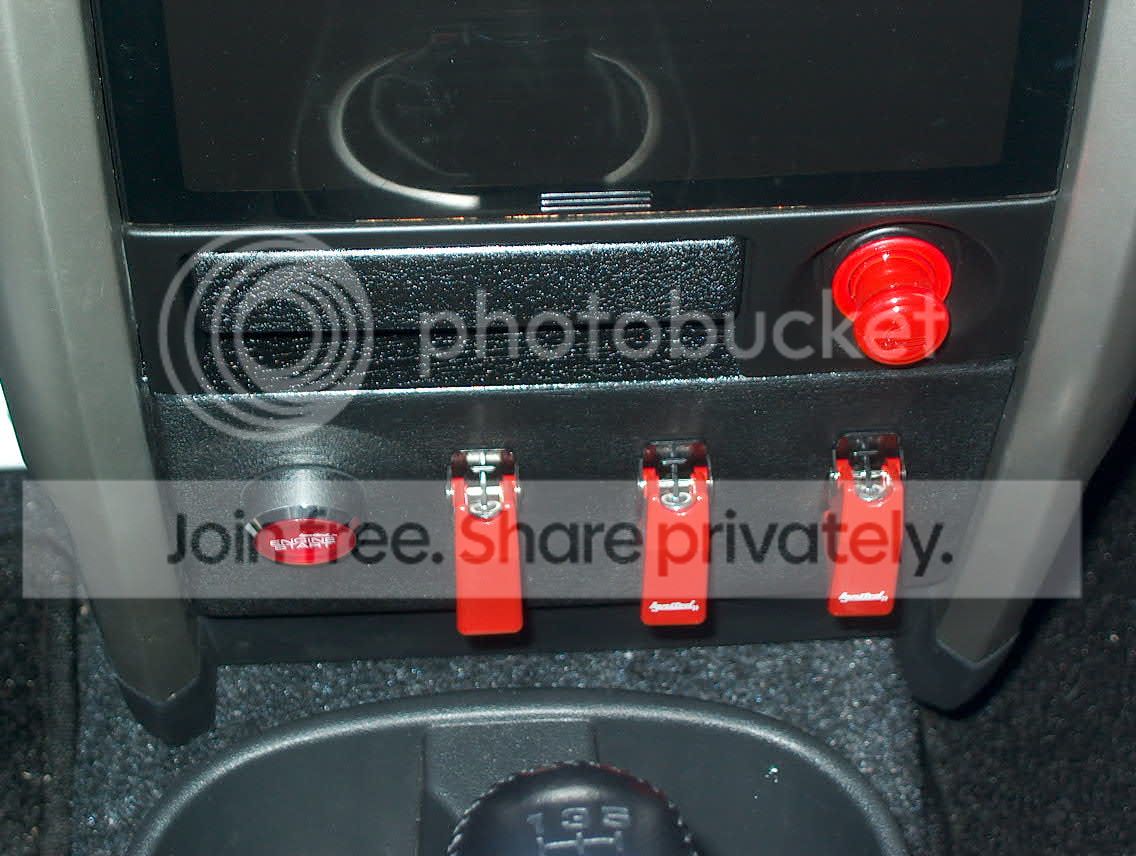
The panel done and painted with Plastikote Wrinkle Paint. Matches the interior of the car nicely. Switches installed, just need to be wired. Yes, yes, i know, i know, the first rocker doesn't say ignited, the heat wave crap that's been going on stripped it off or something, i rubbed it and it started chipping off... gonna wait for the other two to start chipping off.
Same as above but with the switches opened, have little red led's on the tips Went all out... 20 bucks a piece... got 60 bucks just on those rockers, and the start button was 60 bucks, got 120 on this panel just in the parts... the bondo and all of that fiberglass and what not ran about 30 total for everything. Oh yea, and that ignited din panel was 20 bucks, it came with two din panel pieces, i guess ones for backing... still got a panel left if someone else wants to try it, PM me. High quality stuff from ignited though :D
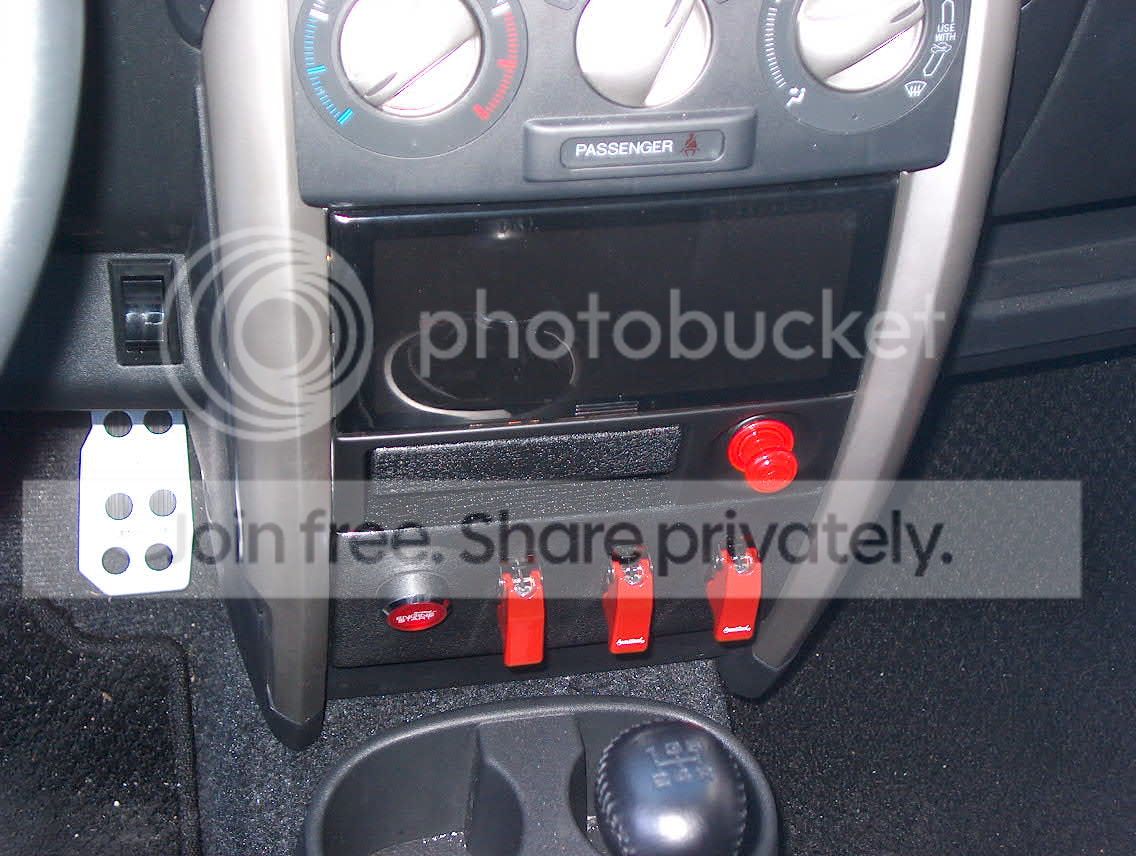
Alright, look at the panel then look at the plastic around the black switch above my pedal... mmmm... matches pretty damn close. The top of the panel looks all gouged cause it is... lol, i totally forgot to sand it down some more on the top or at least fill it in with some bondo. I just sanded it down and repainted the top so it looks fine now. you won't see it after i put the radar detector in anyways though.
anyways... thats my pictures and my descriptions mike
ahhhh... styrofoam... i was thinking that you were using that.. that's what they use on houses to get trim shapes when they stucco, and bondoing is like stuccoing a house... thought it would work but wasn't sure, didn't know what the process was... awesome... i'll keep that in mind when i do the radar detector next.
Originally Posted by mikochu
I don't believe the ist have the ashtray/lighter DIN. I think I saw it as an option on japanparts
Originally Posted by mikochu
ahhhh! we need picture descriptions!
Sanded down with 80 grit to give a rough surface the bondo would stick to.
Traced opening onto lexan piece, cut to size and cut out the middle... i didn't know how big the ignited panel was when i did this, i just cut it to get it ready.
Lexan fitted into panel.
Trimed lexan to fit the panel... had to grind down the sides of the ignited panel to fit inside the window. Ended up only needing a top and bottom of the lexan as a border. Used adhesive to hold it in place. Don't ask why I used it on the front of the panel, i don't know why I did that, i had to sand that crap off and adhevise doesn't sand down very good. Used the adhesive on the back to hold the pieces together. Let it dry for about an hour.
Side shot of the pieces together... notice how mine pieces are a little below the window, that caused me to do a lot of extra bondoing that wasn't necessary.. if you guys are gonna do this make sure everything fits almost flush before you start bondoing. Other than that, you can see that the seams are flush.
First run of bondo on the panel. Rubber scrapers and a popsickle stick will make a world of difference on how easy bondo is to use. The less hardener you use, the more time you have to play with it, it also takes longer to harden, but this gives you more time if this is your first time like it was mine.
Second run of bondo on the panel. Sanded down the first layer of bondo to even out the bumps then filled in the bondo with the popsickle stick and then used the rubber scraper. I had a package of scrapers, came in 3 sizes... used the small for the seams to get them smooth, then used the large one to go over the panel to get it all even.
Side shot of the bondo. You can see how thick the bondo is getting because my pieces were laid in too deep. Made it stronger in the end though, piece is heavy though. When you get around the holes, just let the bondo go in them, when the bondo starts getting stiff poke out the holes.
Third run of bondo on the panel. Started filling in the center and evened out everything. The problem with this panel is that it's not straight across, its got a slight slight curve to it.. it'll make sense when you start sanding it, you'll notice in the next picture.
This is the final run of bondo on it and sanded down with 80 grit. I blocked sanded it and power sanded it. You can tell what I mean by the panel not being perfectly flat cause it has a curve to it naturally from the corners of the panel. They still have bondo in them while the middle doesn't at the top and bottom. Anyways, left out the pictures of the fiberglassing because i forgot to take pictures of it
The panel done and painted with Plastikote Wrinkle Paint. Matches the interior of the car nicely. Switches installed, just need to be wired. Yes, yes, i know, i know, the first rocker doesn't say ignited, the heat wave crap that's been going on stripped it off or something, i rubbed it and it started chipping off... gonna wait for the other two to start chipping off.
Same as above but with the switches opened, have little red led's on the tips
Alright, look at the panel then look at the plastic around the black switch above my pedal... mmmm... matches pretty damn close. The top of the panel looks all gouged cause it is... lol, i totally forgot to sand it down some more on the top or at least fill it in with some bondo. I just sanded it down and repainted the top so it looks fine now. you won't see it after i put the radar detector in anyways though.
anyways... thats my pictures and my descriptions mike