DIY Rear Garnish Removal and Debadge..
 11-14-2012, 12:25 AM
#1

Warning!!! I take no blame for any mess ups or injuries caused to you or your part while attempting this DIY.
First off removing the garnish (I'll add pics of this later)
~Parts list~
Panel/clip remover
Needle nose pliers
10mm deep well socket and driver
Start by removing the side and top trim piece inside the hatch grab one side by the top and give it a simple pull mine came all off in one pull but you may need to remove each piece
Next I removed the license light bulb cover (on inside of car) for leverage I grabbed on side and pulled…it’s tight so don’t be afraid to give it a good pull. Then grabbed the other side and did the same thing then
I grabbed the bottom of the license cover and pulled the rest right off. Make sure you got all the clips out of car before proceeding if any got stuck use the needle nose pliers and pull or you can use a clip remover (I don’t have one so)
After you get that off there are 4 10mm nuts two holding the hatch release button and 2 holding the top of the garnish remove all 4 and close the hatch…
Grab the bottom at one side and pull there are 4 clips running the top that you must remove to get it off. Once you have it started you can pull where the clips run and it should pop right off.
Clean and proceed to debadging
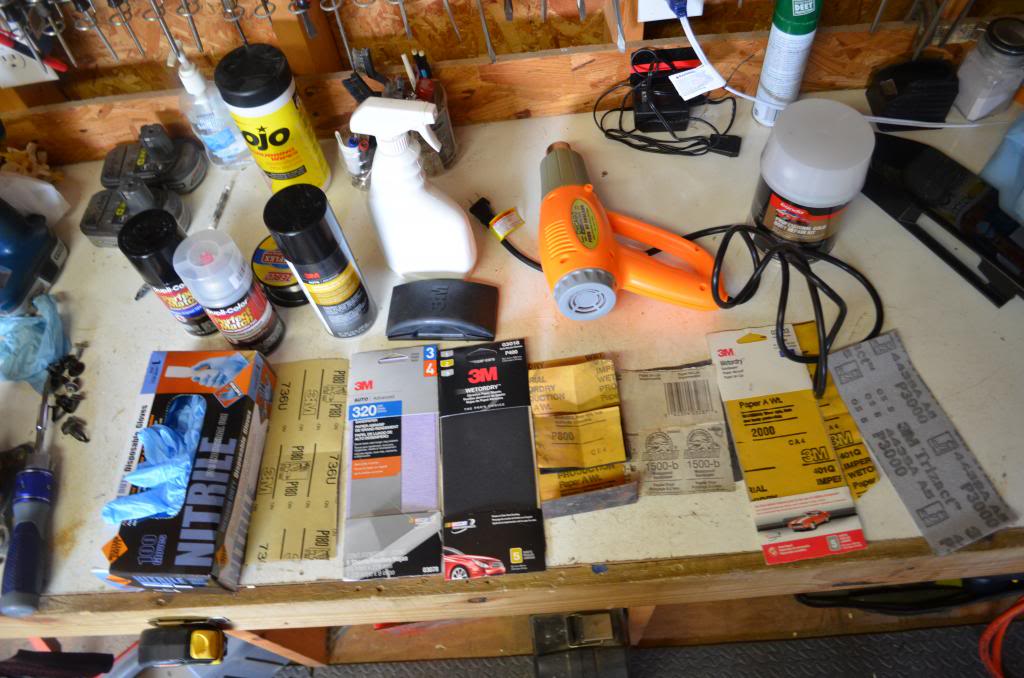
~Parts list~
Heat Gun or Hair Dryer
Fishing Line
Super Glue (any kind)
Tape(any kind)
Bondo & Hardener (any kind) I used Bondo Professional Gold easier to work with
Bondo Spreader
Wax Paper or Paper Pad made for Bondo use wax paper is quick easy and cheap DON’T USE CARDBOARD
Spray Paint or Spray Gun Paint(your color choice but I use Duplicolor perfect match and color matched)
Primer (any kind) I recommend Rust-Oleum automotive primer
Clear Coat (any kind) I recommend Dupli Color perfect match
Flat Sanding Block
Sand Paper Grits (180, 320, 400, 800,1500, 3000)
Buffer- or you can hand buff
Buffing Compound(use lightest scratch kind) I used mcguires ultimate compound
Bucket & Water
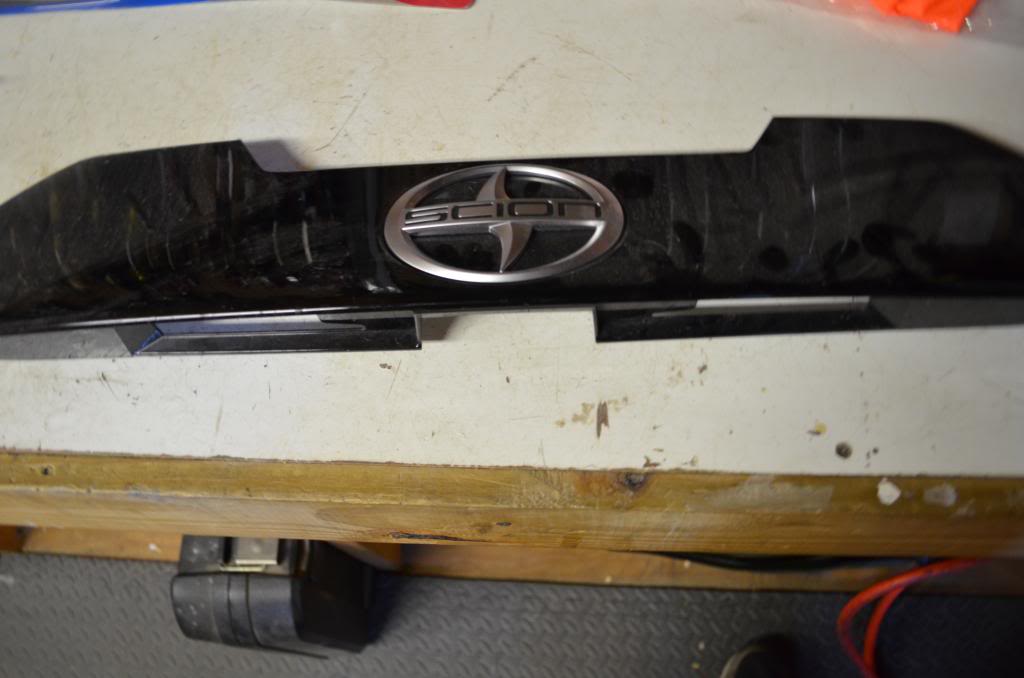
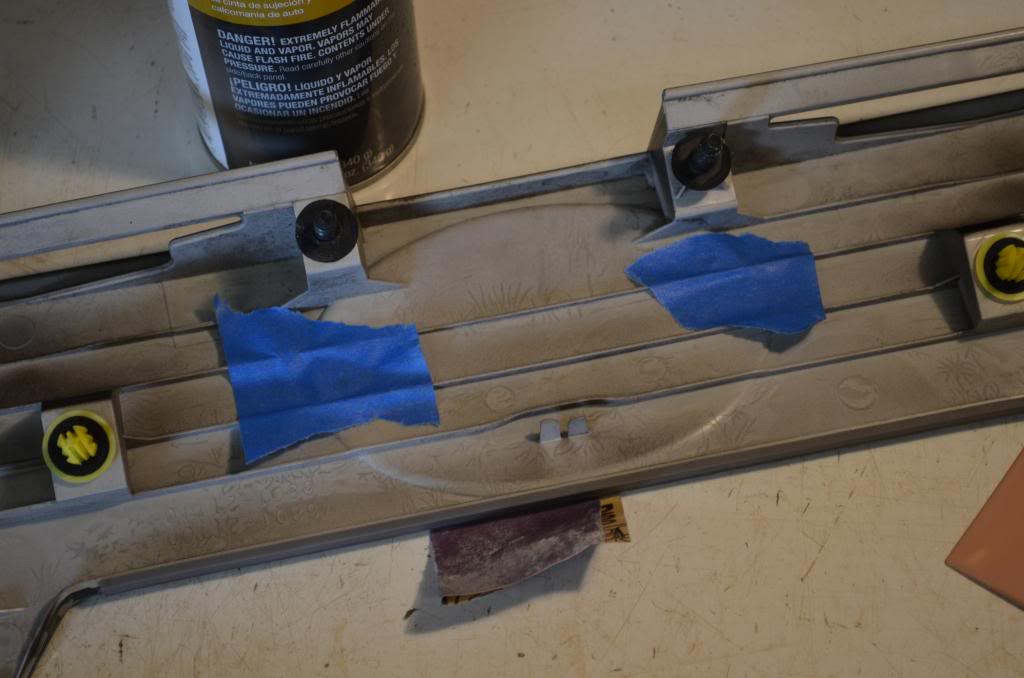
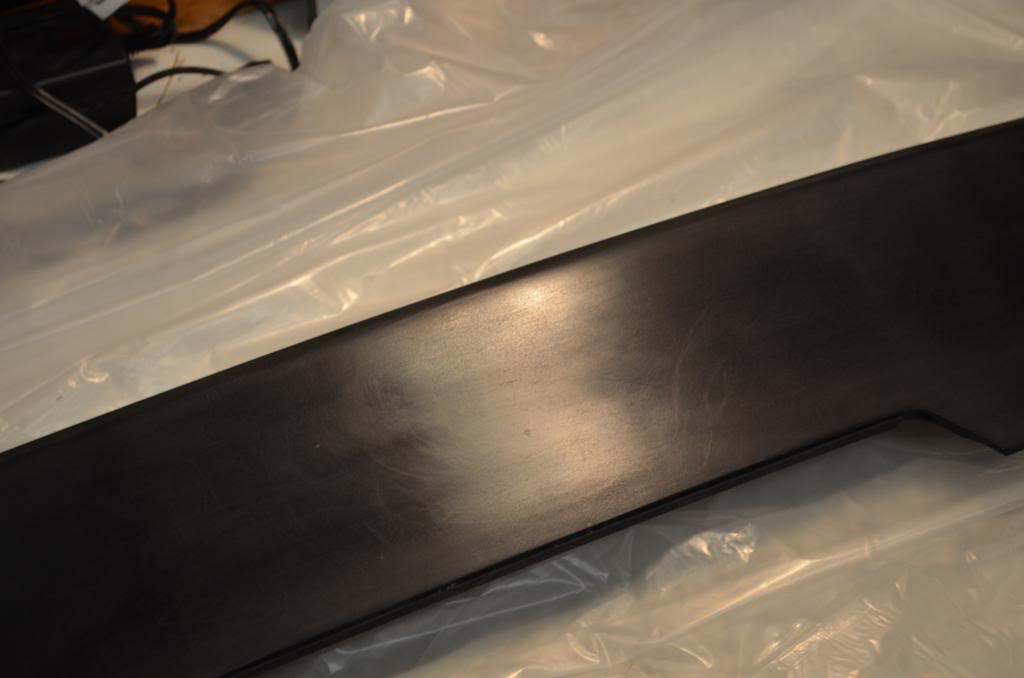
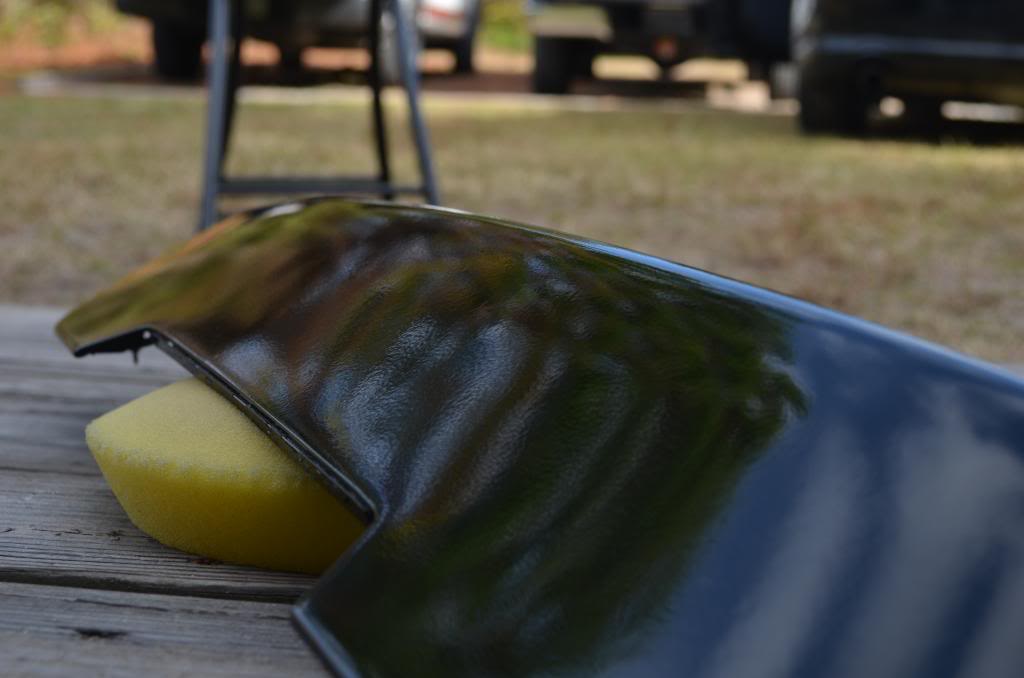
This is the rear garnish removed from the car.
I used a heat gun to heat up the emblem which has some adhesive on the back. While the area is warm. Use the fishing line in a sawing motion to slice through the adhesive. Be careful of the 2 posts on the back of the emblem.
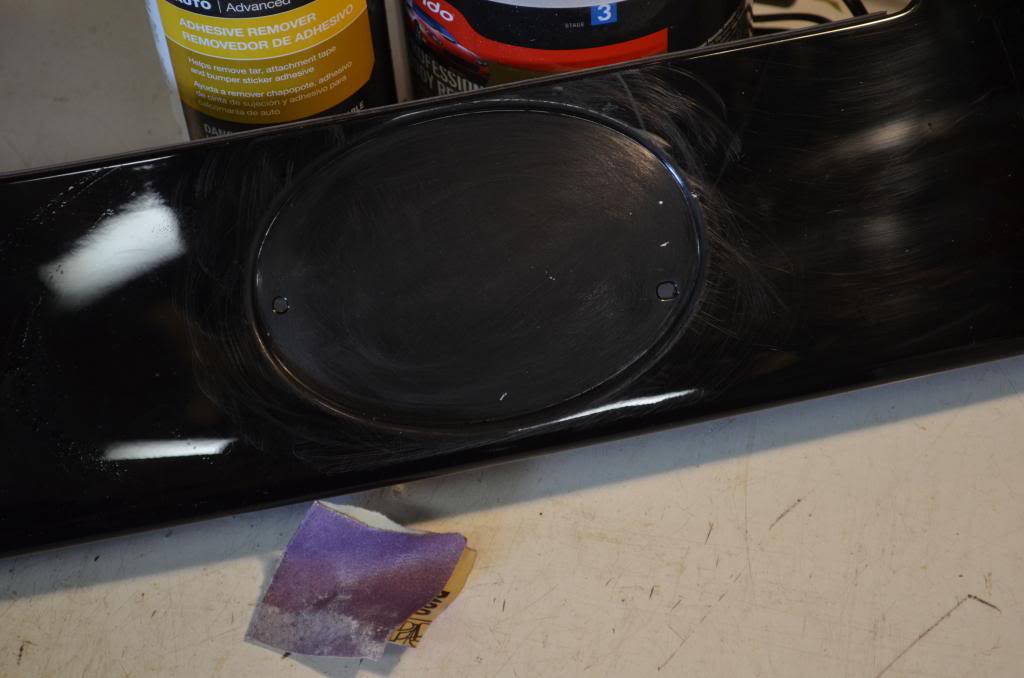
Just a close up view of the area where the emblem use to be.
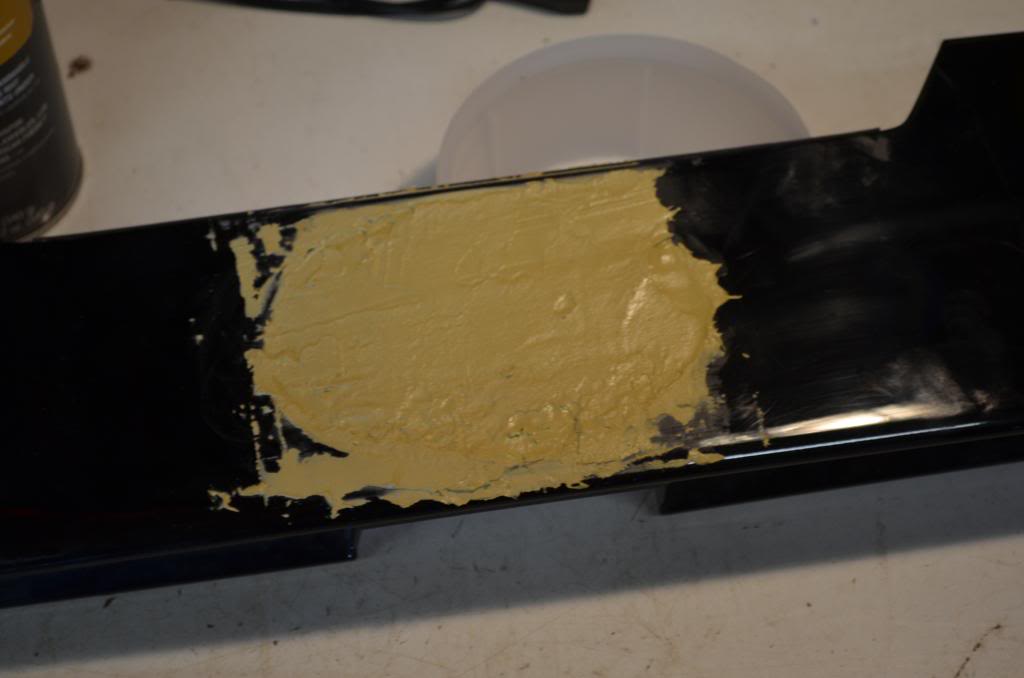
I used 180grit sand paper to sand down some of the outer oval edge to make it flatter or angled. You do not want the outer oval edge to be completely flat or else the bondo wont have anything to hold on to.
Also sand the middle of the oval with 180grit paper a little so the surface is rough for the bondo to stick to.

Flip over the garnish and cover over the 2 holes to prevent the bondo from going through.
Pour some of the bondo onto the wax paper or special pad for bondo. Then need the hardener in the tube for 1min. Depending on the amount of bondo poured, depends on the amount of hardener needed.
I like to make a smiley face with the hardener on top of the bondo. That amount usually does the trick. Apply the mixed up bondo within the oval and let dry for 10mins.
Apply another layer of bondo on top so that it fills the oval area up and goes pass the oval edge line some.
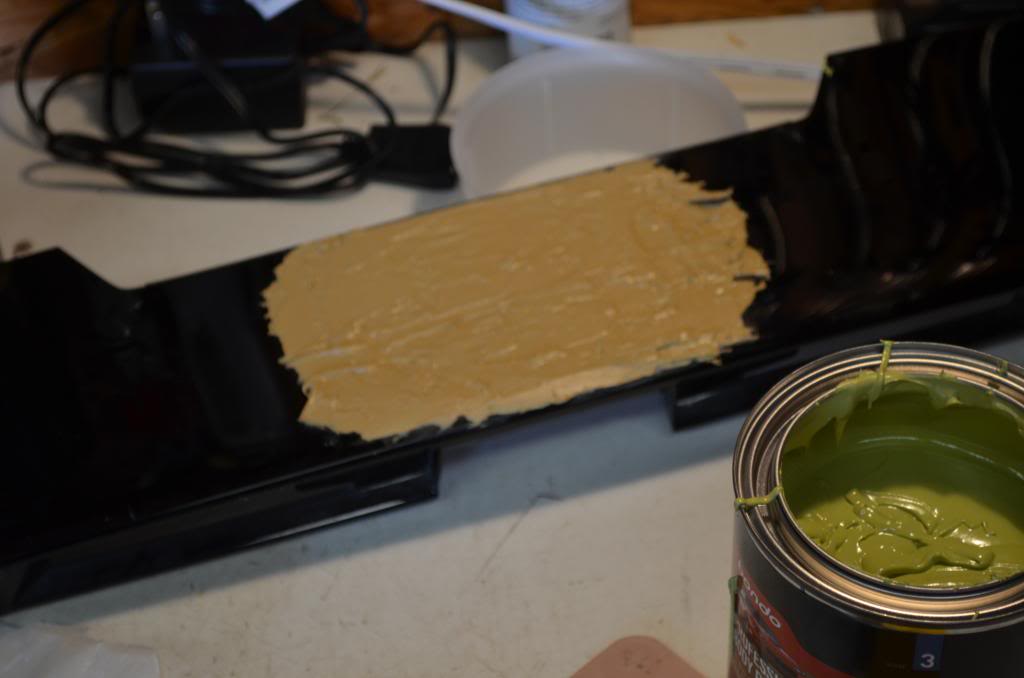
Use the flat sanding block with 180grit paper. Make sure to keep the sanding block flat and do a full back and forth sweeping motion. Do this until the edges of the bondo are basically even with the garnish.
Apply another layer of bondo and this time start further out from the edge of the last bondo put down.
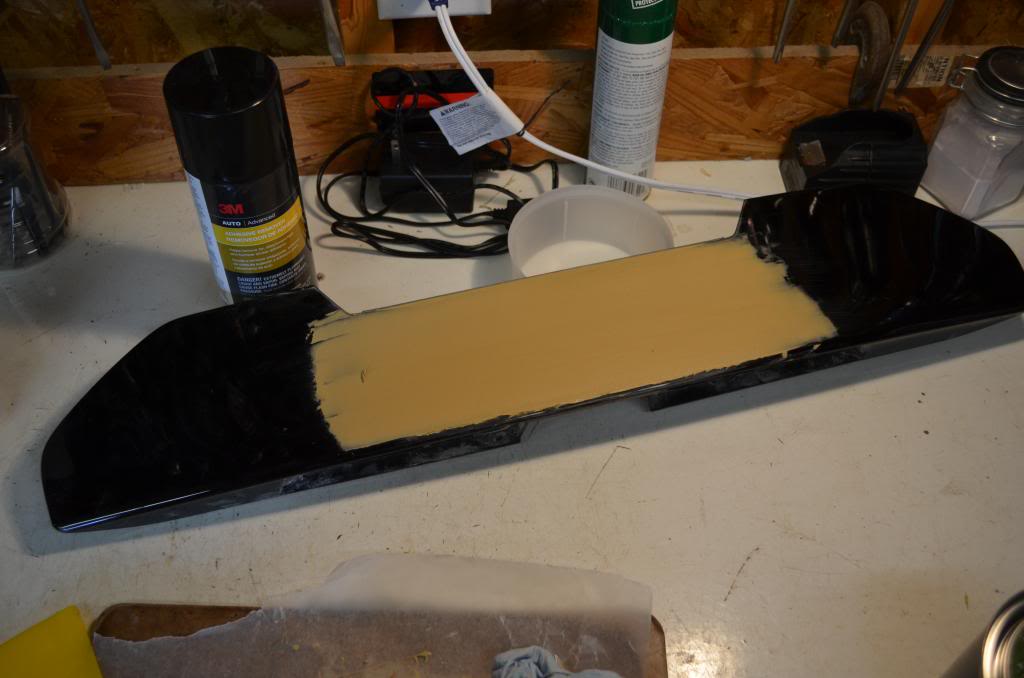
Continue to use the flat sanding block with 180grit paper.
Now start using 320grit paper with the flat sanding block. This will get the bondo much smoother and to feather out the edges of the bondo so its more even with the garnish.
If you no longer feel any low spots or edges you are done with the bondo but if you feel low spots do one more layer Like if you cant feel the edge of the line between the bondo and the garnish.
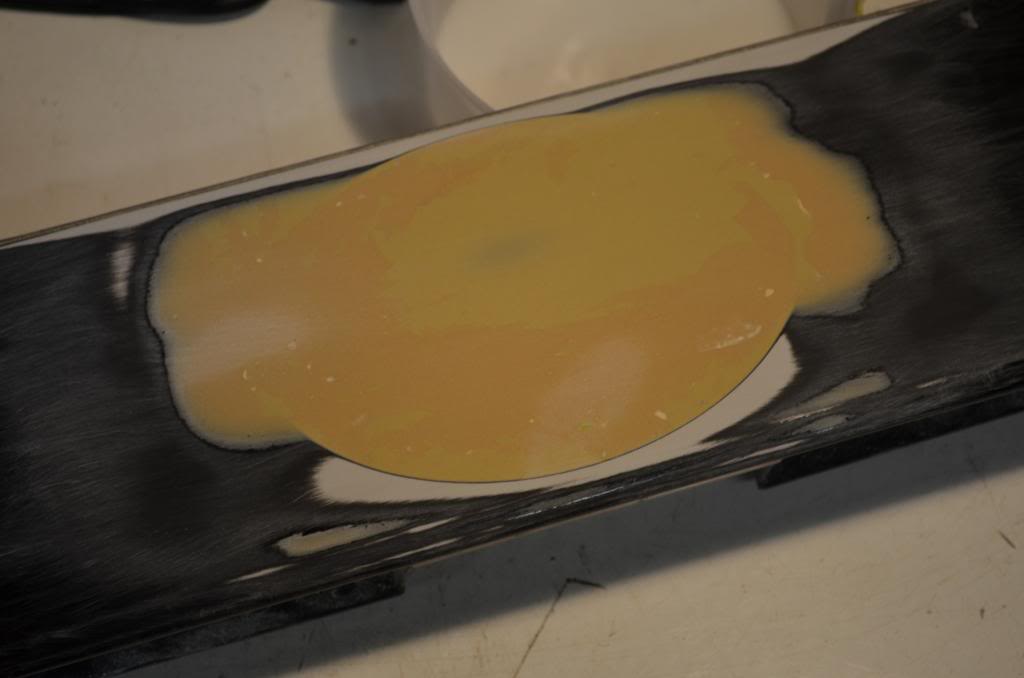
Turn the garnish back over to remove the tape you put on earlier. Now where the holes are. Put some super glue in them and a little bit around the hole.
This will keep the bondo from going through the holes while you are driving down the street. Keep the garnish turned over for like 2 hrs or until its completely dry.
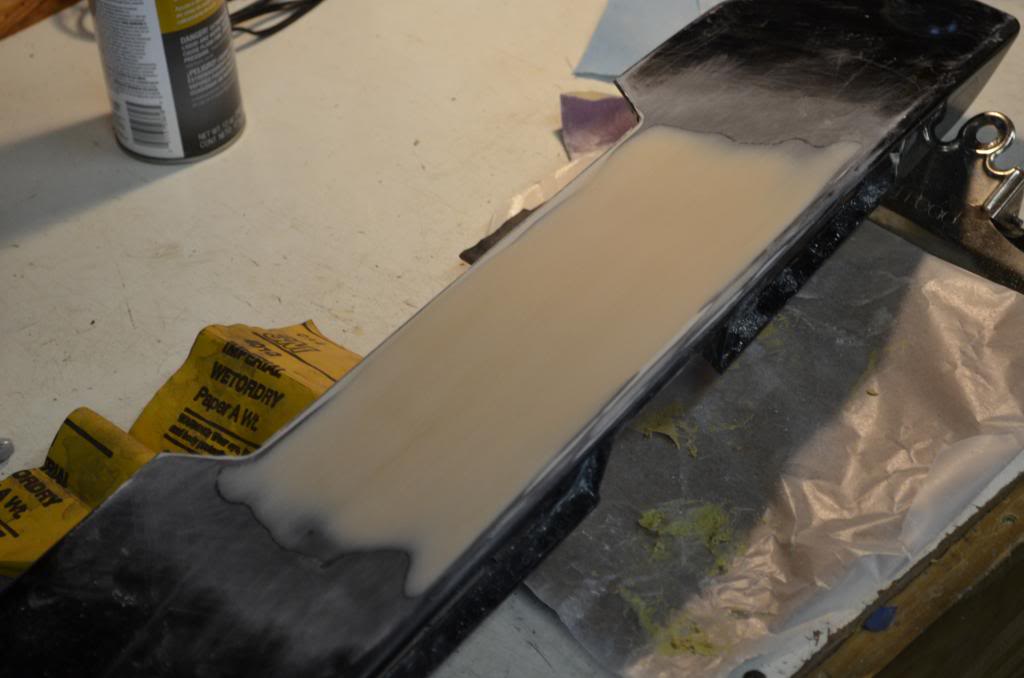
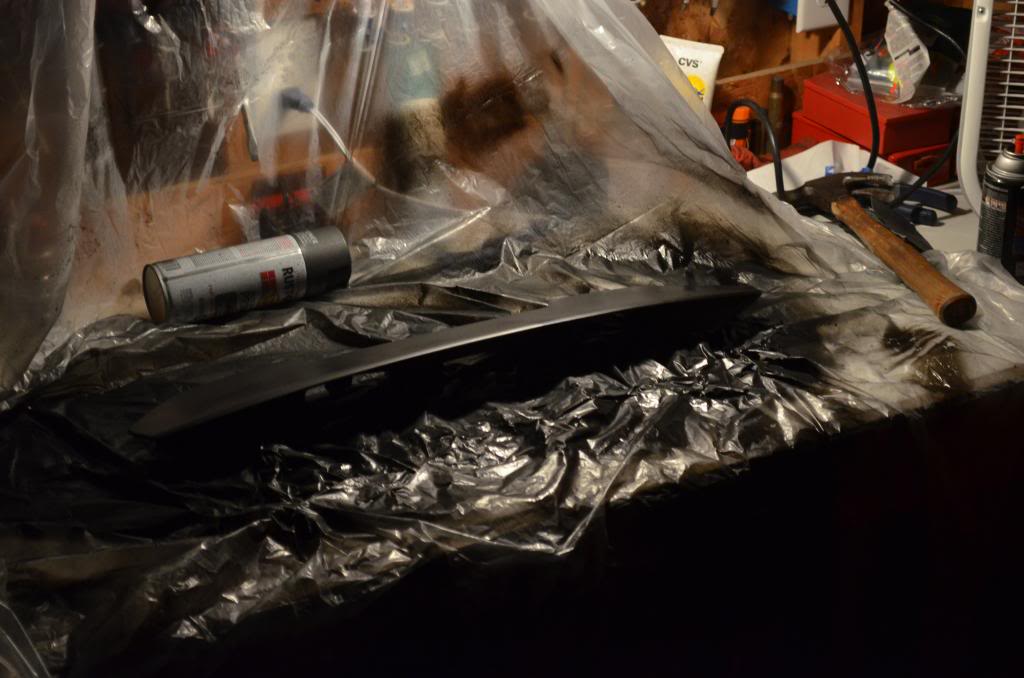
Now its time to spray on the primer. Remember to spray on light even coats so the primer can dry faster. It also makes your job easier to wet sand later cause you don't have runs in the primer.

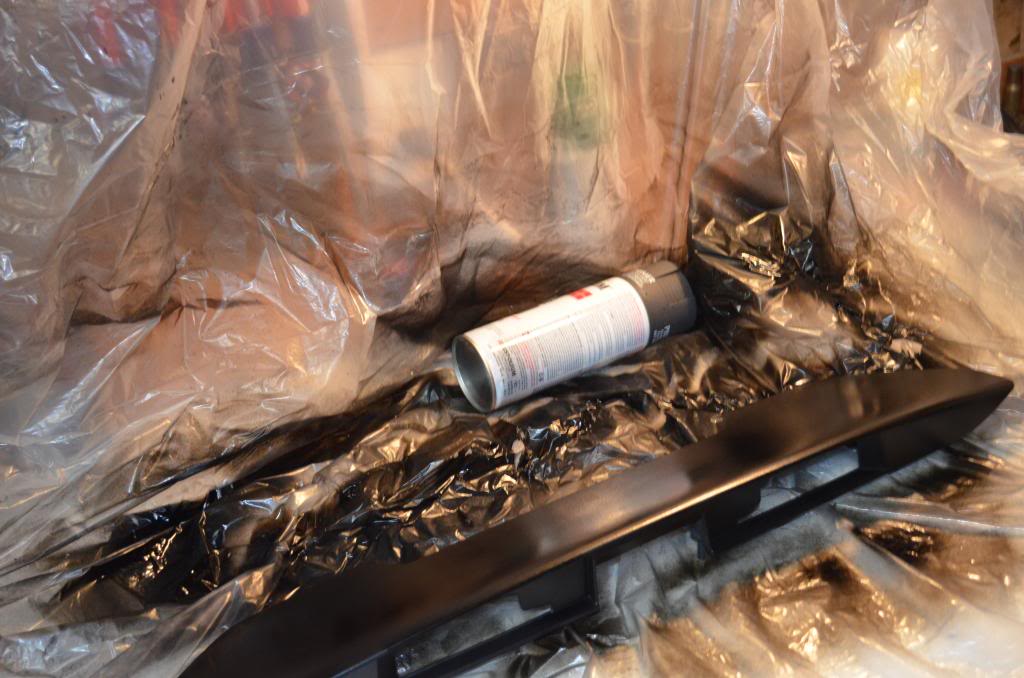
Here is the garnish with 3 coats of primer on it and right before the wet sanding. (a primer sealer will help prevent paint from soaking into the bondo later on especially with darker colors) (and sorry had to go inside started to rain)
Get a bucket and fill it up some with water cause now its time to do some wet sanding. You don't need to use the flat sanding block any more. Use the 800grit sand paper for the wet sanding.
You want to make sure you keep the garnish wet to minimize scratches. Its okay if you sand some of the primer off. Wet sand until the primer is one light color shade and has no bumps on it.
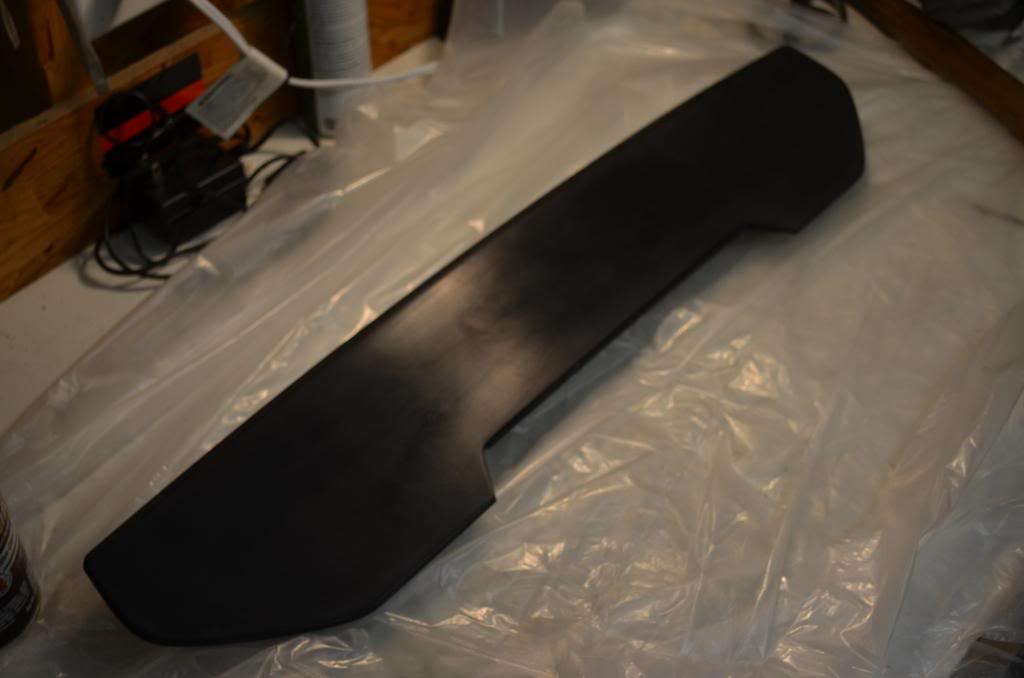
After you are done wet sanding the primer. Dry it off and let dry before you start to paint the garnish. Now again, spray your color of choice on the garnish lightly to prevent runs and to allow the paint to dry quicker. If you do get pieces of trash in the paint. Let it dry and wet sand it with 1000grit paper until the trash is gone.
Dry off the garnish and continue to paint. Do not wet sand your finally coat of paint cause it will look very dull when you clear coat it. Lighter colors take more coats than darker colors, i used about 5 coats of black 202 to cover the garnish. Let the paint dry for at least 1hr before clear coating.
Once the paint has dried. It is time to move on to spraying clear coat on the garnish. Remember to spray light coats so you don't get runs in the clear coat.
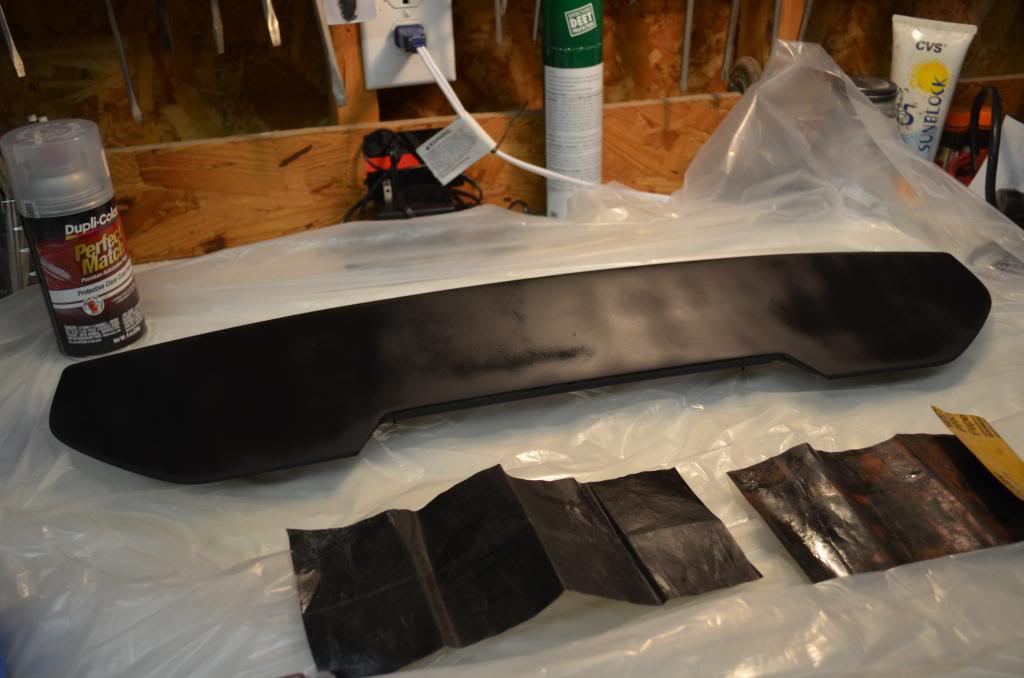
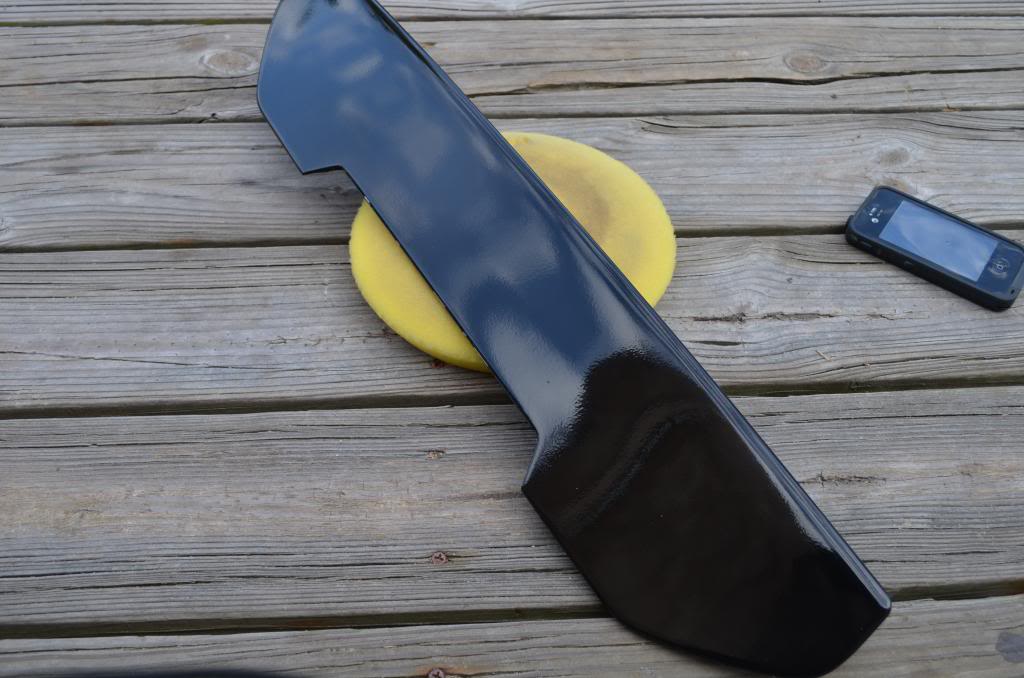
I like to do 5 to 6 coats of clear. It gives you a nice finish and enough clear coat to buff on. Let the clear coat dry for 24hrs before you buff on it.
Once the clear coat is dry. Get your bucket with water in it and use the 3000grit paper. Wet sand the garnish until the clear coat is evenly dull looking and remember to keep the garnish wet while sanding. Now get your buffer and very light buffing compound. If your buffer has a speed setting. Set the speed to 1200rpm. I laid the buffer on its back
and locked the trigger down so it would stay on. Spread some of the buffing compound on the garnish. Now slowly move the piece back and forth. Make sure to hold the garnish firmly when doing this. I buffed the garnish several times or until the piece looks good to you. Wipe the garnish off with a clean micro fiber towel and your finish.
First off removing the garnish (I'll add pics of this later)
~Parts list~
Panel/clip remover
Needle nose pliers
10mm deep well socket and driver
Start by removing the side and top trim piece inside the hatch grab one side by the top and give it a simple pull mine came all off in one pull but you may need to remove each piece
Next I removed the license light bulb cover (on inside of car) for leverage I grabbed on side and pulled…it’s tight so don’t be afraid to give it a good pull. Then grabbed the other side and did the same thing then
I grabbed the bottom of the license cover and pulled the rest right off. Make sure you got all the clips out of car before proceeding if any got stuck use the needle nose pliers and pull or you can use a clip remover (I don’t have one so)
After you get that off there are 4 10mm nuts two holding the hatch release button and 2 holding the top of the garnish remove all 4 and close the hatch…
Grab the bottom at one side and pull there are 4 clips running the top that you must remove to get it off. Once you have it started you can pull where the clips run and it should pop right off.
Clean and proceed to debadging
~Parts list~
Heat Gun or Hair Dryer
Fishing Line
Super Glue (any kind)
Tape(any kind)
Bondo & Hardener (any kind) I used Bondo Professional Gold easier to work with
Bondo Spreader
Wax Paper or Paper Pad made for Bondo use wax paper is quick easy and cheap DON’T USE CARDBOARD
Spray Paint or Spray Gun Paint(your color choice but I use Duplicolor perfect match and color matched)
Primer (any kind) I recommend Rust-Oleum automotive primer
Clear Coat (any kind) I recommend Dupli Color perfect match
Flat Sanding Block
Sand Paper Grits (180, 320, 400, 800,1500, 3000)
Buffer- or you can hand buff
Buffing Compound(use lightest scratch kind) I used mcguires ultimate compound
Bucket & Water
This is the rear garnish removed from the car.
I used a heat gun to heat up the emblem which has some adhesive on the back. While the area is warm. Use the fishing line in a sawing motion to slice through the adhesive. Be careful of the 2 posts on the back of the emblem.
Just a close up view of the area where the emblem use to be.
I used 180grit sand paper to sand down some of the outer oval edge to make it flatter or angled. You do not want the outer oval edge to be completely flat or else the bondo wont have anything to hold on to.
Also sand the middle of the oval with 180grit paper a little so the surface is rough for the bondo to stick to.
Flip over the garnish and cover over the 2 holes to prevent the bondo from going through.
Pour some of the bondo onto the wax paper or special pad for bondo. Then need the hardener in the tube for 1min. Depending on the amount of bondo poured, depends on the amount of hardener needed.
I like to make a smiley face with the hardener on top of the bondo. That amount usually does the trick. Apply the mixed up bondo within the oval and let dry for 10mins.
Apply another layer of bondo on top so that it fills the oval area up and goes pass the oval edge line some.
Use the flat sanding block with 180grit paper. Make sure to keep the sanding block flat and do a full back and forth sweeping motion. Do this until the edges of the bondo are basically even with the garnish.
Apply another layer of bondo and this time start further out from the edge of the last bondo put down.
Continue to use the flat sanding block with 180grit paper.
Now start using 320grit paper with the flat sanding block. This will get the bondo much smoother and to feather out the edges of the bondo so its more even with the garnish.
If you no longer feel any low spots or edges you are done with the bondo but if you feel low spots do one more layer Like if you cant feel the edge of the line between the bondo and the garnish.
Turn the garnish back over to remove the tape you put on earlier. Now where the holes are. Put some super glue in them and a little bit around the hole.
This will keep the bondo from going through the holes while you are driving down the street. Keep the garnish turned over for like 2 hrs or until its completely dry.
Now its time to spray on the primer. Remember to spray on light even coats so the primer can dry faster. It also makes your job easier to wet sand later cause you don't have runs in the primer.
Here is the garnish with 3 coats of primer on it and right before the wet sanding. (a primer sealer will help prevent paint from soaking into the bondo later on especially with darker colors) (and sorry had to go inside started to rain)
Get a bucket and fill it up some with water cause now its time to do some wet sanding. You don't need to use the flat sanding block any more. Use the 800grit sand paper for the wet sanding.
You want to make sure you keep the garnish wet to minimize scratches. Its okay if you sand some of the primer off. Wet sand until the primer is one light color shade and has no bumps on it.
After you are done wet sanding the primer. Dry it off and let dry before you start to paint the garnish. Now again, spray your color of choice on the garnish lightly to prevent runs and to allow the paint to dry quicker. If you do get pieces of trash in the paint. Let it dry and wet sand it with 1000grit paper until the trash is gone.
Dry off the garnish and continue to paint. Do not wet sand your finally coat of paint cause it will look very dull when you clear coat it. Lighter colors take more coats than darker colors, i used about 5 coats of black 202 to cover the garnish. Let the paint dry for at least 1hr before clear coating.
Once the paint has dried. It is time to move on to spraying clear coat on the garnish. Remember to spray light coats so you don't get runs in the clear coat.
I like to do 5 to 6 coats of clear. It gives you a nice finish and enough clear coat to buff on. Let the clear coat dry for 24hrs before you buff on it.
Once the clear coat is dry. Get your bucket with water in it and use the 3000grit paper. Wet sand the garnish until the clear coat is evenly dull looking and remember to keep the garnish wet while sanding. Now get your buffer and very light buffing compound. If your buffer has a speed setting. Set the speed to 1200rpm. I laid the buffer on its back
and locked the trigger down so it would stay on. Spread some of the buffing compound on the garnish. Now slowly move the piece back and forth. Make sure to hold the garnish firmly when doing this. I buffed the garnish several times or until the piece looks good to you. Wipe the garnish off with a clean micro fiber towel and your finish.
Last edited by MR_LUV; 04-01-2020 at 05:21 AM. Reason: Awarded 5 Yr Badge yet
 11-14-2012, 12:48 AM
#2
Senior Member

SL Member
Team ScioNRG

Join Date: Jan 2009
Location: Wellesley, MA
Posts: 2,406
Great write up, similar procedure I used on my tC about a year and a half ago. Only difference is that I used fiberglass to first fill the emblems imprint, that makes for a more solid layer for the bondo afterwords. Straight bondo will crack over time from vibrations. Also, you might want to toss another wetsand on there as you have a decent amount of orange peel showing. Otherwise this is a great addition for the DIY crew out there.
11-14-2012, 12:54 AM
#3
i thought about the fiberglass but didnt do it because frankly i just didnt feel like going and buying more fiberglass as for the orange peel its not that bad i stopped when i did because i wanted it to match the stock ____ty paint job and the orange peel the stock black tc2 is know for if you look at the garnish then the paint you can barely tell a difference also im thinking of doiing my front bumper but wanted to see how they were holding up knowing the emblem acts as a brace of sorts and since youve done yours awhile back how is it

 11-14-2012, 05:47 AM
#7
It's all about the clear and wet sanding and polishing I've made some pretty dank stuff with a rattle can as a matter or fact I'm helping a friend paint his entire car rattle can style and its coming out real nice so far
 11-14-2012, 12:20 PM
#9
^^ I have one I don't like it... It puts pressure on another part of your hand and I find it hurts my hand more then the rattle can ( and I've sprayed with both for extended periods) as for even coverage it makes me feel like I'm using my gun which is bad becuase you forget to shake.. Also you always have to pay attention to the spray tip it easily gets turned and can produce horrible splatter....... Just my review on the product take it as you may

Thread
Thread Starter
Forum
Replies
Last Post
peyton331
Scion tC 1G Aero & Exterior
8
11-14-2011 09:40 PM
06tcsizzlincrimson
Scion tC 1G Aero & Exterior
13
06-29-2010 03:08 PM