BackUp Camera Install tC2 Alpine HU
 10-12-2011, 10:19 PM
#1
Member
Thread Starter

Join Date: Sep 2011
Posts: 32
OK So I took on the task of installing a BU camera on tC2. The hardest part was running the cable from the back to the HU. But its all done and here is my experience:
Parts Inventory:
Scion tC2
Alpine HU (Any HU with Video IN)
Alpine Video Wiring Harness (this part is hard to find. I have the pins mapped on the Alpine HU if anyone needs it)
Pac-Audio VCI-LP3C http://www.autotoys.com/x/product.php?productid=22364
Household tools
Patience
The PAC VCI-LP3C makes all connections at the HU. You dont tap into the tail lights for power or ground. Depending what BU camera you use make sure the wiring is long enough for your needs.
If you use a license plate camera make sure it can be adjusted down so you have room to hit your trunk release
Gen1 tC Rear hatch handle panel was only held in places with plastic clips I believe Gen2 it is actually Bolts on so it wont pull off. Any here we go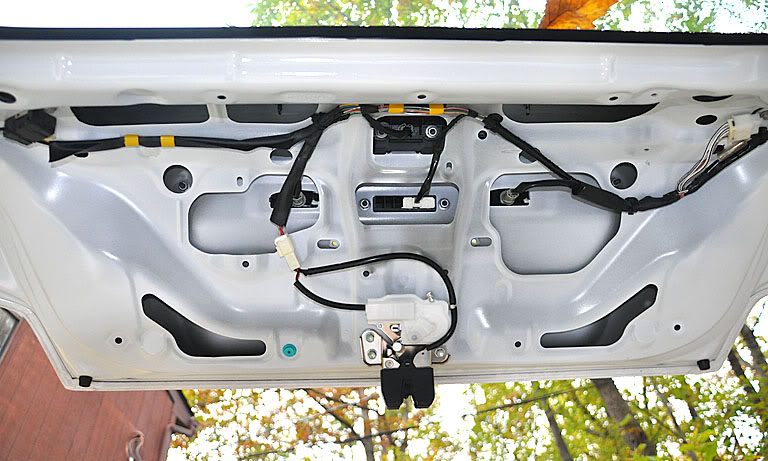


This is the finished product
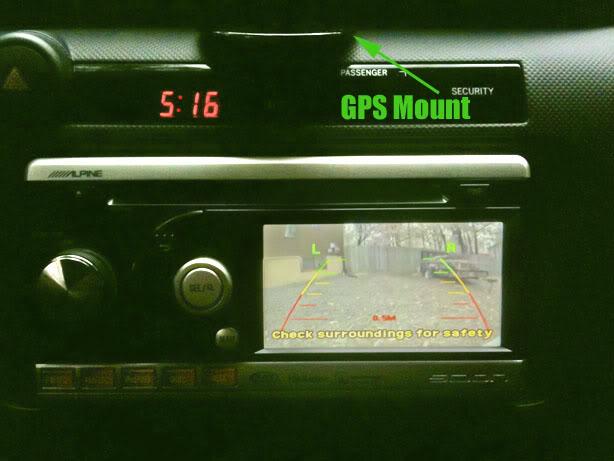
The cool thing the radio doesn't have to be on. If you have the radio off and put it in reverse the camera image will still pop on the screen.
___
Parts Inventory:
Scion tC2
Alpine HU (Any HU with Video IN)
Alpine Video Wiring Harness (this part is hard to find. I have the pins mapped on the Alpine HU if anyone needs it)
Pac-Audio VCI-LP3C http://www.autotoys.com/x/product.php?productid=22364
Household tools
Patience
The PAC VCI-LP3C makes all connections at the HU. You dont tap into the tail lights for power or ground. Depending what BU camera you use make sure the wiring is long enough for your needs.
If you use a license plate camera make sure it can be adjusted down so you have room to hit your trunk release
Gen1 tC Rear hatch handle panel was only held in places with plastic clips I believe Gen2 it is actually Bolts on so it wont pull off. Any here we go
- Pull plastic panels off the hatch. Start at the top and work your way to the rear
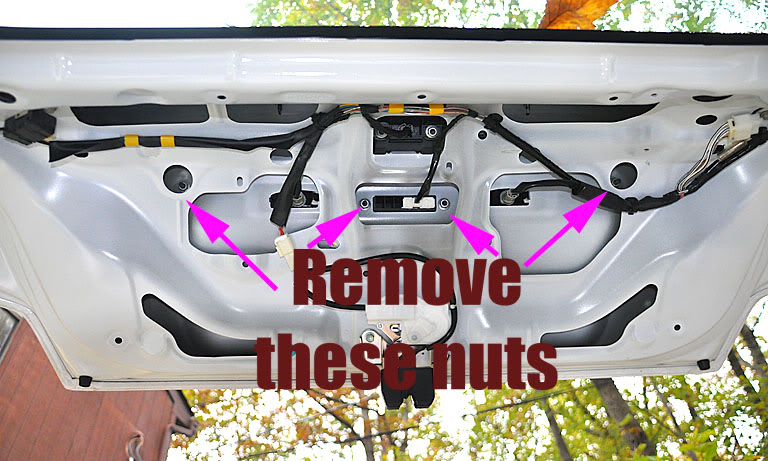
- Now remove the 4 nuts that hold in the rear hatch handle
- Should be able to pull off rear hatch handle
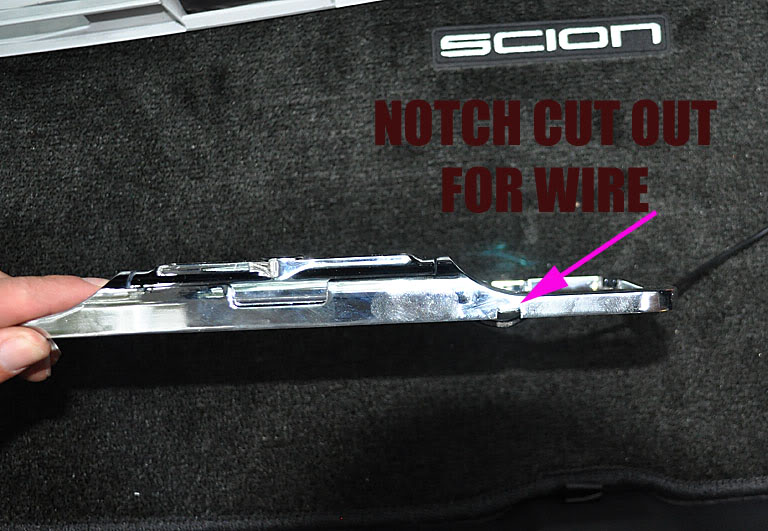
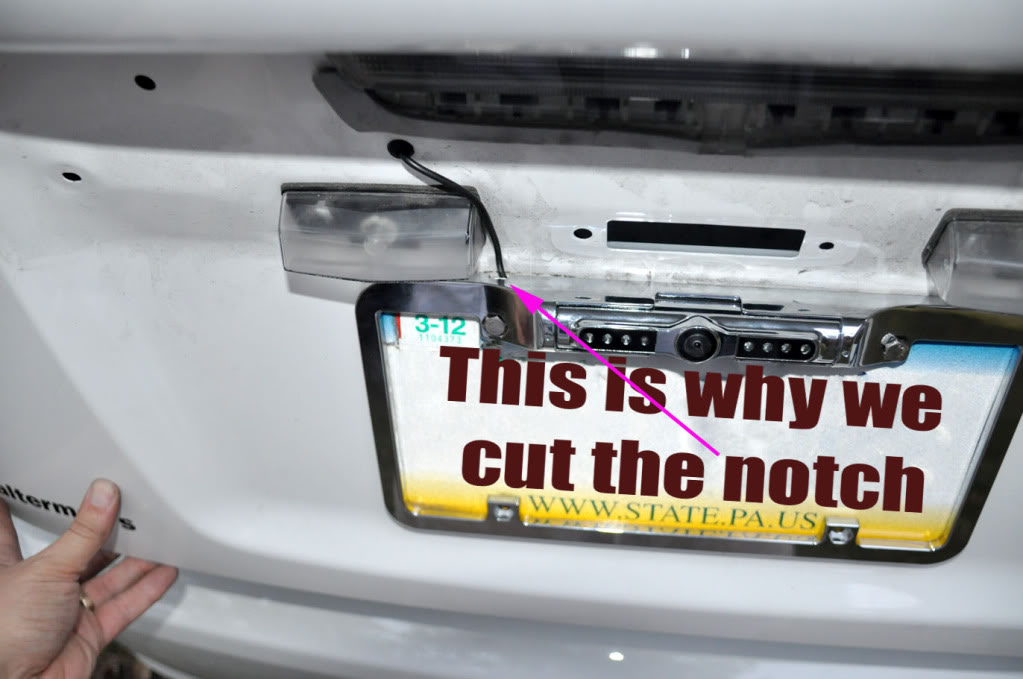
- This is not a necessary step, but it prevents the cord from being pinched. Make a notch in the frame for the wire to run through
- Now mount the plate and run the wire through one of the two holes
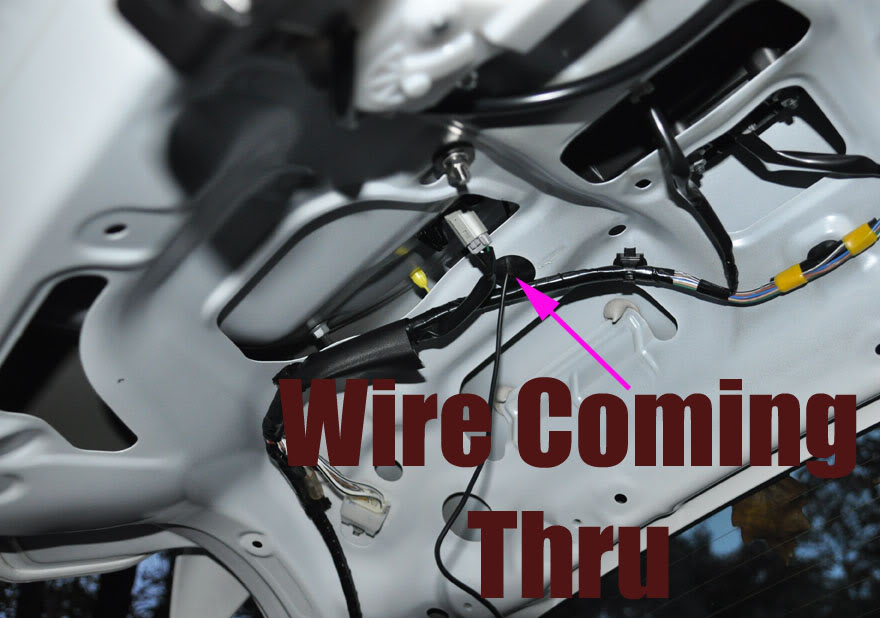
- Remove the plastic plug from the rear hatch handle that you used to run the wire through
- Now install the rear hatch panel and re-install the nuts and tighten everything up. It should like pretty.
- Start running your wires. In my case all my connections are made at the HU so here I go
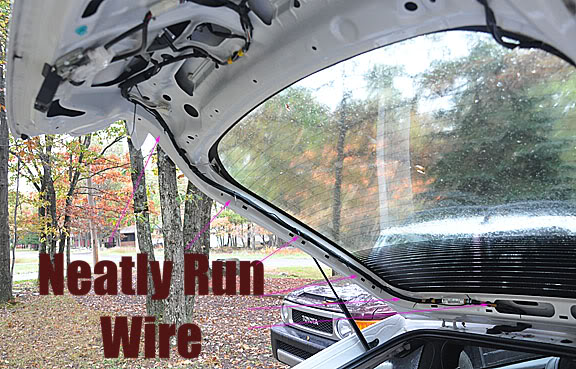
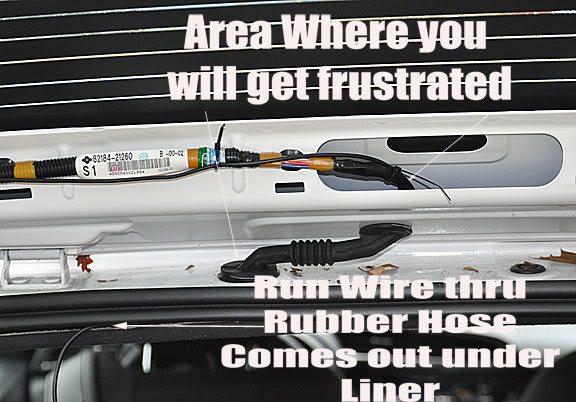
- It was very tight to run the cable through the rubber casing. I should have lubed it up, but after 20 mintues it came (haha) out the other end.
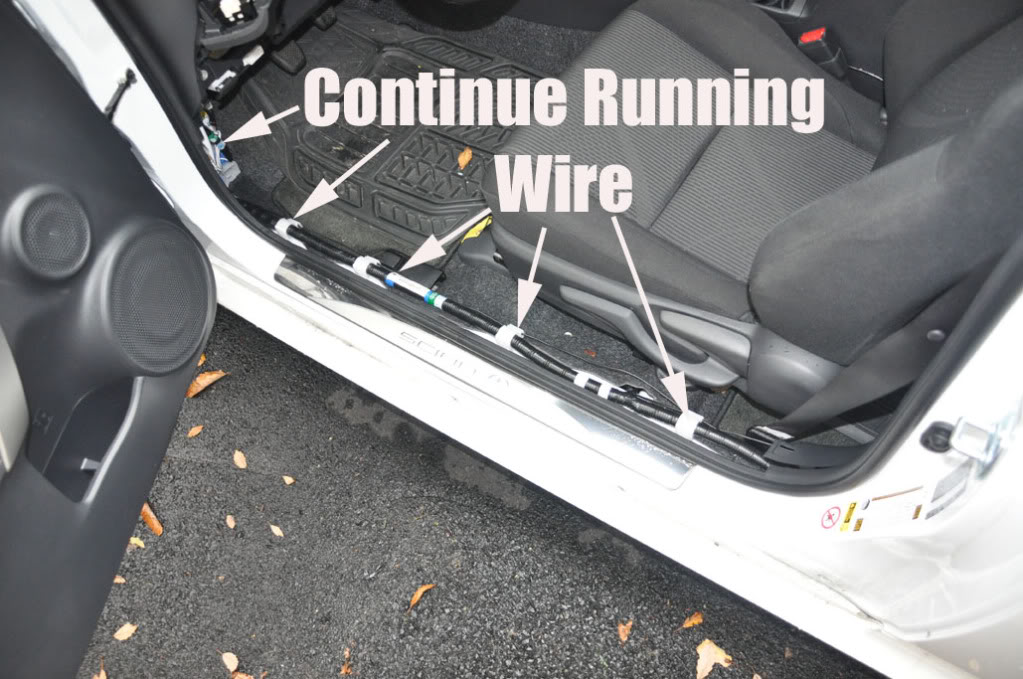
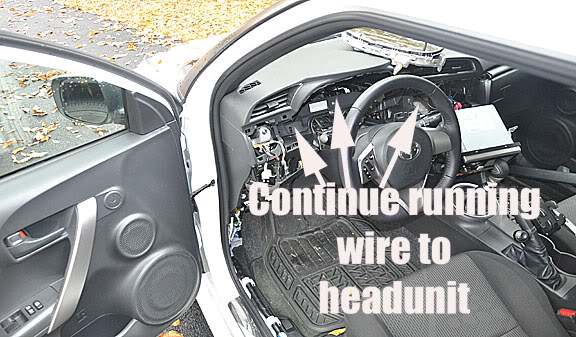
- I ran the wire across the headliner and down the side pillar, along door sill, across gauge cluster and finally to HU
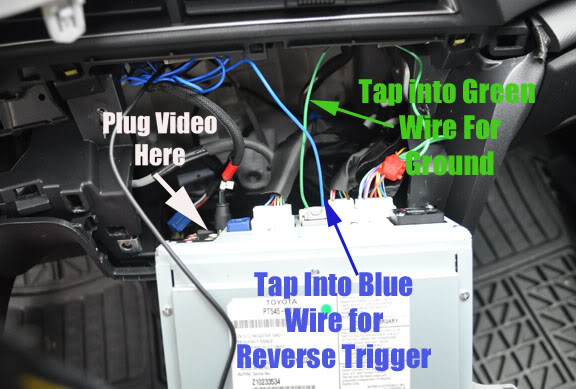
- Now at the HU, plug the video cable into the video IN, tap into the blue wire from the wiring harness (reverse trigger on) and tap into the green wire for ground (the green wire is grounded into the brown wire on the HU main wiring harness)
- This link shows where the blue wire is tapped into pulling reverse trigger from https://www.scionlife.com/forums/sho...d.php?t=208361
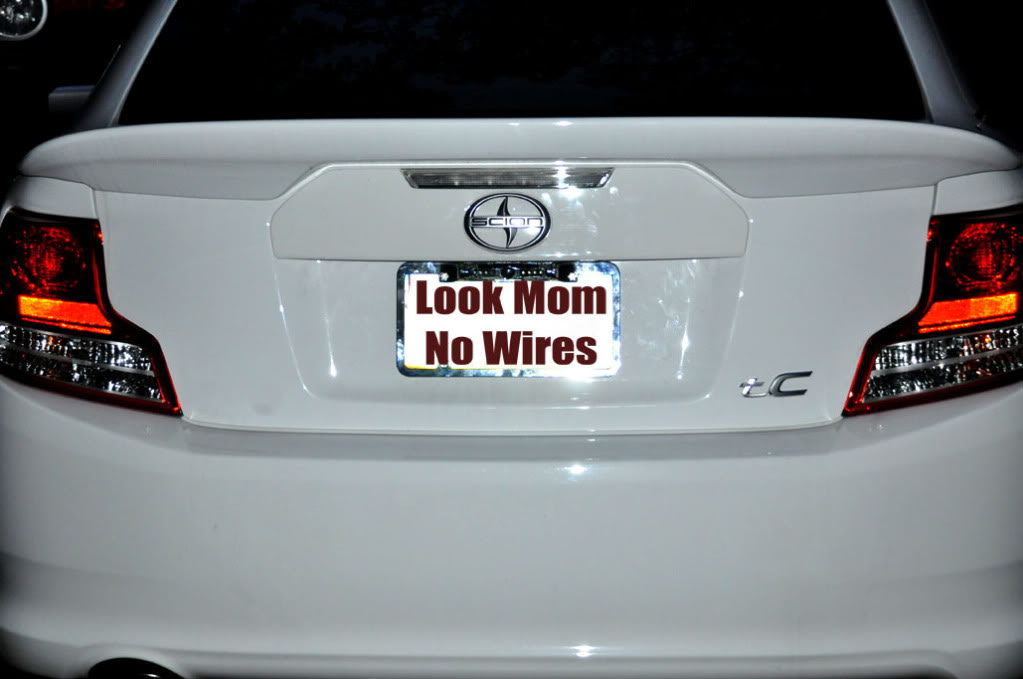
This is the finished product
The cool thing the radio doesn't have to be on. If you have the radio off and put it in reverse the camera image will still pop on the screen.
___
Last edited by MR_LUV; 05-09-2020 at 06:40 AM. Reason: Awarded 5 Yr Badge


 01-02-2012, 06:53 PM
#6
Junior Member

Join Date: Dec 2011
Posts: 2
Hi CREEPUR,
Could you possibly share the mapped pins for the Alpine HU? I want to hook a backup cam up to the Alpine HU but I cannot find the Alpine video cable anywhere.
I had the parts dept at my dealership looking for one and they searched all over the country and couldn't find any available. They said from what they were told Alpine stopped manufacturing the cable.
Anyway, I want to see if I can just solder the wires to the HU so if you could provide the info I would appreciate it.
Thanks...
Last edited by MR_LUV; 06-07-2018 at 04:46 PM.
01-03-2012, 12:52 AM
#7
Member
Thread Starter
Join Date: Sep 2011
Posts: 32
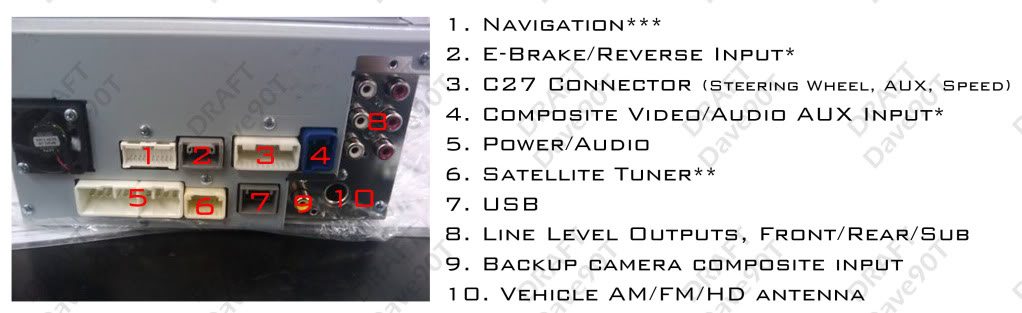
Ok look at the pic below. What you want is plug number 2. The pin all the way to the left needs to tap into reverse trigger (blue wire on the above pic). The pin all the way on the
right is the pin that needs to be grounded (green wire on the above pic) Also remember you need to go into the HU menu and turn on the rear camera.
right is the pin that needs to be grounded (green wire on the above pic) Also remember you need to go into the HU menu and turn on the rear camera.
Last edited by MR_LUV; 10-21-2017 at 05:36 AM.
01-03-2012, 01:00 AM
#8
Member
Thread Starter
Join Date: Sep 2011
Posts: 32
Also try this dealer for the harness, I called them direct and they had it, even after my dealer told me they checked all other dealers
Big Two Toyota 1250 S. Gilbert Rd.
Chandler, AZ 85286 Parts:480-302-4652
Big Two Toyota 1250 S. Gilbert Rd.
Chandler, AZ 85286 Parts:480-302-4652
Last edited by MR_LUV; 10-21-2017 at 05:37 AM.

 01-03-2012, 04:31 PM
#10
Junior Member
Join Date: Dec 2011
Posts: 2
Thanks a lot for your help CREEPUR... I will try the dealer you listed and a as a last resort I guess I will have to just solder my own wires to the pins if they don't have the Alpine cable.
Last edited by MR_LUV; 10-21-2017 at 05:42 AM.
04-13-2012, 07:37 PM
#11
Member

Join Date: Apr 2010
Location: Portland, OR
Posts: 44
I know its been a few months since any activity on this thread, but I am currently stuck in the same predicament of not being able to get a video input kit. Thank you very much for the pin mappingand the excellent DIY. I was wondering if there is some way besides soldering (like an end connector or something) to attach the wires to the HU? Does anyone think it would be possible to get a local car stereo place to fabricate a harness or possibly find the plastic connector part online? I have contacted a ton of dealerships and been searching on ebay for a long time with absolutely no luck. Just trying to avoid soldering if I can because it has been about 10 years since I have done any. Thanks.
Last edited by MR_LUV; 10-21-2017 at 05:38 AM.
04-13-2012, 09:25 PM
#12
Member
Thread Starter
Join Date: Sep 2011
Posts: 32
Before I found the harness I was going to fabricate the harness connector. If I can find the male connector then I can fabricate the harness. Anyone has an idea of the male connector that will plug
into slot 2 and 4 in the above pic?
into slot 2 and 4 in the above pic?
Last edited by MR_LUV; 10-21-2017 at 05:38 AM.
04-13-2012, 10:08 PM
#13
Member
Join Date: Apr 2010
Location: Portland, OR
Posts: 44
So I was looking at some other Scion HUs when I realized that all of the connectors on the back of the Alpine were standardized to Toyota specifications. Why wouldn't the backup camera connection be? I looked up a picture of the back of the SNS and it appears to have the same connection that is listed as connection #2 on Alpine Dave's diagram. The first picture below has the SNS (Top) next to the stock pioneer HU (bottom) and the second picture is the back of the Alpine HU. See the similarity? Notice how the stock pioneer in the first picture does not have the same connector that is on the Alpine and the SNS.
Last edited by MR_LUV; 10-21-2017 at 05:43 AM.
04-15-2012, 02:53 AM
#14
Member
Join Date: Apr 2010
Location: Portland, OR
Posts: 44
Sorry to jack this thread a little bit. CREEPUR would you happen to have the pinout for the blue connector for the other part of the harness? I believe I have finally narrowed down the two connector clips. Pictures below are of the male connectors and their associated ports. I also found a japanese website that has pinouts for both of the connectors on a different stereo, but I am not sure how they line up with the alpine. PM me for the web address (have to use an online translator to understand that text) if you want it. Any input from others with experience or with the harness would be much appreciated. If I can get the pinouts, then I will likely fab a harness for myself.
Last edited by MR_LUV; 10-21-2017 at 05:38 AM.
04-17-2012, 12:34 AM
#15
Member
Thread Starter
Join Date: Sep 2011
Posts: 32
Ok the blue connector is Audio and video channel Input. As you are looking at the pins:
Top left pin - Left Channel Positive
Bottom Left pin - Left Channel Negative
Middle Pin - Right Channel Positive
Middle Bottom - Right Channel Negative
Top Right Pin - Video Channel Positive
Bottom Right Pin - Video Channel Negative
Top left pin - Left Channel Positive
Bottom Left pin - Left Channel Negative
Middle Pin - Right Channel Positive
Middle Bottom - Right Channel Negative
Top Right Pin - Video Channel Positive
Bottom Right Pin - Video Channel Negative
Last edited by MR_LUV; 10-21-2017 at 05:35 AM.
04-17-2012, 02:48 AM
#16
Member
Join Date: Apr 2010
Location: Portland, OR
Posts: 44
Thanks for the Pin Out. I am about 75% certain I have found the right connectors for the back of the HU and I am just trying to narrow down the wire gauge and the size of the crimp terminals that fit into the connectors. Toyota sells a wire with a crimp terminal already installed, but it is 15-17$ for one and the wire is only 6 inches so it is not really useful. Unfortunately, they wouldn't supply me with the gauge and terminal information. My best guess right now is 22 gauge wire and what is called a .040 crimp terminal.
Last edited by MR_LUV; 10-21-2017 at 05:39 AM.
04-18-2012, 09:23 PM
#17
Member
Join Date: Apr 2010
Location: Portland, OR
Posts: 44
Ok so I have hit a bit of a bump. I am sure I have the right connectors and their part numbers, but I am having trouble finding the little crimp connector pins that attach to the wire and slide into the plastic harness connector. Has anyone out there made a custom harness or know anyone who has made one for Scion/Toyota? If I can get the terminal part number or at least something that is close then I can get the right wire gauge and should be able to make one or two complete harnesses. Any help is appreciated!
Last edited by MR_LUV; 10-21-2017 at 05:39 AM.
04-21-2012, 05:58 AM
#18

Thanks for this I used it when i did my SNS200 hook up with a eBay camera and your right snaking that wire thru the headliner was a PITA lol
I didn't use a license plate bracket for the camera instead I drilled a hole in the garnish and mounted it on the bottom.
I didn't use a license plate bracket for the camera instead I drilled a hole in the garnish and mounted it on the bottom.
Last edited by MR_LUV; 06-07-2018 at 04:27 PM.
04-21-2012, 07:25 PM
#19
Member
Join Date: Apr 2010
Location: Portland, OR
Posts: 44
Alright. I was able to get my hands on the reverse/parking break connector and two wires for it so I should be able to do a test in the next few weeks after I receive the wires. I won't have a backup camera yet, but does anyone think hooking up a regular digital camera to the yello composite video in would work so I can see if I get an image?
Last edited by MR_LUV; 10-21-2017 at 05:35 AM.
05-04-2012, 12:08 AM
#20
Member
Join Date: Apr 2010
Location: Portland, OR
Posts: 44
Ok. So I got the pieces I needed finally and was able to get everything hooked up and working. I plugged in a digital camera via the yellow video cable and got picture on the screen along with the "check surroundings for safety" message at the bottom of the screen. The cost of fabricating the harness for just the back up camera was about $30 and that was for the wire with terminal, connector, splices, and extra wire. Unfortunately, I did not fabricate a video harness because the costs of the needed wires makes the thing about $100. So until I can find a cheaper supplier of a few specific parts then it is a little too expensive. I have an extra wire with terminal and the needed pieces to make another back up camera harness if anyone is interested. I would be glad to let it go for my cost. Not looking to profit, just trying to take full advantage of the alpine head unit. Let me know.