DIY: How to paint your stock wheels gloss black
 01-18-2013, 12:52 AM
#1
Senior Member
SL Member
Thread Starter

Join Date: Oct 2011
Location: Huntington Beach, CA
Posts: 743
Decided to paint my wheels. I've gone the plastidip route, but didnt care much for it and want a glossy look like the Release Series tC's have.
I purchased everything from Home Depot, Lowes and Auto Zone:
1 pack of 800 grit automotive wet/dry sandpaper (Autozone)
1 can of rustoleum sandable auto primer in a dark grey color (Lowes)
3 cans of rustoleum black glossy auto paint (Home Depot)
2 cans of rustoleum glossy clear coat auto paint (Home Depot)
medium/coarse steel wool (Home Depot)
Index cards (lying around the house)
Just want to give credit to where I got my info:
http://www.clubwrx.net/forums/tutori...rx-stocks.html
MAKE SURE TO WEAR A MASK, there's too much painting going on to not use one.
Anyways, here is what I did:

Jack the car up and put it on jack stands, it just makes it so much easier, when I plasti-dipped them, I did it one at a time and it took all weekend. This was much easier, TRUST ME!!


Clean the wheels really well, I used some dish soap and hot water in a bucket, just like you would for a car wash, do a 80/20 mix (20% dish soap) to really cut the grease and clean the wheels. I first scuffed them up lightly with the steel wool and then wet sand with 800 grit sand paper. If you have never used wet sand paper, pretty much just stick the sand paper in your soapy water and start sanding. it will get hazy, this is just the clear coat that you have sanded off. No need to go too crazy here, the idea is to make it so the surface is no longer smooth so the primer will fill in the grooves and the paint will hold.

After everything is evenly sanded, you want to hose off the wheels really well, and clean them off with a sponge. Next, set the wheels out in the sun to dry, and don't rush this step, if there's water left over, it will ruin your paint job. It probably took about 10 minutes on a sunny day. After they appear dry, pick up the wheel and bounce it to make sure the water runs out of the gap between the tire and the wheel (I let them dry again and bounced one last time).
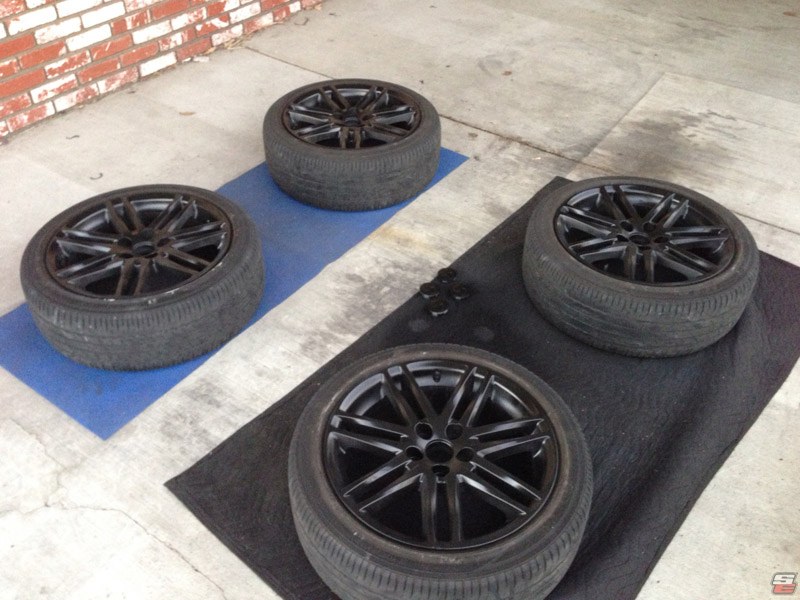
Next step is to lay out the wheels in the shade (painting in the sun causes paint to dry too quickly), preferably on canvas, newspaper, etc. Place the wheels about 2 ft away from each other (like I did in the picture above) so you can walk around them easily. You may want to pop out the center caps and paint those too, they just pop out, push on them from the back. Also, make sure to tape off your valve stems with some painters tape. Frog tape is the best and you can find it at Home depot

Make sure to put index cards with a slight overlap inside between the rim and the wheel. this will prevent overspray and you can just lift them out after painting.
Note that all the painting steps will apply to both the wheels and the center caps evenly. I painted the wheels in the same order (clockwise), then painted the centercaps.
Next, is the primer stage, if done right, you will only need one can. One thing to note, I didn't sand my primer, because this was my first time, but I have been told that when you sand your primer, it will make your paint much more glossy and have less texture. Mine came out slightly frosted looking if you get up really close. Now if you do this, you will have to primer, then sand, then rinse, dry, bounce wheels, then primer again and some people sand more, repeat. You might want to use an even higher sandpaper if you do that, maybe 1000. Note that some Home Depots only went up to 600, so I went to Auto Zone, they have 800 and 1000.
Anyways, apply a light coat of primer be careful to paint evenly, spraying about 12 inches away in an even sweeping motion. Spray to the left, let off the nozzle, spray to the right, let off the nozzle, also I walked around the wheel and tried to get it from all angles. Make sure to do light coats, if you rush it, you will get pools and runs of paint. Its better to do more light coats and look even. Note that it might not cover all the original wheel on the first coat, that's ok, don't try to cover it, you'll get it on the next coat.

Wait 10 minutes for it to dry and then do another light coat.

Wait 10 more minutes, then do a medium coat of primer

Wait 10-15 more minutes, then do your first light coat of color. The color barely showed up for the first coat or two and when it did, it was flat black, don't worry, the gloss will come, we just need to cover that primer!

Wait another 10 minutes, then lay down a second light coat of color.
Here's the black, barely starting to show through on the second coat.

Wait another 10 minutes, then spray a medium coat (funny it really doesn't look much different in the pics, but it does change slightly in person from coat to coat.)

Wait another 10 minutes...then another medium coat...I know, very repetitive. I'd say drink beer, but there's just too many fumes as it is. Definitely wear a mask.

Wait 20-25 minutes, then paint a light coat of clear. Then wait 10 more minutes and paint another light coat of clear. Finally the gloss is showing up nicely!

Wait 20 minutes, then apply a medium coat of clear. If necessary, wait another 20 minutes, then paint one more medium coat of clear. After your last coat, wait 20 minutes, then your done!

Next, pull the index cards out one or two at a time. I let the wheels sit for about an hour or so, then remounted back on the car. The time you leave them sit off the car is up to you.
I would hold off on cleaning the wheels for at least a week. The paint can said so.
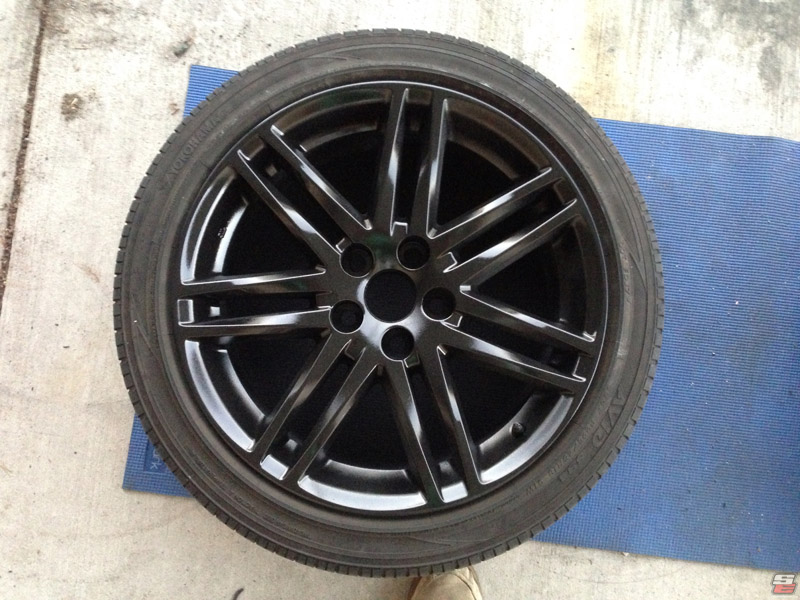


Sorry for being so descriptive, just wanted to get as many questions out of the way. All finished. Enjoy!
I purchased everything from Home Depot, Lowes and Auto Zone:
1 pack of 800 grit automotive wet/dry sandpaper (Autozone)
1 can of rustoleum sandable auto primer in a dark grey color (Lowes)
3 cans of rustoleum black glossy auto paint (Home Depot)
2 cans of rustoleum glossy clear coat auto paint (Home Depot)
medium/coarse steel wool (Home Depot)
Index cards (lying around the house)
Just want to give credit to where I got my info:
http://www.clubwrx.net/forums/tutori...rx-stocks.html
MAKE SURE TO WEAR A MASK, there's too much painting going on to not use one.
Anyways, here is what I did:
Jack the car up and put it on jack stands, it just makes it so much easier, when I plasti-dipped them, I did it one at a time and it took all weekend. This was much easier, TRUST ME!!
Clean the wheels really well, I used some dish soap and hot water in a bucket, just like you would for a car wash, do a 80/20 mix (20% dish soap) to really cut the grease and clean the wheels. I first scuffed them up lightly with the steel wool and then wet sand with 800 grit sand paper. If you have never used wet sand paper, pretty much just stick the sand paper in your soapy water and start sanding. it will get hazy, this is just the clear coat that you have sanded off. No need to go too crazy here, the idea is to make it so the surface is no longer smooth so the primer will fill in the grooves and the paint will hold.
After everything is evenly sanded, you want to hose off the wheels really well, and clean them off with a sponge. Next, set the wheels out in the sun to dry, and don't rush this step, if there's water left over, it will ruin your paint job. It probably took about 10 minutes on a sunny day. After they appear dry, pick up the wheel and bounce it to make sure the water runs out of the gap between the tire and the wheel (I let them dry again and bounced one last time).
Next step is to lay out the wheels in the shade (painting in the sun causes paint to dry too quickly), preferably on canvas, newspaper, etc. Place the wheels about 2 ft away from each other (like I did in the picture above) so you can walk around them easily. You may want to pop out the center caps and paint those too, they just pop out, push on them from the back. Also, make sure to tape off your valve stems with some painters tape. Frog tape is the best and you can find it at Home depot
Make sure to put index cards with a slight overlap inside between the rim and the wheel. this will prevent overspray and you can just lift them out after painting.
Note that all the painting steps will apply to both the wheels and the center caps evenly. I painted the wheels in the same order (clockwise), then painted the centercaps.
Next, is the primer stage, if done right, you will only need one can. One thing to note, I didn't sand my primer, because this was my first time, but I have been told that when you sand your primer, it will make your paint much more glossy and have less texture. Mine came out slightly frosted looking if you get up really close. Now if you do this, you will have to primer, then sand, then rinse, dry, bounce wheels, then primer again and some people sand more, repeat. You might want to use an even higher sandpaper if you do that, maybe 1000. Note that some Home Depots only went up to 600, so I went to Auto Zone, they have 800 and 1000.
Anyways, apply a light coat of primer be careful to paint evenly, spraying about 12 inches away in an even sweeping motion. Spray to the left, let off the nozzle, spray to the right, let off the nozzle, also I walked around the wheel and tried to get it from all angles. Make sure to do light coats, if you rush it, you will get pools and runs of paint. Its better to do more light coats and look even. Note that it might not cover all the original wheel on the first coat, that's ok, don't try to cover it, you'll get it on the next coat.
Wait 10 minutes for it to dry and then do another light coat.
Wait 10 more minutes, then do a medium coat of primer
Wait 10-15 more minutes, then do your first light coat of color. The color barely showed up for the first coat or two and when it did, it was flat black, don't worry, the gloss will come, we just need to cover that primer!
Wait another 10 minutes, then lay down a second light coat of color.
Here's the black, barely starting to show through on the second coat.
Wait another 10 minutes, then spray a medium coat (funny it really doesn't look much different in the pics, but it does change slightly in person from coat to coat.)
Wait another 10 minutes...then another medium coat...I know, very repetitive. I'd say drink beer, but there's just too many fumes as it is. Definitely wear a mask.
Wait 20-25 minutes, then paint a light coat of clear. Then wait 10 more minutes and paint another light coat of clear. Finally the gloss is showing up nicely!
Wait 20 minutes, then apply a medium coat of clear. If necessary, wait another 20 minutes, then paint one more medium coat of clear. After your last coat, wait 20 minutes, then your done!
Next, pull the index cards out one or two at a time. I let the wheels sit for about an hour or so, then remounted back on the car. The time you leave them sit off the car is up to you.
I would hold off on cleaning the wheels for at least a week. The paint can said so.
Sorry for being so descriptive, just wanted to get as many questions out of the way. All finished. Enjoy!
Last edited by KidJustin; 01-30-2013 at 04:59 PM.


 01-18-2013, 06:49 PM
#4

Please give feedback asap! Or post pics in progress.
That WRX thread is awesome. I'm looking to change my wheel color and I cant afford new 18" rims.
Also it only costs like $40-60 to paint them back, or in a different color if it looks ____.
That WRX thread is awesome. I'm looking to change my wheel color and I cant afford new 18" rims.
Also it only costs like $40-60 to paint them back, or in a different color if it looks ____.
01-18-2013, 10:19 PM
#5
Senior Member
SL Member
Thread Starter
Join Date: Oct 2011
Location: Huntington Beach, CA
Posts: 743
Yep, probably have pics up on Sunday night! now if I could only find the damn VHT paint in gloss black locally. I might have to just go high temp engine paint.
01-19-2013, 01:23 AM
#7
Senior Member
SL Member
Thread Starter
Join Date: Oct 2011
Location: Huntington Beach, CA
Posts: 743
Do black, they are almost gunmetal already. I've had flat black from plastidip and you lose where the wheel starts and the tire ends so I figured I'd do gloss because it stands off from the tire a little if you look at an rs wheel.
I just bought all my supplies. Just went with rustoleum auto paint because it said it had durability. Don't need high temp from what I've read because wheels don't get too hot.
I think the total came out to around 70 bucks for 2 cans of primer, 4 cans of gloss black auto paint, 2 cans of clear gloss auto, 800 and 1000 grit wetsand paper( had to go to autozone because the depot only went up to 600) and some steel wool.
01-19-2013, 02:22 AM
#8
I don't think our wheels are that Gunmetal.
I'm looking for a color like this : http://www.wheelmax.com/_images/prod...L-BK7-GM_z.gif
Thanks for the hint of not doing flat black though.
I'm looking for a color like this : http://www.wheelmax.com/_images/prod...L-BK7-GM_z.gif
Thanks for the hint of not doing flat black though.
01-19-2013, 05:57 PM
#9
Senior Member
SL Member

Join Date: Oct 2012
Location: West Viginia
Posts: 366
excited to see how this turns out. If it looks good ill def goes this route instead of the DIP. Only reservations i have is of i end up not liking the black and want to take it back to OEM color. IF i strip the paint off there wont be any clear coat? Correct? or could i just clear them again with spray
01-20-2013, 07:35 PM
#11
Senior Member
SL Member
Thread Starter
Join Date: Oct 2011
Location: Huntington Beach, CA
Posts: 743
I'm finally done prepping. Mine took longer because I had the stupid plastidip in the lug holes. If you ever plastidip, do not paint regular paint over it! It is so hard to take off!
