Raceland Coilover Review for the xA
 07-03-2012, 06:51 PM
#21
Senior Member
SL Member
Thread Starter

Join Date: May 2012
Location: Rochester, NY
Posts: 179
yeah i agree but like i said before, i need to put winter tires on in a few months and i wont have the tie to redo my suspension.
but here is the pic you requested, its hard to see, but it is about an inch.

and yeah id like to see the difference, i will be taking out the extra pieces next summer, this summer is just too busy, once it is done, and i get those spacers, im pretty sure my tires will be tucked which will look good
this pic is from when i first put the coilovers in so they are not settled which is why the gap is big
but here is the pic you requested, its hard to see, but it is about an inch.
and yeah id like to see the difference, i will be taking out the extra pieces next summer, this summer is just too busy, once it is done, and i get those spacers, im pretty sure my tires will be tucked which will look good
this pic is from when i first put the coilovers in so they are not settled which is why the gap is big

 07-03-2012, 10:21 PM
#24
Senior Member
SL Member

Join Date: Aug 2010
Location: SoCal-626
Posts: 549
you know that racelands don't come with top hats. i'm assuming that the springs are not compress when you get them. the assembly is the same as regular springs and struts. after removing the helper spring, i'm not sure if you will still need a spring compressor to get the top hat on.
07-04-2012, 01:33 AM
#25
you know that racelands don't come with top hats. i'm assuming that the springs are not compress when you get them. the assembly is the same as regular springs and struts. after removing the helper spring, i'm not sure if you will still need a spring compressor to get the top hat on.
hmc2261CT: 0 offset is the way to go in the back with 20 in the front like austin's xA, for perfectly flush fit. I wouldn't recommend 45mm spacers though lol If you can get in touch with Austin, he was thinking about a new rim setup a while back.
edit: you also may want to roll fenders if you go the low offset route, Austin had to and I'm sure I will too :/
07-04-2012, 03:28 AM
#26
Senior Member
SL Member
Thread Starter
Join Date: May 2012
Location: Rochester, NY
Posts: 179
Is that it? And how hard is it to remove? I see the whole thing comes pre-assembled so you'd need to take it apart to remove it?
as far as getting the top hat on, when i put the struts on the lowest setting they could go, there was no need for spring compressors, in front or rear i did not even touch mine.
the front goes togeather so easy and when you remove the helper spring i can garentee that the main spring wont even be touching the top of the perch, you will need to compress the strut for the spring to touch the top hat.
and xaxaxa: im an happy with the wheels that i bought so i dont think i will be changing them, but unfortunatly i did not know how the large offset would look on my car, In my opinion, it does not look bad. when I was talking before about getting spacers, i would be looking at a 20 mm spacer in the rear and a 10 mm in the front. we are lucky that in the front, the fender lip is so small there really is no need to roll them, however the rear is a pain. I was looking at getting my fenders rolled in the rear, but unfortunately before I bought my car it had been in an accident. There is bondo on the rear quarter pannel (the rear fender) on the passenger side so rolling them would cause the bondo to pop out and then I would have even more headaches and would have to spend more money.
07-04-2012, 06:36 AM
#27
Yes that is the correct part, and it is very easy to remove, curtsk is right they do not come with top hats and nothing is under any load, so all you need to do is remove the top nut and pull everything off, its so easy a caveman could do it.
as far as getting the top hat on, when i put the struts on the lowest setting they could go, there was no need for spring compressors, in front or rear i did not even touch mine.
the front goes togeather so easy and when you remove the helper spring i can garentee that the main spring wont even be touching the top of the perch, you will need to compress the strut for the spring to touch the top hat.
and xaxaxa: im an happy with the wheels that i bought so i dont think i will be changing them, but unfortunatly i did not know how the large offset would look on my car, In my opinion, it does not look bad. when I was talking before about getting spacers, i would be looking at a 20 mm spacer in the rear and a 10 mm in the front. we are lucky that in the front, the fender lip is so small there really is no need to roll them, however the rear is a pain. I was looking at getting my fenders rolled in the rear, but unfortunately before I bought my car it had been in an accident. There is bondo on the rear quarter pannel (the rear fender) on the passenger side so rolling them would cause the bondo to pop out and then I would have even more headaches and would have to spend more money.
Full LED conversion coming soon as well
07-05-2012, 06:57 PM
#29
I live in the South haha, but I'm gonna leave it stock because I want to see how the rims fit since I don't have them in yet. And I need to judge whether I can get into my driveway haha
07-05-2012, 08:27 PM
#30
Senior Member
SL Member
Thread Starter
Join Date: May 2012
Location: Rochester, NY
Posts: 179
and yes I was worried about that to, everytime i go over a speed bump, i hold my breath and pray, so far iv been lucky!
07-06-2012, 01:31 AM
#31
Hahaha you're not QUITE that low... hopefully I'll be good too...
07-09-2012, 10:45 PM
#33
Anyways I got my Racelands today and will post the pics after I mod the front coils. Everything looks to be in good shape other than one of the front coils with the bolt off and in the packaging... makes it easier to remove the helper springs I suppose...
07-09-2012, 11:23 PM
#34

Helper springs out. I could literally compress them fully with my own hand... completely useless lol.
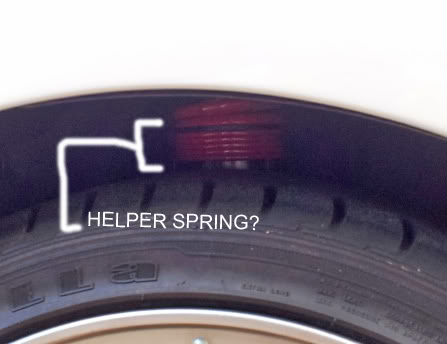
What exactly are the hook looking things used for?
Last edited by xAxAxAxA; 07-09-2012 at 11:43 PM.
07-10-2012, 01:35 AM
#35
Senior Member
SL Member
Thread Starter
Join Date: May 2012
Location: Rochester, NY
Posts: 179
Nice!, Hope the Install goes smoothly.
And the three metal hooks are the tools for adjusting the ride height once the suspension is on the car. they are very important so dont lose them! haha
And I did some research on the helper springs, they are actually important. It turns out that they are what keeps the top of the spring seated in the metal car that is right under the top hat. So if you went over a bump and it was large enough to cause the suspension to extend enough, without the helper spring you are running a higher risk of having the spring lose its seating...which would be very bad. so thats another reason why I want to keep mine in (at least for now)
and just a note: The rear springs, the closer wound section goes closer to the ground, I found out I put mine in upside down, it does not matter but im just giving you the heads up since I made the mistake.
07-10-2012, 05:43 PM
#37
I see what you're saying with how the helper springs are important, but I'll have to see how much air I'll have to get to unseat the springs... That'll come once I put them on. The other worry is the fact that there's only an inch of spring (uncompressed, and maybe 2 inches) til the bump stop starts... Hopefully I don't run into problems with that or I'll have to shave some of it off... Hopefully the spring will compress enough so that I can get a couple inches or air without having to worry about the spring getting out of place. Bridges around here have awful bumps...
As for the rear springs, or any spring for that matter, the lettering should always be right side up (so you can read it). That's what I've been told.
Lastly, can you explain what parts you had to reuse in the install? I want to be clear when I'm installing... Thanks and I'll be installing these Thursday afternoon with 4 other friends so it should be a piece of cake. (fingers-crossed)
07-11-2012, 03:39 AM
#38
Senior Member
SL Member
Thread Starter
Join Date: May 2012
Location: Rochester, NY
Posts: 179
yeah sure, for the fronts, you need to use the stock tophats and hardware to mount the strut. In the rear, you just need the hardware, the rubber gaskets to help seat the spring, and the dust covers to cover the shock.
thats it!
And yes, hopefully everything goes well, it took me 4.5 hours but I was by myself and was taking my sweet time, you can probably have it done in three if you have enough jacks and jack stands
you should try to PB blast as much of the hardware as you can today and tomorrow so that hopefully when Thursday rolls around everything will be easy to take off
07-11-2012, 04:08 AM
#40
yeah sure, for the fronts, you need to use the stock tophats and hardware to mount the strut. In the rear, you just need the hardware, the rubber gaskets to help seat the spring, and the dust covers to cover the shock.
thats it!
And yes, hopefully everything goes well, it took me 4.5 hours but I was by myself and was taking my sweet time, you can probably have it done in three if you have enough jacks and jack stands
you should try to PB blast as much of the hardware as you can today and tomorrow so that hopefully when Thursday rolls around everything will be easy to take off
thats it!
And yes, hopefully everything goes well, it took me 4.5 hours but I was by myself and was taking my sweet time, you can probably have it done in three if you have enough jacks and jack stands
you should try to PB blast as much of the hardware as you can today and tomorrow so that hopefully when Thursday rolls around everything will be easy to take off