Brighter reverse light solution... FINALLY!!! (56K beware)
 05-17-2009, 06:37 PM
#41
Senior Member
SL Member

Join Date: Apr 2008
Posts: 149
Just completed this and it was easy i will post up later when i test it out in the dark! It only took maybe 20 min and a hack saw blade. I got the parts off of ebay for like 15.27 shipped. A dremel would have made it even easier. I just cut off the original bulb and harness.
Here is the stuff off of ebay,
Harness
http://cgi.ebay.com/ebaymotors/H11-H...lenotsupported
Bulb
http://cgi.ebay.com/ebaymotors/ws/eB...lenotsupported
Here is the stuff off of ebay,
Harness
http://cgi.ebay.com/ebaymotors/H11-H...lenotsupported
Bulb
http://cgi.ebay.com/ebaymotors/ws/eB...lenotsupported
 05-20-2009, 08:31 PM
#42
Senior Member
SL Member
Join Date: Oct 2007
Location: San Diego, CA
Posts: 615
I finally did this mod yesterday. I only had to widen one of the slots to get the bulb to fit. I took the assembly in the house and used a small flathead screwdriver that I heated on the stove to make the slot wider. Worked like a charm. I have yet to test this light in the dark but it definitely looks brighter already. It generates quite a bit of heat, but I honestly don't know how hot the stock bulb got. I don't think it should not be a problem.
I'm thinking of getting a 7000k-ish H8 instead so it gives off more of a white/blue light.
Thanks again for the great idea ScionFred!
I'm thinking of getting a 7000k-ish H8 instead so it gives off more of a white/blue light.
Thanks again for the great idea ScionFred!
05-20-2009, 08:49 PM
#43
Senior Member
SL Member
Join Date: Oct 2007
Location: San Diego, CA
Posts: 615
I finally did this mod yesterday. I only had to widen one of the slots to get the bulb to fit. I took the assembly in the house and used a small flathead screwdriver that I heated on the stove to make the slot wider. Worked like a charm. I have yet to test this light in the dark but it definitely looks brighter already. It generates quite a bit of heat, but I honestly don't know how hot the stock bulb got. I don't think it should not be a problem.
I'm thinking of getting a 7000k-ish H8 instead so it gives off more of a white/blue light.
Thanks again for the great idea ScionFred!
I'm thinking of getting a 7000k-ish H8 instead so it gives off more of a white/blue light.
Thanks again for the great idea ScionFred!
05-20-2009, 09:34 PM
#46
Senior Member
SL Member
Join Date: Oct 2007
Location: San Diego, CA
Posts: 615
Originally Posted by jthistle
You could also use an H8 LED bulb.
edited for typo
05-20-2009, 09:47 PM
#47
Senior Member
SL Member

Join Date: Feb 2007
Location: Chicago, IL
Posts: 176
 05-20-2009, 09:58 PM
#48
Senior Member
SL Member
Join Date: Oct 2007
Location: San Diego, CA
Posts: 615
Originally Posted by jthistle
05-20-2009, 10:00 PM
#49
Senior Member
SL Member
Thread Starter
iTrader: (1)

Join Date: Jun 2007
Location: Baltimore, MD, USA
Posts: 3,387
Originally Posted by jthistle
This is the one I was going to try.
 06-20-2009, 10:28 PM
#51

Originally Posted by rockthebeef
I'm thinking of getting a 7000k-ish H8 instead so it gives off more of a white/blue light.
06-26-2009, 12:01 AM
#52
Originally Posted by renegade4x4
Just completed this and it was easy i will post up later when i test it out in the dark! It only took maybe 20 min and a hack saw blade. I got the parts off of ebay for like 15.27 shipped. A dremel would have made it even easier. I just cut off the original bulb and harness.
Here is the stuff off of ebay,
Harness
http://cgi.ebay.com/ebaymotors/H11-H...lenotsupported
Bulb
http://cgi.ebay.com/ebaymotors/ws/eB...lenotsupported
Here is the stuff off of ebay,
Harness
http://cgi.ebay.com/ebaymotors/H11-H...lenotsupported
Bulb
http://cgi.ebay.com/ebaymotors/ws/eB...lenotsupported
Thanks -- Trevor
06-26-2009, 03:25 AM
#53
Senior Member
SL Member
Thread Starter
iTrader: (1)
Join Date: Jun 2007
Location: Baltimore, MD, USA
Posts: 3,387
Originally Posted by TrevorS
Aargh! I just tried to install the Ebay H8 bulb to the housing and I'm looking at three mounting prongs on the bulb, not four  . Kind of typical of my luck these days, but I'd appreciate learning how you worked around this in your install.
Thanks -- Trevor
Thanks -- Trevor
06-26-2009, 07:44 PM
#54
Originally Posted by ScionFred
All H8 bulbs have 3 prongs but fit if you just enlarge one of the 4 slots in the housing a little bit. Rockthebeef's idea to use a heated screwdriver is a good one. All you have to do is enlarge the opening just enough so the H8 will slide into the the housing and it will lock tightly with a little twist.
It's done now and secure. Unfortunately, I managed to fixate on the standard clockwise rotation to secure the bulb, and the only way I came up with achieving that involved adjusting three slots. I swear, if a task can be made as difficult as possible, I'll probably come up with an approach that's at least reminiscent
Thanks again
 !
06-30-2009, 02:20 AM
!
06-30-2009, 02:20 AM
#55
Senior Member
SL Member
Thread Starter
iTrader: (1)
Join Date: Jun 2007
Location: Baltimore, MD, USA
Posts: 3,387
Originally Posted by TrevorS
Thanks Fred, for some reason I was under the impression your bulb had four tabs.
It's done now and secure. Unfortunately, I managed to fixate on the standard clockwise rotation to secure the bulb, and the only way I came up with achieving that involved adjusting three slots. I swear, if a task can be made as difficult as possible, I'll probably come up with an approach that's at least reminiscent. I used the cut and solder approach for the wiring and the bulb definitely looks bright, even in broad daylight on a sunny day.
Thanks again!
It's done now and secure. Unfortunately, I managed to fixate on the standard clockwise rotation to secure the bulb, and the only way I came up with achieving that involved adjusting three slots. I swear, if a task can be made as difficult as possible, I'll probably come up with an approach that's at least reminiscent
Thanks again
!
06-30-2009, 03:38 AM
#56
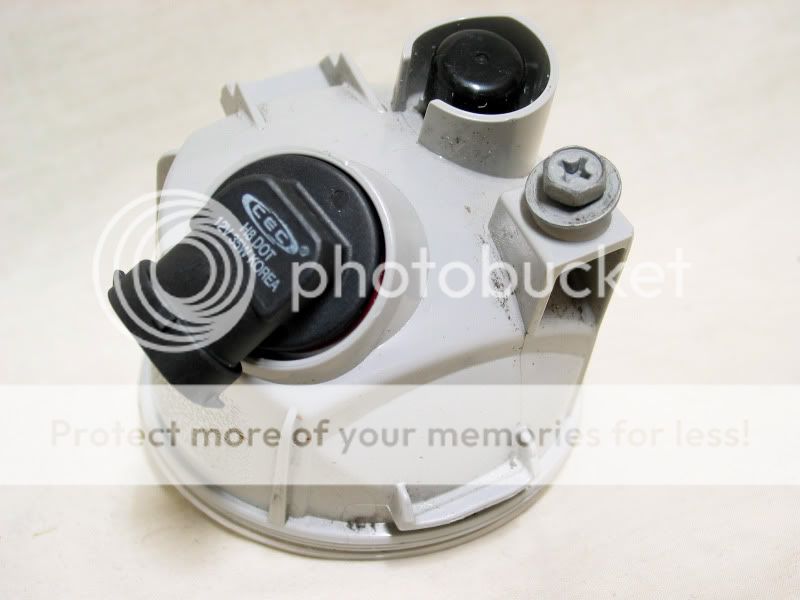
Oh my gosh, you also adjusted three slots? That does make me feel better ! Yes, my old four pronger also still locks in fine, but given I completely removed the OE plug-in, it probably makes little difference -- at least you still have both !. In case there's any interest at all in my solution, here's a photo showing the material I removed in order to satisfy my "fixation" . However, since it appears to remove more housing material than yours, I'm certainly not suggesting it's the optimal solution.
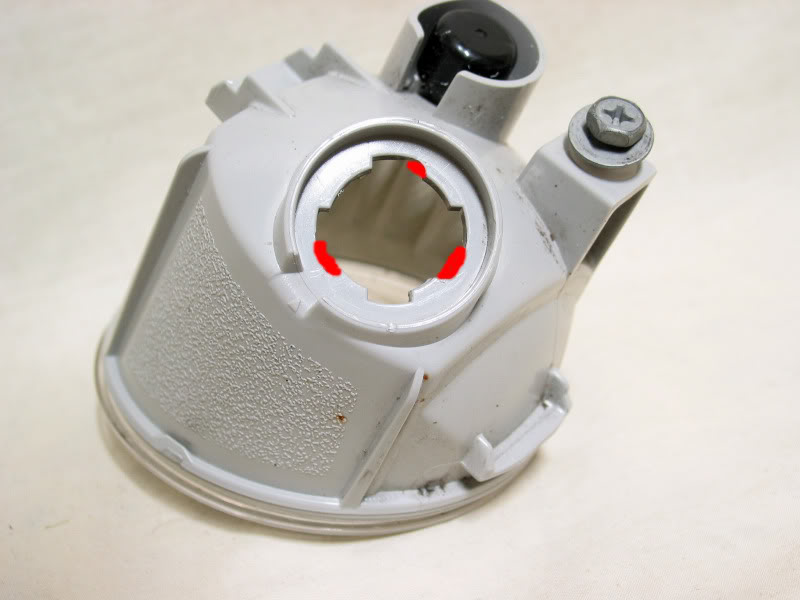
Like you said earlier, running a separate line from the battery to seriously illuminate the area would probably be most effective, but I'm very happy to double the light output with your solution.
! Yes, my old four pronger also still locks in fine, but given I completely removed the OE plug-in, it probably makes little difference -- at least you still have both !. In case there's any interest at all in my solution, here's a photo showing the material I removed in order to satisfy my "fixation" . However, since it appears to remove more housing material than yours, I'm certainly not suggesting it's the optimal solution.Like you said earlier, running a separate line from the battery to seriously illuminate the area would probably be most effective, but I'm very happy to double the light output with your solution.
06-30-2009, 05:19 AM
#57
Senior Member
SL Member
Thread Starter
iTrader: (1)
Join Date: Jun 2007
Location: Baltimore, MD, USA
Posts: 3,387
IMO whatever works for the individual modder, given the tools available to him/her, is the optimal solution. Luckily it's pretty easy to fit an H8 bulb into our oem housing. I was very lucky with "eyeballing" a ~35W halogen bulb that would fit. Although I still have a 37W 894 bulb that "looked' close enough at the parts store but turned out to be too small unless glued in with rtv.
07-11-2009, 06:45 PM
#58

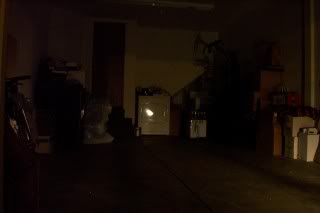
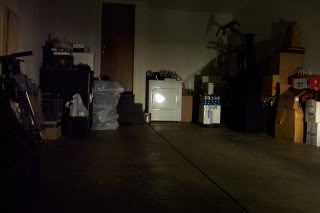
Nice mod ScionFred, I finally did it yesterday, and it produces significantly more light.
I think my camera exaggerates the difference a little, but it is a very noticeable improvement.
Thanks for figuring this out, and posting the DIY.
Oh, and thanks for the harness too. :D
Stock reverse light bulb
New H8 35 watt halogen bulb
I think my camera exaggerates the difference a little, but it is a very noticeable improvement.
Thanks for figuring this out, and posting the DIY.
Oh, and thanks for the harness too. :D
Stock reverse light bulb
New H8 35 watt halogen bulb
