Installation of C-Pillar Net Storage
 06-05-2007, 10:07 PM
#1
Member
SL Member
Thread Starter

Join Date: Feb 2007
Location: KY
Posts: 59
As the local dealer didn't have this item in stock, I ordered it off the net. Package came in and was looking at parts and description of how to put it in, but have some questions, if anyone has actually installed this unit.
1) You drill 4 mm holes to depth of 5 mm in the area marked with the template, easy nuff. Then you use a 15 mm hole saw and drill holes to depth of 15 mm. What is the purpose of these holes?
2) The screws that come with it are definitely NOT sheet metal screws, so when you drill out the holes in step #1, are you cutting holes for the screws to be mounted in or just gaining access to some places that are already there to screw them into?
All in all, the units seem like they will be nice and since wife wanted them in HER car, was just trying to figure out how to install these before I go drilling holes all over her car.
Also, I found drill stops (to keep from drilling too deeply) at hardware store, but am wondering where I can get a 15 mm hole saw. Any ideas?
Any and all help appreciated![/img]
 06-05-2007, 11:04 PM
#2
Member
SL Member

Join Date: Apr 2007
Posts: 91
Can you list all the parts that come with the package? On the cargo net, I had to drill 40mm holes and then the side supports were secured to the metal frame. They give you screws, and they also have little plastic housings that it secures to. The housings are inserted into the metal frame, and then the screws go into that. Is that the same as these? Can you scan the directions?


 06-06-2007, 03:00 AM
#5
Member
SL Member
Thread Starter
Join Date: Feb 2007
Location: KY
Posts: 59
Originally Posted by ToeCutter05
You have to DRILL holes for the cargo nets?!
That is unbelieveable!
As easy as Scion has made stereo swaps, etc, I can't believe they overlooked a simple cargo net install...
That is unbelieveable!
As easy as Scion has made stereo swaps, etc, I can't believe they overlooked a simple cargo net install...
Hopefully, we can have a DIY manual for all parts after a few people get these types of things installed.
And yes, I thought these things would be installed using velcro or some such method!
06-06-2007, 05:23 AM
#6
Member
SL Member
Join Date: Apr 2007
Posts: 91
OK, looking at the directions, it looks like the hole you create (15mm) is to allow the net frame to go into the C-Pillar. From the looks of it, the screws do secure into something else behind it, but I don't think it secures to the holes you drill. It's quite possible there are plastic grommets behind the C-Pillar plastic to accept the screws. When I did the cargo cover, I actually placed the grommets in, but I also had the Qtr panel pulled out.
The 4mm hole is just a pilot hole. It's so when you use the 15mm hole saw, you don't mis-align the holes you're creating.
Not sure where you can find a 15mm hole saw... My 40mm one because a 44mm since the closest I could fine was a 1 3/4" although I know they have a 1 5/8" (~42mm). You might have an easier time using a 5/8" drill bit. That's about as close as you'll get. I did see some 3/4" hole saws on Home Depot, but that's like 19mm, so might be a bit too big considering the limited clearance you have
06-07-2007, 02:52 AM
#7
Member
SL Member
Thread Starter
Join Date: Feb 2007
Location: KY
Posts: 59
Originally Posted by Liquid-R1
OK, looking at the directions, it looks like the hole you create (15mm) is to allow the net frame to go into the C-Pillar. From the looks of it, the screws do secure into something else behind it, but I don't think it secures to the holes you drill. It's quite possible there are plastic grommets behind the C-Pillar plastic to accept the screws. When I did the cargo cover, I actually placed the grommets in, but I also had the Qtr panel pulled out.
The 4mm hole is just a pilot hole. It's so when you use the 15mm hole saw, you don't mis-align the holes you're creating.
Not sure where you can find a 15mm hole saw... My 40mm one because a 44mm since the closest I could fine was a 1 3/4" although I know they have a 1 5/8" (~42mm). You might have an easier time using a 5/8" drill bit. That's about as close as you'll get. I did see some 3/4" hole saws on Home Depot, but that's like 19mm, so might be a bit too big considering the limited clearance you have
The 4mm hole is just a pilot hole. It's so when you use the 15mm hole saw, you don't mis-align the holes you're creating.
Not sure where you can find a 15mm hole saw... My 40mm one because a 44mm since the closest I could fine was a 1 3/4" although I know they have a 1 5/8" (~42mm). You might have an easier time using a 5/8" drill bit. That's about as close as you'll get. I did see some 3/4" hole saws on Home Depot, but that's like 19mm, so might be a bit too big considering the limited clearance you have
Have looked all over the net and called everywhere I could find locally to try to find a 15 mm hole saw. Was able to finally hey ahold of the guys at the local dealership and found out they just use a 9/16" and call it close nuff. There are some 9/16" hole saws on the net, but you have to get special arbors, etc. so am looking at using a forstner bit to drill a 9/16" hole with. Naturally, that is NOT a size that I own, so now looking for one of them on the morrow. Oh, well, at least its nice to see after looking at her car that unless you are a madman, the likelihood of drilling out thru the body of the car is very low with all that plastic held in place.
Not sure when I will get to do this, but still open to suggestions, and yes, will make pics and post them when I get into this mod. At this point, its a matter of principle to get this one done without the dealer!
 06-07-2007, 05:25 PM
#8
Member
SL Member
Join Date: Apr 2007
Posts: 91
So, doing some quick math, this is what I find...
15mm = ~0.59"
9/16" = ~0.56"
5/8" = ~0.62"
So, 9/16 might be a wee bit small... It really depends on the size of those points that protrude from the cargo net frame... I think 5/8" maybe a better bet as long as it doesn't go over the ridge of the quarter panel.
Not sure if you can remove the upper panels. I have removed the lower ones, in which case you should be able to get to the upper ones. In order to move (don't remove them as the guide for the cargo cover specify said don't remove since it's a pain to get back,) do the following:
1) Remove the trunk bottom and the tray (i.e. the cover and the foam piece above the spare wheel.)
2) Remove the bottom/side cubby holes. (They also house the jack onthe left and a big empty spot on the right.) You'll need to remove 2 x 10mm nuts on each side...
3) Next, remove the plastic piece on the outer edge/bottom of the trunk (it goes through the receiving hook for the trunk.) You'll pull it straight up...
4) On the side quarter panels, you'll see D-Rings... Remove those using the 10mm wrench. Once those are removed, you can pull the panel towards the middle... The guide advises you don't go more than 3 clips out on the rear panel... Also, it says don't play w/ the weather molding...
5) At this point, I would think you can get to the upper panel... You might want to be careful. If I remember correctly, the rear side air curtains are behind the front part of the quarter panel...
I would scan the guide for you, but I tossed it after I installed the cargo cover.... haha
06-08-2007, 02:14 AM
#9
Member
SL Member
Thread Starter
Join Date: Feb 2007
Location: KY
Posts: 59
Found out that there are 2 majors that make the 9/16 hole saw: Bosch & DeWalt.
After calls to 800 numbers for both, with no luck, a guy at the local DeWalt service center suggested I call a place I would have never thought of in a million years. Called and they had it, but the hole saw needs a Bosch special arbor. Picked up both and am was still hunting for a 9/16" drill stop, but no-one could even tell me how to order one. Looks like I am just going to have to use electrical tape and just let the auger go at a SLOW speed on my portable drill.
Will have to be really careful, as my wife will kill me if I screw up her new ride.
Was looking at the pillars again tonight and when I saw the air bags were in them, decided that removing them was not worth the risk, so think I will pass on that one.
It sure seems like Toyota could have made these a bit easier to install, but they expect you to take your car in to the dealer, even if they don't have the part, I would assume. Oh, well, am hoping the fog lights go easier!
After calls to 800 numbers for both, with no luck, a guy at the local DeWalt service center suggested I call a place I would have never thought of in a million years. Called and they had it, but the hole saw needs a Bosch special arbor. Picked up both and am was still hunting for a 9/16" drill stop, but no-one could even tell me how to order one.
Will have to be really careful, as my wife will kill me if I screw up her new ride.
Was looking at the pillars again tonight and when I saw the air bags were in them, decided that removing them was not worth the risk, so think I will pass on that one.
It sure seems like Toyota could have made these a bit easier to install, but they expect you to take your car in to the dealer, even if they don't have the part, I would assume. Oh, well, am hoping the fog lights go easier!
06-08-2007, 05:19 AM
#10
Member
SL Member
Join Date: Apr 2007
Posts: 91
Yah, just go slow with the hole saw. I didn't use any stops and I had no problem... Of course, I had the rear panels pulled out. But you'll be able to feel when it's about to pop through. Just take your time and you should be fine ;)
06-12-2007, 12:42 PM
#11
Member
SL Member
Thread Starter
Join Date: Feb 2007
Location: KY
Posts: 59
OK, finally got the C-Pillar Storage Units installed and now have the pics available, as well as some tips to those who want to make this a DIY project.
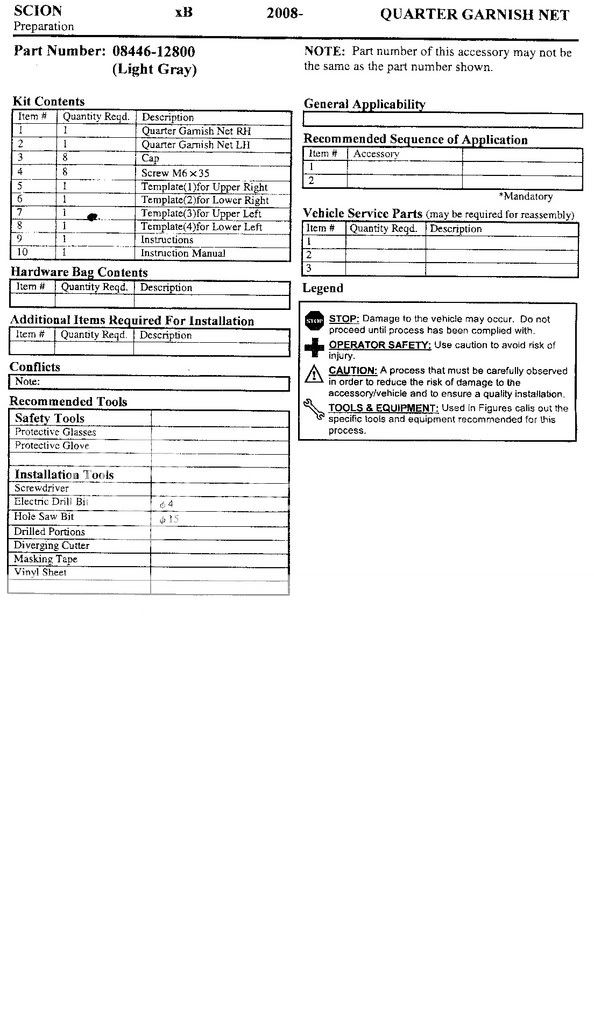
Front cover of the install directions from Toyota:
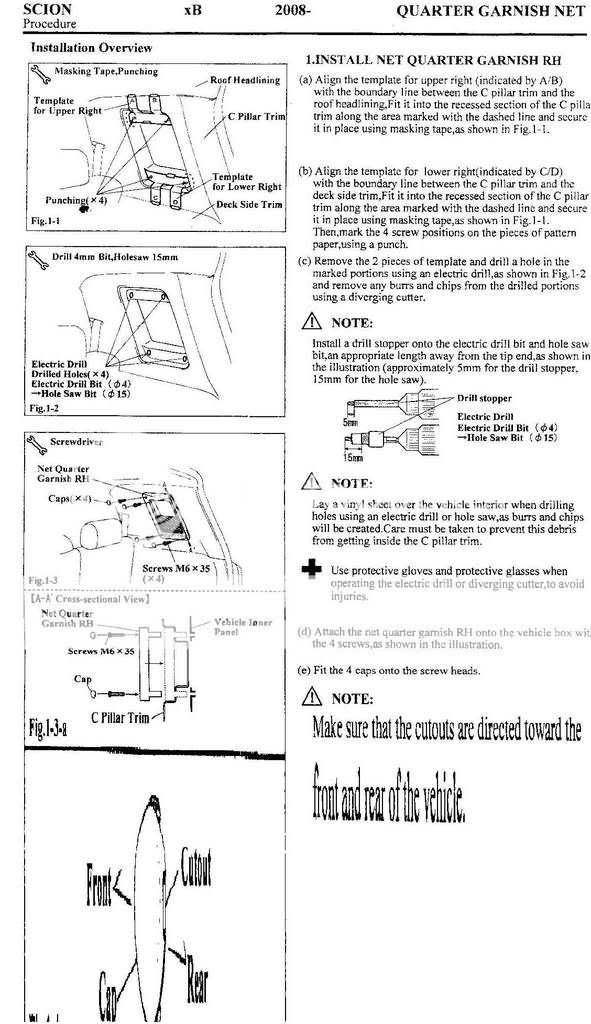
Steps to install the kit (right hand side):
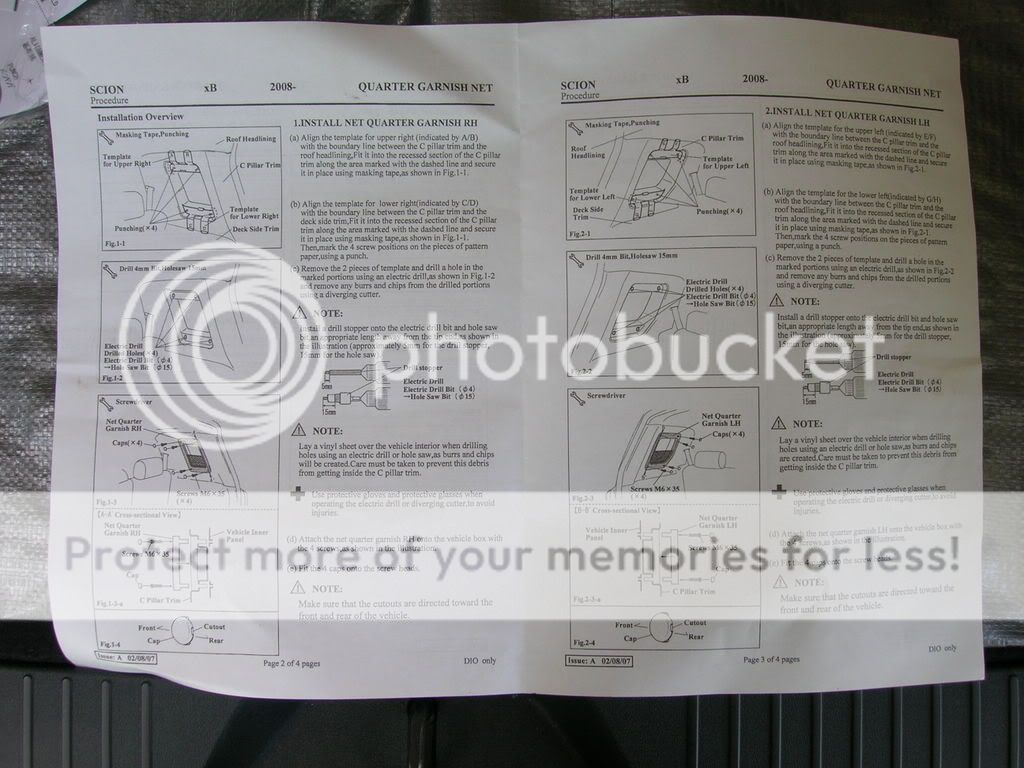
Both interior Pages of the install directions:
Back page (page 4) of directions says basically "clean up your mess!"
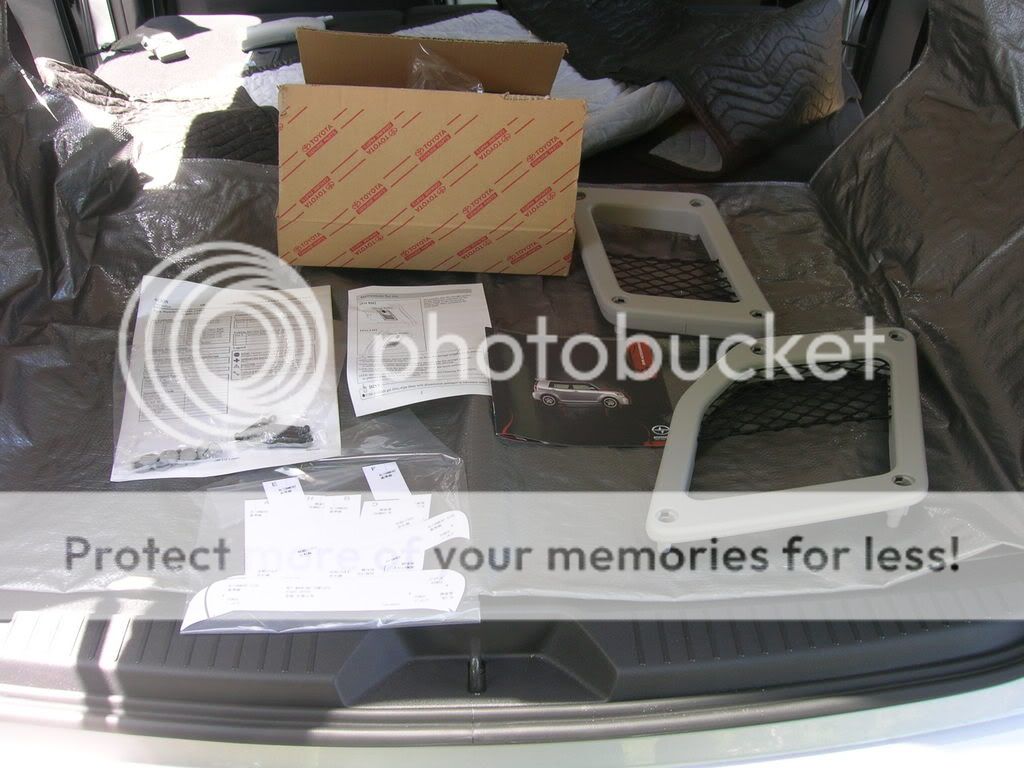
The parts in the box from Toyota are: screws to hold units in place, screw covers to finish off install, units with netting installed, templates, and instructions.
Remove the templates and have on hand a small punch to mark locations of holes, a 5/32 (or 4 mm.) drill bit to make pilot holes, and a 9/16 (or 15 mm.) hole saw. I bought a Bosch hole saw for the install as they were available locally and both bit and arbor were under $20.
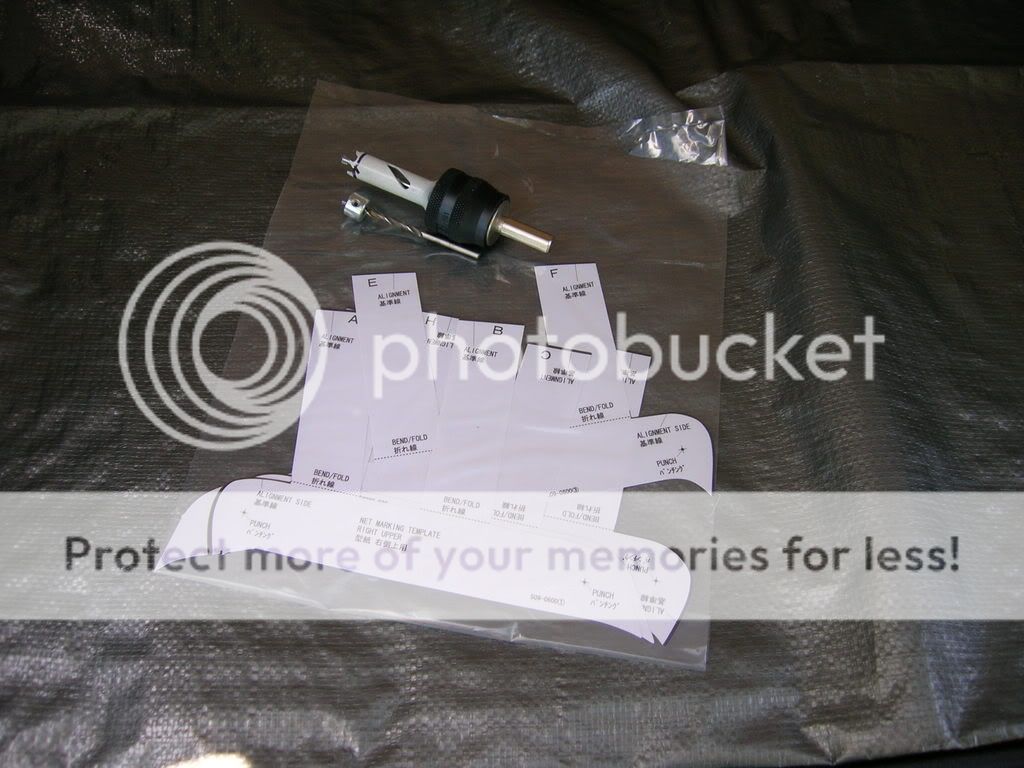
Mount the templates, being careful to place them exactly as shown in directions. I used "clear medical tape" to hold them in place so I could see that they are in correct positions:

(Continued Below)
Front cover of the install directions from Toyota:
Steps to install the kit (right hand side):
Both interior Pages of the install directions:
Back page (page 4) of directions says basically "clean up your mess!"
The parts in the box from Toyota are: screws to hold units in place, screw covers to finish off install, units with netting installed, templates, and instructions.
Remove the templates and have on hand a small punch to mark locations of holes, a 5/32 (or 4 mm.) drill bit to make pilot holes, and a 9/16 (or 15 mm.) hole saw. I bought a Bosch hole saw for the install as they were available locally and both bit and arbor were under $20.
Mount the templates, being careful to place them exactly as shown in directions. I used "clear medical tape" to hold them in place so I could see that they are in correct positions:
(Continued Below)
06-12-2007, 01:11 PM
#12
Member
SL Member
Thread Starter
Join Date: Feb 2007
Location: KY
Posts: 59
Use your punch to create an indentation to mark the spots to drill. Drill your pilot holes
with the 5/32" bit. Use the 9/16" hole saw to drill holes for mounting the unit using the
pilot holes to center the mounting holes. Use care not to drill any of these holes too
deeply as the screws are machine screws and they will screw into "bolts" that are in the
frame of the car and you could render them useless if you drill those bolts out. You may wish to use a small file to neaten up the plastic where you drilled the hole. Also, the Toyota directions are SERIOUS when they advise to lay down some plastic before you start this install as there will be some serious minute pieces of plastic when you are done drilling.

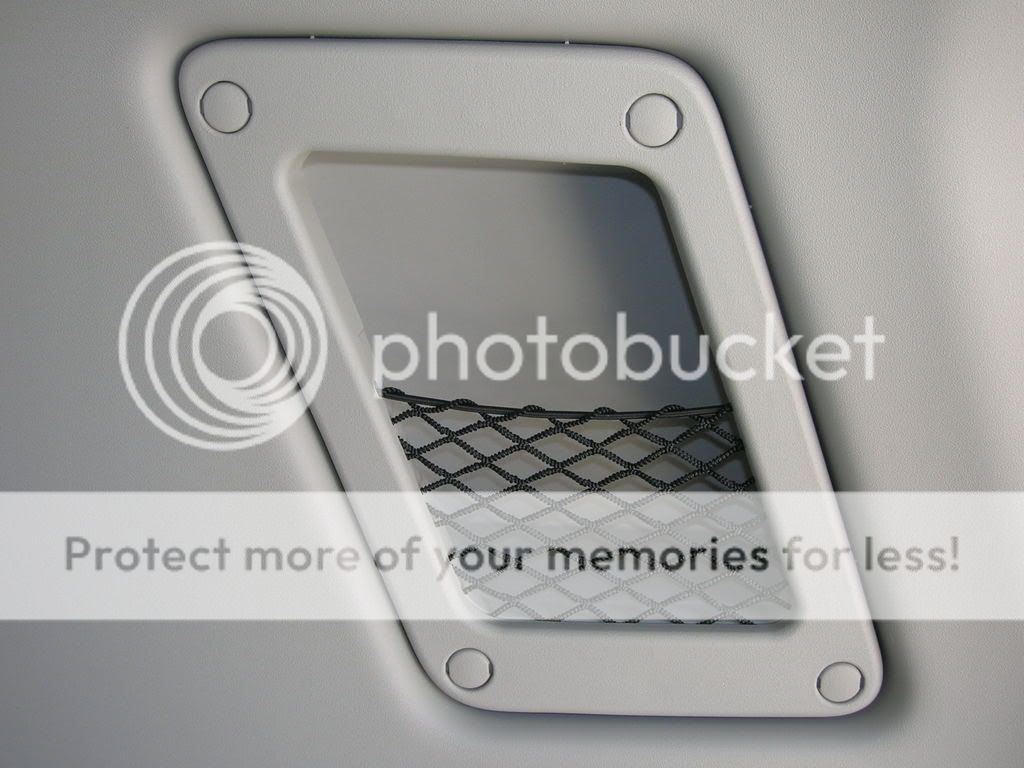
Alternate view:

Place netted unit in place, screw screws into receptacles (you will have to use a screwdriver as these must be "felt" into place), and use covers to finish up install:
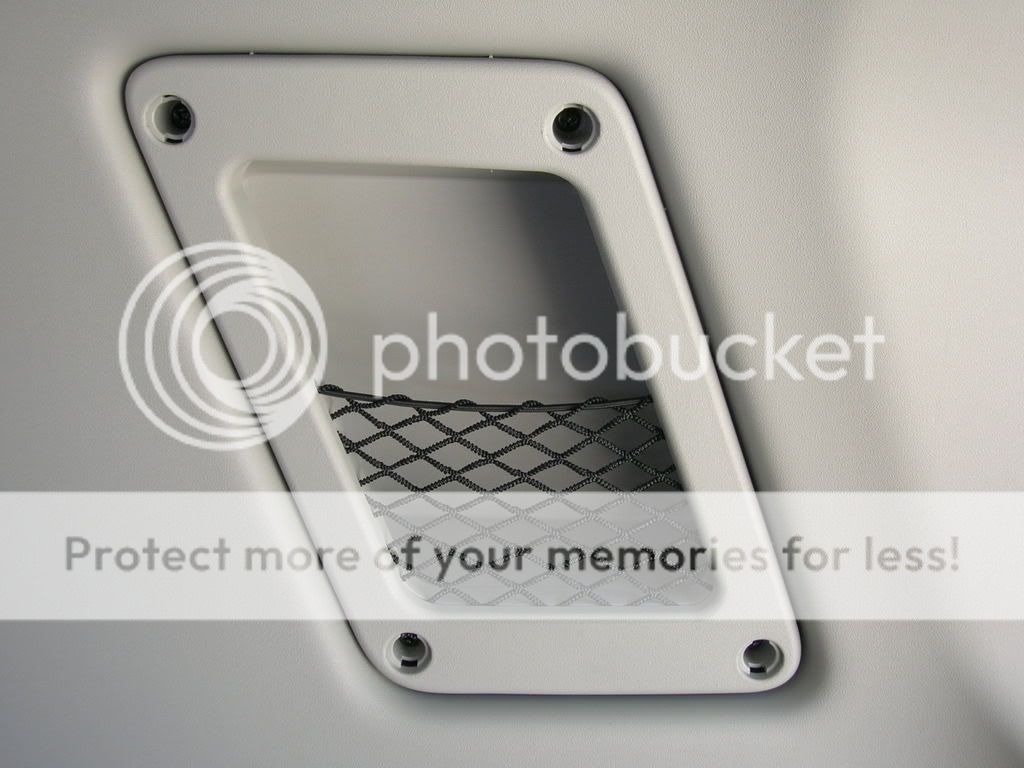


Included in the parts box there is a one page leaflet to be placed in the owner's manual. It basically warns against carrying cement blocks in there due to the netting. Otherwise, from the way this unit installs, you most likely could carry bricks and cement blocks in the storage units.
All in all, I spent about $110 for parts and needed tools to do this project on my wife's car. It looks as good as anything the factory would do, so if you are a bit handy
with tools and want to tackle this project, it should be fairly easy to do.
If you have any questions about doing this install, please leave a message and will attempt to help you out.
Thanks go out to Liquid-R1 for his advice on this successful project!
with the 5/32" bit. Use the 9/16" hole saw to drill holes for mounting the unit using the
pilot holes to center the mounting holes. Use care not to drill any of these holes too
deeply as the screws are machine screws and they will screw into "bolts" that are in the
frame of the car and you could render them useless if you drill those bolts out. You may wish to use a small file to neaten up the plastic where you drilled the hole. Also, the Toyota directions are SERIOUS when they advise to lay down some plastic before you start this install as there will be some serious minute pieces of plastic when you are done drilling.
Alternate view:
Place netted unit in place, screw screws into receptacles (you will have to use a screwdriver as these must be "felt" into place), and use covers to finish up install:
Included in the parts box there is a one page leaflet to be placed in the owner's manual. It basically warns against carrying cement blocks in there due to the netting. Otherwise, from the way this unit installs, you most likely could carry bricks and cement blocks in the storage units.
All in all, I spent about $110 for parts and needed tools to do this project on my wife's car. It looks as good as anything the factory would do, so if you are a bit handy
with tools and want to tackle this project, it should be fairly easy to do.
If you have any questions about doing this install, please leave a message and will attempt to help you out.
Thanks go out to Liquid-R1 for his advice on this successful project!
 06-12-2007, 03:39 PM
#14
Member
SL Member
Thread Starter
Join Date: Feb 2007
Location: KY
Posts: 59
Originally Posted by scionofPCFL
Wow. That $139 for dealer installed seems worth it now. There's a lot of places that can go extremely wrong. 
take this project on, but, as a EE, I think I could do this job in a matter of 10 minutes
or so, if I was to repeat the project.
Also, my local dealers didn't have this in stock when I ordered it and with sales taxes
and having to go pick it up, it would have cost me around $160 vs. the $85 or so (delivered) I paid
for the official Toyota kit. People who already have the equipment I had to purchase
(the hole saw and the arbor to hold it) can save close to 50% as a DIY project.
I did tell my wife that I had accidentally drilled all the way thru the outside shell of the
car's body, but she didn't see any humor in that!
violent sort, eh? hehehe
06-12-2007, 06:02 PM
#15
Member
SL Member
Join Date: Apr 2007
Posts: 91
Looks great!!! Thanks for the write up on the how to install the unit. Looking at this install and my cargo cover, it looks like they made installation of these parts slightly more difficult than the ones on the Gen 1... Even the Cargo Net requires you to drill holes in the rear qtr panel. I'm not sure if they made it more difficult because they wanted service to install them, or they wanted to make the stock parts cleaner looking? It's weird because they do put in the bolts, screws, holes or whatever behind the plastic, so it's ready for it, it's just not as simple as plug and play...
06-13-2007, 04:16 PM
#16
Member
SL Member
Thread Starter
Join Date: Feb 2007
Location: KY
Posts: 59
Originally Posted by Liquid-R1
Looks great!!! Thanks for the write up on the how to install the unit. Looking at this install and my cargo cover, it looks like they made installation of these parts slightly more difficult than the ones on the Gen 1... Even the Cargo Net requires you to drill holes in the rear qtr panel. I'm not sure if they made it more difficult because they wanted service to install them, or they wanted to make the stock parts cleaner looking? It's weird because they do put in the bolts, screws, holes or whatever behind the plastic, so it's ready for it, it's just not as simple as plug and play...
install one of these themselves can take a look at the Toyota manual, pics and hints and
make a 10-15 minute job of it, saving themselves a few $$$.
As far as the fit, up close, the netting units look as good as anything that is factory
standard in the car, so I am betting that Toyota engineers made these installs to look
like that, as opposed to trying to intimidate people into going to dealers.
Now, will put the fog lights on as soon as they come in, before we take the wife's xB on a road trip to see the kids and relax.
02-11-2008, 09:02 PM
#17
Junior Member

Join Date: Aug 2007
Posts: 9
Sorry to necro-post, but I was thinking about buying these and installing them myself. I must say I'm rather intimidated now. I wish there was an easier way to install them. I'm just too clumsy to be drilling holes in my baby's interior!
02-12-2008, 01:19 PM
#18
Member
SL Member
Thread Starter
Join Date: Feb 2007
Location: KY
Posts: 59
Originally Posted by Groovymarlin
Sorry to necro-post, but I was thinking about buying these and installing them myself. I must say I'm rather intimidated now. I wish there was an easier way to install them. I'm just too clumsy to be drilling holes in my baby's interior!
As it turned out, if you just drill until you are through the molded interior plastic piece there is no danger of drilling into the outside body of the car. I was going to use "drill-stops" but could not find any the right sizes for the drill bits I used, so used an OLD trick, put a piece of tape on the bit to mark the distance I needed to drill in (maybe 1/4") and then quit pressing when that depth had been reached. Using a decent "variable speed" drill is mandatory (you may want to borrow a good one if you don't own one). Just remember to drill with very light pressure on the drill and drill SLOWLY. Thinking about it, you should drill these out using the drill in "reverse" as well, making it nearly impossible to over-drill the holes, although it would take a lot longer to drill the needed holes.
These are neat places to store maps, things we use every once in a while that we want to keep in a place in the car that we KNOW where they are, etc. and and wife is glad that I put them in for her, as well as both of us when we are on the road in her xB.
Also, these kits can be bought on-line for much less than the "dealer price" and are authentic Toyota parts made just for the 2008 Scion.
06-14-2008, 10:48 PM
#19
Member

Join Date: May 2008
Location: Cincinnati, Ohio USA
Posts: 40
Seems like a lot of trouble and money for not a lot of additional storage capacity. Anyone actually use these things for storing anything useful?
Just wondering, because I was tempted to order them myself but it doesn't look like you could store much more than a few CD's or a couple of paperback books in there --both items which would be useless to store in the rear compartment because they're so far out of reach from the front seats.
I was tempted to order them just because the existing "cubbie holes" look kind of dumb sitting there with no purpose, but I can't talk myself into the expense or going through the trouble to install them when I can't imagine what I'd use them for.
Anyone?
06-15-2008, 03:28 AM
#20
Member
SL Member
Thread Starter
Join Date: Feb 2007
Location: KY
Posts: 59
The best use that we have made of them is for holding maps (always nice to have, even though we have GPS in car as well.) Other things are stored in the areas on an as needed basis, but the maps STAY there.
Are they useful? That is personal preference, IMO, but to the wife, they were well worth the investment.
Are they useful? That is personal preference, IMO, but to the wife, they were well worth the investment.