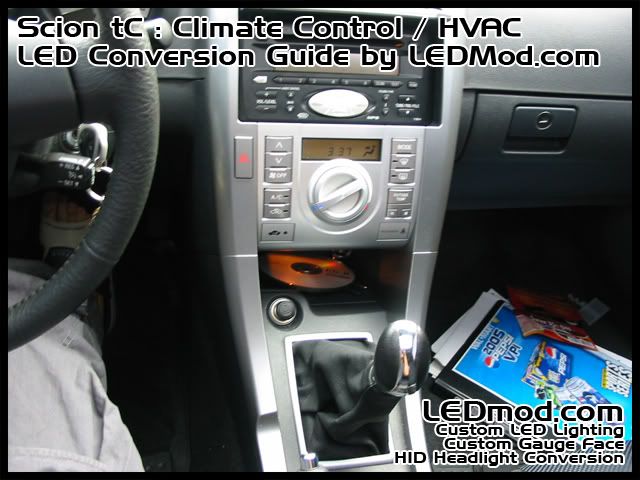
* tC : HVAC / Climate Control LED Conversion Guide
 06-24-2007, 09:08 PM
#1
Former Sponsor
SL Member

Thread Starter

Join Date: Apr 2006
Location: Anaheim, CA & Las Vegas
Posts: 2,093
Scion tC : HVAC / Climate Control LED Conversion/Swap Guide
by www.LEDmod.com
** NOTE : This isn't for beginner, so if you aren't sure you can do this then, please seek professional help.
I also offer installation for Local and Out of state customers
Local installation service available below (Follow the link for more information)
- Southern California
- Las Vegas
- New York (Currently not available)
- For out of state customers, please e-mail me for information Sean@LEDmod.com
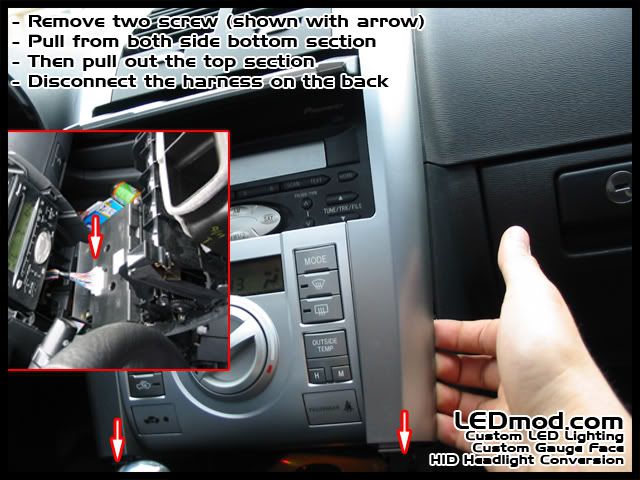
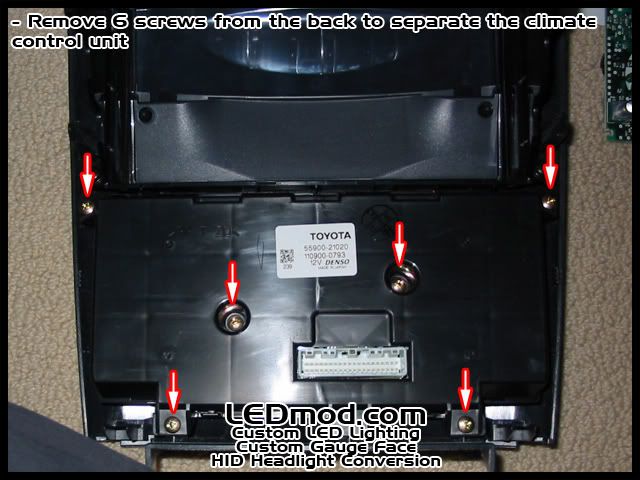
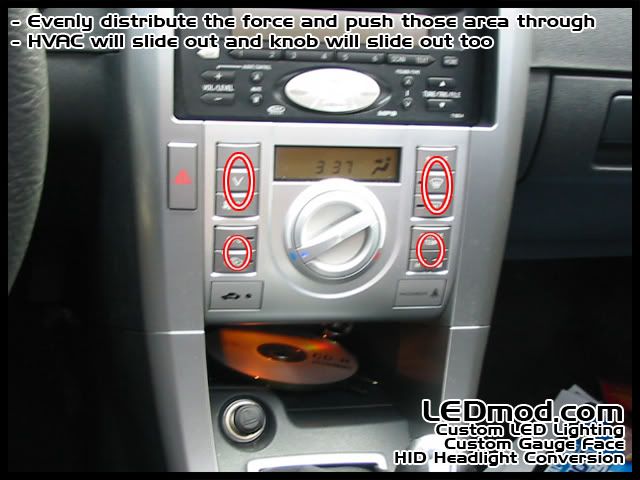
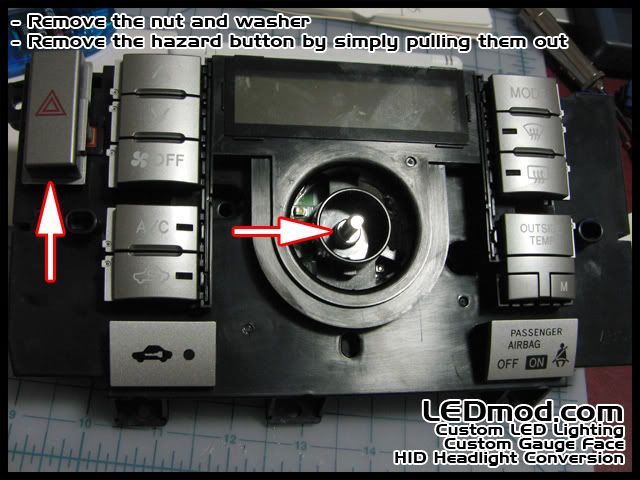
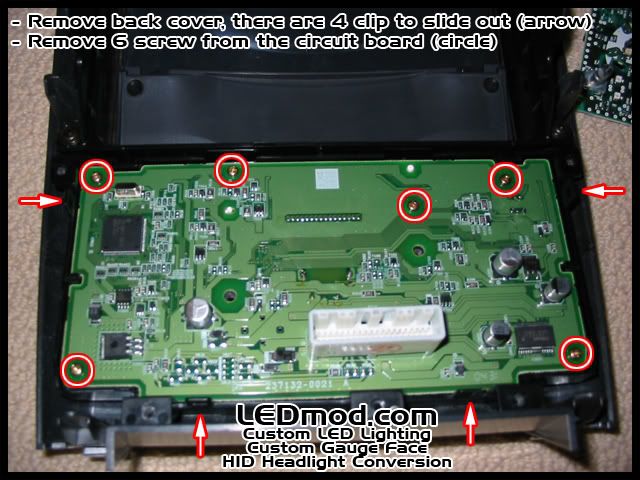
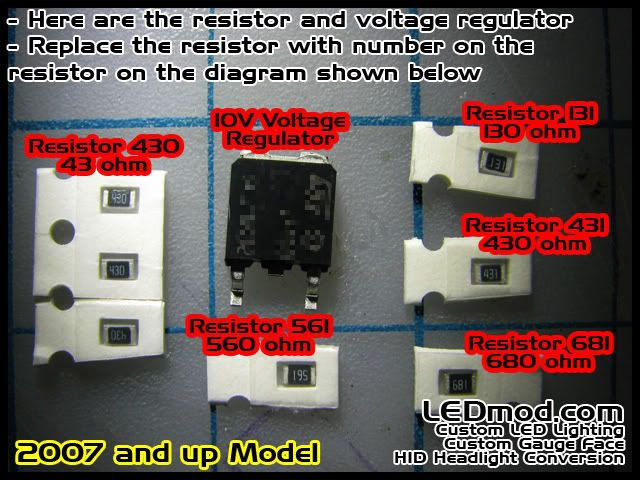
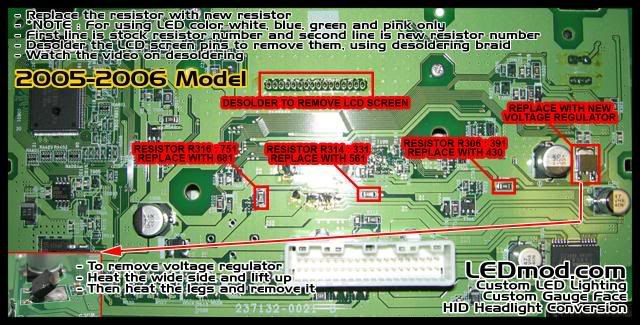
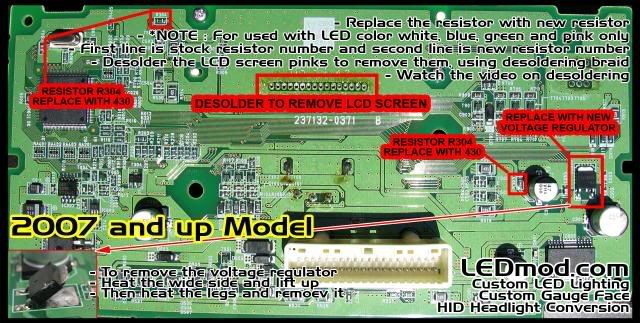
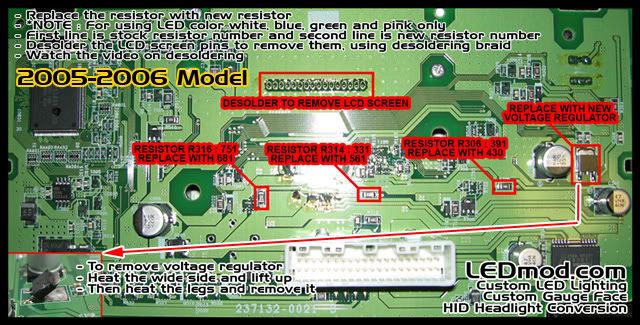
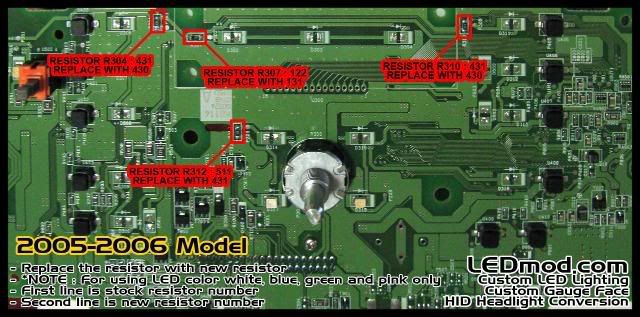
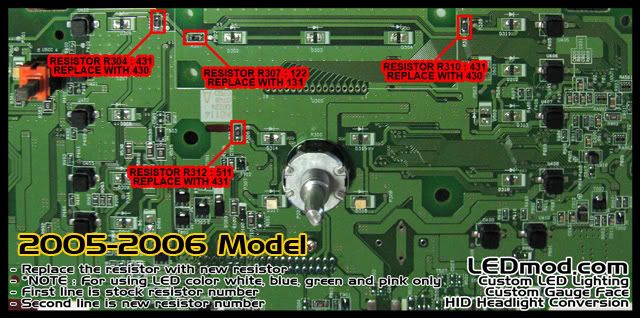
Here is a step by step guide for LED Conversion/Swap
Things you'll need (Mostly available at RadioShack)
- Fine point Pencil Soldering Iron (Recommend 15-30 watt)
- Solder : Prefer silver-bearing solder or rosin core solder (Thinner the better, easier to work with)
- Soldering accesories
- Philips screw driver
- 10mm socket wrench or needle plier
- Surface mount LED, resistor and voltage regulator (Available at LEDmod.com)
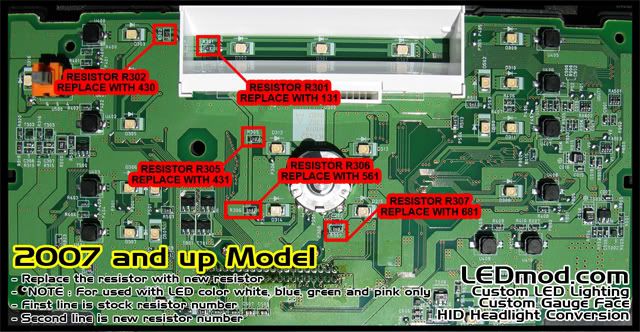
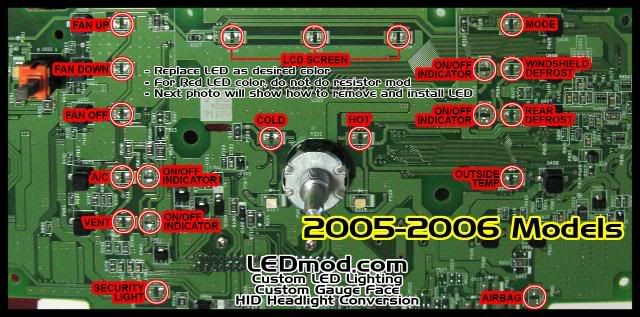
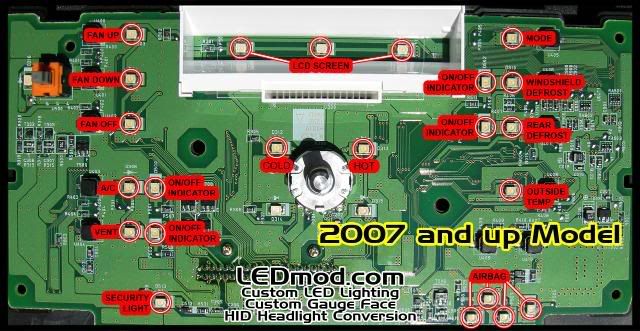
*** NOTE : If you are doing Red LED conversion, you can skip the resistor and voltage regulator swap.
Just change all the LED to RED, also removing the LCD screen is a must


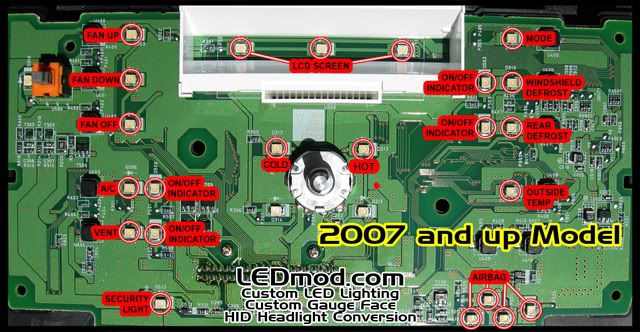
Result will be similar to this (link by SquallLHeart)

by www.LEDmod.com
** NOTE : This isn't for beginner, so if you aren't sure you can do this then, please seek professional help.
I also offer installation for Local and Out of state customers
Local installation service available below (Follow the link for more information)
- Southern California
- Las Vegas
- New York (Currently not available)
- For out of state customers, please e-mail me for information Sean@LEDmod.com
Here is a step by step guide for LED Conversion/Swap
Things you'll need (Mostly available at RadioShack)
- Fine point Pencil Soldering Iron (Recommend 15-30 watt)
- Solder : Prefer silver-bearing solder or rosin core solder (Thinner the better, easier to work with)
- Soldering accesories
- Philips screw driver
- 10mm socket wrench or needle plier
- Surface mount LED, resistor and voltage regulator (Available at LEDmod.com)
*** NOTE : If you are doing Red LED conversion, you can skip the resistor and voltage regulator swap.
Just change all the LED to RED, also removing the LCD screen is a must
Result will be similar to this (link by SquallLHeart)
Last edited by LEDmod; 02-25-2012 at 05:01 PM.


 06-25-2007, 02:30 AM
#4
Senior Member

SL Member
Join Date: Apr 2005
Location: Bremerton, WA
Posts: 1,178
Nice! Looks a lot easier than I once thought. It kinda eases my mind knowing that those PLCCs are lot bigger than the 0603 LEDs like in the Wiimotes. 
I know that SL has a tech article for the gauge cluster already, but I'd like to see a guide like this one for the gauge cluster.
I know that SL has a tech article for the gauge cluster already, but I'd like to see a guide like this one for the gauge cluster.
06-25-2007, 03:05 AM
#5
Former Sponsor
SL Member
Thread Starter
Join Date: Apr 2006
Location: Anaheim, CA & Las Vegas
Posts: 2,093
I'll be making one for the gauge cluster soon....
After I'm done with the 07 and up model for climate control..
I have all the pictures, but need to spend time making them all nice and easy to understand....
After I'm done with the 07 and up model for climate control..
I have all the pictures, but need to spend time making them all nice and easy to understand....
07-04-2007, 04:49 PM
#7
Former Sponsor
SL Member
Thread Starter
Join Date: Apr 2006
Location: Anaheim, CA & Las Vegas
Posts: 2,093
Originally Posted by magnetic
So I got a quick question: I tentatively want my HVAC to be all white, with the on/off lights be red. Will doing the resistor swap harm those red LEDs in any way?


 09-13-2007, 07:07 PM
#12
Member

Join Date: Sep 2005
Location: Bodymore, MD
Posts: 36
When doing the LCD screen, how do you get the Reverse look to it?
Does that require a different screen, or do you just put it in backwards?
__________________
Does that require a different screen, or do you just put it in backwards?
__________________
Last edited by MR_LUV; 02-05-2020 at 02:40 AM. Reason: Awarded 10 Yr Badge
09-14-2007, 01:44 AM
#13
Former Sponsor
SL Member
Thread Starter
Join Date: Apr 2006
Location: Anaheim, CA & Las Vegas
Posts: 2,093
Originally Posted by frankryzzo
When doing the lcd screen, how do you get the revers look to it? Does that require a different screen, or do you just put it in backwards?
Reversing the stock film and using new film that will reverse it(I sell them)
If you use the stock film, it's really hard to keep it clean. Since it's tidious to remove the film without bending and remove the adhesive...
When using new film, just clean up the adhesive after removing the stock film...
It's easy to remove the adhesive on the LCD screen it self... just apply some adhesive remover and scrape it off with sharp razor blade.....
Then put new film, it comes with self adhesive layer...


 11-25-2007, 11:06 PM
#16
Former Sponsor
SL Member
Thread Starter
Join Date: Apr 2006
Location: Anaheim, CA & Las Vegas
Posts: 2,093
Originally Posted by PhantomGT
Is there a way to change the CD Player/ Head unit LCD to another color?
 05-05-2008, 05:31 AM
#18


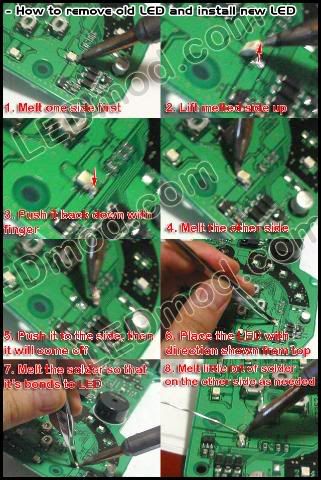
I highly recommend NOT useing solder braid, it is how 95% of the first time swappers crack their screens. Use a solder sucker and do it right. Also a writup on resistor placement & info has been up for 2 years now  Pretty hard to make wheel more... round
Last, the power ic you are useing is only a 500ma unit, should be a 1amp rated unit minimum.
Pretty hard to make wheel more... roundLast, the power ic you are useing is only a 500ma unit, should be a 1amp rated unit minimum.
05-05-2008, 05:36 AM
#19
Senior Member
SL Member

Join Date: May 2005
Location: Bay Area
Posts: 4,790
Originally Posted by Garage1217
I highly recommend NOT useing solder braid, it is how 95% of the first time swappers crack their screens. Use a solder sucker and do it right. Also a writup on resistor placement & info has been up for 2 years now Pretty hard to make wheel more... round
Pretty hard to make wheel more... roundyep, u dont want the solder to drip down.
05-05-2008, 07:00 AM
#20
Noobs also put to much heat on the braid for far to long which damages the lcd screens. All around a long painfully annoying process to use solder braid which usually results in some sort of damage. I can desolder a screen in around 1 - 1.5 minutes with the equipment I have and I am not even in a hurry And non techies can do the same in a little more time with just a solder sucker & low wattage iron.
And non techies can do the same in a little more time with just a solder sucker & low wattage iron.