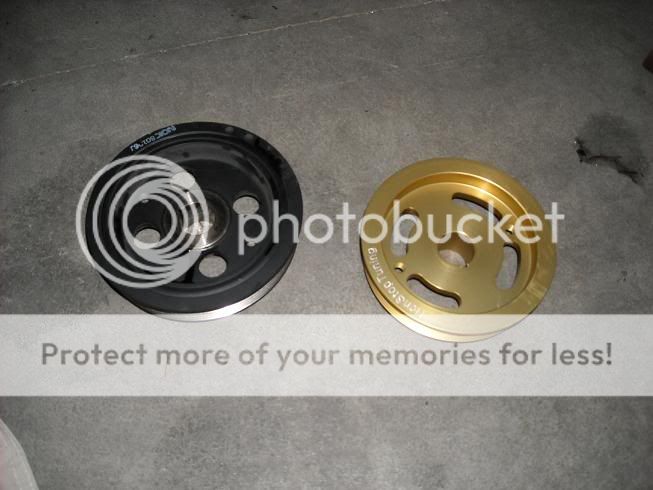
Pulley Install (NST, Underdrive Crank)
 03-10-2009, 09:05 PM
#1

Originally Posted by Garage1217
Hey guys, installed my pre-production pulley and install was a breeze! Everything was spot on. Made a couple hundred mile trip over turkey day and it seems my MPG definitely increased! With 2 adults, 3 kids and a load of educational books for the kids in the back of the car, I managed 34.5mpg! Not to shabby. More testing to come on my normal route to work and back.
Things that stood out immediately.
- Car revs much more freely
- 1st gear & a little in 2nd gear pull harder
- No issue with anything at all including ac
All in all a WIN for the product. Here is a quick how to guide... With the right tools you can install this bad boy in about 25 minutes.
Jack up the car & place jack stands under the car for safety

Next, take off the rim or hubcaps, whatever you have....

Remove the two 10mm bolts holding on the inner plastic fender cover and pull it aside

Loosen the tension on the belt. The XD has a mechanical tensioner system.

Wait for rain to stop.... DOH!!!!!

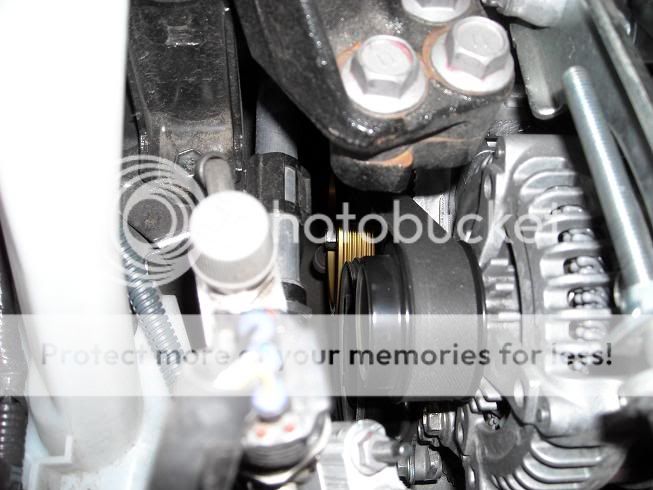
Next, remove the crank pulley bolt. It is a 19mm. I recommend an impact gun in this case which makes it a snap. I was lucky and my pulley just slid right off.

Have a gear puller set on hand in case the pulley does not just slide off... which it most likley will not "I was lucky"

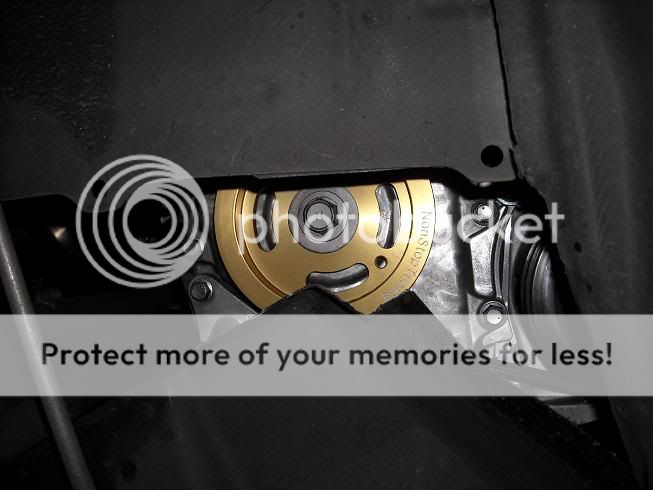
Put new pulley in place. Chances are it will not just slide on as NST pulleys are TIGHT tolerance. Make sure the keyway is lined up with the key inside the pulley.

Tighten the crank bolt by hand with a socket wrench which will draw the pulley over the shaft and in place. The torque to spec... I did not have the proper torque spec with me so I used the German "goodntight" method.

Last, slap the belt back on & re-tension it. Take her for a test drive and SMILE!
Great product guys. I highly recommend it!
Things that stood out immediately.
- Car revs much more freely
- 1st gear & a little in 2nd gear pull harder
- No issue with anything at all including ac
All in all a WIN for the product. Here is a quick how to guide... With the right tools you can install this bad boy in about 25 minutes.
Jack up the car & place jack stands under the car for safety
Next, take off the rim or hubcaps, whatever you have....
Remove the two 10mm bolts holding on the inner plastic fender cover and pull it aside
Loosen the tension on the belt. The XD has a mechanical tensioner system.
Wait for rain to stop.... DOH!!!!!
Next, remove the crank pulley bolt. It is a 19mm. I recommend an impact gun in this case which makes it a snap. I was lucky and my pulley just slid right off.
Have a gear puller set on hand in case the pulley does not just slide off... which it most likley will not "I was lucky"
Put new pulley in place. Chances are it will not just slide on as NST pulleys are TIGHT tolerance. Make sure the keyway is lined up with the key inside the pulley.
Tighten the crank bolt by hand with a socket wrench which will draw the pulley over the shaft and in place. The torque to spec... I did not have the proper torque spec with me so I used the German "goodntight" method.
Last, slap the belt back on & re-tension it. Take her for a test drive and SMILE!
Great product guys. I highly recommend it!

 03-10-2009, 09:06 PM
#2
Please share your thoughts and comments with us in this thread everyone.
The more user reviews, the better.
FAQ #1: I am interested in this pulley. Where can I order one?
ANSWER: http://www.nonstoptuning.com/pKitToySciXD.html
FAQ #2: Will I need to use a shorter belt for this pulley?
ANSWER: No, the OEM belt is compatible with this pulley.
I will add more FAQs as the are brought to my attention.
03-10-2009, 09:25 PM
#3
Senior Member
SL Member

Join Date: Apr 2008
Posts: 957
pulley is on! started it up and took it around the block. fairly noticeable difference in 1st and 2nd gear, and the shifting seems a lot smoother between all gears, especially when downshifting because the engine matches its rpms better with less rotating mass. no difference in any accessories from what i can tell, but i havent thrown the AC on yet because its snowing a little now. i dont expect any difference though.
i also noticed that when i shift at lower rpms, i get more popping and whatnot from my exhaust. i like it.
all in all, its the same kind of benefit you get from the SSK, making your car that much more fun to drive (and you do get a little stronger pull in 1st and 2nd). a must have!
also, i thought i would try and write up some tips for those with questions about the install:
1. the splash guard is held on by 5 bolts/screws. save yourself the heartache of having it in your way and take it all the way off instead of just removing 2 or 3 screws bending it out of the way. its just as easy to put back on.
2. most important tip probably, you are going to need a STRONG impact wrench. im sure it varies some from car to car, but a 250ftlb wrench wasnt coming close to moving that thing. i used a 550ftlb wrench from home depot at 90psi (the max suggested) and it was able to break it free after a few seconds.
3. you will notice that the inside wall of the wheel well comes low enough to get in the way of your impact wrench getting a good bite on the bolt. be careful not to put it on there at an angle or you could strip the bolt. this didnt work for me, but you could try putting an extension on the wrench to give you room to work with. in my case, the joints between the gun, extension, and sockets absorbed too much of the 'impact' from the wrench to break it free. do what you can to use just the wrench with the socket on it.
4. moving the alt can be a pain. you will see the two bolts on top that youll want to loosen to let it slide fore and aft... but the process would be a lot easier if you could loosen the bolt below the alt. i didnt have any luck getting it loose, there is not much room down there to get a wrench on it also. nonetheless, you can still move the alt once you loosen the tension assembly bolts with a rubber mallet/block of wood method.
5. after youve got the pulley on, tightening that bolt to 140ftlb can be a pain because its hard to hold that pulley still. the best thing if you cant get a torque wrench to work is to dial your impact gun down some and put it on that way. i put my weak impact gun (250ftlb) on and turned the air pressure down a little. this bolt isnt responsible for turning the pulley (that is the key/keyways job) - it just keeps the pulley from sliding off the end of the crank.
6. belt tension - looks like the spec was posted on the previous page, but you need to move the alt about a half inch or so more forward than stock to make up for the slightly smaller pulley. you may even think to yourself that you are about to max the tension out, but you wont, so keep tapping with that mallet until the belt is taught.
i cant think of anything else at the moment, but those are the 'hiccups' that i ran into. it took me about 2 hours to get it on, but that includes putting the car back together halfway through and running to the store for a new impact wrench. i could probably do it again in 30min tops, so dont let this install scare you.
03-10-2009, 11:49 PM
#4
Member

Join Date: Sep 2008
Posts: 35
.
I'm thinking of purchasing this product. Nice tips pickledchang. So, How tight should the belt be? Should it be real tight as in no slack whatsoever when pushing on the belt after install or should have some slack. If needs some slack, how much slack when pushing on the belt? Will it cause any damgages to any part if the wrong tension is installed.
Would like to know what is the correct tension so I can DIY this baby.
Thanks for all the info.
*EDIT* I saw the other thread for the belt deflection specs. Thanks anyways guys. I just need to press SEND to order. LOL.
.
 03-11-2009, 12:06 AM
#6
Originally Posted by PUMPKIN1230
.
I'm thinking of purchasing this product. Nice tips pickledchang. So, How tight should the belt be? Should it be real tight as in no slack whatsoever when pushing on the belt after install or should have some slack. If needs some slack, how much slack when pushing on the belt? Will it cause any damgages to any part if the wrong tension is installed.
Would like to know what is the correct tension so I can DIY this baby.
Thanks for all the info.
.
After installing your new pulley, you should apply tension and get a similar feel when applying pressure to the belt. There will be no negative effects if you apply the incorrect amount of pressure. You just may need to make an adjustment or two.
You would want to start the car after your installation is complete and listen to your car. If your belt sounds the same while spinning as it did before your pulley install, then you are good to go!
The worst thing that could happen would be that you may break a belt prematurely, in which case you would need to spend a whole $12 on a new belt!!!
You can read customer reviews, feedback, and comments from other NST pulley owners on the following forums... You will find nothing but happy customers...
www.ScionLife.com (tC, xA, xB, xB2 owners)
www.YarisWorld.com (similar setup as the xD)
www.8thCivic.com
www.club4ag.com
www.XR-Underground.com
www.86garage.com
www.MicroImageOnline.com
03-11-2009, 01:35 AM
#7
Senior Member
SL Member
Join Date: Jan 2009
Posts: 203
According to the xD technical manual the deflection is 7.5 to 8.0 mm for a new belt or 8.0 to 10.0 mm for a used belt. You check it at the mid point of the belt up and away from the air conditioner pulley. The crankshaft pulley nut is to be torqued to 140 ft lbs.
03-11-2009, 03:32 AM
#10
Member

Join Date: Jun 2008
Location: Aurora, CO
Posts: 31
Well I got mine installed and am very pleased. Over all it was a fairly easy install. I would say that it was easier than installing a Fujita CAI but the main thing was having the right tools. A impact gun is a must, but other than that it was super easy. A special thanks to Non-Stop Tunning for seeing this project to the end and hopefully we will see a few more performance parts for the xD from NST.
03-11-2009, 04:16 AM
#11
Originally Posted by coloskydiver
Well I got mine installed and am very pleased. Over all it was a fairly easy install. I would say that it was easier than installing a Fujita CAI but the main thing was having the right tools. A impact gun is a must, but other than that it was super easy. A special thanks to Non-Stop Tunning for seeing this project to the end and hopefully we will see a few more performance parts for the xD from NST.
Thank you for the kind words sir, we certainly do appreciate it!
Good luck and have fun with all your future projects!!!
03-11-2009, 11:05 PM
#12
Senior Member
SL Member

Join Date: Apr 2008
Location: San Diego
Posts: 246
i just got mine installed today and i was able to do it with a craftsman electric impact wrench rated at 250 lbs. and the pulley slid right off so it was pretty simple to do. review will come later.
Yang
Yang
03-12-2009, 01:30 AM
#13
Senior Member
SL Member
Join Date: Apr 2008
Posts: 957
Originally Posted by Yang
i just got mine installed today and i was able to do it with a craftsman electric impact wrench rated at 250 lbs. and the pulley slid right off so it was pretty simple to do. review will come later.
Yang
Yang
 03-12-2009, 02:28 AM
#15
Senior Member
SL Member

Join Date: Mar 2008
Posts: 1,052
Originally Posted by pickledchang
Originally Posted by Yang
i just got mine installed today and i was able to do it with a craftsman electric impact wrench rated at 250 lbs. and the pulley slid right off so it was pretty simple to do. review will come later.
Yang
Yang
03-12-2009, 03:31 AM
#16
Senior Member
SL Member
Join Date: Apr 2008
Posts: 957
maybe... ive had mine since march of 08, 14k miles.
have any of you noticed how much smoother downshifting is? the engine braking is a little weaker, not that its a bad thing or that bugs me. ill be real curious when the mpg reports start coming in.
have any of you noticed how much smoother downshifting is? the engine braking is a little weaker, not that its a bad thing or that bugs me. ill be real curious when the mpg reports start coming in.
03-12-2009, 04:02 AM
#17
Senior Member
SL Member

Join Date: Nov 2007
Location: CNY
Posts: 125
Has anyone needed a gear puller (as mentioned in the initial installation guide), or had any problems getting the pulley off AFTER the bolt is off? I'm thinking about giving this a try with my elec impact wrench (claims 250 ft-lbs). If it doesn't work, I'll have to wait until next weekend (  ) when I can get to a friend's garage and borrow a bigger air impact!
Either way, I'm very excited to get this on soon... :D
Andy
Either way, I'm very excited to get this on soon... :D
Andy
03-12-2009, 06:38 PM
#19
Senior Member
SL Member
Join Date: Apr 2008
Posts: 957
andy, i did not need a puller at all. the pulley slides right off. the shaft it sits on is not tapered, so its not wedged on or anything. and you might be one of the lucky ones to be able to get it off with a 250lb electric. maybe the electrics apply the force differently from air and thats why i needed a higher rated air impact. i dunno.
03-12-2009, 07:33 PM
#20
Senior Member
SL Member
Join Date: Nov 2007
Location: CNY
Posts: 125
Thanks Pickle! Good to know. The main reason I was going to wait and use my buddy's garage is that he has a gear puller set... (and the bigger air impact!) But I might see if I can give it a go before then. I'll definitely report back!