My last rotary project/project... 3 rotor RX-7
 01-10-2017, 11:57 AM
#141
Senior Member
SL Member
Thread Starter

Join Date: Sep 2012
Posts: 115
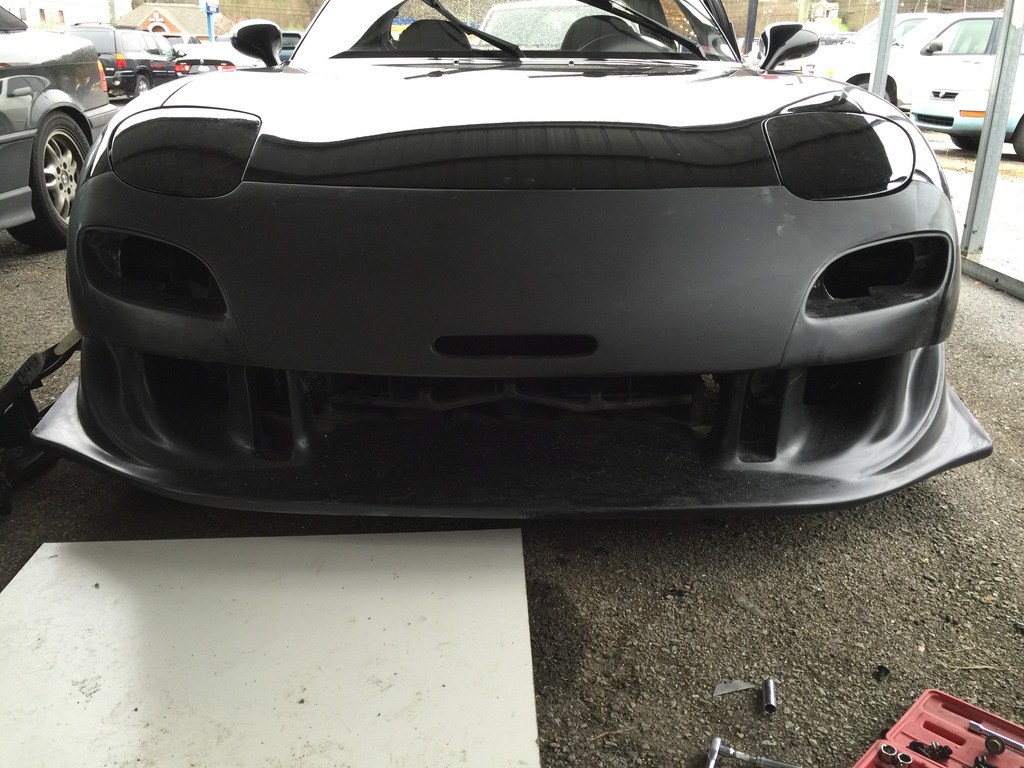
Update..
I realized I didn't post anything about the bumper project I did early last year.
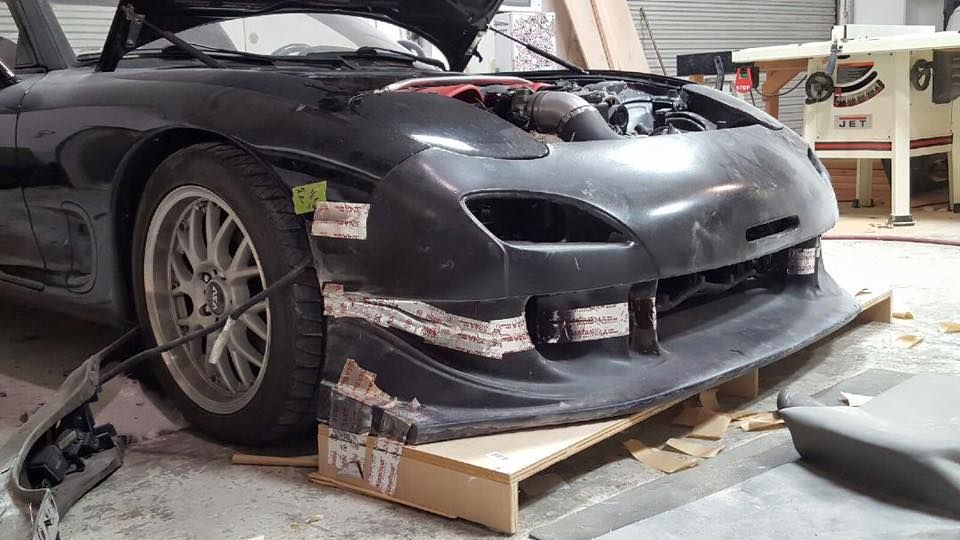
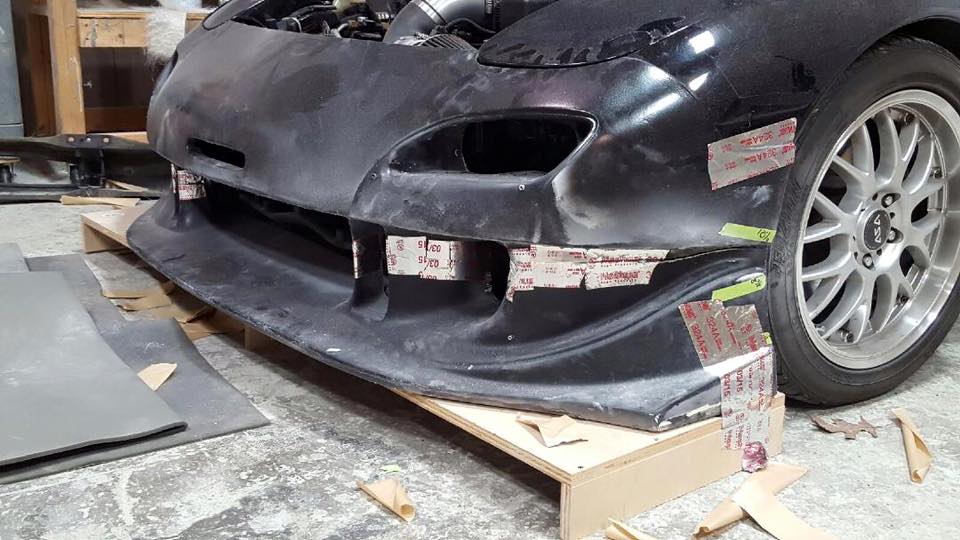
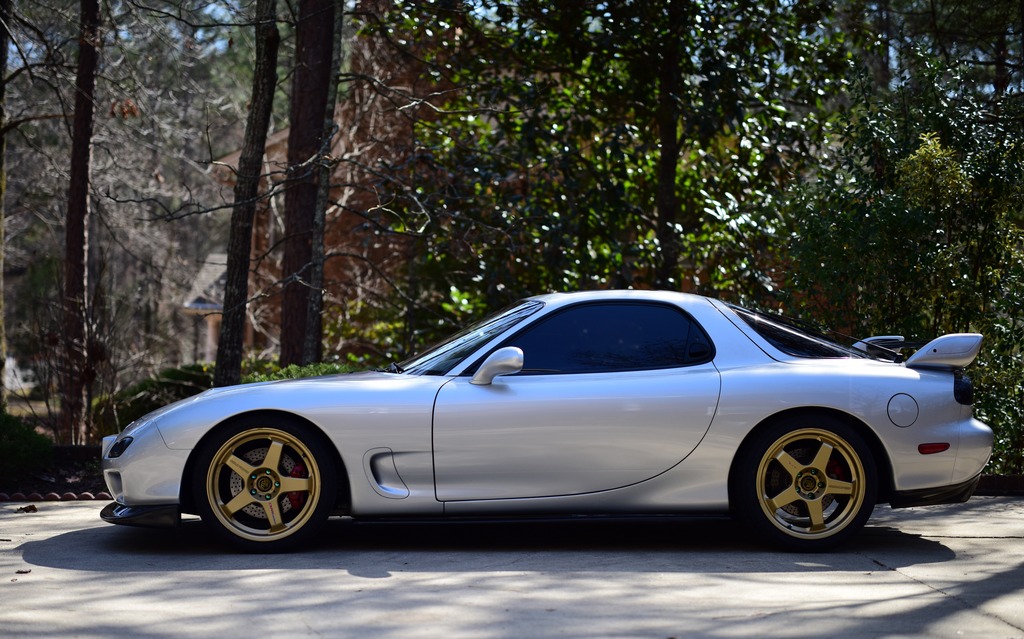
Back story.. When I first started this thread, I was building a car for SEMA, my 3 rotor project. For years leading up to this point of building this car, I had a vision of my ultimate 3 rotor. But like most of you, job, family, money, etc. can lead to not quite execute your dream build. In this case, one of the thing I wanted to do was make a unique bumper. I wanted to mash together my 2 favorite japanese companies; Fujita Engineering (FEED) and RE-Amemiya. If you look at the car now, you will see that its pretty much built using both of those companies. But what I really wanted to do was build a bumper using two iconic bumpers. FEED Type 2R and RE-A N1-02 bumper. I love the signal/driving light set of of the FEED and loved the aggressive bottom of the N1-02.
FEED Type 2R on my 2 rotor
Re-Amemiya N1-02 with Front diffuser add on
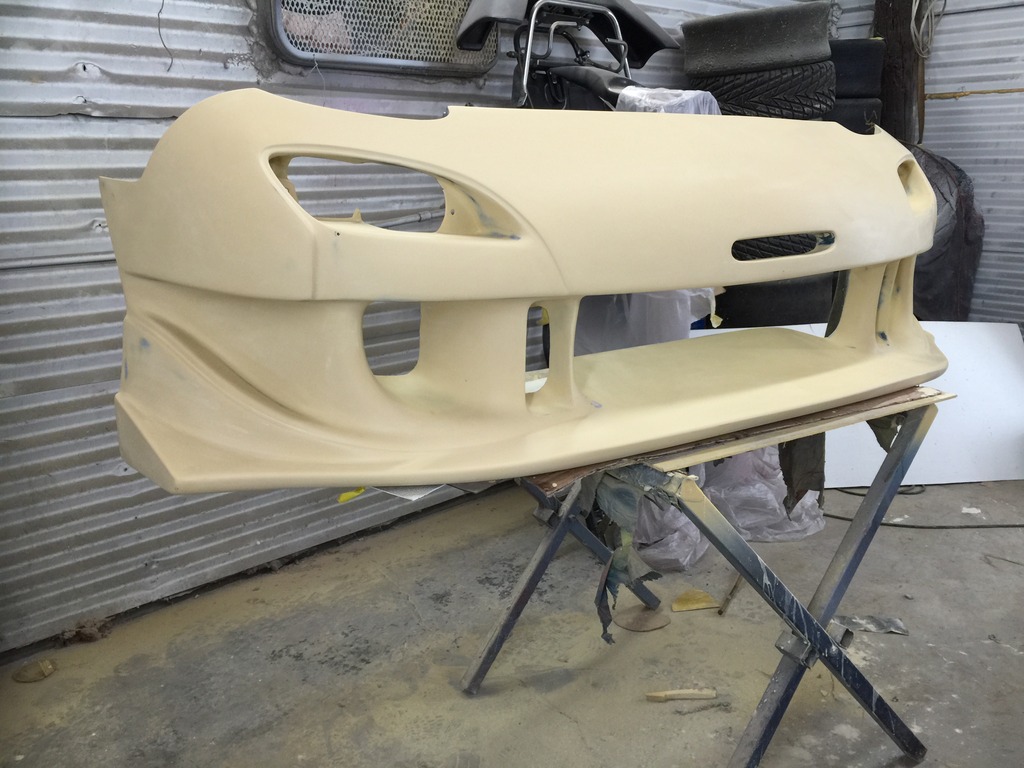
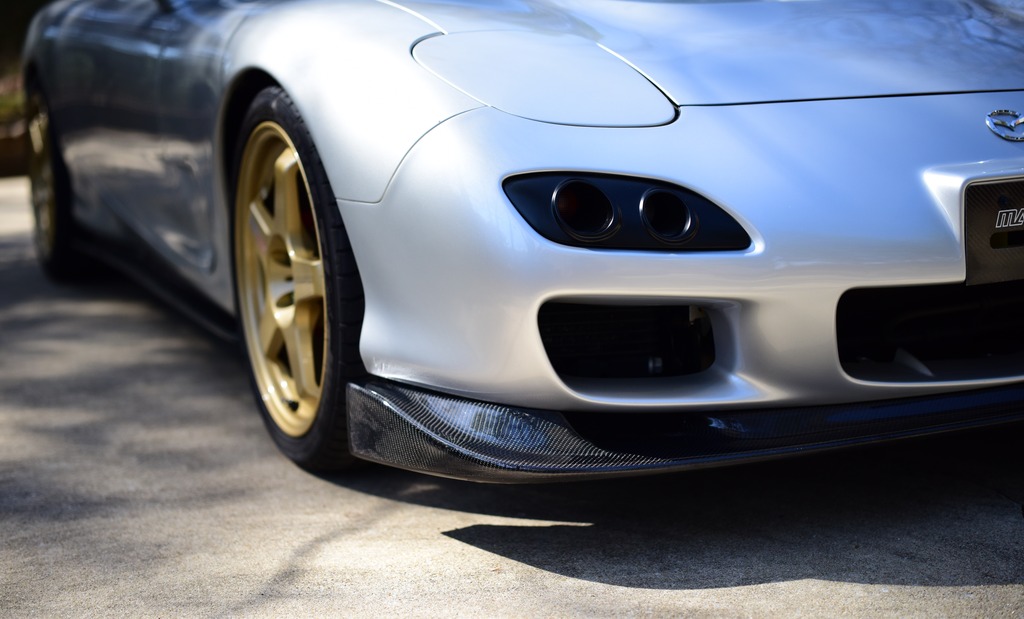
Back in 2015, I decided that it was time to fulfill my goal of making a bumper that meets my vision. Instead of using RE-A N1-02, I decided to used the N1-05 which has the molded in undertray/diffuser. We cut the both bumpers and started to put them together. (Oh, I should most definitely give credit to my engine builder and long time friend Luis Canizales and his son Luke Canizales for their help putting the bumper together and helping me make the initial mold).
I did not like the 90's 'hump' on the front bumper so we made it to sit flat.
Here is an initial shaping of the bumper.. It weighs 40-50lbs
We made a mold and pulled one bumper off. When running the bumper on the, it didn't quite fit correctly. It sat quite low and required some hand on modification. Again thanks to Luis and his friend, we were able to have it on and made it to an event very next day (low as in I couldn't make it out of my driveway).
I was able to have it on the car and get it featured in SpeedHunters.
Meet The Rotary Maniac - Speedhunters
But I wanted to make the bumper correctly and more of it.
Following year, I was conversing with my friend Michael about the project. He said he knew someone who might help me regarding making a new updated bumper.
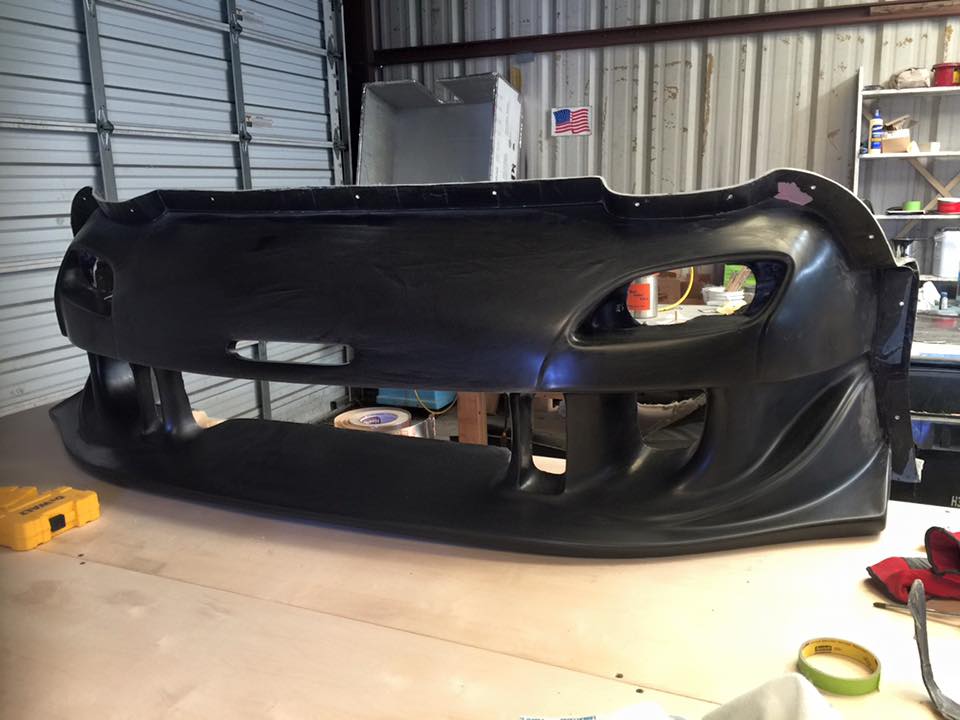
So, I took my initial bumper and started to correct some of the issues. Being extremely low was an issue, so first bumper was cut, fix the height issue, and corrected the flat part of the bumper.
First bumper pulled from the second mold.
Im running out of time so I will update next week regarding the fitment and the results.
Phil
I realized I didn't post anything about the bumper project I did early last year.
Back story.. When I first started this thread, I was building a car for SEMA, my 3 rotor project. For years leading up to this point of building this car, I had a vision of my ultimate 3 rotor. But like most of you, job, family, money, etc. can lead to not quite execute your dream build. In this case, one of the thing I wanted to do was make a unique bumper. I wanted to mash together my 2 favorite japanese companies; Fujita Engineering (FEED) and RE-Amemiya. If you look at the car now, you will see that its pretty much built using both of those companies. But what I really wanted to do was build a bumper using two iconic bumpers. FEED Type 2R and RE-A N1-02 bumper. I love the signal/driving light set of of the FEED and loved the aggressive bottom of the N1-02.
FEED Type 2R on my 2 rotor
Re-Amemiya N1-02 with Front diffuser add on
Back in 2015, I decided that it was time to fulfill my goal of making a bumper that meets my vision. Instead of using RE-A N1-02, I decided to used the N1-05 which has the molded in undertray/diffuser. We cut the both bumpers and started to put them together. (Oh, I should most definitely give credit to my engine builder and long time friend Luis Canizales and his son Luke Canizales for their help putting the bumper together and helping me make the initial mold).
I did not like the 90's 'hump' on the front bumper so we made it to sit flat.
Here is an initial shaping of the bumper.. It weighs 40-50lbs
We made a mold and pulled one bumper off. When running the bumper on the, it didn't quite fit correctly. It sat quite low and required some hand on modification. Again thanks to Luis and his friend, we were able to have it on and made it to an event very next day (low as in I couldn't make it out of my driveway).
I was able to have it on the car and get it featured in SpeedHunters.
Meet The Rotary Maniac - Speedhunters
But I wanted to make the bumper correctly and more of it.
Following year, I was conversing with my friend Michael about the project. He said he knew someone who might help me regarding making a new updated bumper.
So, I took my initial bumper and started to correct some of the issues. Being extremely low was an issue, so first bumper was cut, fix the height issue, and corrected the flat part of the bumper.
First bumper pulled from the second mold.
Im running out of time so I will update next week regarding the fitment and the results.
Phil
 01-17-2017, 10:47 AM
#142
Senior Member
SL Member
Thread Starter
Join Date: Sep 2012
Posts: 115
Update...
Continuation of the bumper making..
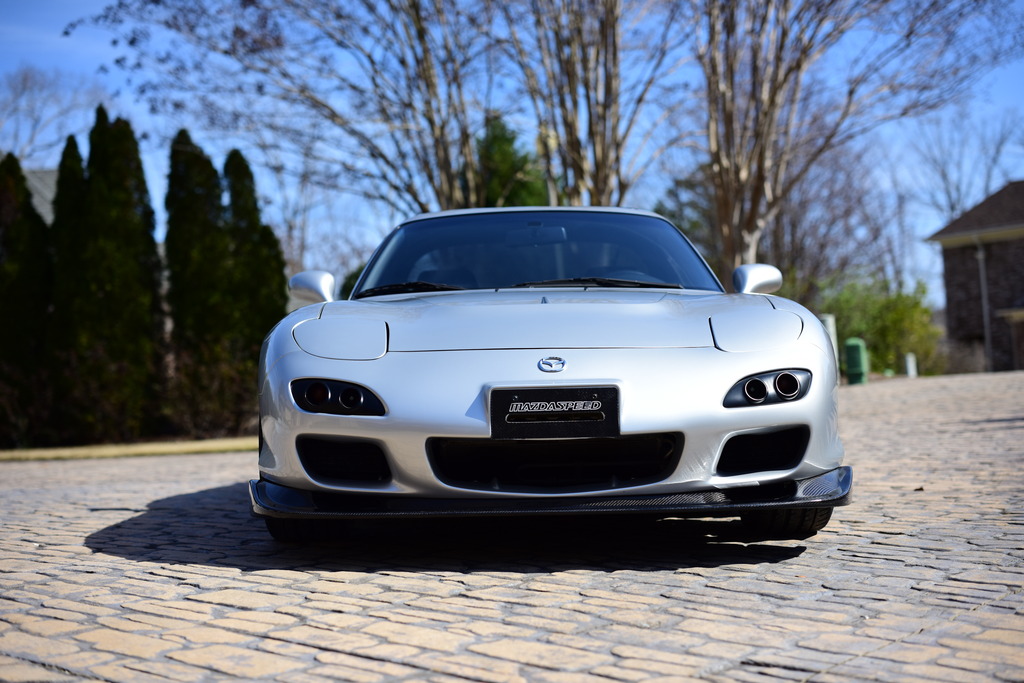
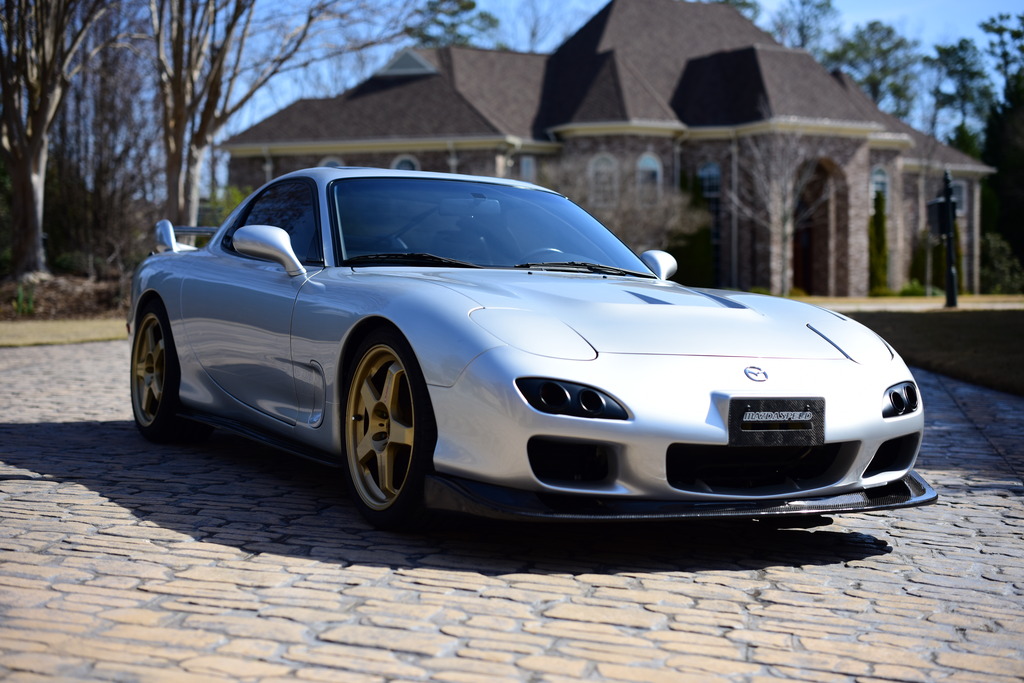
Here are the detail pics of the bumper.
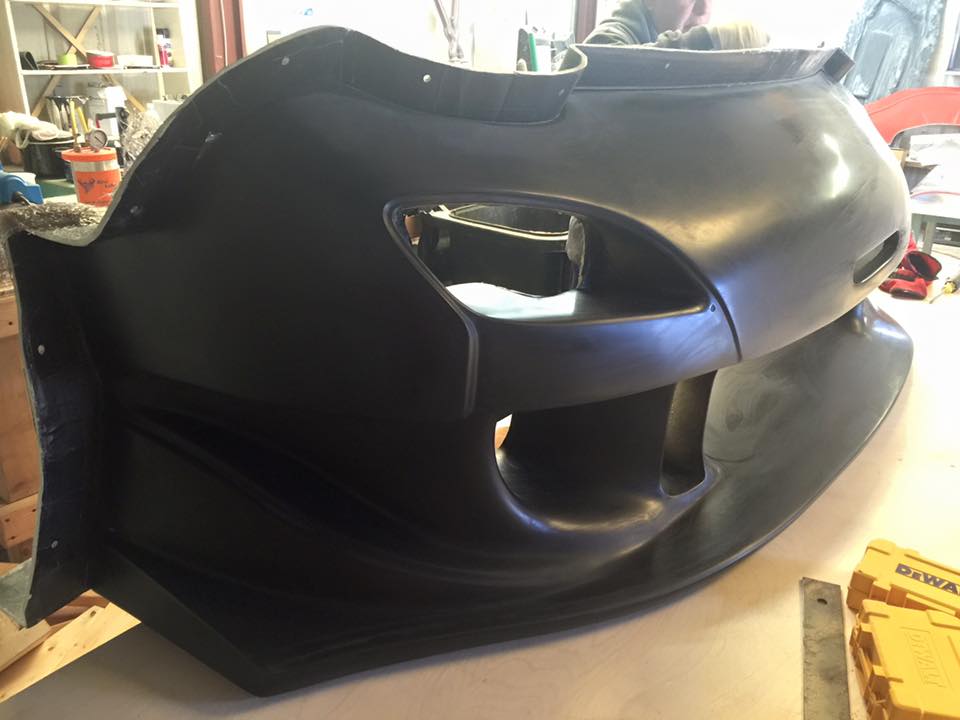
Test fitments:
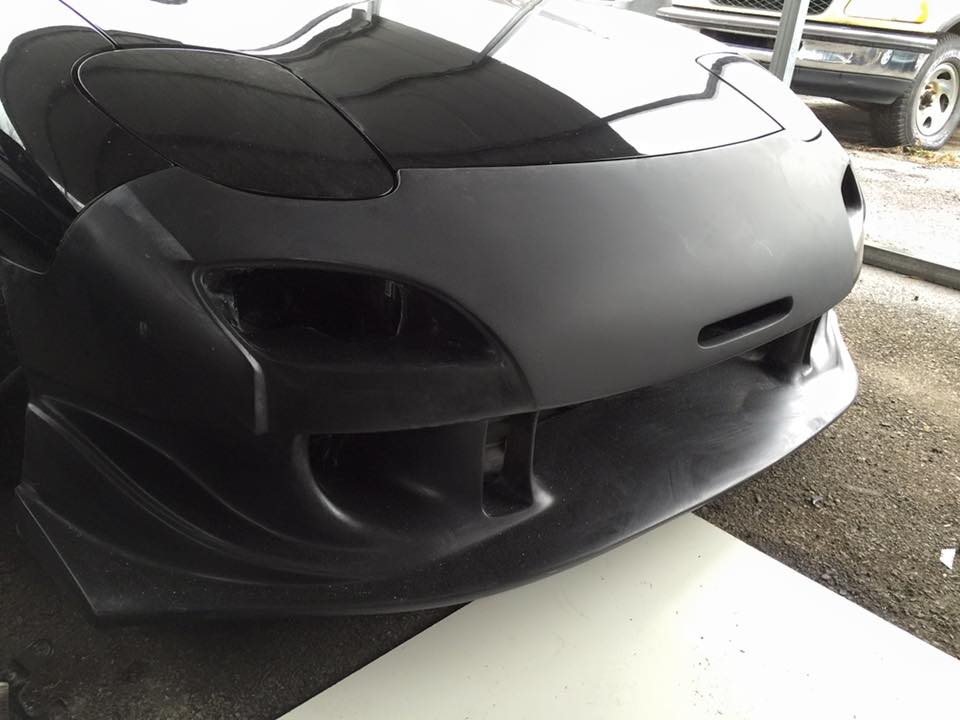
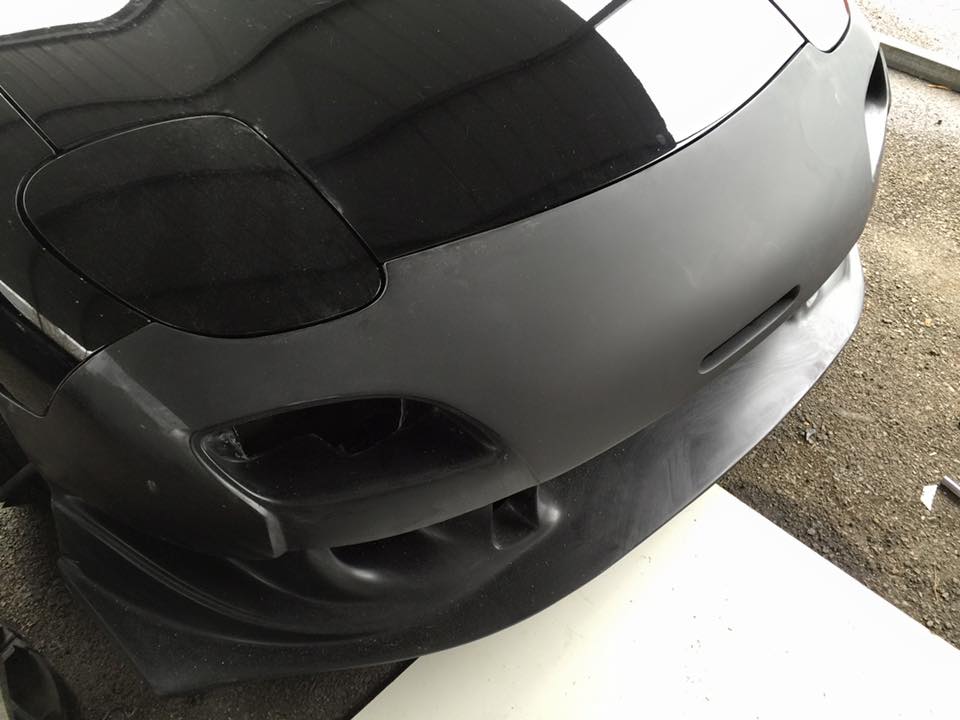
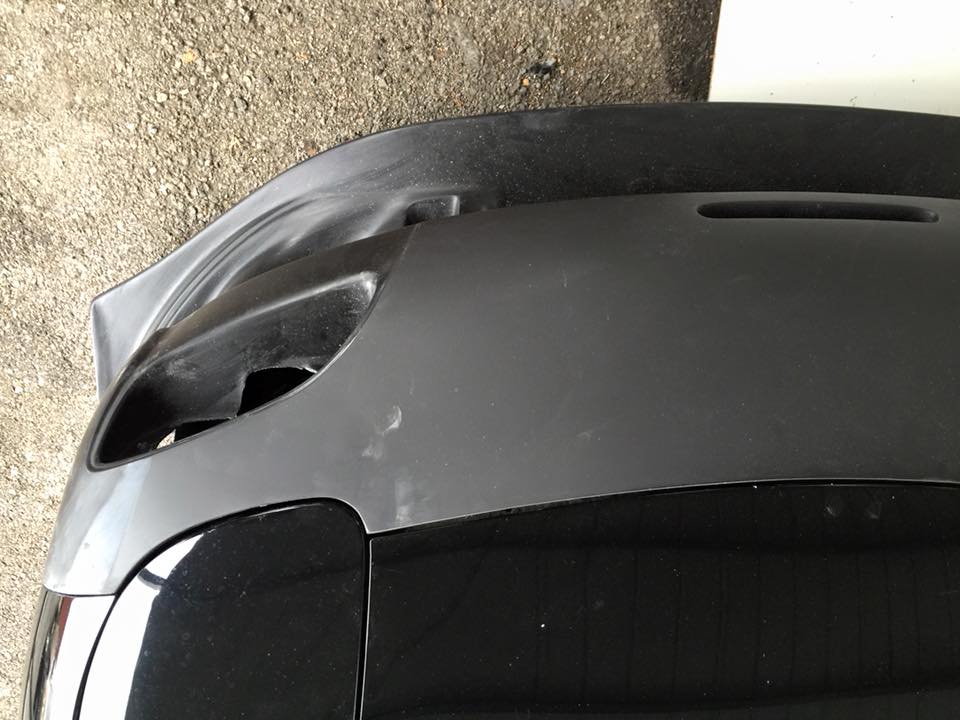
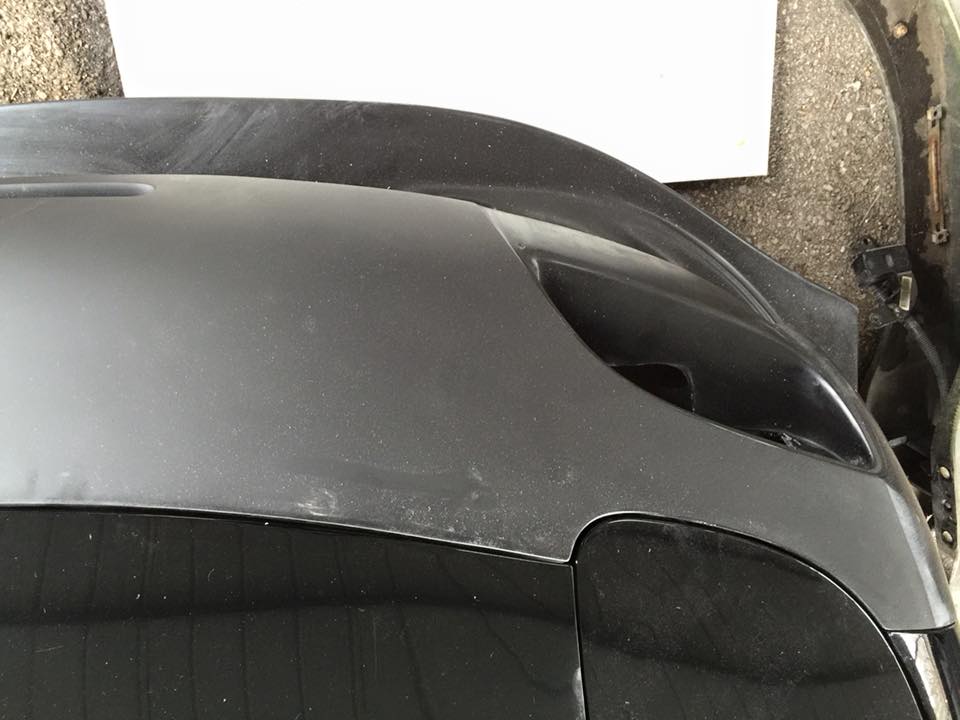
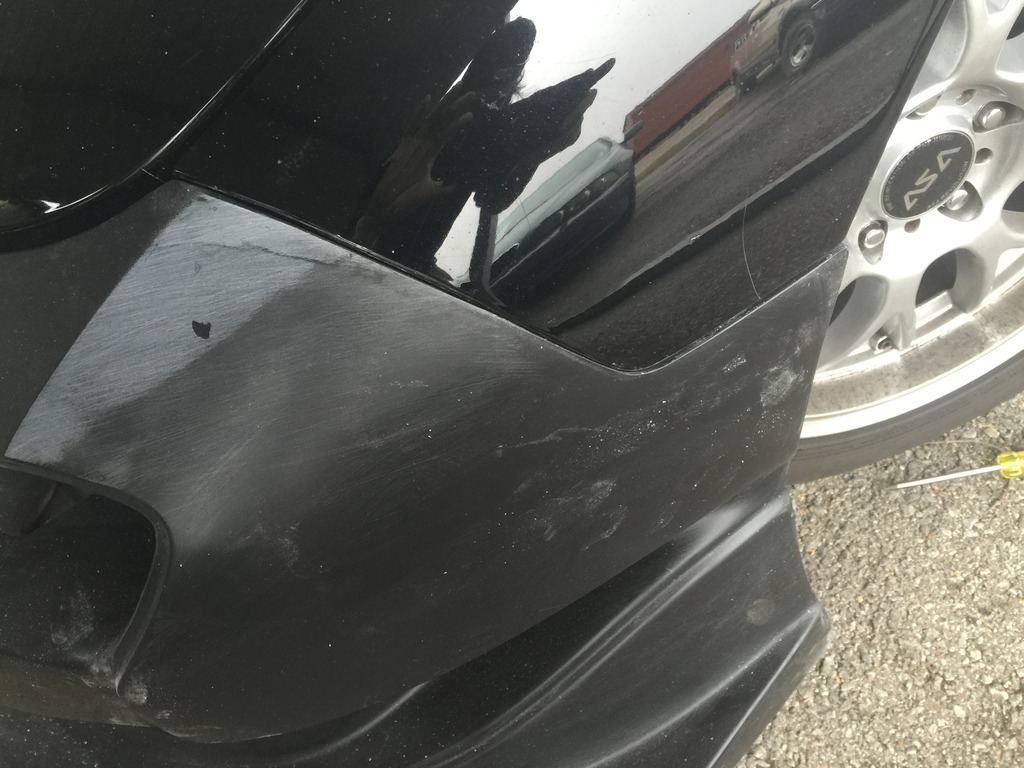
Overall, I was very happy with the results. Fitment was satisfactory for being what it was. Height of the bumper was similar to the stock 93 bumper with 99 front lip. Compare to the first version, its night and day difference in fitment and quality.
Continuation of the bumper making..
Here are the detail pics of the bumper.
Test fitments:
Overall, I was very happy with the results. Fitment was satisfactory for being what it was. Height of the bumper was similar to the stock 93 bumper with 99 front lip. Compare to the first version, its night and day difference in fitment and quality.
01-24-2017, 12:00 PM
#143
Senior Member
SL Member
Thread Starter
Join Date: Sep 2012
Posts: 115
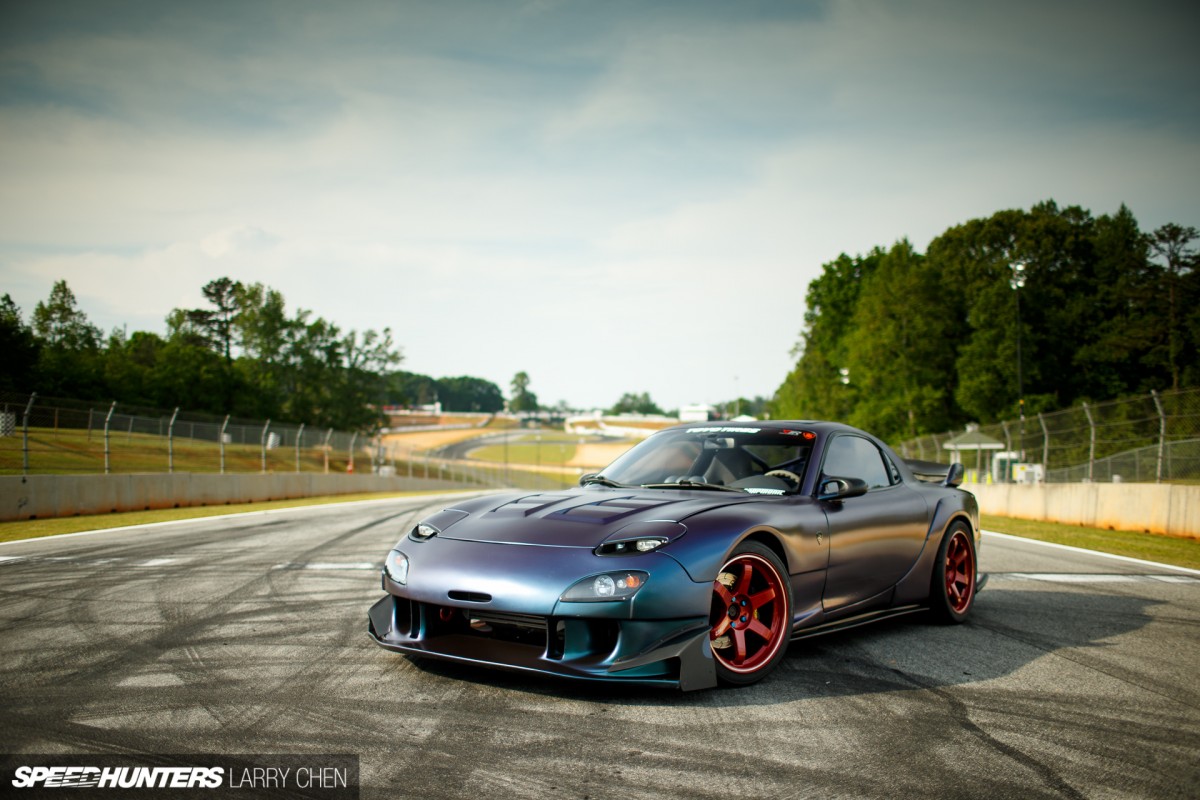
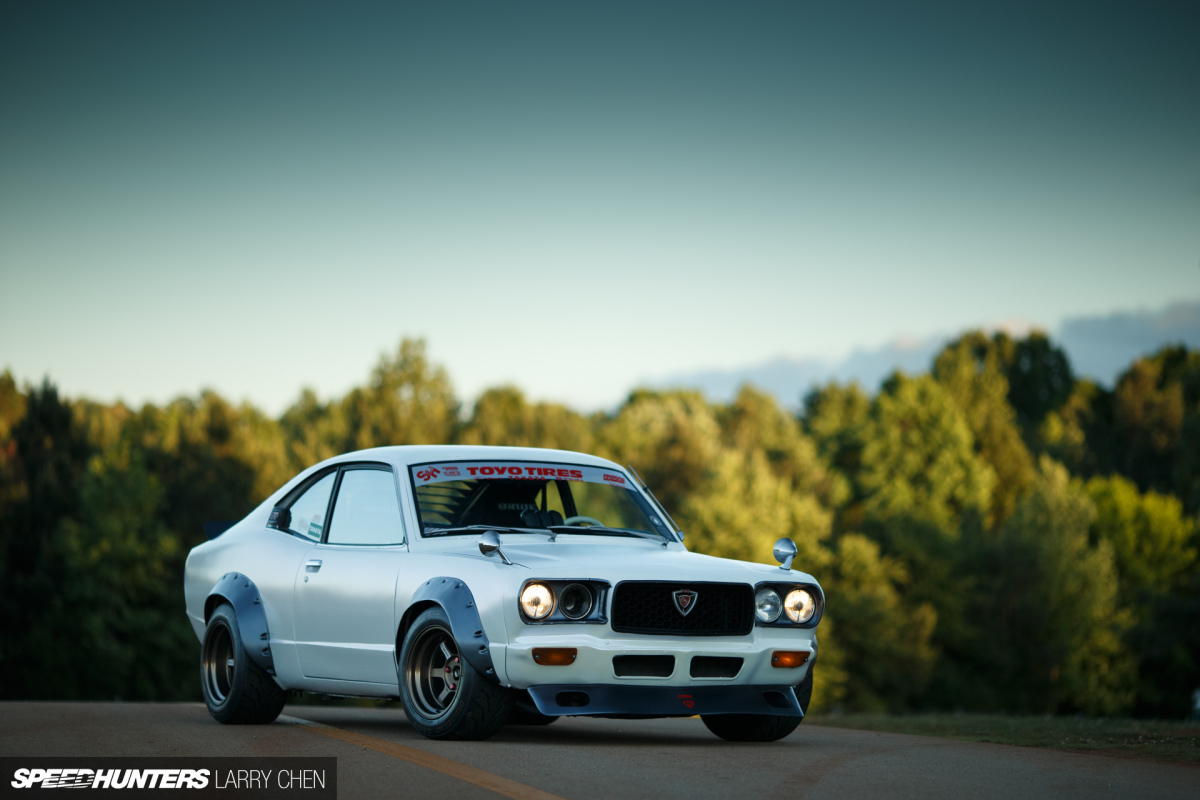
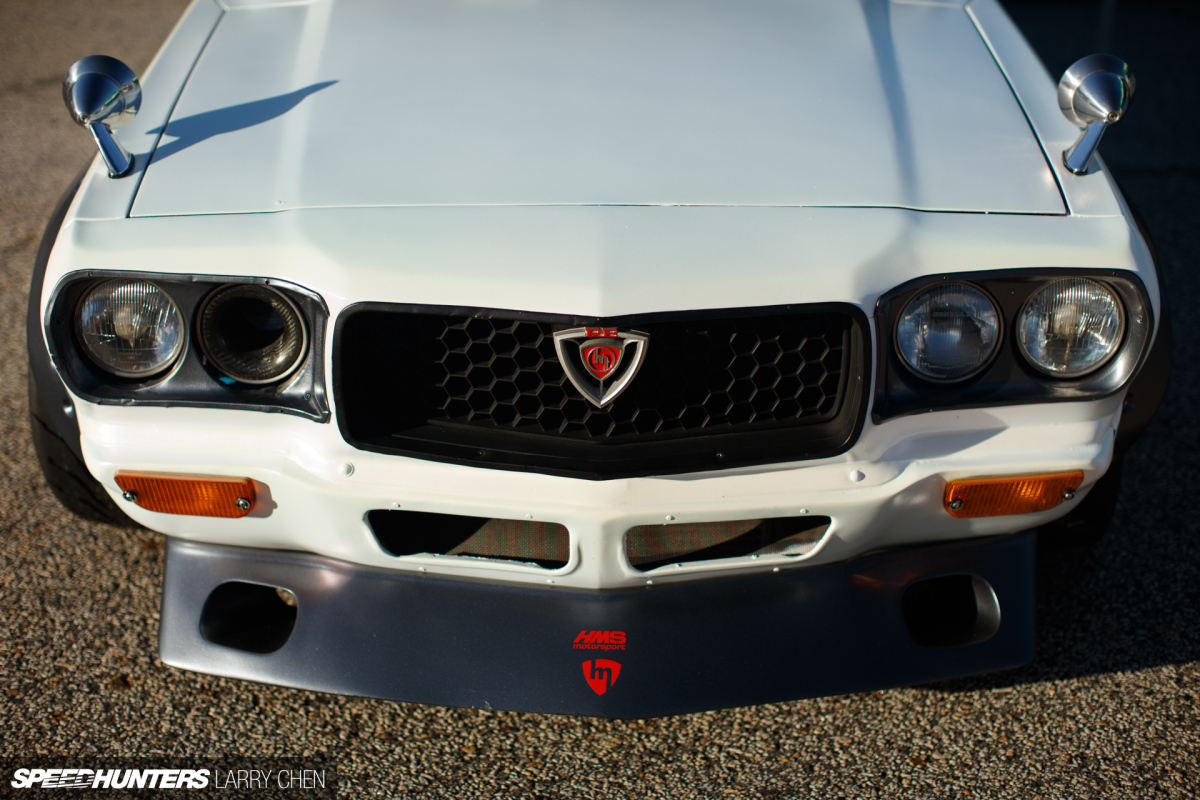
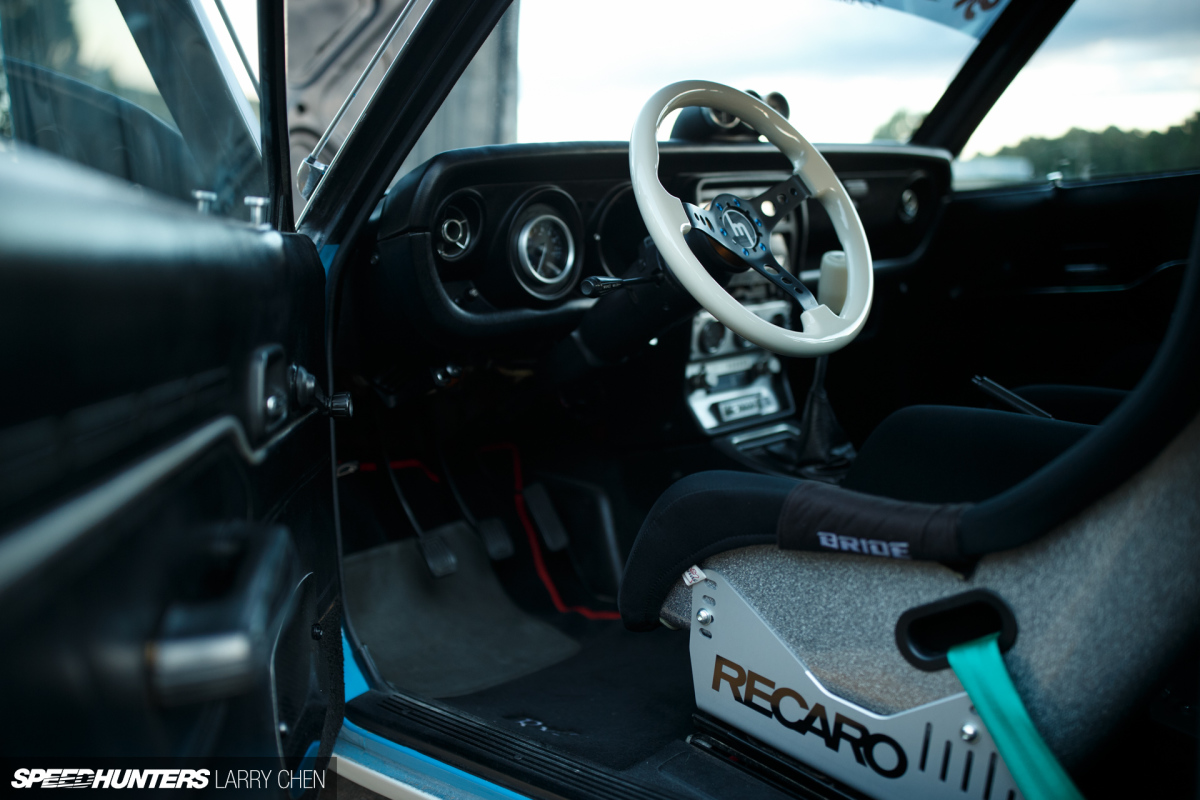
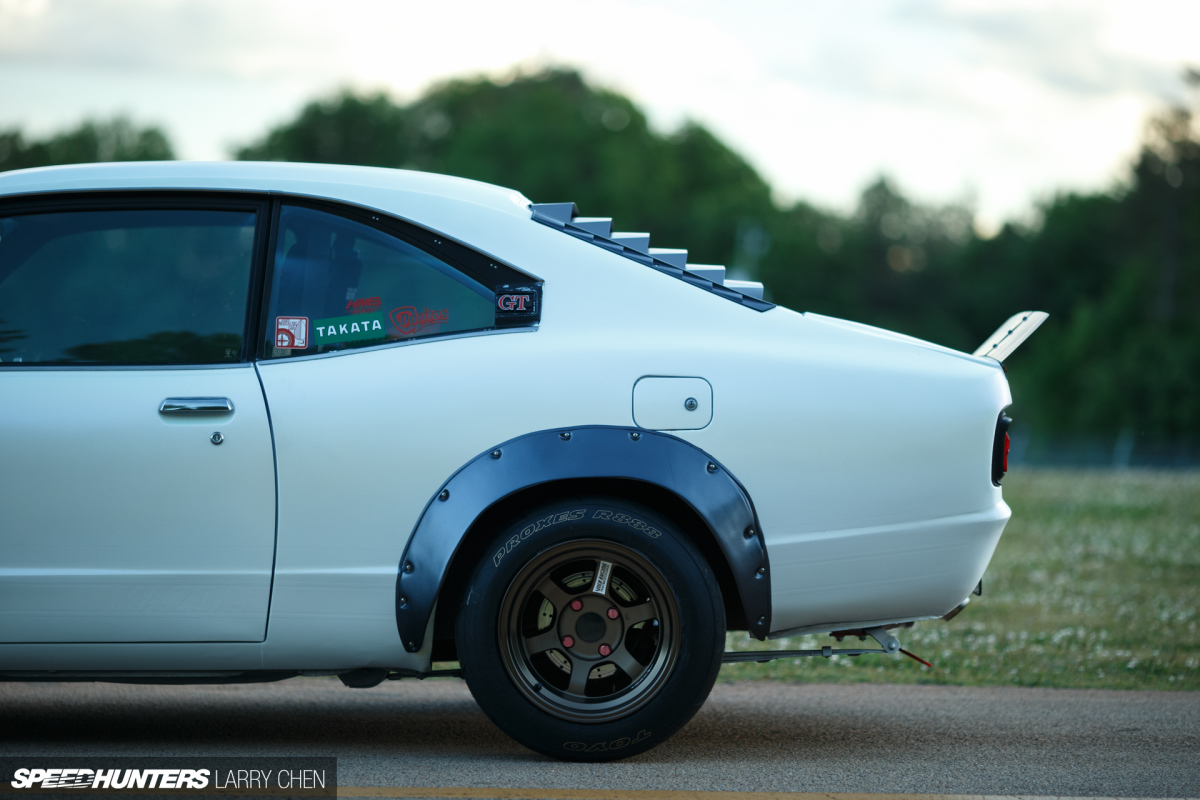
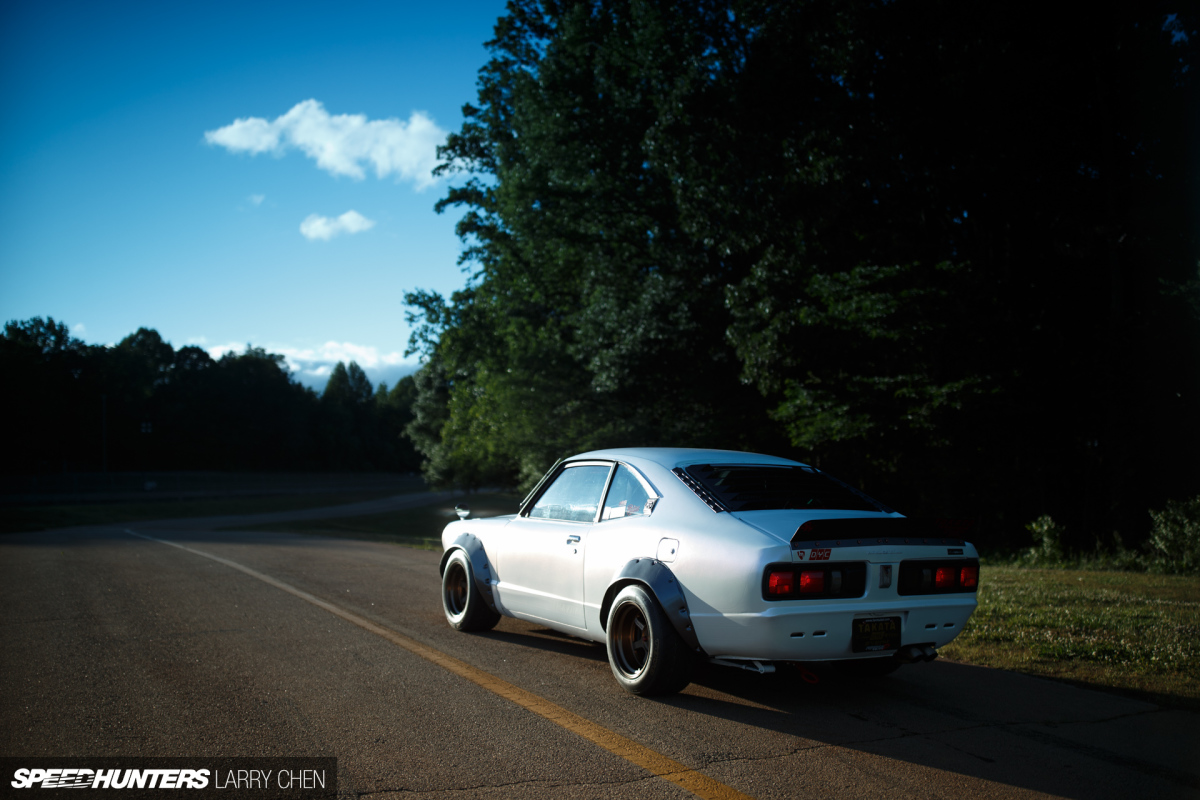
Here is my other feature with SpeedHunters... with my 1973 RX3 and history behind it.
Mazda History & Tales Of Friendship - Speedhunters
I am honored that Mr. Larry Chen was able to shoot the car. It almost didn't happened because of the weather. It rained all day and as I was leaving the track (Road Atlanta), weather started to clear up and Larry gave the thumbs up.
Like any cars or people at this age, it comes with fantastic history. This car was initially built by a gentleman named Tom McGuire. It was his daily for many years and later I was told about the sale of the car by another friend, Chris Mahaffey. At that point, I was only interested in FD RX-7 so I passed it to a good friend Steven White. I regretted no buying first time so, when it was available for sale, I snatched it up from Steven. I fixed few things and after my marriage and 7 cars parked, I ended up selling it to yet another friend who recently had to sell his beloved FD RX-7, Marco Lau. He owned it for several years and was moving to west coast and I ended back up with this car again. I've updated few things for this feature and all my friends have great memories with this car. My future plan is to put maybe NA 20B in it. But I guess I need to finish up few other projects before I do that swap.
In case some of you don't or can't click the link above, here are some photos from it.
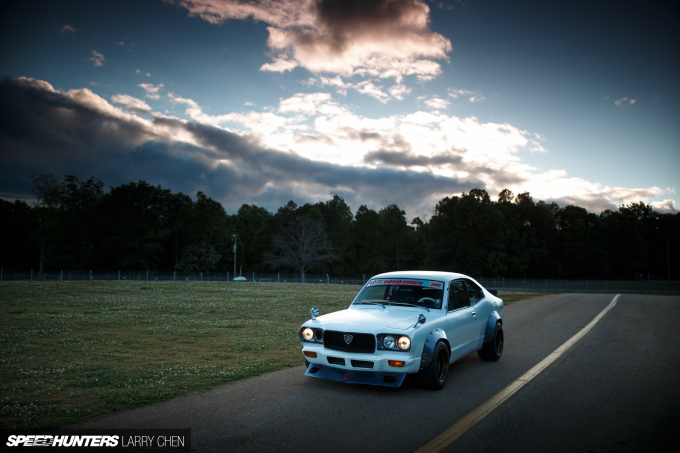
I am honored that Mr. Larry Chen was able to shoot the car. It almost didn't happened because of the weather.
Mazda History & Tales Of Friendship - Speedhunters
I am honored that Mr. Larry Chen was able to shoot the car. It almost didn't happened because of the weather. It rained all day and as I was leaving the track (Road Atlanta), weather started to clear up and Larry gave the thumbs up.
Like any cars or people at this age, it comes with fantastic history. This car was initially built by a gentleman named Tom McGuire. It was his daily for many years and later I was told about the sale of the car by another friend, Chris Mahaffey. At that point, I was only interested in FD RX-7 so I passed it to a good friend Steven White. I regretted no buying first time so, when it was available for sale, I snatched it up from Steven. I fixed few things and after my marriage and 7 cars parked, I ended up selling it to yet another friend who recently had to sell his beloved FD RX-7, Marco Lau. He owned it for several years and was moving to west coast and I ended back up with this car again. I've updated few things for this feature and all my friends have great memories with this car. My future plan is to put maybe NA 20B in it. But I guess I need to finish up few other projects before I do that swap.
In case some of you don't or can't click the link above, here are some photos from it.
I am honored that Mr. Larry Chen was able to shoot the car. It almost didn't happened because of the weather.
02-07-2017, 11:32 AM
#144
Senior Member
SL Member
Thread Starter
Join Date: Sep 2012
Posts: 115
Update:
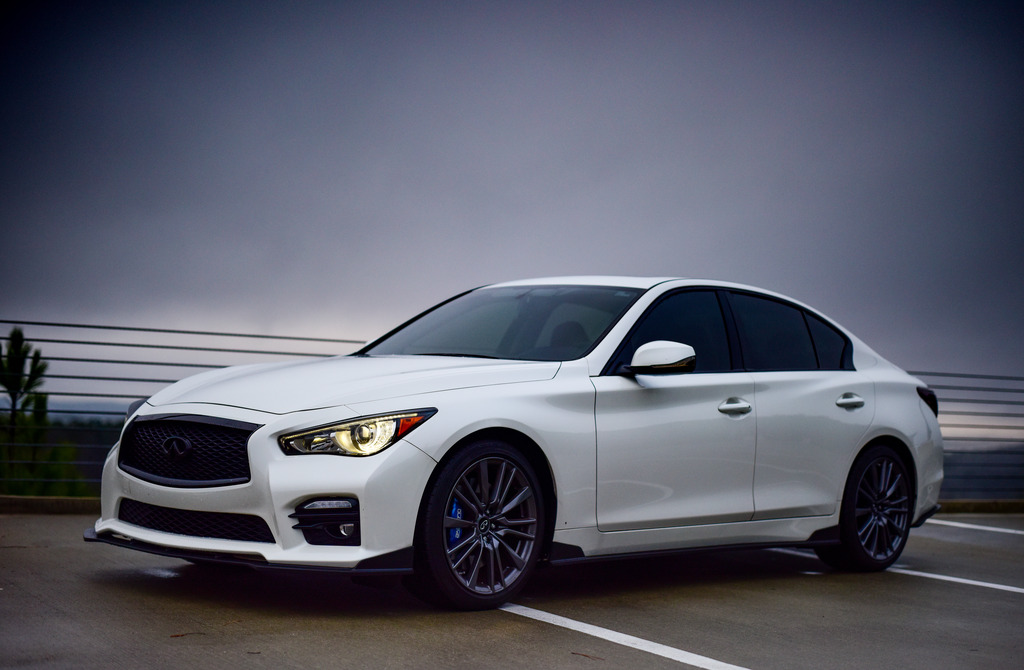
It's been busy few weeks for me. Purchased a new car for the family. Back SEMA 2015, group of friends rented a Infiniti Q50 3.7 in Vegas. I was driving around and put about 100 or so miles on it. Car was comfortable and had decent pick up in speed. At the SEMA, I ran into a guy who put GTR R35 motor into the Q50, and though how it would fulfill my GTR desire. Well, Nissan finally came out with Q50 Red Sport 400, which I recently purchased. Car is just what I needed. Comfortable daily my wife can drive and enjoy, switched to Sport + mode and car comes alive and becomes a beast with 380WHP (thats what some of the stock RS400's been dynoing). Here are couple of pictures of the car.

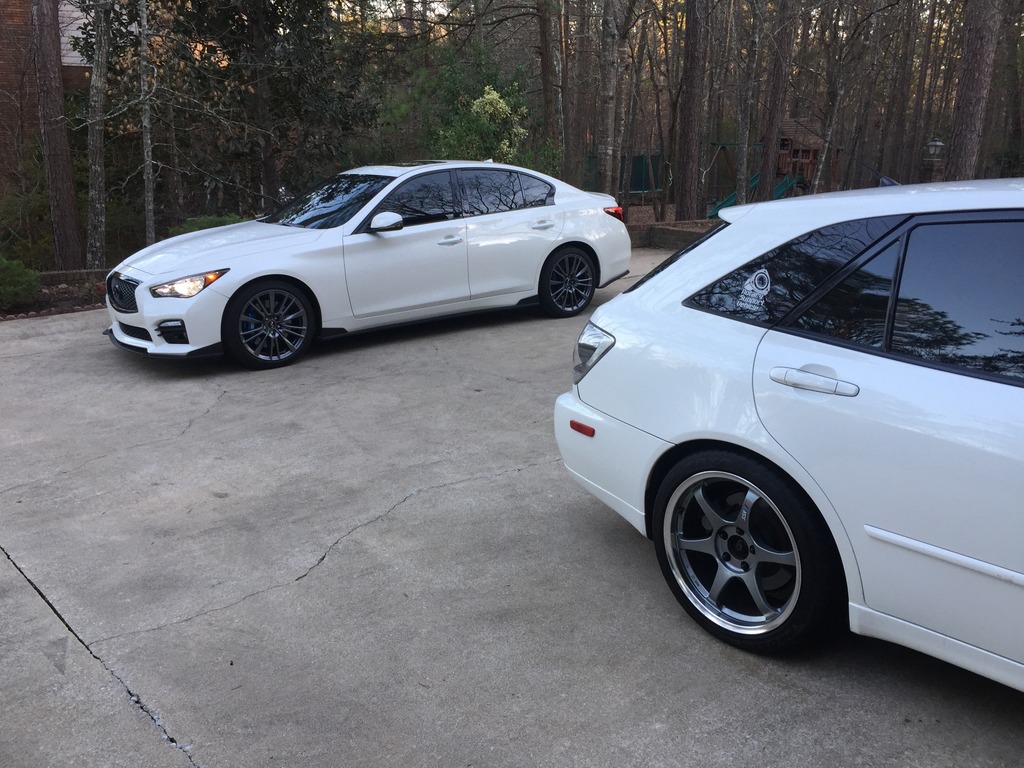
With both of my Daily, RS400 and IS300 Wagon.
Regarding Rotaries...
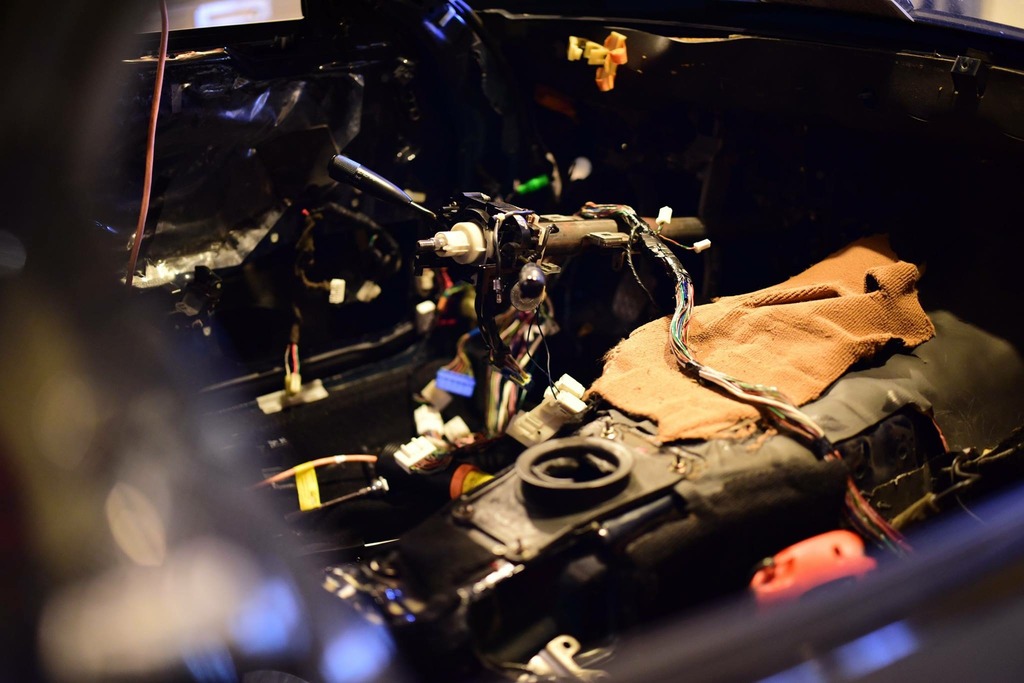
I've decided to clean up some wiring to get ready to put a new set up in the car.
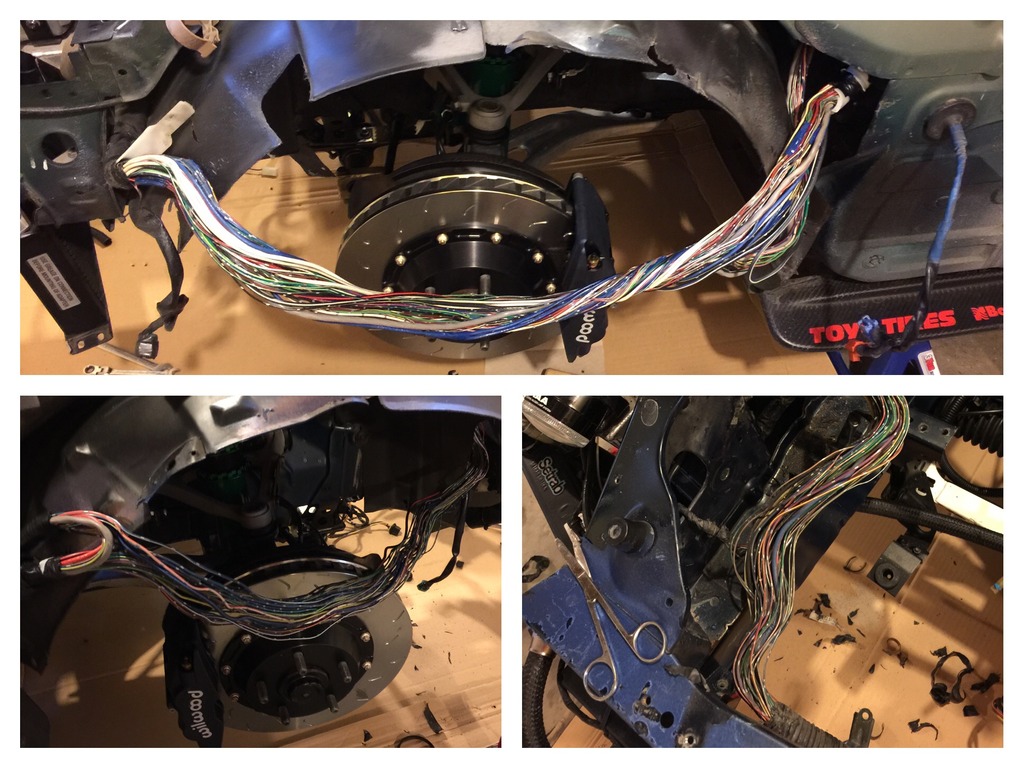
To do it right, I also needed to pull the dash and clean up the hacked up 20 year old interior harnesses.
More to come next week..
It's been busy few weeks for me. Purchased a new car for the family. Back SEMA 2015, group of friends rented a Infiniti Q50 3.7 in Vegas. I was driving around and put about 100 or so miles on it. Car was comfortable and had decent pick up in speed. At the SEMA, I ran into a guy who put GTR R35 motor into the Q50, and though how it would fulfill my GTR desire. Well, Nissan finally came out with Q50 Red Sport 400, which I recently purchased. Car is just what I needed. Comfortable daily my wife can drive and enjoy, switched to Sport + mode and car comes alive and becomes a beast with 380WHP (thats what some of the stock RS400's been dynoing). Here are couple of pictures of the car.
With both of my Daily, RS400 and IS300 Wagon.
Regarding Rotaries...
I've decided to clean up some wiring to get ready to put a new set up in the car.
To do it right, I also needed to pull the dash and clean up the hacked up 20 year old interior harnesses.
More to come next week..
02-15-2017, 10:43 AM
#145
Senior Member
SL Member
Thread Starter
Join Date: Sep 2012
Posts: 115
Not much to update. Been busy spending time with my son over the weekend and work.
But I was able to sand down my Mazdaspeed Carbon Fiber front bumper lip and clear it to bring the shine back. Than replaced my 99 lip from my SSM FD.
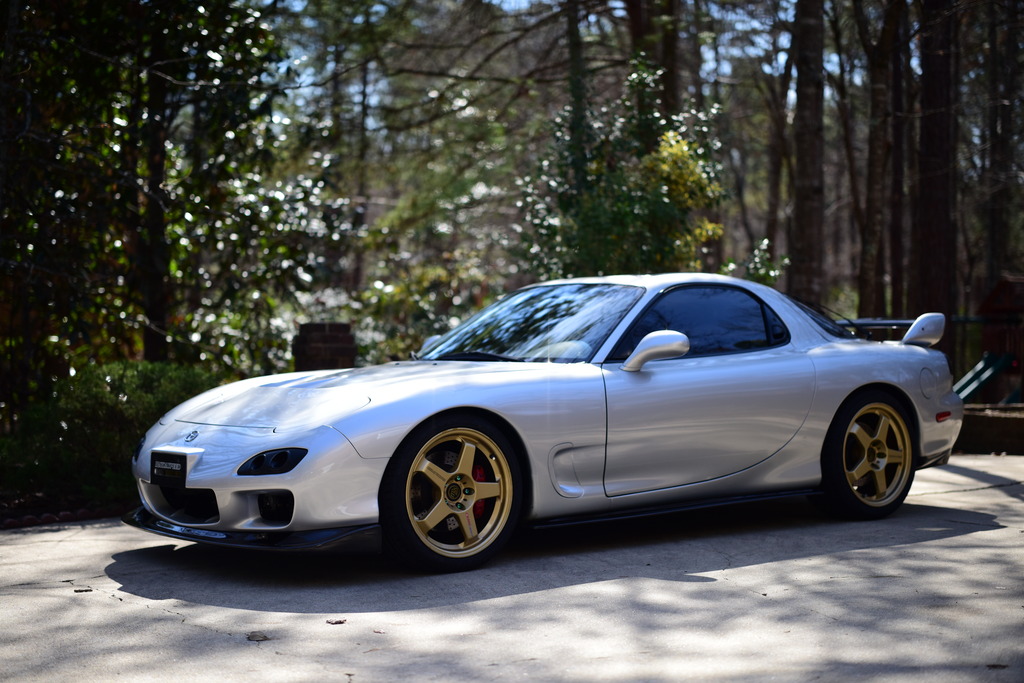
But I was able to sand down my Mazdaspeed Carbon Fiber front bumper lip and clear it to bring the shine back. Than replaced my 99 lip from my SSM FD.
02-22-2017, 10:23 AM
#146
Senior Member
SL Member
Thread Starter
Join Date: Sep 2012
Posts: 115
Update:
Over the weekend I was able to do some wrenching on the car.
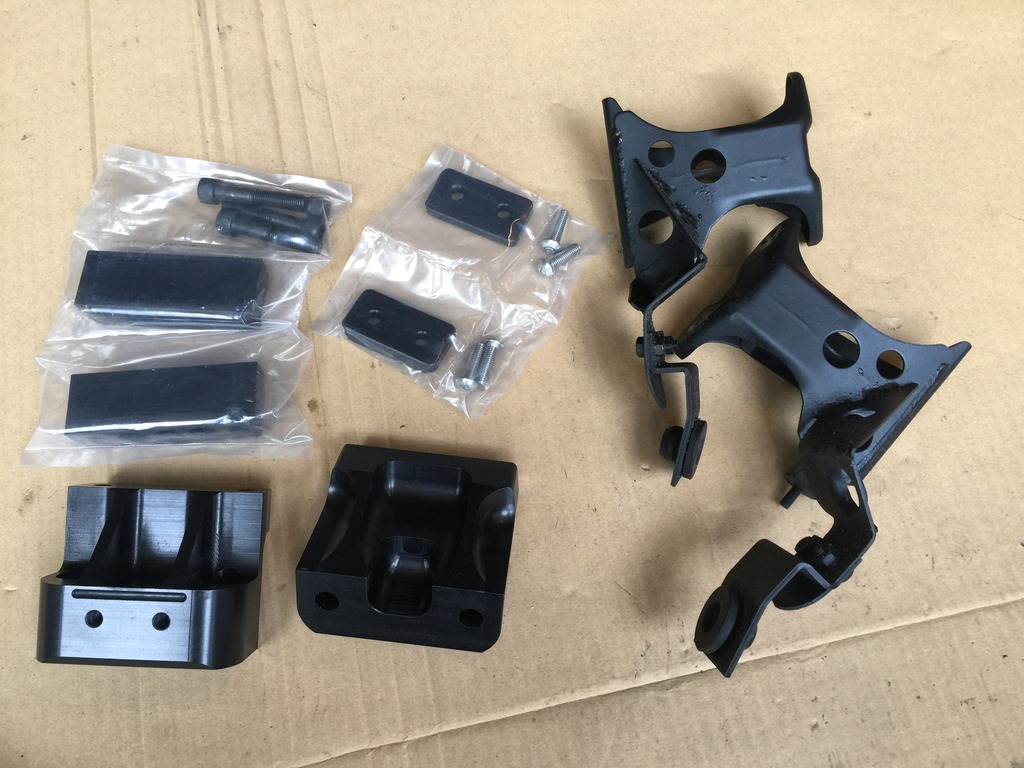
First installation of Sakebomb garage upgraded swaybar mounts. These things are beefy and well made. I'll be using a new Tripoint swaybar with these.
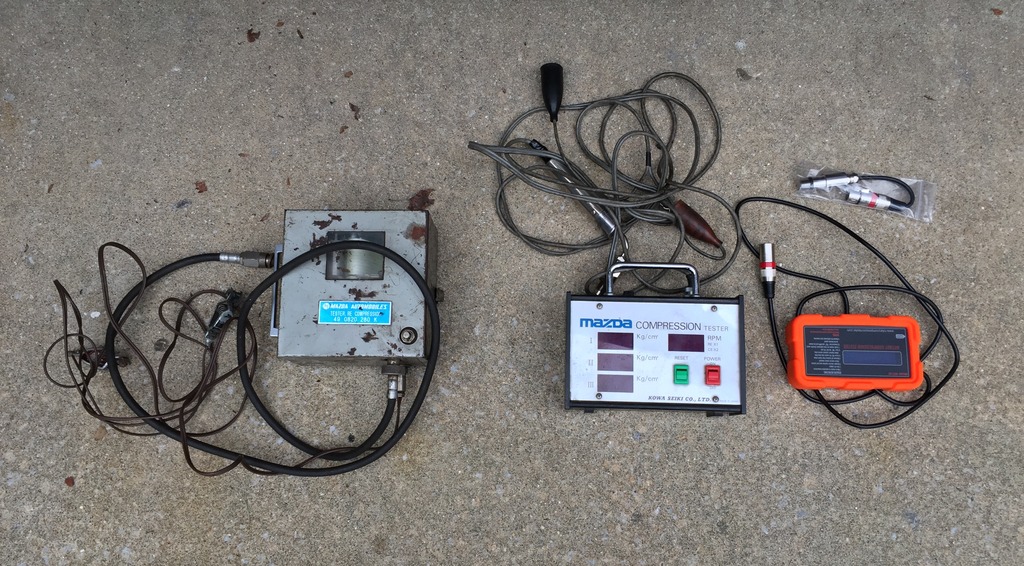
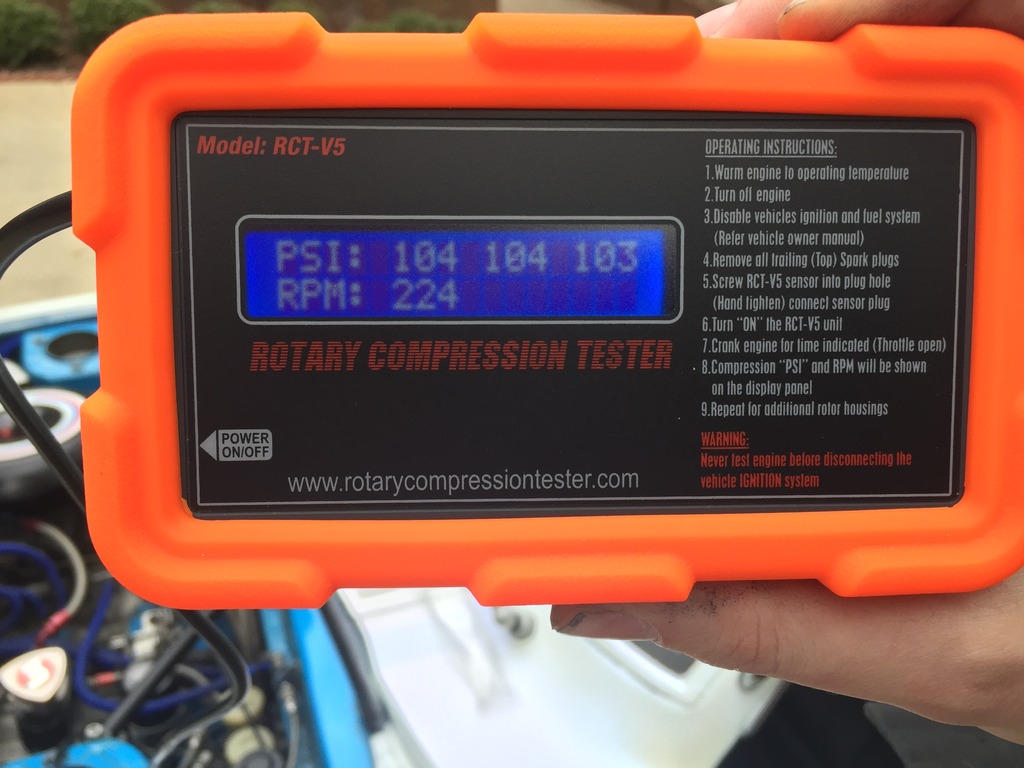
Another thing I was able to do was check the compression on my 1973 RX-3. I recently got the Rotary Compression Tester (RCT)'s battery operated compression tester and wanted to compare to my Mazda Specialty tool compression testers (old thermal and digital).
After warming up the car, I've tested just the OE digital and RCT testers. RCT unit uses 9V battery and it has automatic altitude calculation. Its super well made and easy to use. All you have to do is warm up, kill the ignition and fuel pump, install the sensor in the trailing plug hole and crank the motor. I did a facebook live video (
) hope some of you can view it.
Anyhow, here are the results from the RCT:
Front
 [/URL]
Rear
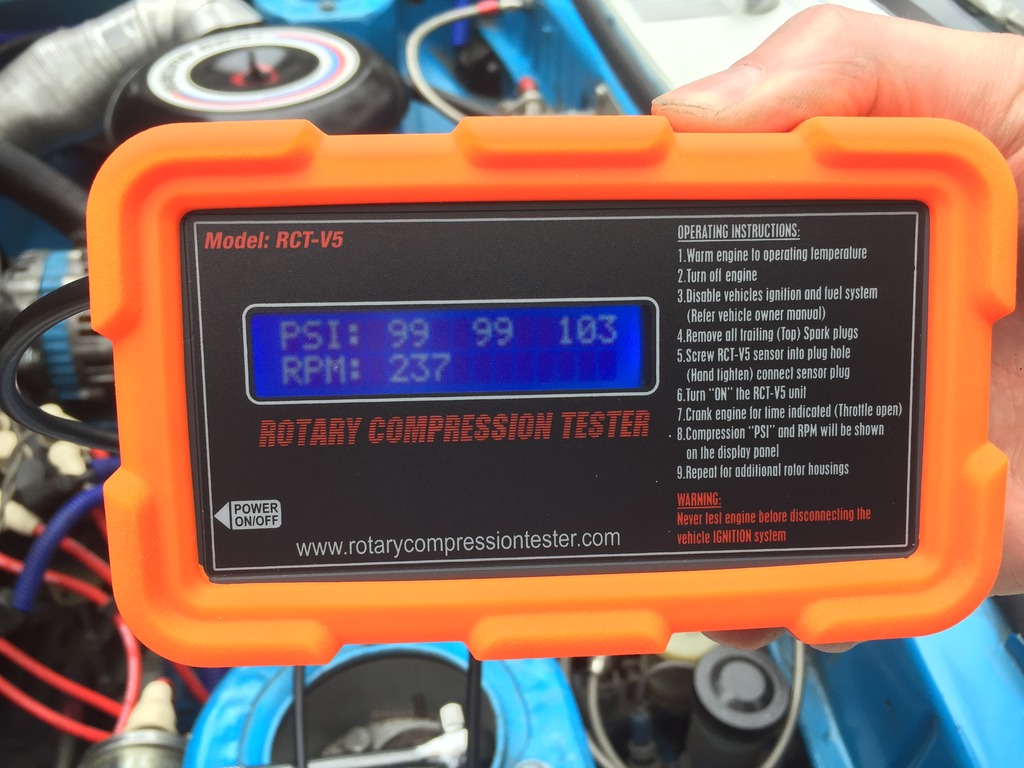
Not bad for 20+ year old engine
Here is the RX-3 warming up before the test.
Over the weekend I was able to do some wrenching on the car.
First installation of Sakebomb garage upgraded swaybar mounts. These things are beefy and well made. I'll be using a new Tripoint swaybar with these.
Another thing I was able to do was check the compression on my 1973 RX-3. I recently got the Rotary Compression Tester (RCT)'s battery operated compression tester and wanted to compare to my Mazda Specialty tool compression testers (old thermal and digital).
After warming up the car, I've tested just the OE digital and RCT testers. RCT unit uses 9V battery and it has automatic altitude calculation. Its super well made and easy to use. All you have to do is warm up, kill the ignition and fuel pump, install the sensor in the trailing plug hole and crank the motor. I did a facebook live video (
Facebook Post
Anyhow, here are the results from the RCT:
Front
[/URL]Rear
Not bad for 20+ year old engine
Here is the RX-3 warming up before the test.
03-02-2017, 10:26 AM
#147
Senior Member
SL Member
Thread Starter
Join Date: Sep 2012
Posts: 115
Update!
Couple of months ago I ran into Facebook post about Champion Autoparts, "Search for a Champion 2017" promotion.

I've decided to enter and a week ago, I was chosen as one of the top 25 finalist!!!

I would greatly appreciate it if those of you following this thread to vote for me. I have an unique project that I'll be working on later this year and would be nice to win this to support that build. If I win, I'll share what that is the day of winner being announced... otherwise, I'll be keeping it hush hush for little bit longer
To Vote, goto: 2017 Search for A Champion Grand Prize Voting Now Open!
Voters can also win prizes from Champion. Thank you for your support!
Couple of months ago I ran into Facebook post about Champion Autoparts, "Search for a Champion 2017" promotion.
I've decided to enter and a week ago, I was chosen as one of the top 25 finalist!!!
I would greatly appreciate it if those of you following this thread to vote for me. I have an unique project that I'll be working on later this year and would be nice to win this to support that build. If I win, I'll share what that is the day of winner being announced... otherwise, I'll be keeping it hush hush for little bit longer
To Vote, goto: 2017 Search for A Champion Grand Prize Voting Now Open!
Voters can also win prizes from Champion. Thank you for your support!
03-08-2017, 11:09 AM
#148
Senior Member
SL Member
Thread Starter
Join Date: Sep 2012
Posts: 115
Update:
I finally had a weekend to do some car related stuff.
First my daily IS300 Wagon...
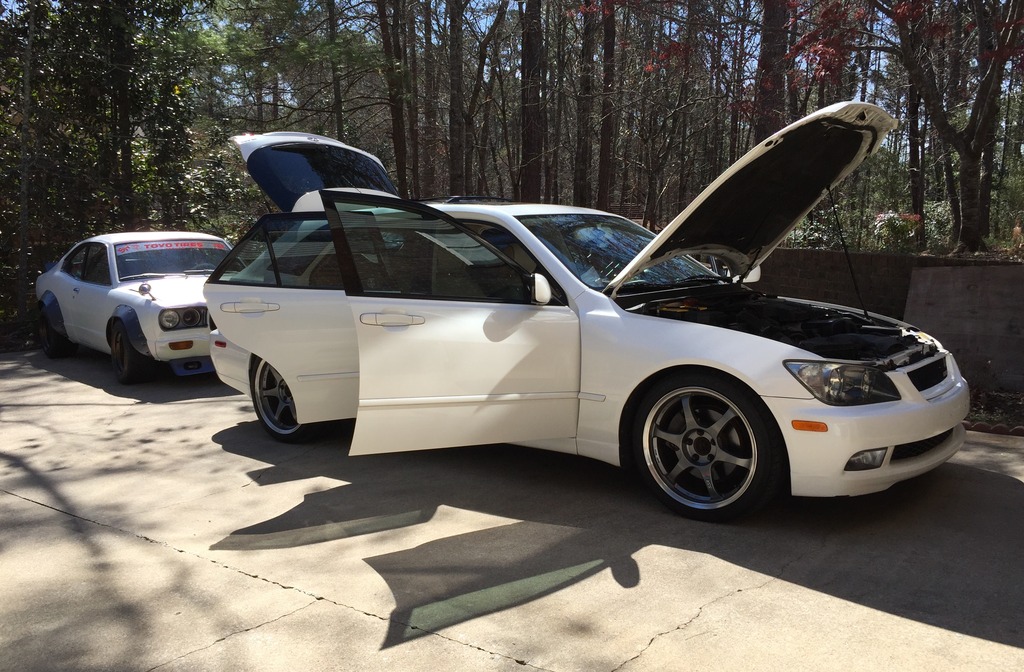
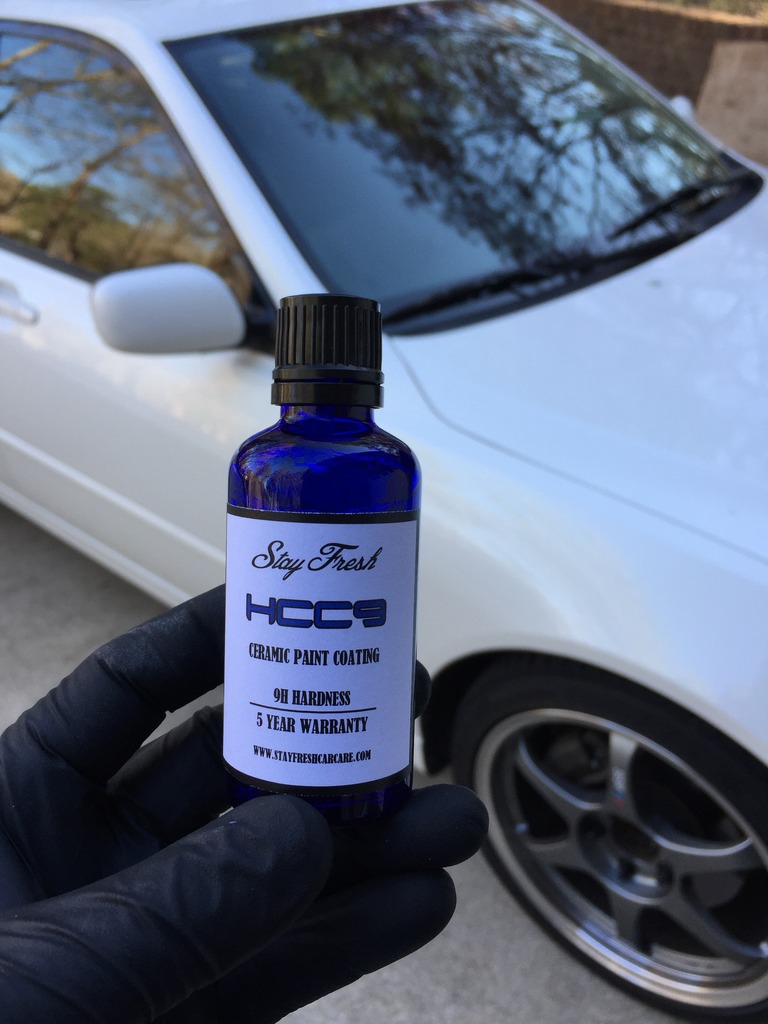
My RedSport had ceramic/nano coating from previous owner and so far I was very happy with the results. So, I've decided to put the coating on my IS300.
I've decided to try 'Stay Fresh Car Care' as I've had great luck with their detailing products in the past.
Stay Fresh Car Care / Premium Car Care Supplies
I went with HCC9, 50mL kit with 8oz Quick Ceramic detailer. (less than $100).
First, I cut the car using a random orbitor and various pads and such (3-5 hours)
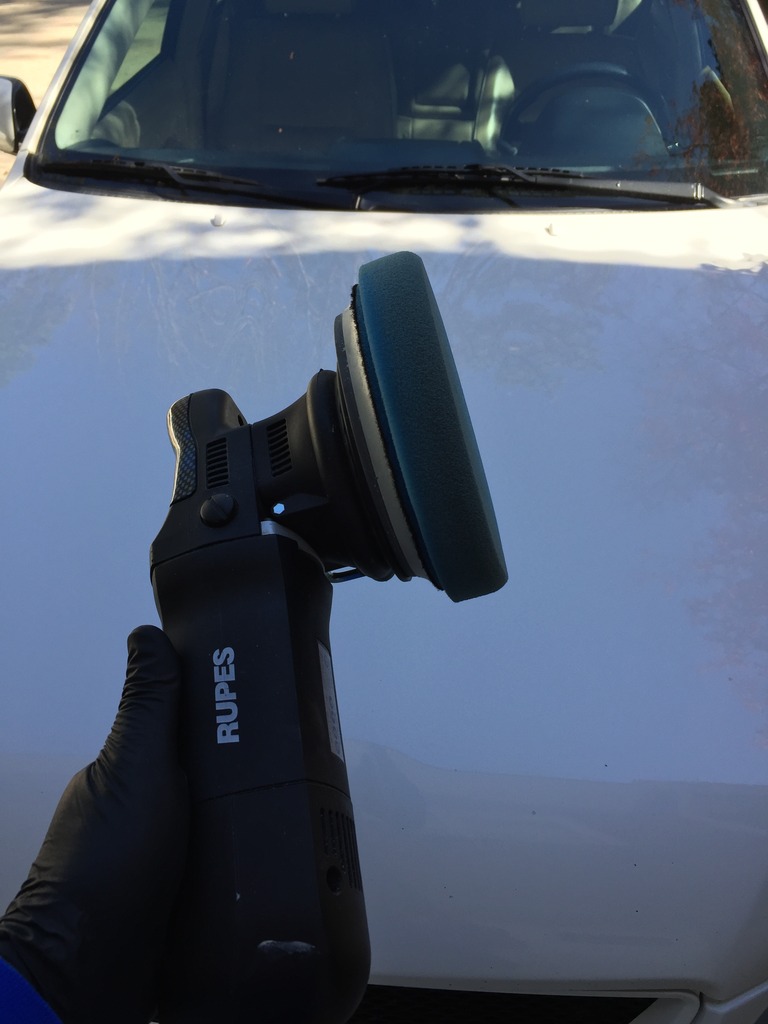
Wiped it down with isopropanol (rubbing alcohol) to remove any residue from wax, sealant, oil etc. I than started to apply the HCC9 using supplied applicator. This process wasn't bad. I was told to do small section at a time but the temperature was kind of cool and HCC9 wasn't drying that quickly so I did panel at a time. First layer of application including alcohol wipe down took me about an hour.
I had about 30-40% of the ceramic coating leftover so, i messaged the owner of Stay Fresh about if second coat is necessary. He said it will help. He suggested I use the remainder of the bottle on the car. He said you can apply the second layer after about an hour after 1st application. I decided to let the first layer harden overnight.
Oh, no water can touch the car during hardening process.
Here is the result:
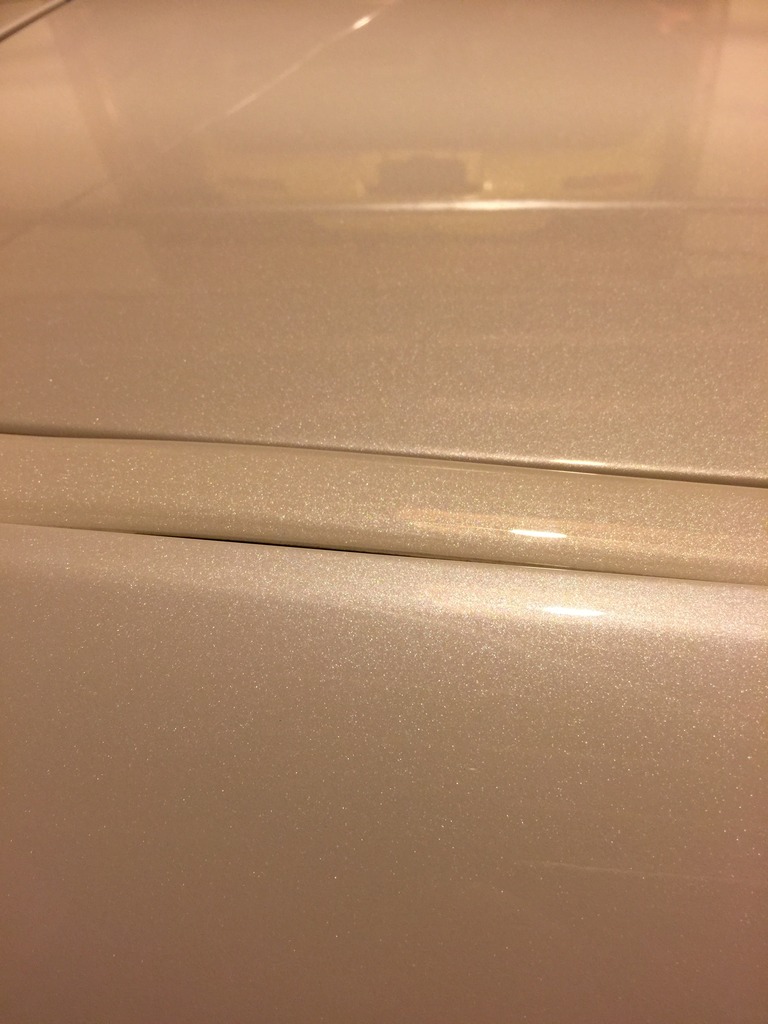
Definitely shines pretty decent. I was driving home last night and it was raining. I could tell this stuff was working. In heavy traffic, everytime I came to a stop, a good amount of water from the roof of the car will rush towards the front windshield. Moving forward, I could see the water coming down on my rear window. This is first time seeing such a thing. To maintain, no waxing, no soap, just water to clean the car for the next 5 years! Benefit I see with this is daily driven cars and car that might be loosing little of clarity due to fade.
Anyhow, now about the RX...
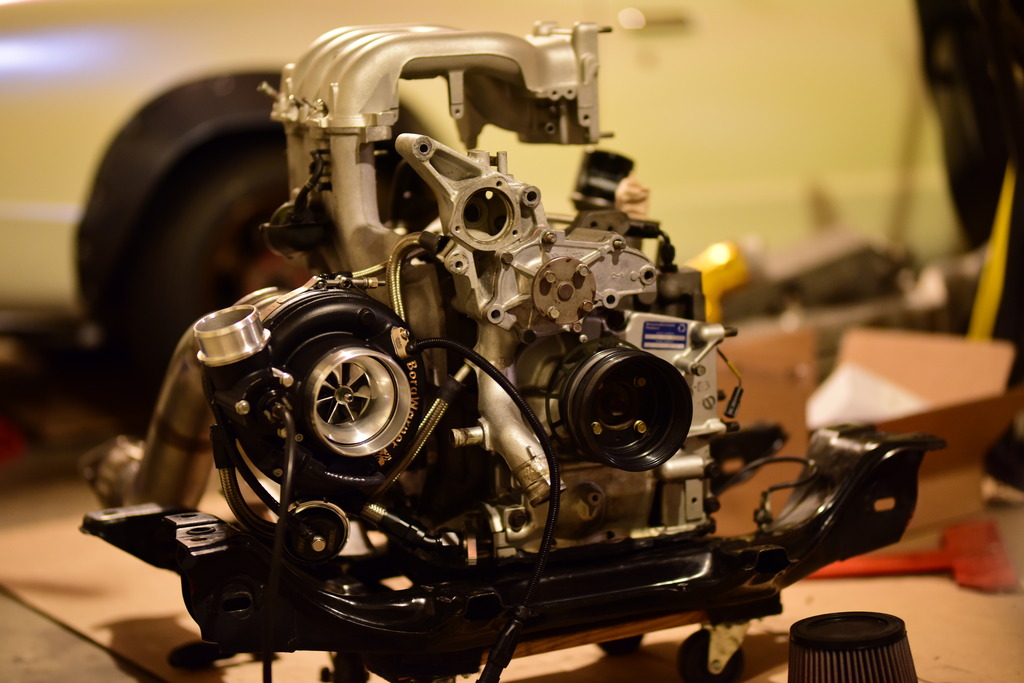
I'm re-doing my RX-7 for a guaranteed feature with SuperStreet Magazine. So, I've decided to re do my turbo set up and support my friend Zach, Addicted Performance. He also supports my event, 'Deals Gap Rotary Rally' (DGRR) and helped me by answering many of my questions regarding turbos and tuning.
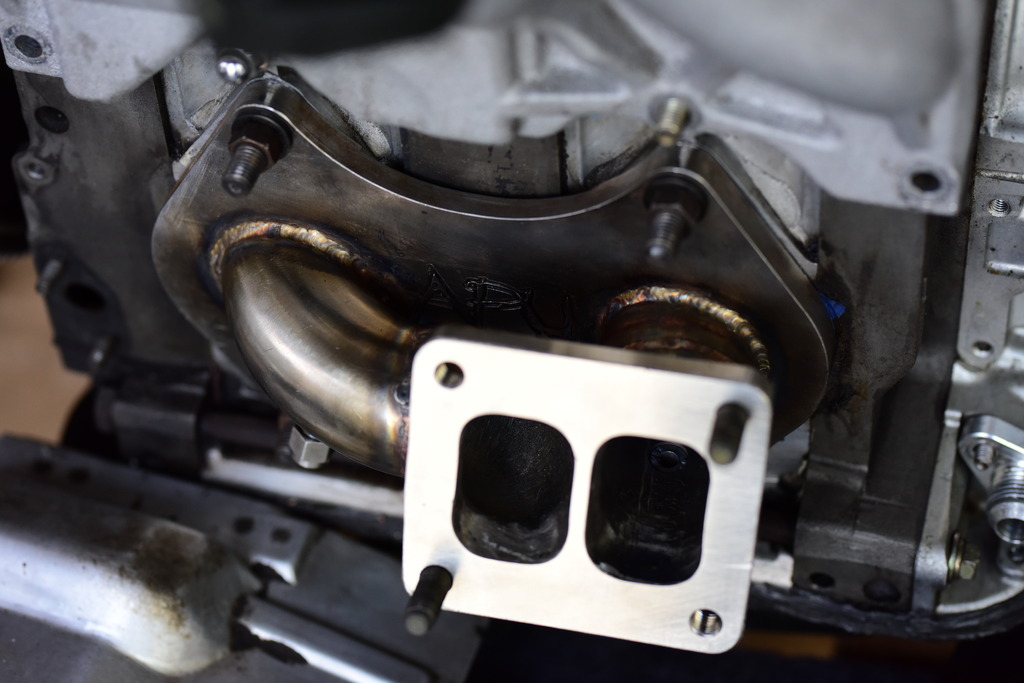
I've decided to go with his Borg Warner EFR kit. Craftsmanship on the kit is top notch!! Also, Zach is a great tuner and will be taking my car to his shop when its done for a tune. Hopefully during DGRR and unveil the car there.
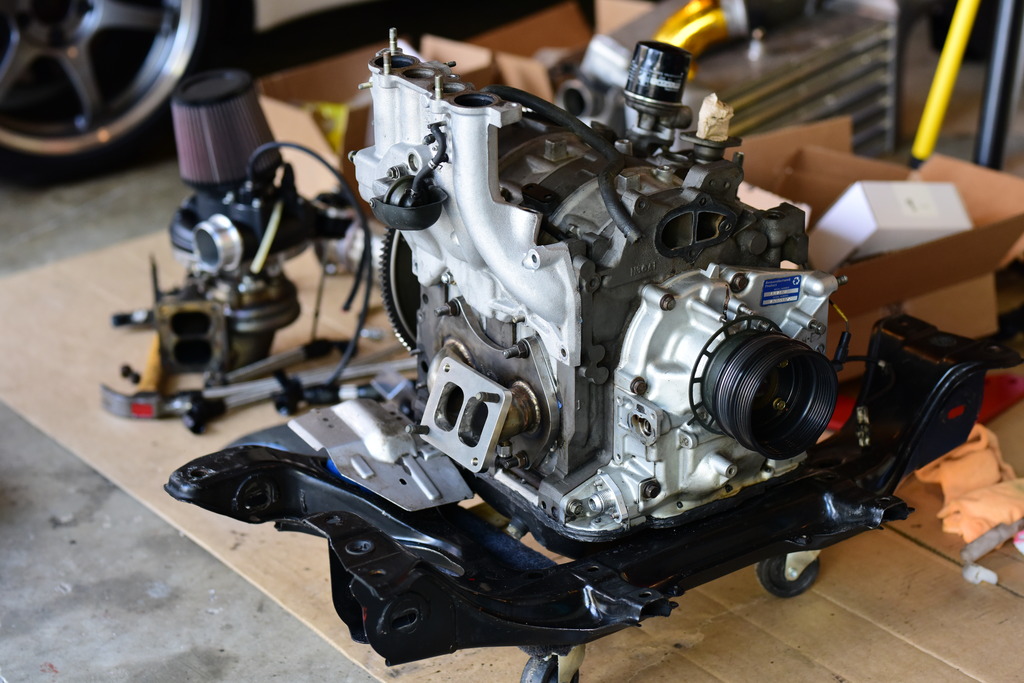
Turbo is Borg Warner EFR 8374 IWG with Turbosmart upgraded Bypass valve and IWG actuator.

I've mocked it up on my spare 13B-REW motor, and this is using REW intake manifold. I'll be also mocking it up with Cosmo 13B-RE manifold later on.
Also, vote for me!!! You can vote daily!!
2017 Search for A Champion Grand Prize Voting Now Open!
Thank you all for reading this thread!!
I finally had a weekend to do some car related stuff.
First my daily IS300 Wagon...
My RedSport had ceramic/nano coating from previous owner and so far I was very happy with the results. So, I've decided to put the coating on my IS300.
I've decided to try 'Stay Fresh Car Care' as I've had great luck with their detailing products in the past.
Stay Fresh Car Care / Premium Car Care Supplies
I went with HCC9, 50mL kit with 8oz Quick Ceramic detailer. (less than $100).
First, I cut the car using a random orbitor and various pads and such (3-5 hours)
Wiped it down with isopropanol (rubbing alcohol) to remove any residue from wax, sealant, oil etc. I than started to apply the HCC9 using supplied applicator. This process wasn't bad. I was told to do small section at a time but the temperature was kind of cool and HCC9 wasn't drying that quickly so I did panel at a time. First layer of application including alcohol wipe down took me about an hour.
I had about 30-40% of the ceramic coating leftover so, i messaged the owner of Stay Fresh about if second coat is necessary. He said it will help. He suggested I use the remainder of the bottle on the car. He said you can apply the second layer after about an hour after 1st application. I decided to let the first layer harden overnight.
Oh, no water can touch the car during hardening process.
Here is the result:
Definitely shines pretty decent. I was driving home last night and it was raining. I could tell this stuff was working. In heavy traffic, everytime I came to a stop, a good amount of water from the roof of the car will rush towards the front windshield. Moving forward, I could see the water coming down on my rear window. This is first time seeing such a thing. To maintain, no waxing, no soap, just water to clean the car for the next 5 years! Benefit I see with this is daily driven cars and car that might be loosing little of clarity due to fade.
Anyhow, now about the RX...
I'm re-doing my RX-7 for a guaranteed feature with SuperStreet Magazine. So, I've decided to re do my turbo set up and support my friend Zach, Addicted Performance. He also supports my event, 'Deals Gap Rotary Rally' (DGRR) and helped me by answering many of my questions regarding turbos and tuning.
I've decided to go with his Borg Warner EFR kit. Craftsmanship on the kit is top notch!! Also, Zach is a great tuner and will be taking my car to his shop when its done for a tune. Hopefully during DGRR and unveil the car there.
Turbo is Borg Warner EFR 8374 IWG with Turbosmart upgraded Bypass valve and IWG actuator.
I've mocked it up on my spare 13B-REW motor, and this is using REW intake manifold. I'll be also mocking it up with Cosmo 13B-RE manifold later on.
Also, vote for me!!! You can vote daily!!
2017 Search for A Champion Grand Prize Voting Now Open!
Thank you all for reading this thread!!
03-15-2017, 10:35 AM
#149
Senior Member
SL Member
Thread Starter
Join Date: Sep 2012
Posts: 115
To follow up on the ceramic coating, here are couple of video of my IS300 Wagon showing how water just beads off.
Water on the hood.
Close up on the fender.
Besides this, not much is going on. Spent most of the weekend hanging out with my son and dinner with close friend. Otherwise, not much of a car week
Water on the hood.
Close up on the fender.
Besides this, not much is going on. Spent most of the weekend hanging out with my son and dinner with close friend. Otherwise, not much of a car week

Thread
Thread Starter
Forum
Replies
Last Post
cquencebrakes
PPC: Suspension / Brakes
0
06-23-2015 09:42 PM