DIY HKS Turbo Timer Type 1 Install
 10-06-2009, 12:42 AM
#1
Member
SL Member
Thread Starter

Join Date: Mar 2009
Location: TAMPA FL
Posts: 83
This is a DIY for HKS TT type 1 install with a plug n play harness from Ptuning.
This Install was done on a 2008 Scion tC.
First of all, I am NOT responsible for what you or this aftermarket part does to your car. Unless you are completely comfortable with tearing things apart, DO NOT PROCEED.
* ALWAYS keep hardware (bolts, nuts, screws, anything) in a SAFE PLACE.
Tools you'll need:
- Screwdrivers, Phillips and Flathead.
- Socket wrench and socket set.
Step 1
Disconnect your battery.
Step 2
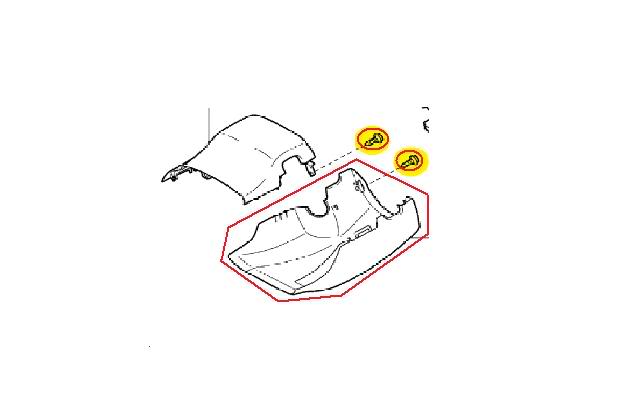
Remove two screws on the steering column cover, and pull off the bottom cover as shown in the picture highlighted in red.
Step 3
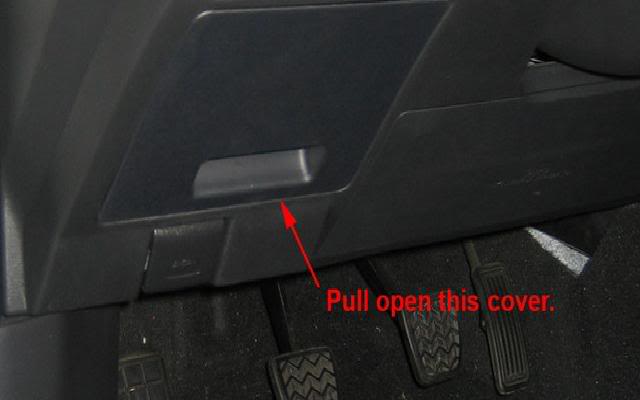
Remove the fuse cover as shown in the picture below by pulling off.
Step 4
Removing shift gate cover and the cover with the cup holders.
1. Begin by removing your shift ****. Remember, "Lefty loosey."
2. Remove the shift gate cover, there are four points which you will want to pry with a Flathead. I have marked the area with a red arrow in the picture below.
Before pulling the cover up and away there is a wire that is plugged into the cigarette lighter, go ahead and unplug the wire from the cigarette lighter before removing the cover away from the area.
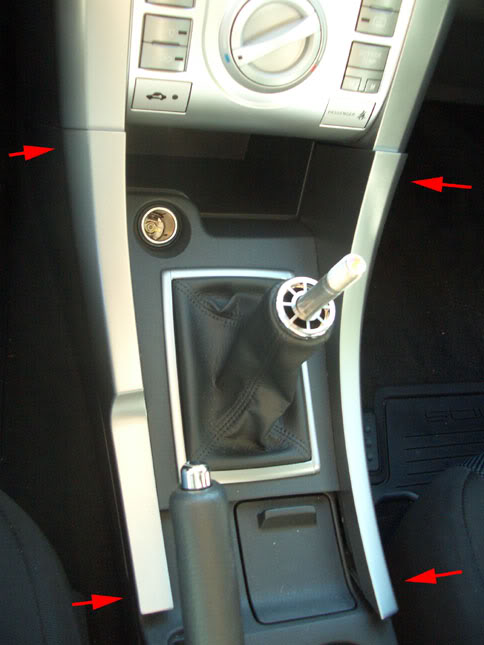
3. Remove the cup holder section, by doing the same procedure that you did with shift gate cover. The four points which you will need to pry, are in the similar location as the shift gate cover.
Step 5
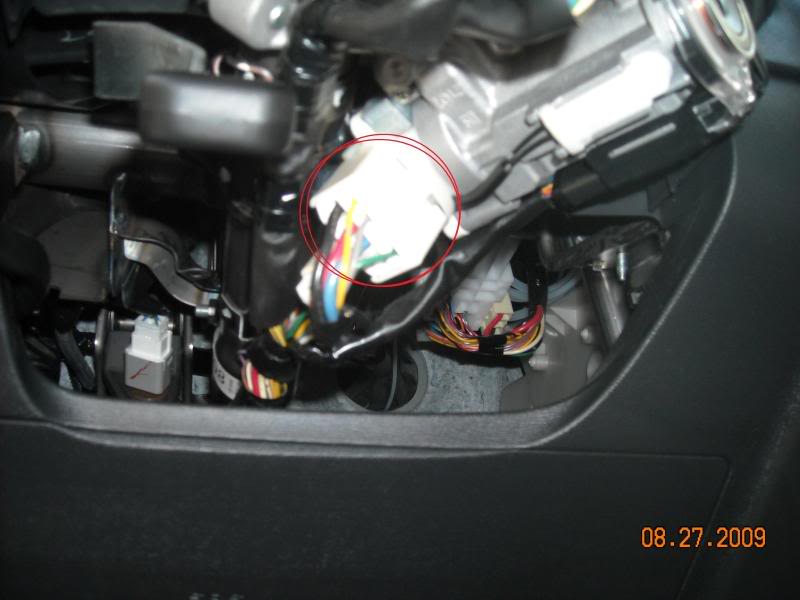
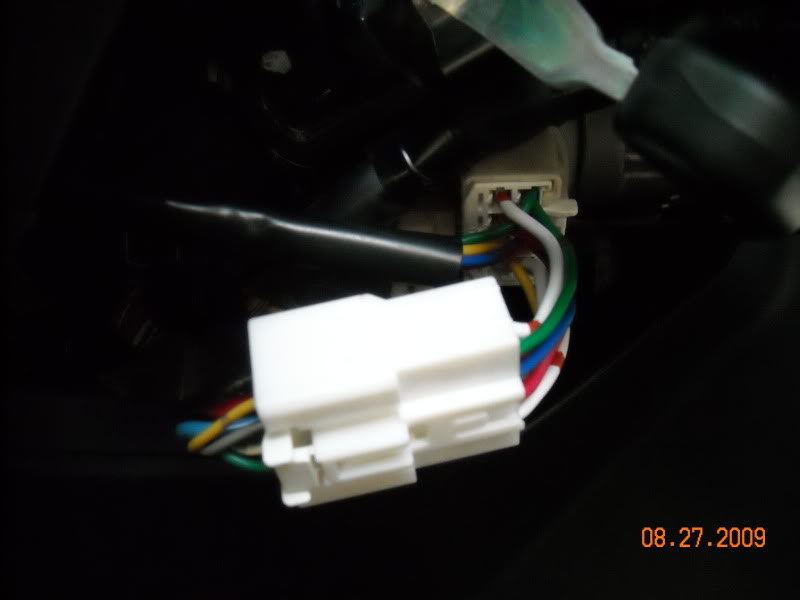
Remove the ignition harness clip, from the ignition connector.
This Install was done on a 2008 Scion tC.
First of all, I am NOT responsible for what you or this aftermarket part does to your car. Unless you are completely comfortable with tearing things apart, DO NOT PROCEED.
* ALWAYS keep hardware (bolts, nuts, screws, anything) in a SAFE PLACE.
Tools you'll need:
- Screwdrivers, Phillips and Flathead.
- Socket wrench and socket set.
Step 1
Disconnect your battery.
Step 2
Remove two screws on the steering column cover, and pull off the bottom cover as shown in the picture highlighted in red.
Step 3
Remove the fuse cover as shown in the picture below by pulling off.
Step 4
Removing shift gate cover and the cover with the cup holders.
1. Begin by removing your shift ****. Remember, "Lefty loosey."
2. Remove the shift gate cover, there are four points which you will want to pry with a Flathead. I have marked the area with a red arrow in the picture below.
Before pulling the cover up and away there is a wire that is plugged into the cigarette lighter, go ahead and unplug the wire from the cigarette lighter before removing the cover away from the area.
3. Remove the cup holder section, by doing the same procedure that you did with shift gate cover. The four points which you will need to pry, are in the similar location as the shift gate cover.
Step 5
Remove the ignition harness clip, from the ignition connector.
Step 6
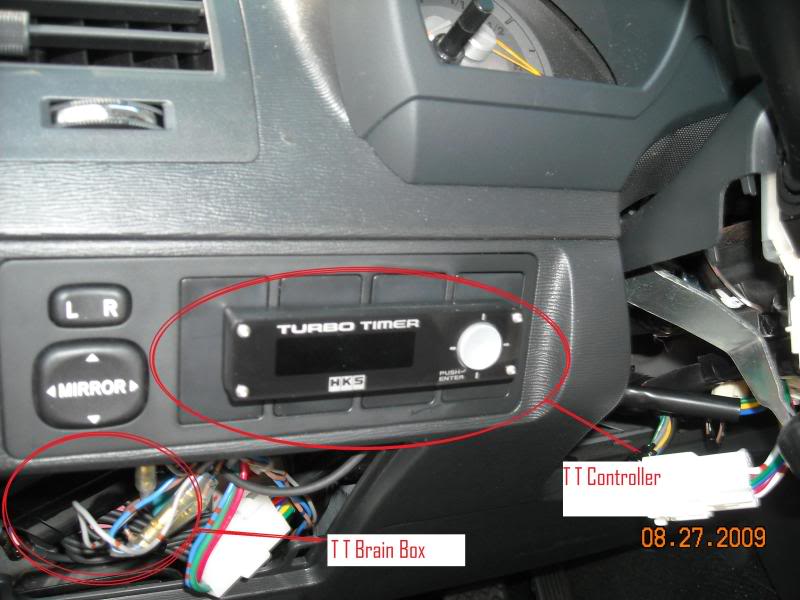
Mount your TT brain box, and TT controller panel in a location that you want it in. It is best to keep it in an area where your plug n play harness can reach ignition harness connector.
Make sure that you connect your TT controller panel to your TT brain box once you have mounted both items to it location. In the picture below is where I mounted my TT brain box and controller.
Step 7
Connect your plug n play harness to your TT brain box, and run it to the ignition harness connector.
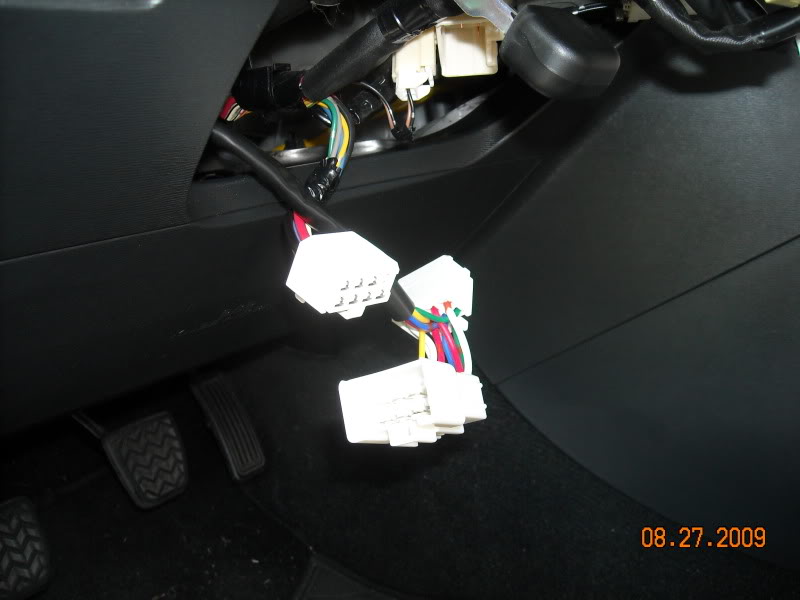
Step 8
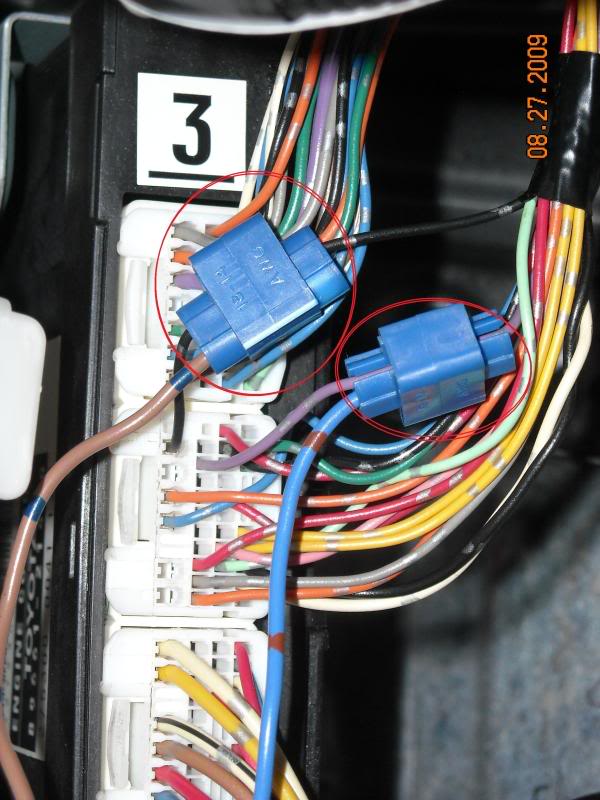
Connect your plug n play harness to the ignition harness clip, and connector as shown in the picture below.
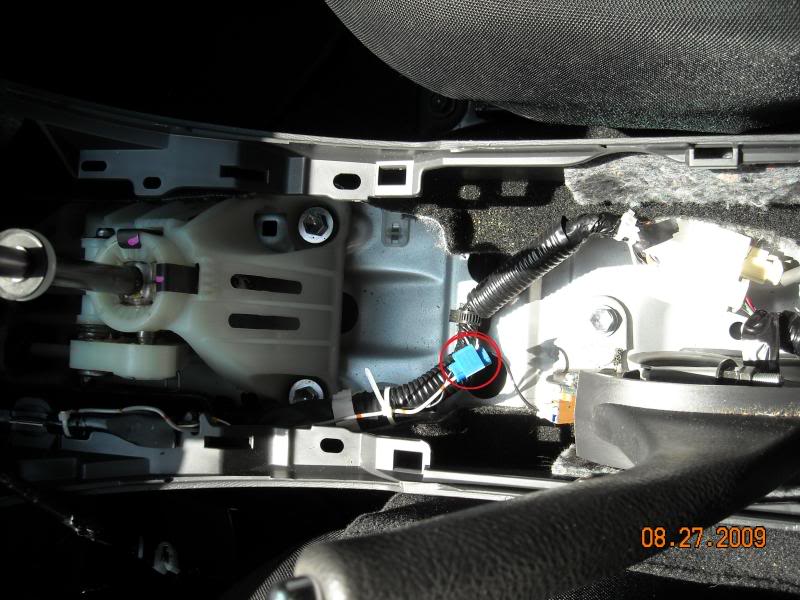
Step 9
Run your parking brake wire which is gray from your TT brain box to your E-Brake, and splice the wire into your E-Brake wire with a splice connector as shown in the picture below.
Step 10
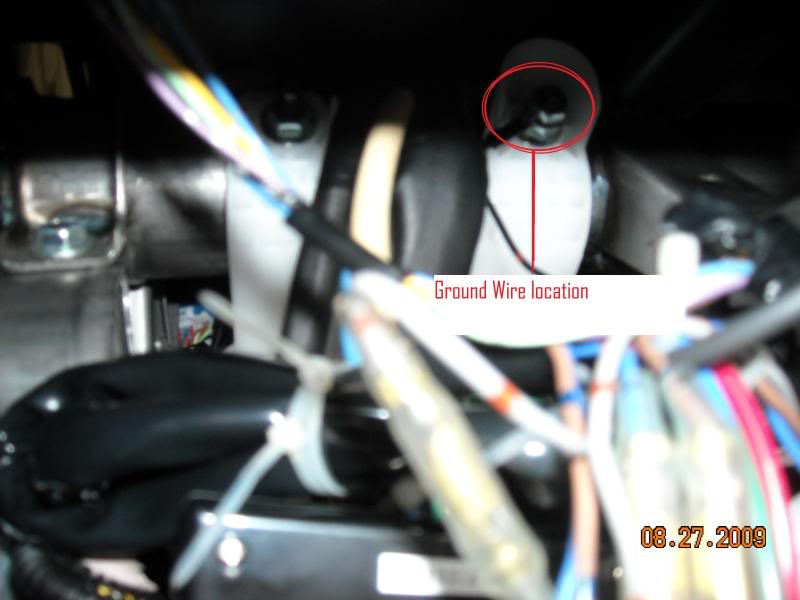
Take your ground wire which is black, and connect a ring terminal to the end of the wire.
Then unscrew the nut which is located in the fuse area, and run your ground wire to the stud which you pulled the nut off from.
Place the ring terminal on to the stud, and screw the nut back on to the stud as shown in the picture below.
Step 11
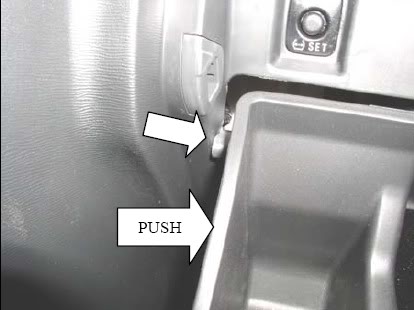
Removing your glove box.
1. Open the glove box and push on both sides toward the middle of the box and pull towards you lightly to release the box. Shown in picture below.
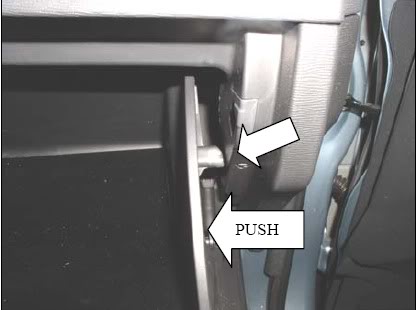
2. Rotate the glove box downward to gain access to the hinge. Squeeze the plastic hinge together and push away from the supporting rod. Shown in picture blow.
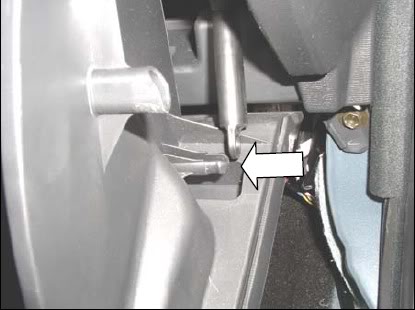
3. Remove the glove box.
Step 12
Run both RPM signal lead wire, and your speed signal lead wire from your TT brain box to your ECU.
Step 13
1.connect your RPM signal lead wire which is brown to your ECU RPM signal wire which is black with a splice connector as shown in picture below.
2. Connect your speed signal lead wire which is blue to your ECU speed signal wire which is purple with a spice connector as shown in picture below.
Step 14
Connect your battery.
Step 15
Start up your car, and check to see if your TT is running proper.
Step 16
Once everything is good to go, put back to gather your glove box, steering column cover, and your fuse cover.
Last edited by MR_LUV; 10-22-2017 at 05:36 AM.


 10-06-2009, 02:04 AM
#4
Member
SL Member
Thread Starter
Join Date: Mar 2009
Location: TAMPA FL
Posts: 83
thanks Im not sure, because they used a different ecu. you should check out dezod motor sports tech notes for scion tc 05-06 ecu pin-out, you may find what your looking for.
10-06-2009, 04:24 PM
#5

Nice DIY
The wiring for an RPM signal will be different for an 05-06 than an 07-09.
For wiring for both, go here:
http://www.dezod.com/tech_notes.cfm
The wiring for an RPM signal will be different for an 05-06 than an 07-09.
For wiring for both, go here:
http://www.dezod.com/tech_notes.cfm
10-06-2009, 05:47 PM
#7
Senior Member
SL Member

Join Date: Jun 2007
Location: Florida
Posts: 429
Thats going by what the OP wired into.
(Will not be the same for other items such as piggybacks)
10-06-2009, 10:28 PM
#10
Member
SL Member
Thread Starter
Join Date: Mar 2009
Location: TAMPA FL
Posts: 83
If you have a plug n play harness for your fic the wires should still be in the same location but on the plug n play harness,or you can splice it into the car harness before it goes into your plug n play harness.
 08-12-2011, 01:19 PM
#13
Senior Member
SL Member
Scinergy

Join Date: Aug 2006
Location: Fontana, CA
Posts: 651
I installed mine in the '06, works OK.
Only problem is that it isn't reading the speed wire properly.
I followed the manual that came with the TT.
It runs about twice the speed it should be when compared to my speedometer.
Only problem is that it isn't reading the speed wire properly.
I followed the manual that came with the TT.
It runs about twice the speed it should be when compared to my speedometer.


Thread
Thread Starter
Forum
Replies
Last Post
my06tc
PPC: Engine / Drivetrain
10
06-25-2015 12:18 AM
JM Auto Racing
Exclusive Sponsored Sales
14
12-19-2014 06:36 PM
TheRedBox
Scion xA/xB 1st-Gen Drivetrain & Power
31
12-02-2003 04:53 PM