
How-to: Install front coaxial speakers


Senior Member
SL Member
Scinergy
Joined: Dec 2007
Posts: 1,139
From: Scion Heaven
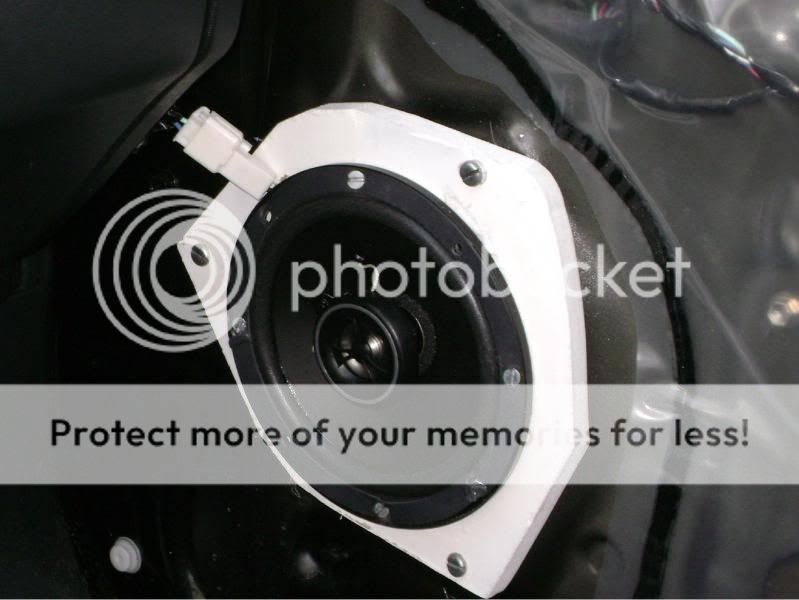
use a homemade baffle like he did. I bought one from a site that was linked somewhere on scionlife. Thing fits perfect, but has holes all around. Awful design. Until spring when I'll make my own, I had to patch work some model clay in the damn things.

bump
hey Magnus213, great DIY. I might have a solution to your tweeter problem. It looks like in one of the pictures, that both wires connected to the stock tweeter are the same color. This would indicate that the stock tweeter is wired in series with the stock speaker. If this is correct, to make your new speaker operate sans stock tweeter, simply cut the two wires connected to the stock tweeter and connect them.
hey Magnus213, great DIY. I might have a solution to your tweeter problem. It looks like in one of the pictures, that both wires connected to the stock tweeter are the same color. This would indicate that the stock tweeter is wired in series with the stock speaker. If this is correct, to make your new speaker operate sans stock tweeter, simply cut the two wires connected to the stock tweeter and connect them.


Banned
Fail, INC
Scikotics
SL Member
MN Scions
Joined: Feb 2009
Posts: 995
Alright, so I know this isn't helpful because you're asking for something other than MDF, but I just figured I could add to the thread. I used MDF, and it was pretty easy. I was kinda worried about the moisture thing too, especially because as I was taking out the old "bracket" i had made, there was condensation/ice everywhere. That's when I went back and put on another layer of Killz, primer/sealer. I think I did four altogether, and I'm pretty satisfied.
and I'm not sure about the other person, but I couldn't see mine through the grill on the door

[/img]
and I'm not sure about the other person, but I couldn't see mine through the grill on the door
[/img]
Banned
Fail, INC
Scikotics
SL Member
MN Scions
Joined: Feb 2009
Posts: 995
tip of advice, not sure about the xb's setup, but in hindsight, I think it would have been easier to trace out a stencil using the empty speaker well instead of the speaker/bracket. the reasoning is because i made mine a tiny bit large. definitely not a big deal because it still fit when i put my door on, but had it been any larger, it may have become a problem.
just a heads up. GL
just a heads up. GL

Banned
Fail, INC
Scikotics
SL Member
MN Scions
Joined: Feb 2009
Posts: 995
oh yea, well it really isn't any different, you either have to trace the old bracket, or the door mount, and if you do it on the door, it will just look cleaner, and make sure that it doesnt get too big.
either way though, it's pretty simple.
if i could figure it out, anybody else's will be perfect
either way though, it's pretty simple.
if i could figure it out, anybody else's will be perfect


Junior Member
Joined: Jul 2011
Posts: 10
From: Whitefish, Montana
I blew out my stocks and took a knife - cutting out the existing speaker. I left the outside frame mount intact and removed the cone/magnet and reinforcement plastic that went behind it. Simply took some gorilla glue [normal] and put it around the ring on my new speakers and plopped it in. Had to mount a stick from inside the car against the speaker so I knew it would hold, but I saved far more time by just cutting out the old one and dropping in a new one P: Had to wipe off the excess glue as it oozed out but all went well.

Junior Member
Joined: Jan 2013
Posts: 5
From: Central New Jersey
I found factory style spacers for the front speakers here:
http://www.bestkits.com/product.php?p=1170
I haven't bought them or used them, yet. So, I'm not sure if they will work with any of the aftermarket speakers, but they seem easy enough to modify in any matter.
http://www.bestkits.com/product.php?p=1170
I haven't bought them or used them, yet. So, I'm not sure if they will work with any of the aftermarket speakers, but they seem easy enough to modify in any matter.


for tc1, there are some room under glove box. Just unclip the plastic panel under the glove box.
and there is plastic cover under your side mirror switch. I shovel the other crossover in there.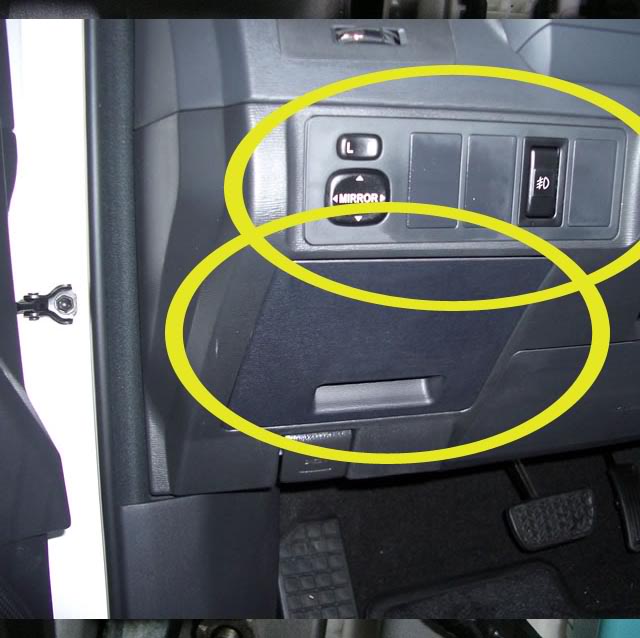
and there is plastic cover under your side mirror switch. I shovel the other crossover in there.
Last edited by GammaTNT; Jan 23, 2015 at 03:30 PM. Reason: add image

Member
SL Member
Joined: Apr 2005
Posts: 75
From: Fort Worth, TX
Thanks.
I ordered some of the brackets that crutchfield has, and am planning on ordering the Polk DB6501 components for the front and the Polk DB651 for the back along with JVC KW-R910BT head unit.
I am still open for any other speaker or head unit suggestions if there is something better in the same price range. Will probably order it first thing next week. I will be listening to my rattling speaker driving back and forth to Austin for the weekend.