
Dezod Stainless Steel Brake and Clutch Lines: HOW TO and REVIEW


In this How To I will be installing Dezod Motorsports' brake lines and clutch line, and flushing the system with Motul RBF 600 High Performance Fluid (DOT 4).


To install new clutch and brake lines, you will need
-a good socket wrench set
-open ended wrenches
-clear rubber tubing
-a bucket and an empty water bottle
-a plastic funnel
-several bottles of fresh DOT 4 brake fluid .
However I strongly recommend you also obtain other various items for dealing with stripped bolts stuck threads such as PB blast, Vise Grip Locking Pliers, a heat gun, and a rubber mallet.

In theory installation is very straight forward, the difficulty comes in the fact that many of the brake fittings will likely be stuck pretty bad. This is a completely doable project however, and can be handled by anyone who has a bit of experience wrenching on their car.
I'll begin this walk through at the front brake lines.
Begin by safely raising your car, making proper use of a hydraulic jack and jack stands, and removing the front wheels
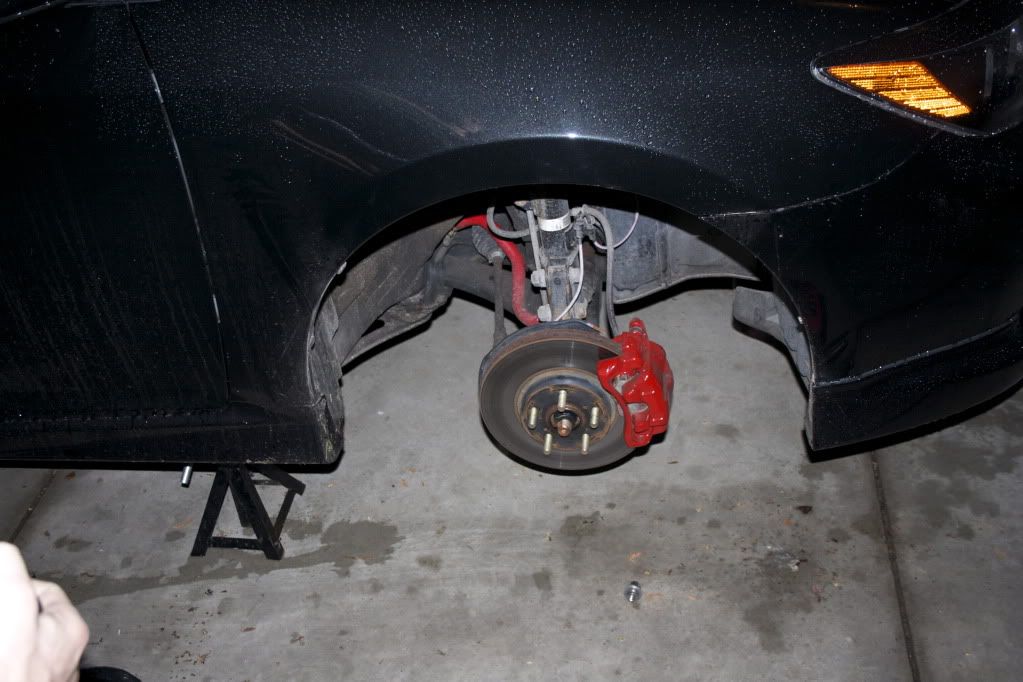
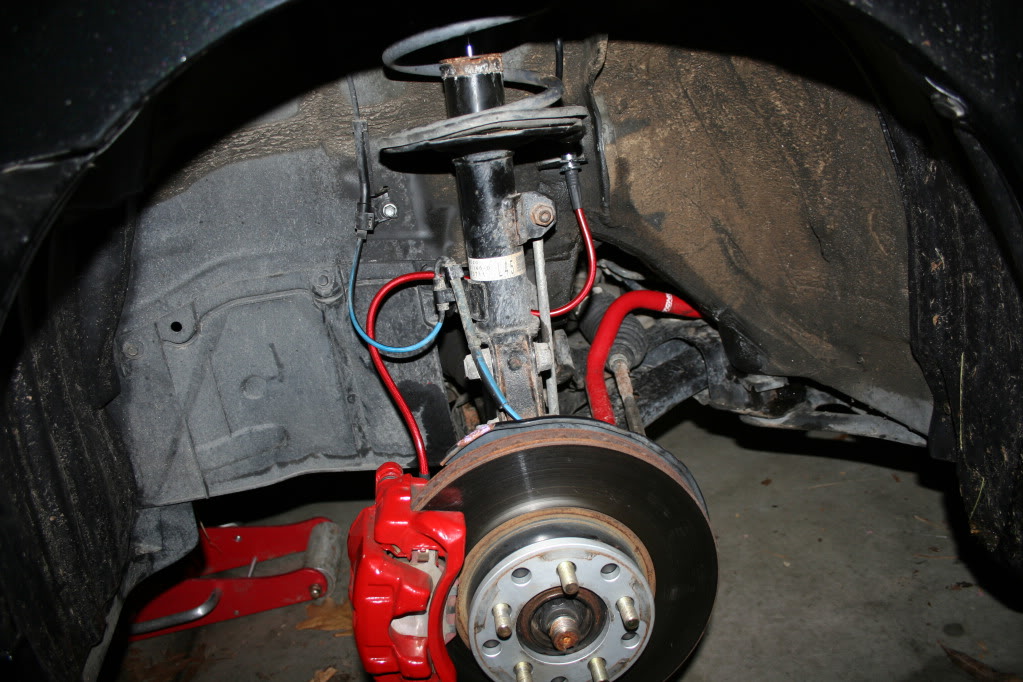
Stock passenger-side brake line:
Look on the back of the brake caliper for the banjo bolt that connects the brake line to caliper

This will be the easy end of the line to remove, but be prepared for fluid to pour out upon removal. Position your bucket beneath the caliper and use a 14mm socket to remove the bolt.
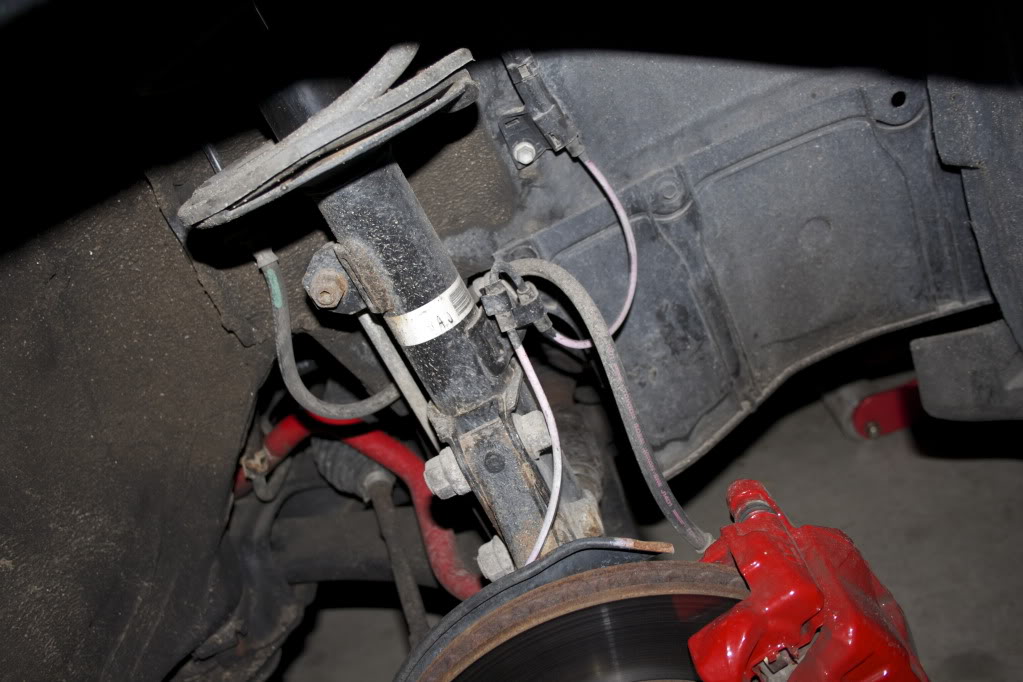
Trace your stock rubber line to where it is connected to the metal feed line
These fittings are pure evil and will bring nothing but pain and frustration. Be prepared
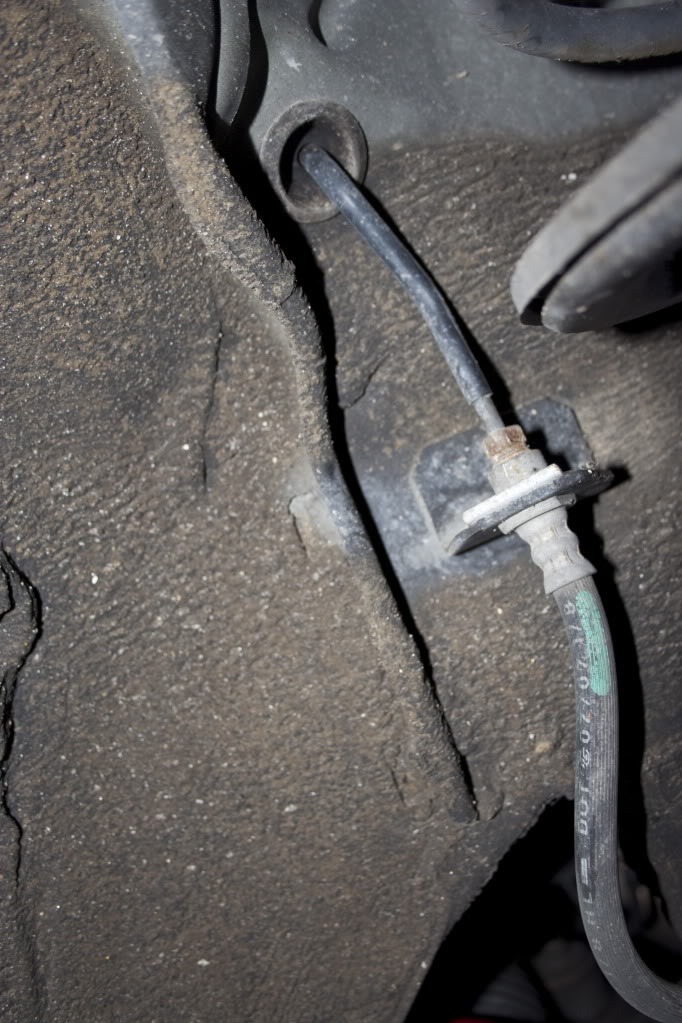
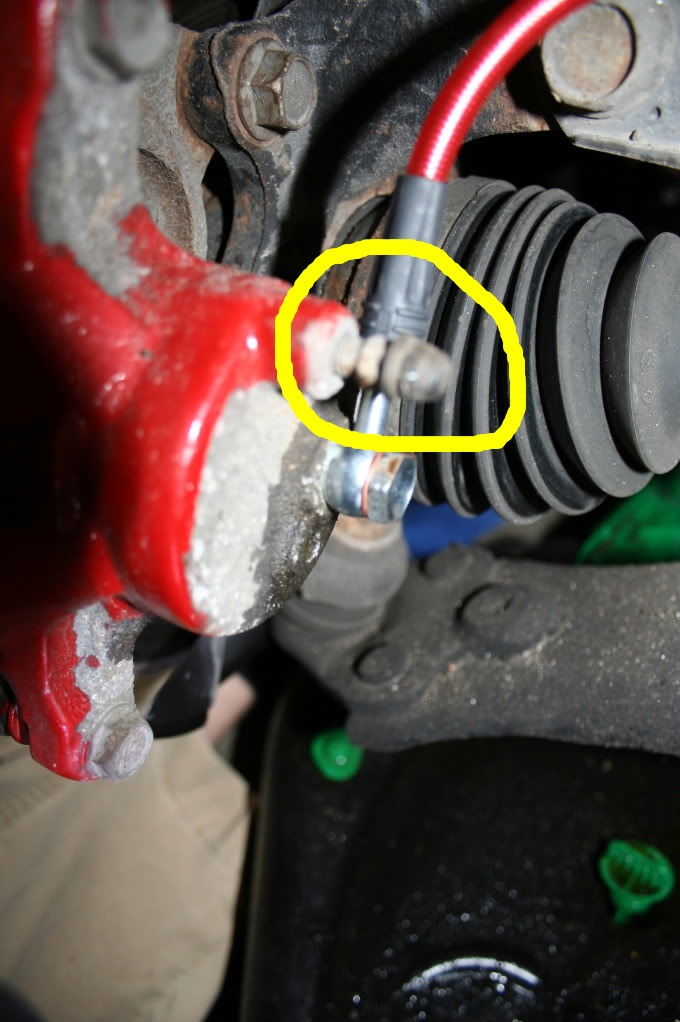
What you want to do is use a 10mm open ended wrench to unscrew the fitting that is circled in yellow from the stock brake line:
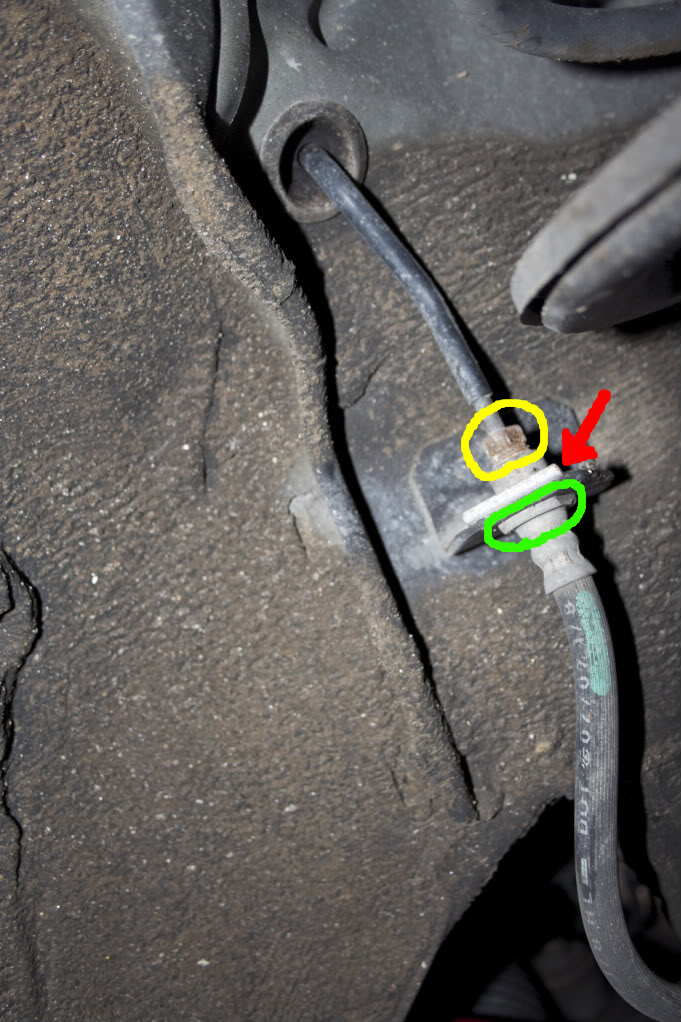
The red arrow points to a clip that should prevent the stock line from spinning while you try to remove the fitting from it. If it does not do its job well enough, you may have to use a 17mm open ended wrench on the part of the brake line that is circled in green, This will not be easy because the flat sides are very skinny and do not provide much area for the wrench to exert force.
I found this very hard to remove because as you can see it is slightly rusted and was thus stuck very tight. I used lots of PB plast and heated it up using my heat gun, and even so, my 10mm wrench did little but strip the fitting badly. I was finally able to break the threads free by using a my locking pliers
Fitting undone:
The line will still be held in place by that clip mentioned above. Re-adjust the locking pliers to grab an edge of that clip and give it a good yank
Set it aside, it will be reused.
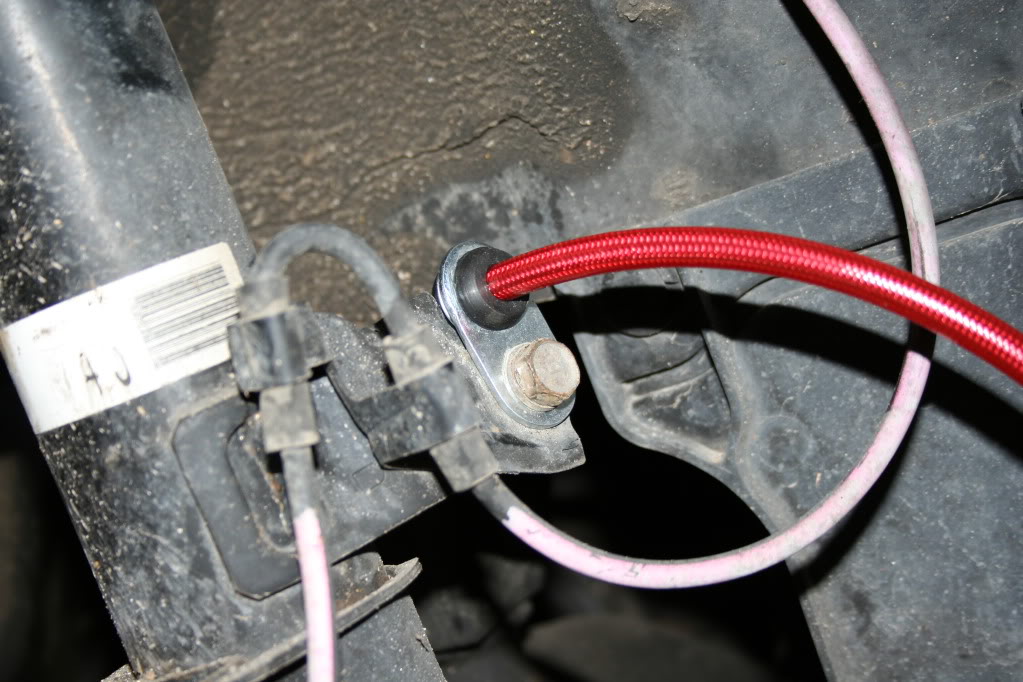
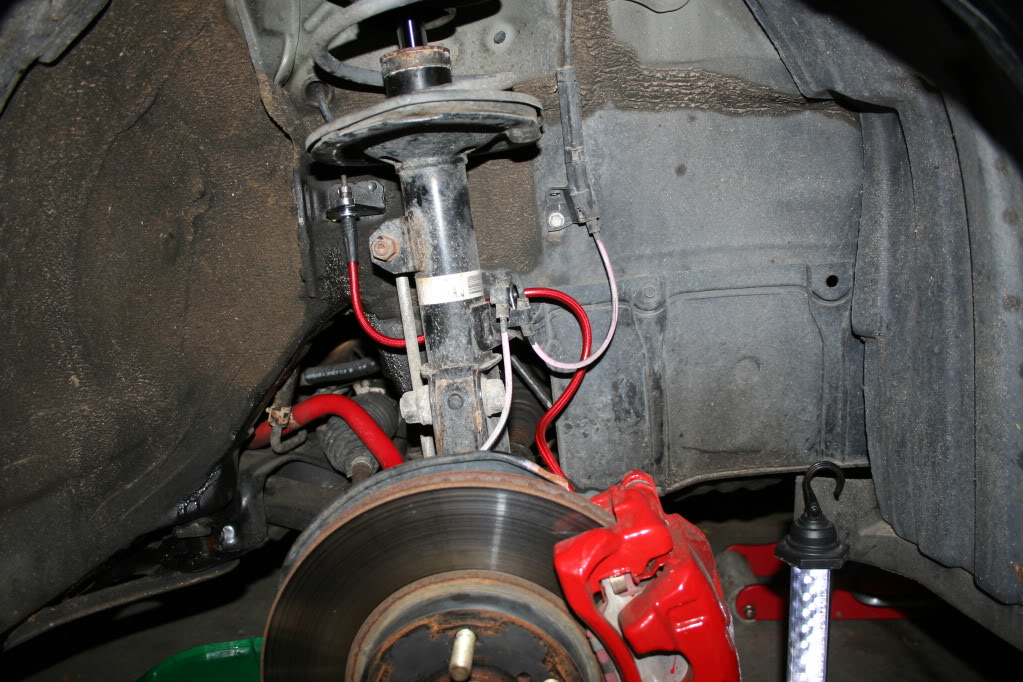
The brake line should be flimsily hanging off a mounting tab on the strut.
use a 12mm socket to remove the bolt
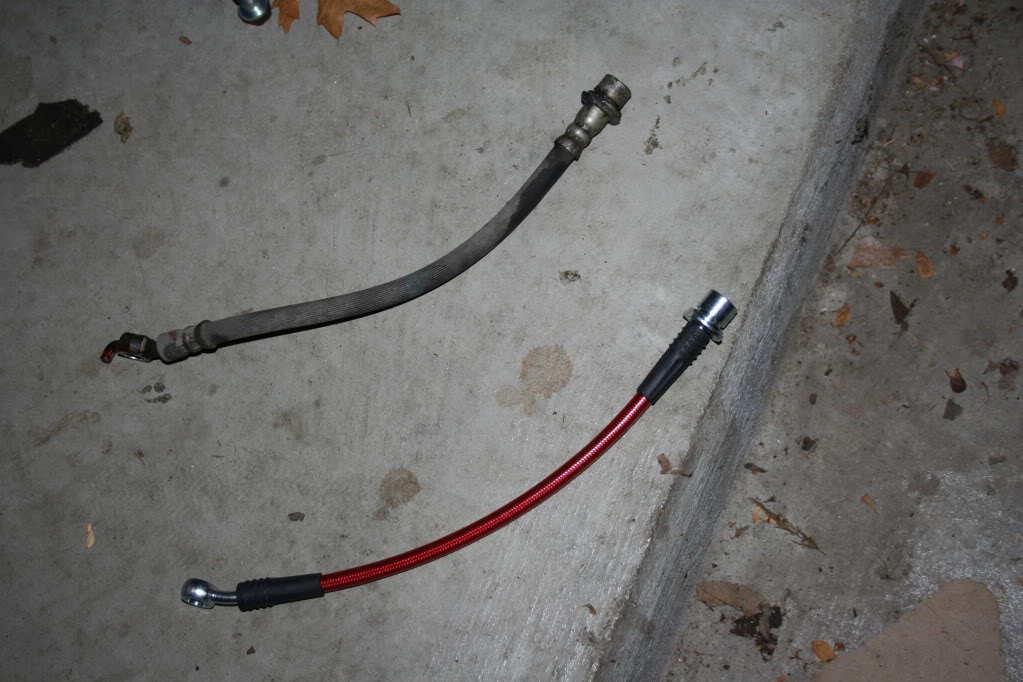
Compare your stock line to your new beautiful stainless steel line and be reminded that it will all be worth it
Reuse the 12mm bolt, to bolt your new line to the strut, just as the stock line was
Using your 17mm open ended wrench and the 10mm wrench connect the new line to the stock feed line
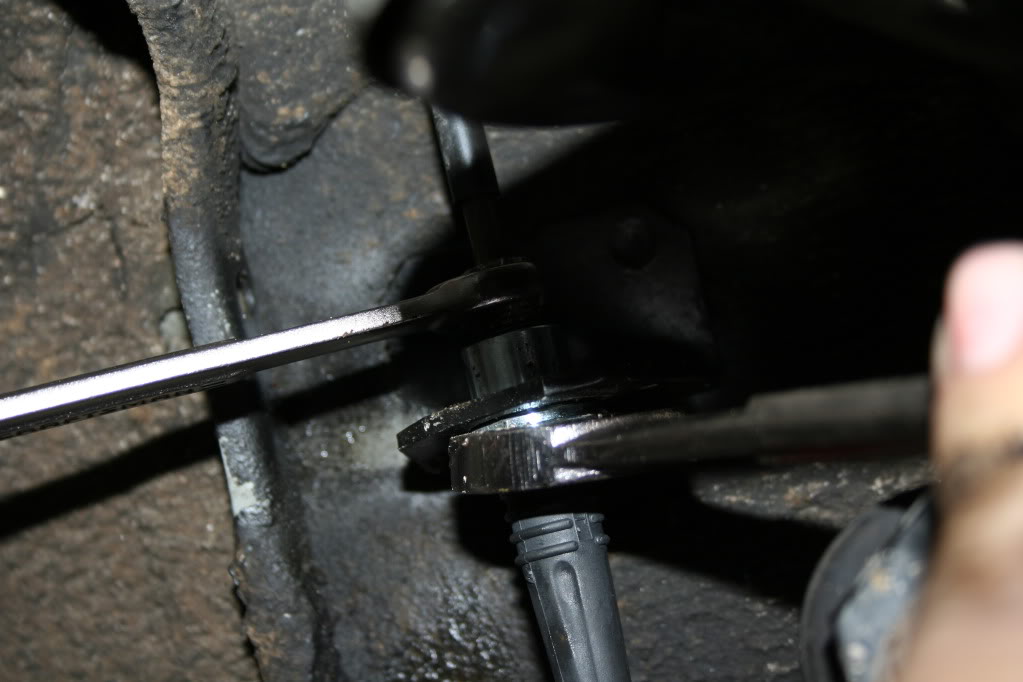
If the fitting is to stripped to be tightened sufficiently using the 10mm wrench, carefully use the locking pliers.
Connected:
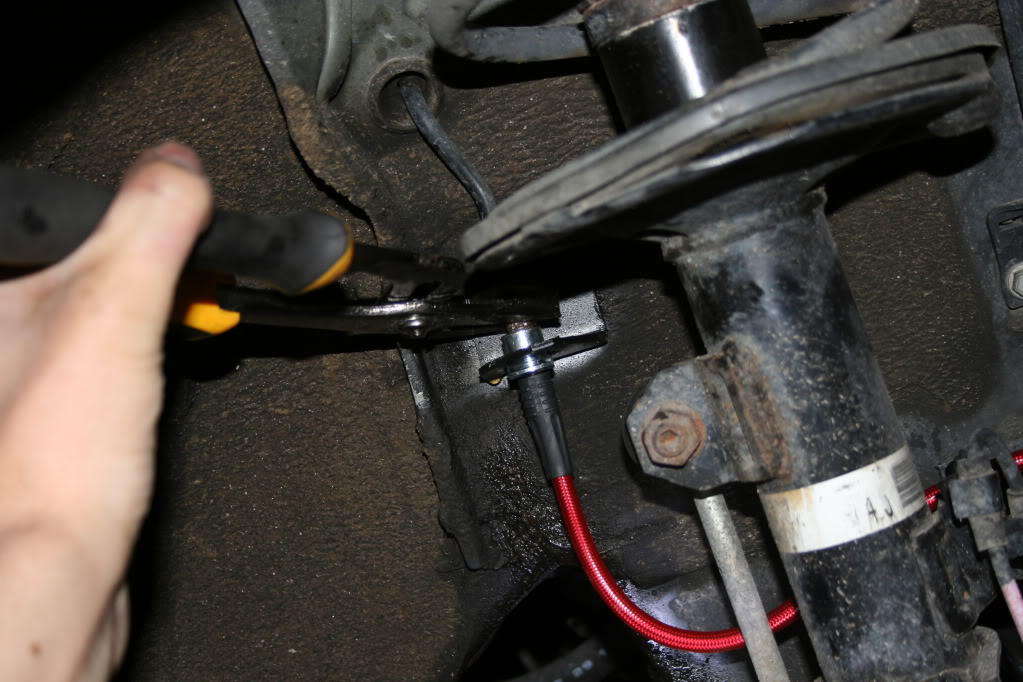
Now to connect the other end of the stainless steel line to the caliper, break out the bag of included hardware, and obtain 1 banjo bolt and 2 copper washers
[IMG[http://ecx.images-amazon.com/images/I/21QowRWHyhL._SL500_AA300_.jpg[/IMG]
The correct order is :
caliper | copper washer | brake line | copper washer | banjo bolt
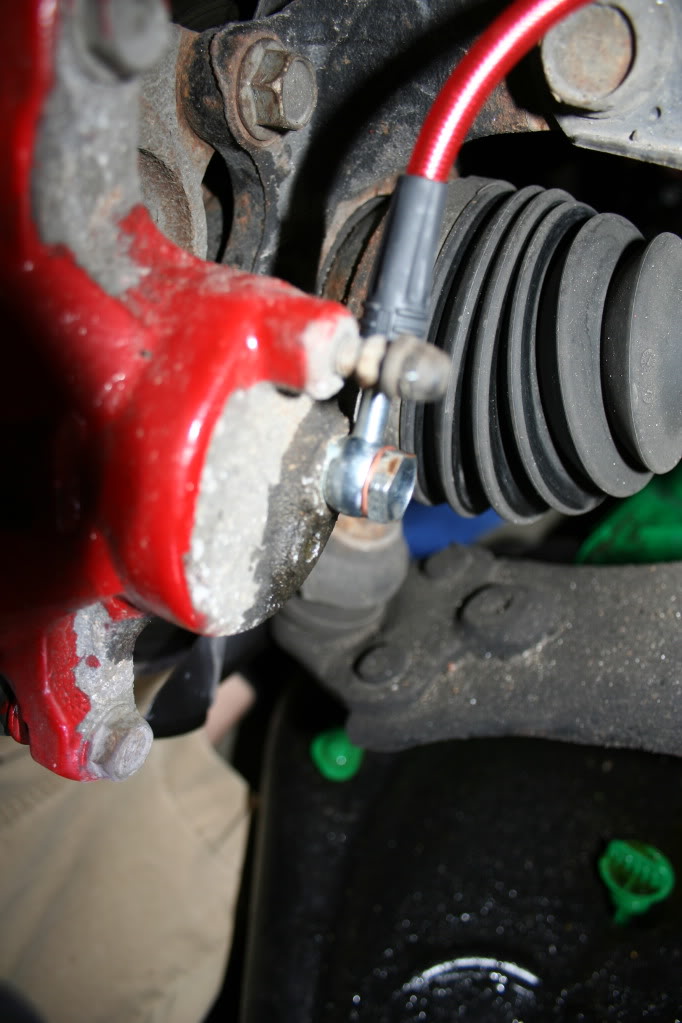
The copper washers are meant to crush slightly so as to form a gasket seal so tighten the bolt down good, but don't use so much force that you brake anything.
To get the line to curve the way you want hold the line in place with your free hand while tightening with the other so the line does not spin as the bolt is torqued down.
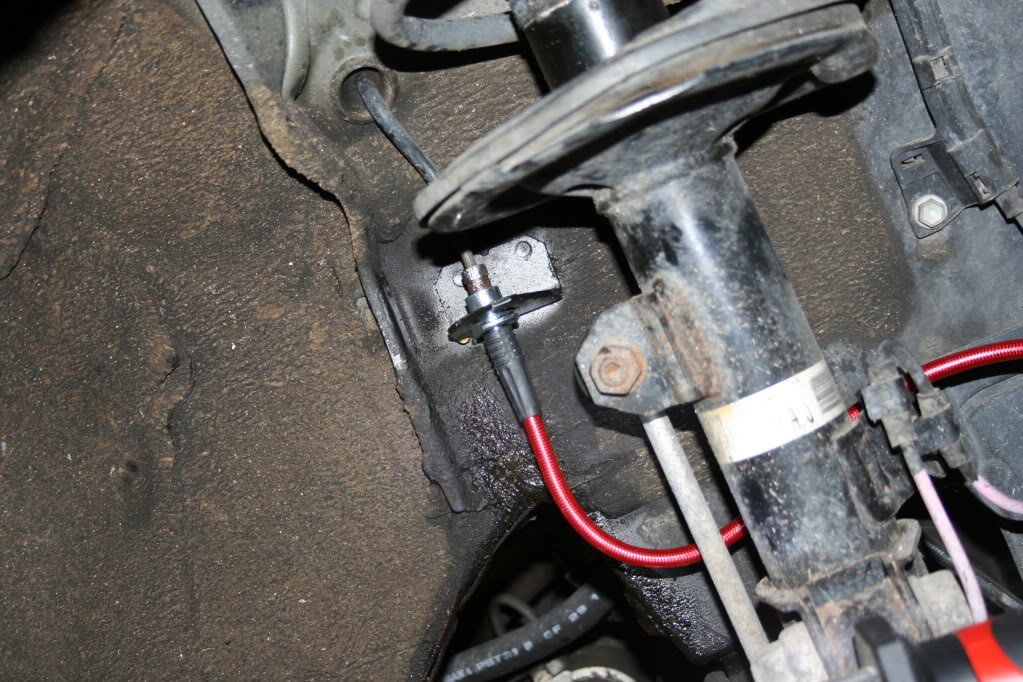
Finish securing the connection by taking the metal clip you removed and sliding it over the new connection just as it was in the original connection. You may have to tap it lightly with a rubber mallet to get it to go into place.
Front passenger-side completed:
Follow the same procedure for the other side
Drivers-side completed:
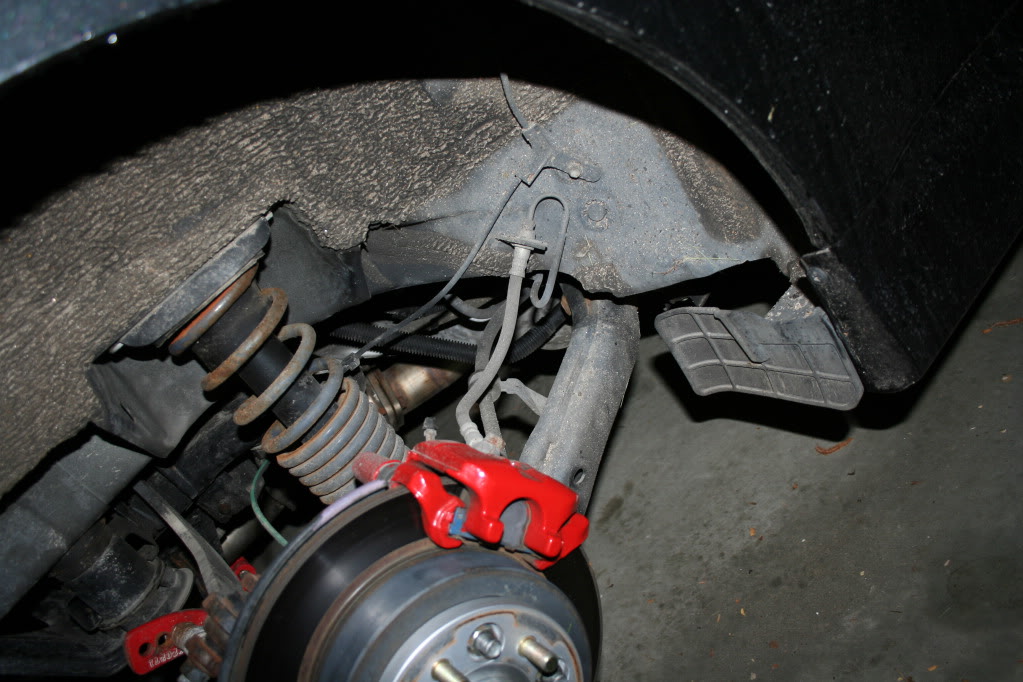
The rear lines are pretty much the same story except they are shorter and are not attached to the struts like the fronts are
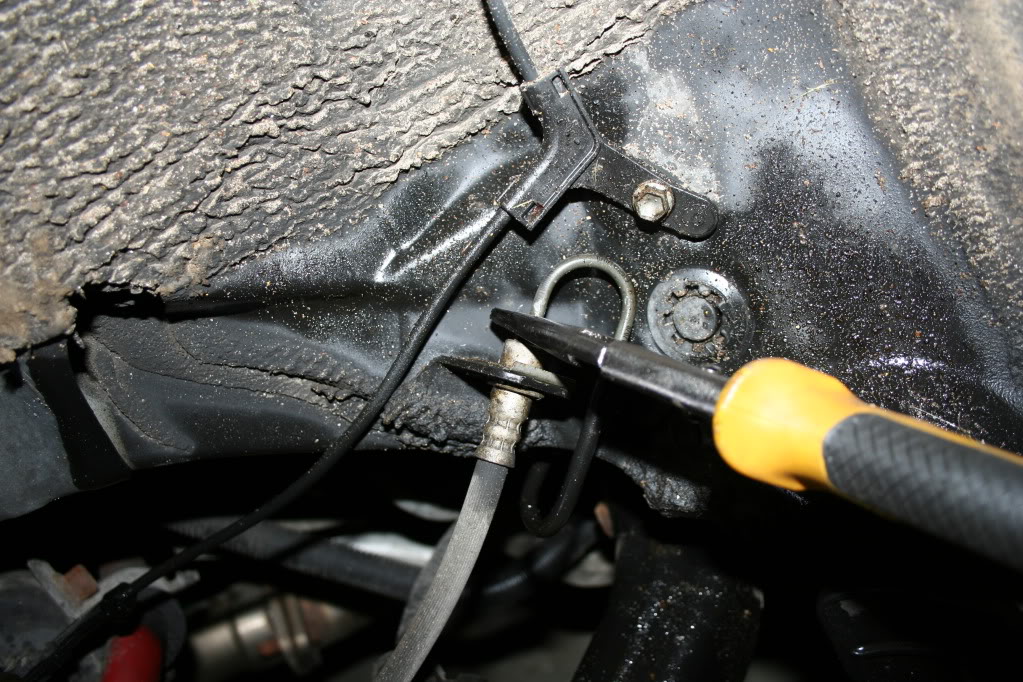

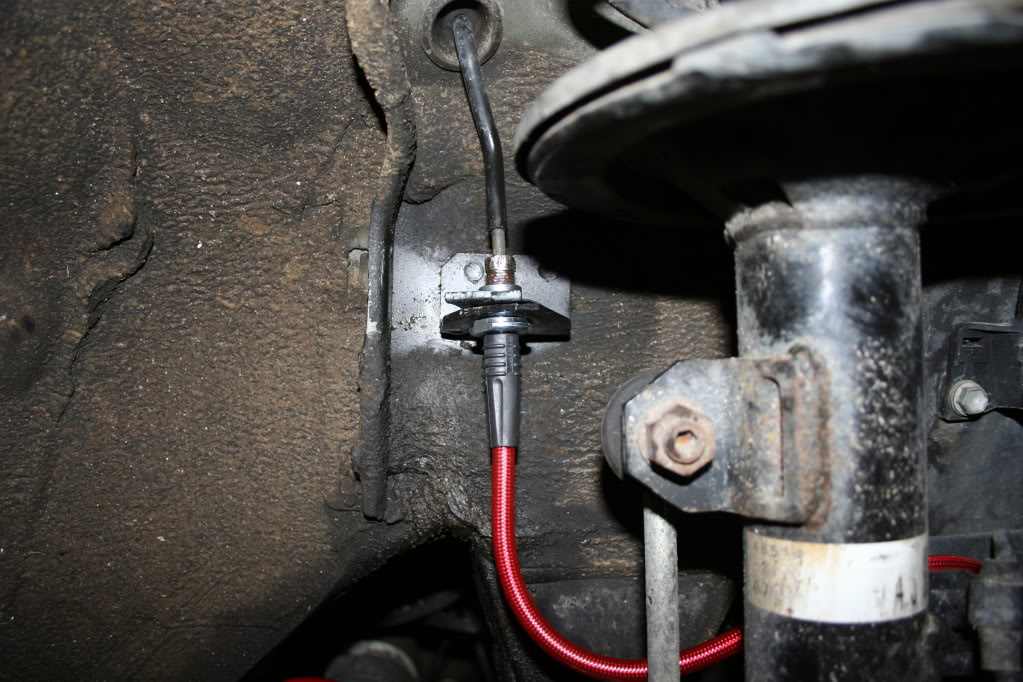
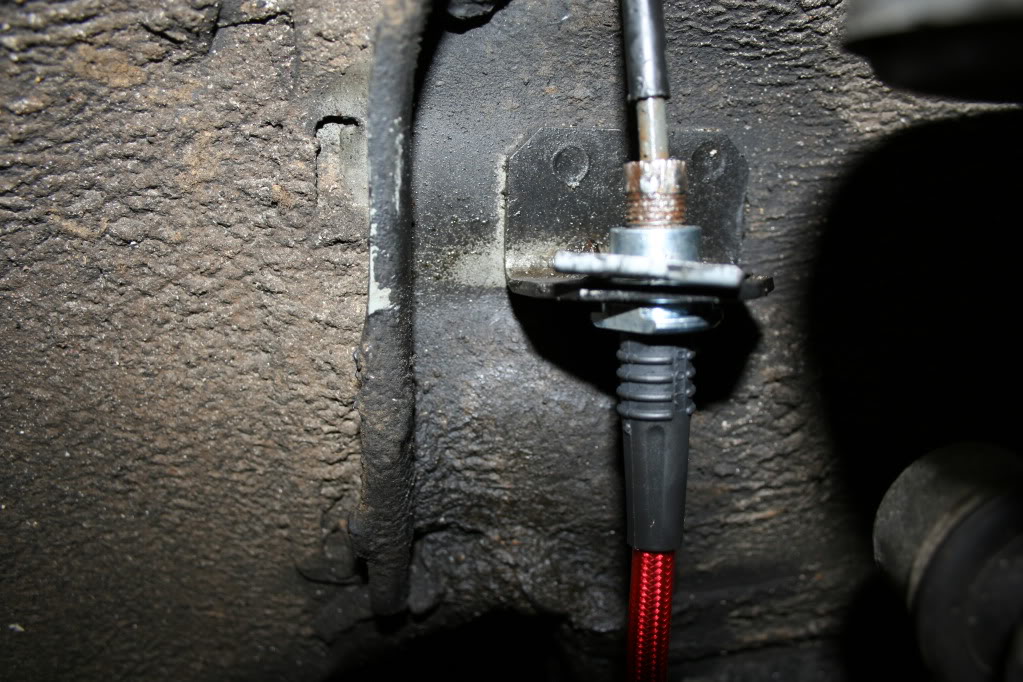
For the clutch line, remove the bottom splash sheilds (if you still have them :p), and look to the right of your front jacking point
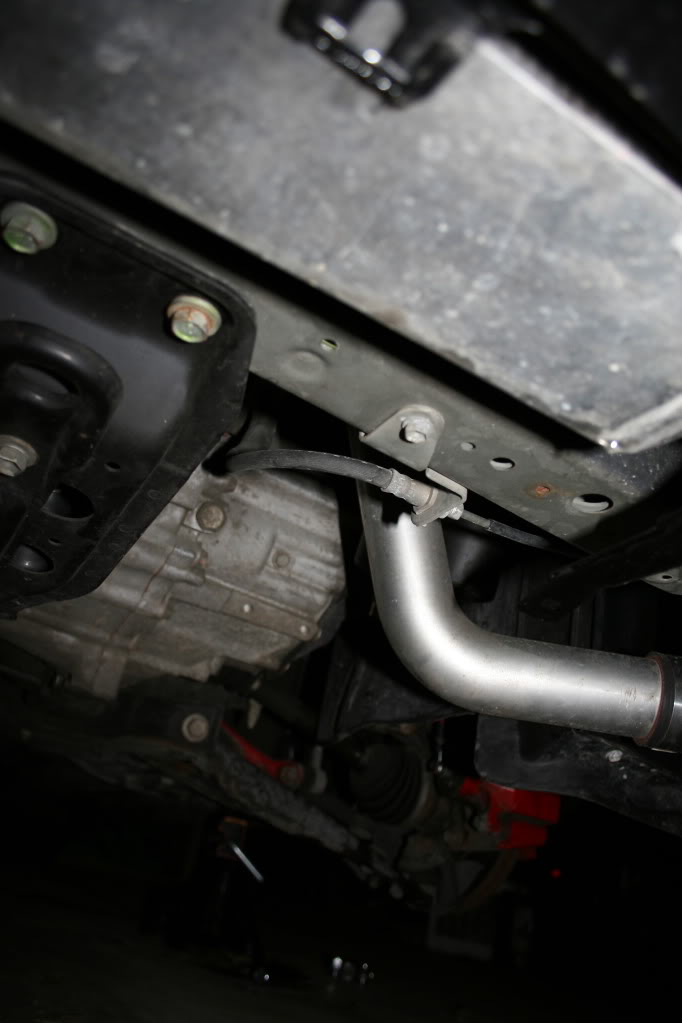
that is the feed line connection for the clutch line, trace the stock rubber line to the other connection secured to the transmission itself. The tough thing here is that neither connection is the banjo bolt style connection; they are both the evil type lol
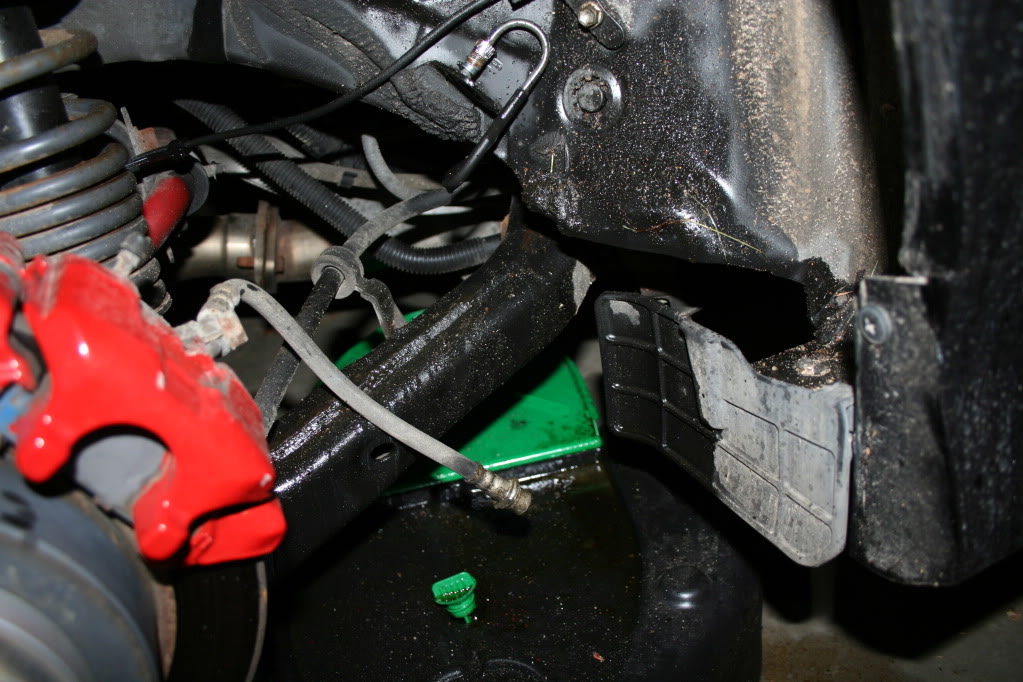
I was not actually able to install the clutch line because my IC pipes and oil catch cans did not give me enough room to get leverage on the connection on the transmission. I tried for a few hours unsuccessfully but I figured I am eventually going to be dropping the trans to install a new clutch and flywheel at some point anyway so might as well wait
On to bleeding the lines. For this part you are going to need an assistant; have him/her sit in the drivers seat
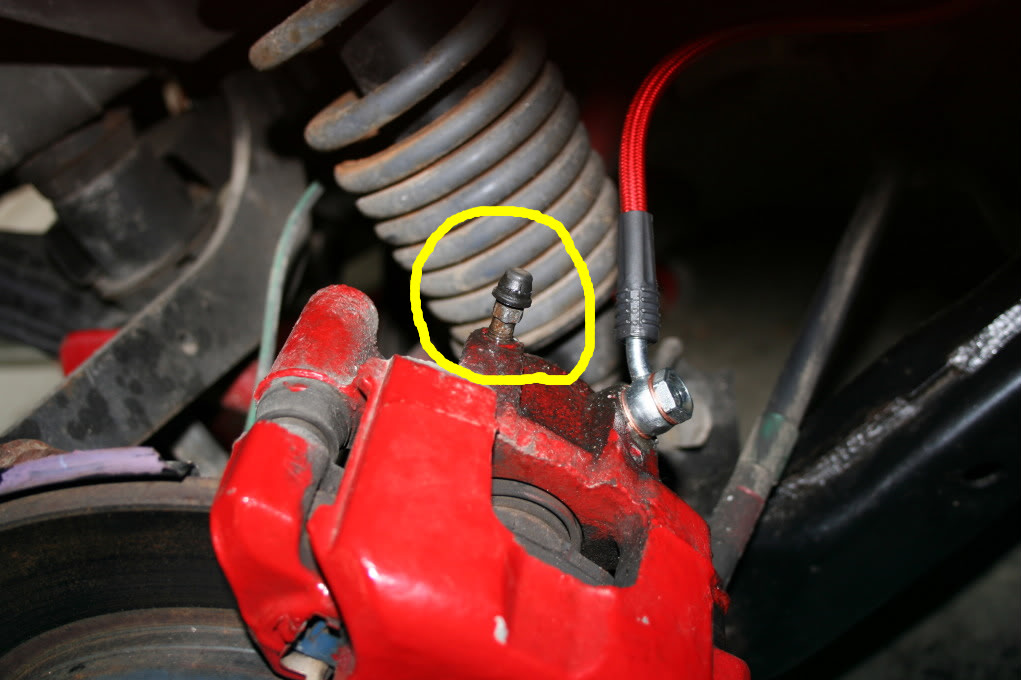
the locations of the front and rear caliper bleed valves, respectively, are shown below circled in yellow
Remove the the little rubber cap and slide the the clear tubing over the tip of the bleed valve, and place the other end in the opening of an empty water bottle.
Instruct your assistant that when you say "DOWN," he is to press the brake pedal with a bit more force than required to keep the car from rolling down hill, introducing positive pressure into the system. At about halfway down the the resistance he should meet resistance making it difficult to continue presing the pedal down. Using a 10mm wrench, loosen the the bleed valve about a quarter turn. When you do this, make sure your assistant maintains a constant pressure, and the brake pedal will sink to the floor. As this happens, fluid will flow through the clear line and into the watter bottle. When the pedal reaches the floor, your assistant should inform you by repeating "DOWN," and you should immediately tighten the the valve back up. Once you have closed the valve, say "UP," permitting your assistant to allow the brake pedal up. When the pedal is all the way up again, he should respond "UP." Repeat this up/down open/close dance untill, the old fluid has been flushed out of the system and only new fluid is coming out of the bleeder valve with no signs of any bubbles.
Repeat this process for all four corners starting at the one furthest from the master cylinder and working toward it; the order should be:
pass. side rear => drive side rear => pass. side front => drive side front
As you bleed the lines, monitor the fluid level of the reservoir located at the master cylinder on the back firewall of the engine bay, As the fluid level drops, add new fluid to the reservoir using super clean (preferably brand new) plastic funnel. Check the fluid level every 5 or 10 pumps, DO NOT ALLOW THE LEVEL TO DROP BELOW THE LOW MARK. If you let the fluid drop too low you will introduce air into the system and have to start the bleeding process all over.
Now, because you have removed all four lines of your brake system there is going to be a lot of air to bleed out. This means that even when the bleed valve is closed, your assistant will probably be able to easily press the brake to the floor, rather than meeting some resistance half way down. Until enough air has been bled out to continue bleeding using the "DOWN"/"UP" process described above, I recommend using a "DOWN 1"/ "DOWN 2"/"UP" routine: say "DOWN 1", assistant presses pedal about 1/3 of the way down and repeats "DOWN 1", you open valve and say "DOWN 2", assistant full depresses pedal and says "DOWN 2", you immediately close valve and say "UP" and so on and so on.
Make sure that the valve is not open when there is negative pressure in the system (brake pedal up/moving up). Even if there is no air in the plastic tubing to get sucked back into the caliper, a little air can move past the threads of the valve and enter the system.
Also because of how much air needs to be bled out, I recommend bleeding each corner twice to ensure that you get every last air bubble out and that all the old fluid has been flushed out.
Once you feel confident that you have removed all air from the brake lines, and that they are filled with fresh fluid, double check that everything is appropriately tight, and put the the rubber caps on the bleed valves.
Even thought I didn't install the clutch line, I still decided to bleed the system just to get some fresh fluid in. I figured I had the bottles open anyway so why not.
Follow the green arrow below to find the slave cylinder for the clutch line
The bleeder valve is circled below
Bleeding the clutch is very similar to the brakes. However the up's and downs are reversed:
You say "DOWN", assistant presses pedal to floor, you open bleeder valve a bout a quarter turn and say "UP", assistant will have to physically lift the pedal from the floor either by using his/her hands, or but hooking a foot under it to lift, when assistant has fully lifted pedal he/she replies "UP", you immediately close valve. rinse and repeat.
Triple check that everything is back together than get out and enjoy the feel of your new lines! Thanks for reading, if you have any suggestions on tips I should add, just let me know and I'll update this post.
To install new clutch and brake lines, you will need
-a good socket wrench set
-open ended wrenches
-clear rubber tubing
-a bucket and an empty water bottle
-a plastic funnel
-several bottles of fresh DOT 4 brake fluid .
However I strongly recommend you also obtain other various items for dealing with stripped bolts stuck threads such as PB blast, Vise Grip Locking Pliers, a heat gun, and a rubber mallet.
In theory installation is very straight forward, the difficulty comes in the fact that many of the brake fittings will likely be stuck pretty bad. This is a completely doable project however, and can be handled by anyone who has a bit of experience wrenching on their car.
I'll begin this walk through at the front brake lines.
Begin by safely raising your car, making proper use of a hydraulic jack and jack stands, and removing the front wheels
Stock passenger-side brake line:
Look on the back of the brake caliper for the banjo bolt that connects the brake line to caliper
This will be the easy end of the line to remove, but be prepared for fluid to pour out upon removal. Position your bucket beneath the caliper and use a 14mm socket to remove the bolt.
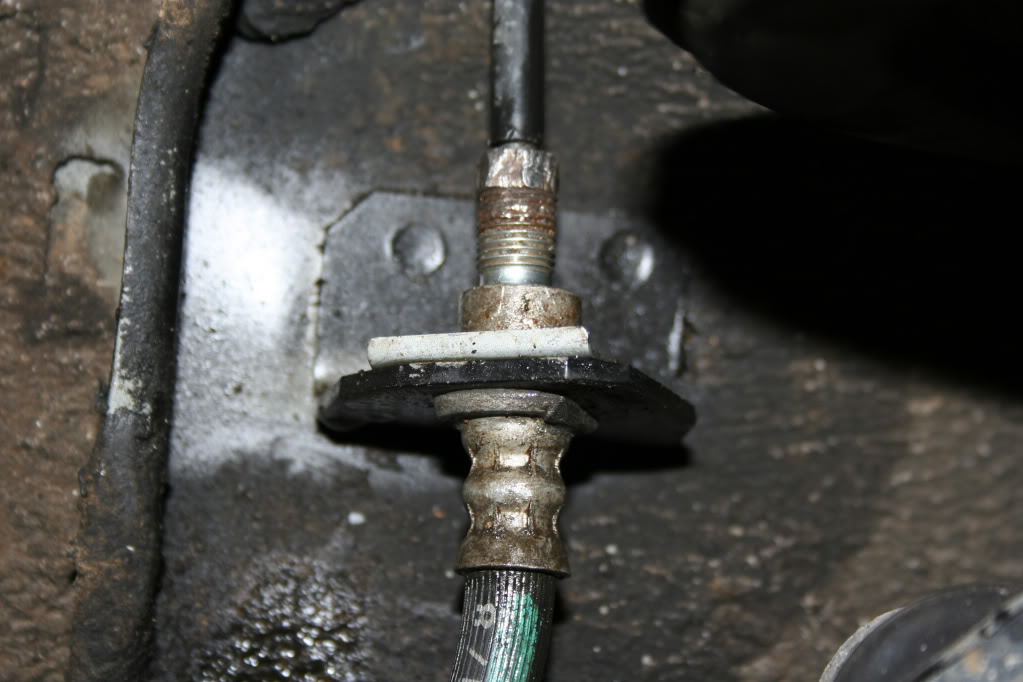
Trace your stock rubber line to where it is connected to the metal feed line
These fittings are pure evil and will bring nothing but pain and frustration. Be prepared
What you want to do is use a 10mm open ended wrench to unscrew the fitting that is circled in yellow from the stock brake line:
The red arrow points to a clip that should prevent the stock line from spinning while you try to remove the fitting from it. If it does not do its job well enough, you may have to use a 17mm open ended wrench on the part of the brake line that is circled in green, This will not be easy because the flat sides are very skinny and do not provide much area for the wrench to exert force.
I found this very hard to remove because as you can see it is slightly rusted and was thus stuck very tight. I used lots of PB plast and heated it up using my heat gun, and even so, my 10mm wrench did little but strip the fitting badly. I was finally able to break the threads free by using a my locking pliers
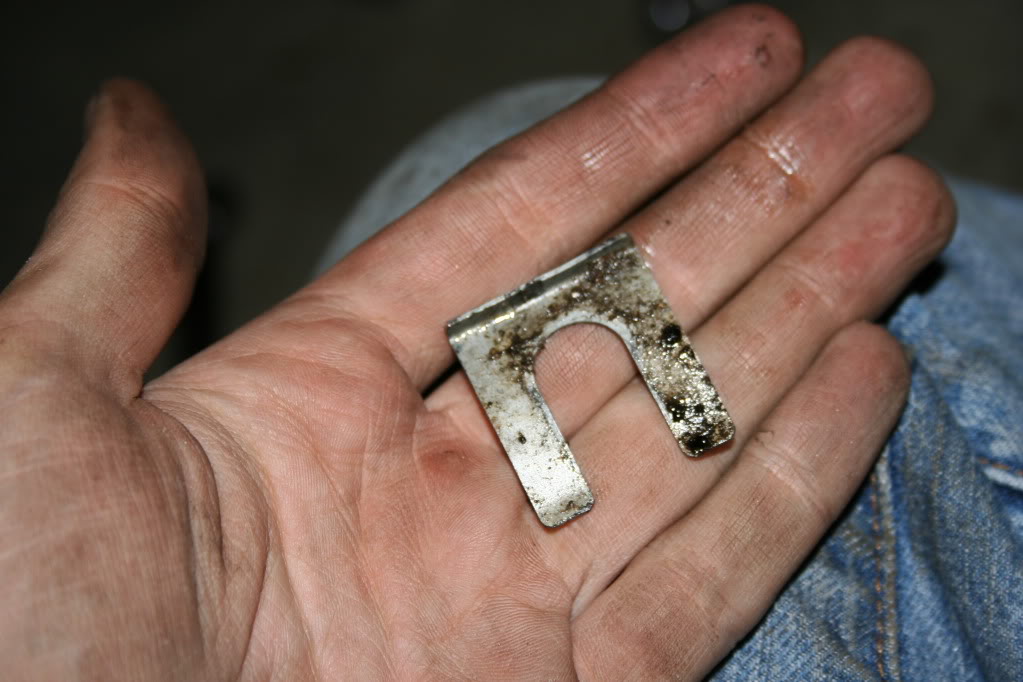
Fitting undone:
The line will still be held in place by that clip mentioned above. Re-adjust the locking pliers to grab an edge of that clip and give it a good yank
Set it aside, it will be reused.
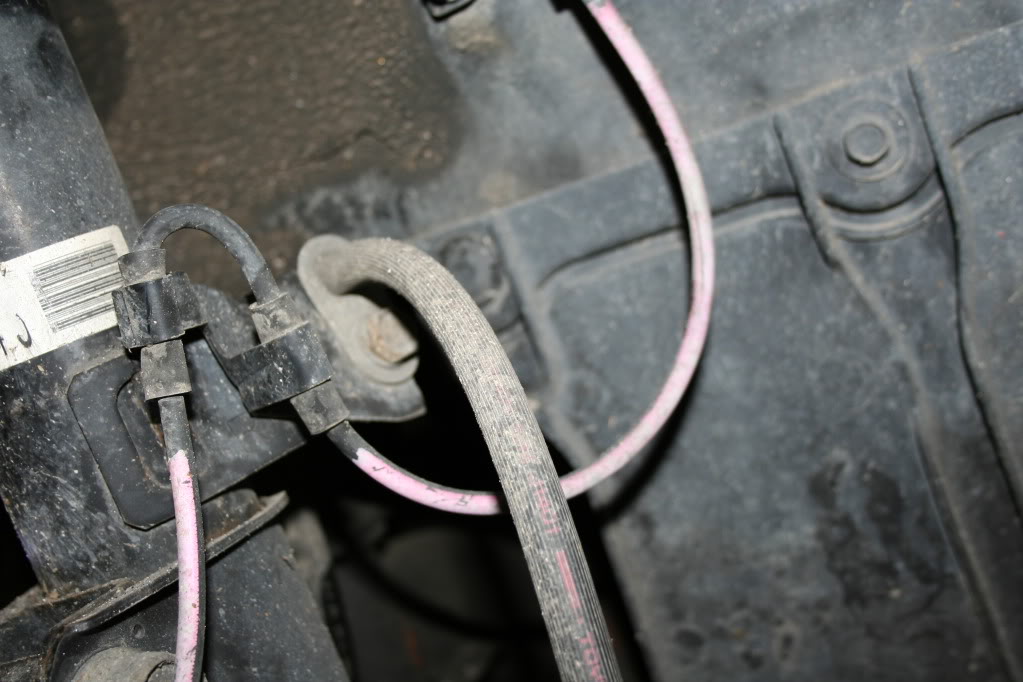
The brake line should be flimsily hanging off a mounting tab on the strut.
use a 12mm socket to remove the bolt
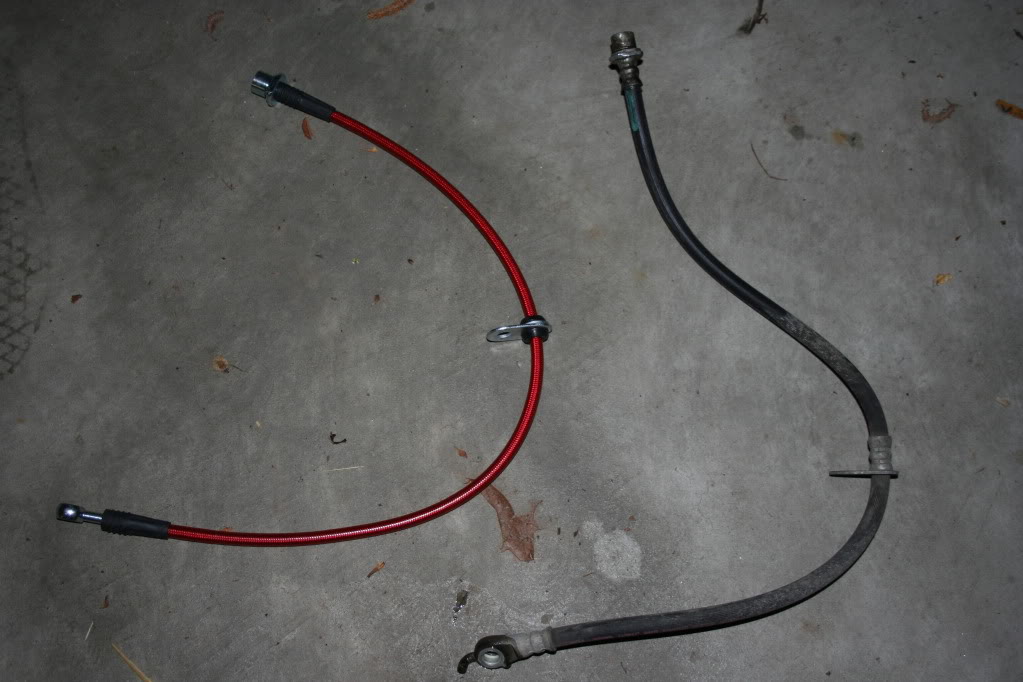
Compare your stock line to your new beautiful stainless steel line and be reminded that it will all be worth it
Reuse the 12mm bolt, to bolt your new line to the strut, just as the stock line was
Using your 17mm open ended wrench and the 10mm wrench connect the new line to the stock feed line
If the fitting is to stripped to be tightened sufficiently using the 10mm wrench, carefully use the locking pliers.
Connected:
Now to connect the other end of the stainless steel line to the caliper, break out the bag of included hardware, and obtain 1 banjo bolt and 2 copper washers
[IMG[http://ecx.images-amazon.com/images/I/21QowRWHyhL._SL500_AA300_.jpg[/IMG]
The correct order is :
caliper | copper washer | brake line | copper washer | banjo bolt
The copper washers are meant to crush slightly so as to form a gasket seal so tighten the bolt down good, but don't use so much force that you brake anything.
To get the line to curve the way you want hold the line in place with your free hand while tightening with the other so the line does not spin as the bolt is torqued down.
Finish securing the connection by taking the metal clip you removed and sliding it over the new connection just as it was in the original connection. You may have to tap it lightly with a rubber mallet to get it to go into place.
Front passenger-side completed:
Follow the same procedure for the other side
Drivers-side completed:
The rear lines are pretty much the same story except they are shorter and are not attached to the struts like the fronts are
For the clutch line, remove the bottom splash sheilds (if you still have them :p), and look to the right of your front jacking point
that is the feed line connection for the clutch line, trace the stock rubber line to the other connection secured to the transmission itself. The tough thing here is that neither connection is the banjo bolt style connection; they are both the evil type lol
I was not actually able to install the clutch line because my IC pipes and oil catch cans did not give me enough room to get leverage on the connection on the transmission. I tried for a few hours unsuccessfully but I figured I am eventually going to be dropping the trans to install a new clutch and flywheel at some point anyway so might as well wait
On to bleeding the lines. For this part you are going to need an assistant; have him/her sit in the drivers seat
the locations of the front and rear caliper bleed valves, respectively, are shown below circled in yellow
Remove the the little rubber cap and slide the the clear tubing over the tip of the bleed valve, and place the other end in the opening of an empty water bottle.
Instruct your assistant that when you say "DOWN," he is to press the brake pedal with a bit more force than required to keep the car from rolling down hill, introducing positive pressure into the system. At about halfway down the the resistance he should meet resistance making it difficult to continue presing the pedal down. Using a 10mm wrench, loosen the the bleed valve about a quarter turn. When you do this, make sure your assistant maintains a constant pressure, and the brake pedal will sink to the floor. As this happens, fluid will flow through the clear line and into the watter bottle. When the pedal reaches the floor, your assistant should inform you by repeating "DOWN," and you should immediately tighten the the valve back up. Once you have closed the valve, say "UP," permitting your assistant to allow the brake pedal up. When the pedal is all the way up again, he should respond "UP." Repeat this up/down open/close dance untill, the old fluid has been flushed out of the system and only new fluid is coming out of the bleeder valve with no signs of any bubbles.
Repeat this process for all four corners starting at the one furthest from the master cylinder and working toward it; the order should be:
pass. side rear => drive side rear => pass. side front => drive side front
As you bleed the lines, monitor the fluid level of the reservoir located at the master cylinder on the back firewall of the engine bay, As the fluid level drops, add new fluid to the reservoir using super clean (preferably brand new) plastic funnel. Check the fluid level every 5 or 10 pumps, DO NOT ALLOW THE LEVEL TO DROP BELOW THE LOW MARK. If you let the fluid drop too low you will introduce air into the system and have to start the bleeding process all over.
Now, because you have removed all four lines of your brake system there is going to be a lot of air to bleed out. This means that even when the bleed valve is closed, your assistant will probably be able to easily press the brake to the floor, rather than meeting some resistance half way down. Until enough air has been bled out to continue bleeding using the "DOWN"/"UP" process described above, I recommend using a "DOWN 1"/ "DOWN 2"/"UP" routine: say "DOWN 1", assistant presses pedal about 1/3 of the way down and repeats "DOWN 1", you open valve and say "DOWN 2", assistant full depresses pedal and says "DOWN 2", you immediately close valve and say "UP" and so on and so on.
Make sure that the valve is not open when there is negative pressure in the system (brake pedal up/moving up). Even if there is no air in the plastic tubing to get sucked back into the caliper, a little air can move past the threads of the valve and enter the system.
Also because of how much air needs to be bled out, I recommend bleeding each corner twice to ensure that you get every last air bubble out and that all the old fluid has been flushed out.
Once you feel confident that you have removed all air from the brake lines, and that they are filled with fresh fluid, double check that everything is appropriately tight, and put the the rubber caps on the bleed valves.
Even thought I didn't install the clutch line, I still decided to bleed the system just to get some fresh fluid in. I figured I had the bottles open anyway so why not.
Follow the green arrow below to find the slave cylinder for the clutch line
The bleeder valve is circled below
Bleeding the clutch is very similar to the brakes. However the up's and downs are reversed:
You say "DOWN", assistant presses pedal to floor, you open bleeder valve a bout a quarter turn and say "UP", assistant will have to physically lift the pedal from the floor either by using his/her hands, or but hooking a foot under it to lift, when assistant has fully lifted pedal he/she replies "UP", you immediately close valve. rinse and repeat.
Triple check that everything is back together than get out and enjoy the feel of your new lines! Thanks for reading, if you have any suggestions on tips I should add, just let me know and I'll update this post.
So I've had the brake lines on for about 3 weeks now and have dint plenty of driving on them. I have really enjoyed having them in all situations relaxed driving, aggressive driving, stuck in traffic, rain etc...
I won't say that my stopping distance has been improved, but that's not what they're advertised to do anyway. Brake feel is what really makes this modification worthwhile. The amount of braking force is very linear with respect to pedal movement.
The "mushy" feel is gone, and brake control is much more predictable. You can snap immediately into ABS if you want or hold it right on the edge of ABS activation much more consistently than with the stock lines.
Coming off the the brakes is significantly more precise as well. I really enjoy trail braking out of turns. It is much easier to keep weight transfer smooth as you roll into the apex before grabbing some throttle.
...it's also really fun to play on wet pavement, its pretty easy to get the rear to track out a bit
There really is much I can provide in terms if numbers or measurements, because this mod is really about driving feel, but i personally enjoy really this mod.
I am really lookin forward to putting in rotors and pads and I think I'll be really happy I already have the lines in.
Last edited by x_Batman_x; Jun 17, 2011 at 05:32 PM.


Banned
Scionetics
KAD
SL Member
Joined: Oct 2005
Posts: 11,936
From: Western NY


Member
SL Member
Joined: Oct 2009
Posts: 97
Bookmarked and page downloaded to HD..thanks for the great thread
edit: You mentioned that you're also doing the rotors..ect, can you also make a thread similar to this? You did a great job with this thread and will help me out greatly..as well as plenty of others.
edit: You mentioned that you're also doing the rotors..ect, can you also make a thread similar to this? You did a great job with this thread and will help me out greatly..as well as plenty of others.

Senior Member
Team Scionara
SL Member
Joined: Mar 2009
Posts: 1,230
From: Hazel Park, MI
Banned
Scionetics
KAD
SL Member
Joined: Oct 2005
Posts: 11,936
From: Western NY
Member
SL Member
Joined: Oct 2009
Posts: 97
How many bottles of Dot 4 should I pick up to bleed all four lines?
Also, what can I use as an indicator that the line is bled enough..just clearer fluid with less bubbles?
I have 35k miles now, and also changing the front brake pads..would it be a good idea to also change the rears now also?
Also, what can I use as an indicator that the line is bled enough..just clearer fluid with less bubbles?
I have 35k miles now, and also changing the front brake pads..would it be a good idea to also change the rears now also?
Banned
Scionetics
KAD
SL Member
Joined: Oct 2005
Posts: 11,936
From: Western NY
How many bottles of Dot 4 should I pick up to bleed all four lines?
Also, what can I use as an indicator that the line is bled enough..just clearer fluid with less bubbles?
I have 35k miles now, and also changing the front brake pads..would it be a good idea to also change the rears now also?
Also, what can I use as an indicator that the line is bled enough..just clearer fluid with less bubbles?
I have 35k miles now, and also changing the front brake pads..would it be a good idea to also change the rears now also?
Depends on the wear.........

Member
SL Member
Joined: Oct 2009
Posts: 97
http://www.dezod.com/
I bought mine from mengmotorsports but id advice buying from them, all you will get is headaches with your order from horrible customer service.