DIY: Replace Flasher Relay to Avoid Hyper Blinking with LED Turn Signals
 03-05-2011, 04:44 AM
#1
Now we can replace our turn signals with LEDs without performing complicated wiring modifications (as seen in Scion202's awesome DIY).
Stick your head down by your pedals and look up. You will see the OEM flasher relay (gray box with a blue connector plugged in):
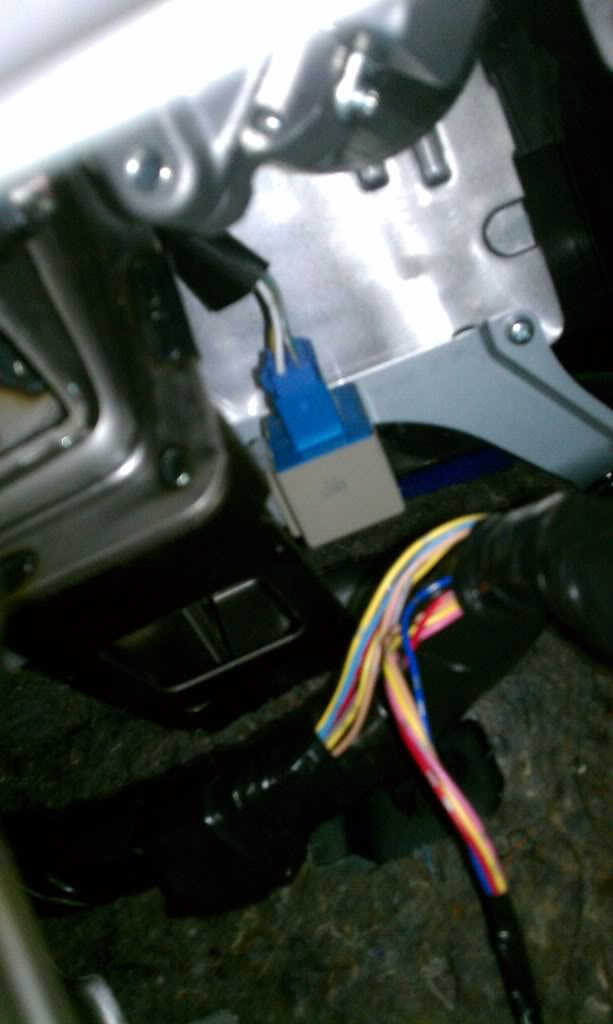
-Photo courtesy of BeloZero
Unplug the OEM flasher relay from the blue connector and plug in a new electronic flasher (link below).
Removing the OEM flasher is somewhat difficult due to the tight and awkward work space you have. The easiest way I found was to pull it completely off of the frame where it is mounted. It won't be easy and will require strength, but once you get it detached from the frame, it is relatively easy to unplug and replace.
You may now use LED bulbs for your turn signals. Your keyless entry lock/unlock flashes will still function as normal.
Two things to note regarding the new flasher:
1. It is not load dependent like the standard OEM flasher, so it will flash at it's normal rate with any combination of LED and/or incandescent bulbs.
2. With the first statement being true, it also will not hyper-blink to notify you that you have a bulb out. You will need to periodically check all four blinkers to ensure they are functioning.
- Just turn on the hazards and make a lap around your car every once in awhile, or
- Pay attention to your lock/unlock confirmation flashes when approaching your car (I'm sure you all will do it any way to check out your sweet new LED blinkers).
Below are two flasher relays that have been proven to work with 2011+ tC AND retain lock/unlock flash confirmations:
http://www.vleds.com/flashers/toyota...ignal-fix.html
http://www.autozone.com/autozone/par...entifier=69840
Stick your head down by your pedals and look up. You will see the OEM flasher relay (gray box with a blue connector plugged in):
-Photo courtesy of BeloZero
Unplug the OEM flasher relay from the blue connector and plug in a new electronic flasher (link below).
Removing the OEM flasher is somewhat difficult due to the tight and awkward work space you have. The easiest way I found was to pull it completely off of the frame where it is mounted. It won't be easy and will require strength, but once you get it detached from the frame, it is relatively easy to unplug and replace.
You may now use LED bulbs for your turn signals. Your keyless entry lock/unlock flashes will still function as normal.
Two things to note regarding the new flasher:
1. It is not load dependent like the standard OEM flasher, so it will flash at it's normal rate with any combination of LED and/or incandescent bulbs.
2. With the first statement being true, it also will not hyper-blink to notify you that you have a bulb out. You will need to periodically check all four blinkers to ensure they are functioning.
- Just turn on the hazards and make a lap around your car every once in awhile, or
- Pay attention to your lock/unlock confirmation flashes when approaching your car (I'm sure you all will do it any way to check out your sweet new LED blinkers).
Below are two flasher relays that have been proven to work with 2011+ tC AND retain lock/unlock flash confirmations:
http://www.vleds.com/flashers/toyota...ignal-fix.html
http://www.autozone.com/autozone/par...entifier=69840
Last edited by biglilsteve; 11-13-2013 at 06:30 PM. Reason: More organized DIY


 09-05-2011, 07:04 PM
#9
Senior Member
SL Member
Join Date: Mar 2009
Posts: 184
The stock flasher is a tridon lm449. The led replacement part number is 81980-50030. They have them at autolumination.com. I don't know where its located yet but it sounds like its behing the gauges or under the driver side dash.
Edit: its an 8 pin relay and it will say "for led" on the side
Edit: its an 8 pin relay and it will say "for led" on the side
09-06-2011, 04:04 AM
#11
Member

Join Date: Aug 2011
Location: Ontario
Posts: 43
actually, its not as hard as it sounds, i stripped the entire dash of my truck for re-paint and add CF, ill post the how-to-do with the 98 F150, havnt done it on a tC before though.
step 1) pop out anything that dont re-quire screws, held on with clips, you'll start seeing some scres / bolts behind them
step 2) get a big bag, and mark what pices are the bolts / scres for, it'll help in the long run
step 3) start unscrewing everything you find. theres ALOT more screws then you'd ever imagine
step 4) you'll know you got all the screws when you got a dump truck filled with them
step 5) remove the pices as you take screws out, you'll find MORE screws
step 6) remove gauge cluster thingy, its mounted directly on the main dash pice, witch would be the one bassically covering the hole front were everything connects to
step 7) you now have the gauge cluster out, you might have to remove the really big pice to actually do something under it though.
its alot more work then it sounds. trust me.
09-06-2011, 07:27 AM
#12
Senior Member
SL Member

Join Date: Mar 2011
Posts: 332
our cluster is cake to remove. check in ice interior forum on the led swap posts, they might have a write up, but our dash pieces just unclip, then there are handles of sorts on the cluster that say pull. might be 1 screw, i cant remember cuz its been awhile
09-06-2011, 10:43 AM
#13
Senior Member
SL Member

Join Date: Dec 2010
Posts: 251
actually, its not as hard as it sounds, i stripped the entire dash of my truck for re-paint and add CF, ill post the how-to-do with the 98 F150, havnt done it on a tC before though.
step 1) pop out anything that dont re-quire screws, held on with clips, you'll start seeing some scres / bolts behind them
step 2) get a big bag, and mark what pices are the bolts / scres for, it'll help in the long run
step 3) start unscrewing everything you find. theres ALOT more screws then you'd ever imagine
step 4) you'll know you got all the screws when you got a dump truck filled with them
step 5) remove the pices as you take screws out, you'll find MORE screws
step 6) remove gauge cluster thingy, its mounted directly on the main dash pice, witch would be the one bassically covering the hole front were everything connects to
step 7) you now have the gauge cluster out, you might have to remove the really big pice to actually do something under it though.
its alot more work then it sounds. trust me.
step 1) pop out anything that dont re-quire screws, held on with clips, you'll start seeing some scres / bolts behind them
step 2) get a big bag, and mark what pices are the bolts / scres for, it'll help in the long run
step 3) start unscrewing everything you find. theres ALOT more screws then you'd ever imagine
step 4) you'll know you got all the screws when you got a dump truck filled with them
step 5) remove the pices as you take screws out, you'll find MORE screws
step 6) remove gauge cluster thingy, its mounted directly on the main dash pice, witch would be the one bassically covering the hole front were everything connects to
step 7) you now have the gauge cluster out, you might have to remove the really big pice to actually do something under it though.
its alot more work then it sounds. trust me.
Our tC however... maybe 2 screws?
However, you may have to pull on a few tabs that have the label 'pull' on them.
So.. be careful there!
09-06-2011, 01:42 PM
#15
http://www.trdsparks.com/install/PT413-21110inst.pdf
this shows how to take apart the dash and where specifically the relay harness is if that is what you are looking for.
this shows how to take apart the dash and where specifically the relay harness is if that is what you are looking for.
09-06-2011, 06:01 PM
#17
Senior Member
SL Member
Join Date: Mar 2009
Posts: 184
im pretty sure its behind the gauges, i have to take mine back out to fix a bad LED so ill check it and let ya guys know. i dont think its the relays behind the radio because those all have wires coming out of them and the flasher relay is a 8 pin plug in