
DIY: Mounting cold cathodes to the Oh Sh*t handles...56k no

Thread Starter
Senior Member

SL Member
Joined: Nov 2005
Posts: 1,527
From: Surf City SoCal
So I added some blue cold cathodes (4 inch models) to my ride the other day and got some mad props for it. I've had more than a few peeps ask me how I done it. I'd love to give everyone a hand with it (and there are a few close enough that I will) but for everyone who wants to try it themselves...here's how. Note: I haven't done the pics and write up on the actual wiring of the cold cathodes..no pics for that. Ask me if you have questions. Second note: I'm on vacation this week so I had the time to do the pics, gotta love time off. :D
Usual disclaimer: If you screw it up don't come crying to me. Take your time, follow the directions and ask me if you have any questions. Enough said.
The tools you'll need...
10 mm socket, 14 mm socket, your fingernail or a very small screwdriver

This is where the cold cathode will be installed...

Notice the two caps on either end. These must be opened to reach the 10 mm bolts holding them on. Pry them open with your fingernail or a very small screwdriver...

You'll remove the grab handle and put it someplace safe along with the bolts.
Next you'll need to remove the small cover on the seat belt anchor, again, use your fingernail or a small screwdriver.

Once the cover is removed you'll see the 14 mm bolt connecting the seat belt anchor to the door piller. We'll come back to this in a moment.

Remove the door sill by pulling up on the edge with your finger. Remove the front door sill and the kick panel at this time.

Then remove the rear door sill in the same manner.

With the sills removed you will now remove the bottom (black) door post cover. It is not hard to do, just grab an edge and pull starting from the front.

Then do the same to the rear.

To remove the top (light colored) half of the door post cover, remove the 14 mm bolt holding the seat belt anchor in place.


Just so it doesn't get tangled up, I let my rest on the drivers seat.

You must pull the door weather striping loose from both the front...

And the rear...

Now use your fingers to pull the upper post cover away from the post. It will be a little tight since there is a plastic plug holding it in. Just pull hard and easy and it will come loose.


Notice the tab and hole set-up. It will make it easier to replace when you're done.

Now remove the two 10 mm bolts holding the grab handles on.

Mine are already installed but you can see where to run the wires from the converter to the bulbs. Just tuck it up under the head liner after running it through the hole for the grab handles.

Then continue the wire run down the door post. I used blue masking tape to hold the wires against the post.

Mount your converter (mine is a double) here on the door post. I used 3M grey double sided tape, the stuff works awesomely!

*Note: The lead from the converter to the bulbs will need to be extended by splicing in extra wire. The provided leads are too short. This is not recommended on the 12 inch bulbs but will work with the 4 inch bulbs. Splice just enough to make it reach, the longer the lead, the dimmer the lighting.
The ports for the bulbs are mounted facing up and the port for the power/ground is facing down. Run your power/ground wires under the door sill and kick panel, up under the dash and down to the power and ground source of your choosing.

I chose to splice my with butt connectors to the existing power/ground leads for the under dash LED's. Remove the center kick panel and you'll find those wires or use the lighter leads.


If you don't already have a switch, you'll need to install one. I used this one in my center console that controls all my inside lighting.

Hold the cold cathode in place with one hand while replacing the grab handle with the other hand...you'll find the wire fits nicely into the hole in the headliner even with the grab handle in place.

The 4 inch cold cathode fits snugly into the grab handle and doesn't require anything else to hold it in place. If you would feel more secure with something holding it, you use a small square of the 3M tape on each end.

When you tighten down the 10 mm bolts, leave the rear one a few turns from completely tight. The front, if tightened all the way will hold the entire handle sturdily.
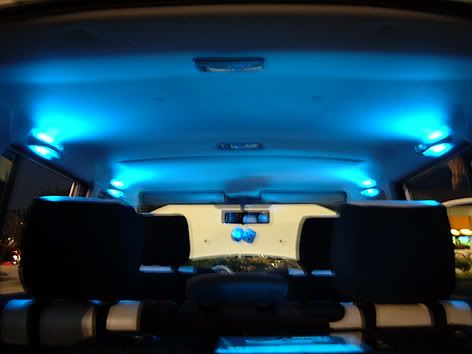
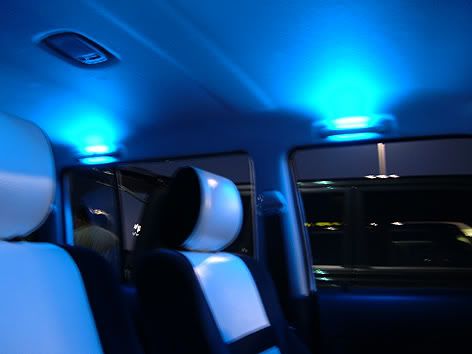
Here is what your completed OSH with the cold cathodes will look like...

A tip: check that your lights work before putting everything back together.
I will do a write up soon on the actual wiring of the cold cathodes for those of you who haven't used them yet. Easy as pie but instructions are always handy.
I hope this helps to answer any questions you may have had about mounting your cold cathodes. If not, feel free to ask me about it. Now, back to what vacation is really all about...

Usual disclaimer: If you screw it up don't come crying to me. Take your time, follow the directions and ask me if you have any questions. Enough said.
The tools you'll need...
10 mm socket, 14 mm socket, your fingernail or a very small screwdriver
This is where the cold cathode will be installed...
Notice the two caps on either end. These must be opened to reach the 10 mm bolts holding them on. Pry them open with your fingernail or a very small screwdriver...
You'll remove the grab handle and put it someplace safe along with the bolts.
Next you'll need to remove the small cover on the seat belt anchor, again, use your fingernail or a small screwdriver.
Once the cover is removed you'll see the 14 mm bolt connecting the seat belt anchor to the door piller. We'll come back to this in a moment.
Remove the door sill by pulling up on the edge with your finger. Remove the front door sill and the kick panel at this time.
Then remove the rear door sill in the same manner.
With the sills removed you will now remove the bottom (black) door post cover. It is not hard to do, just grab an edge and pull starting from the front.
Then do the same to the rear.
To remove the top (light colored) half of the door post cover, remove the 14 mm bolt holding the seat belt anchor in place.
Just so it doesn't get tangled up, I let my rest on the drivers seat.
You must pull the door weather striping loose from both the front...
And the rear...
Now use your fingers to pull the upper post cover away from the post. It will be a little tight since there is a plastic plug holding it in. Just pull hard and easy and it will come loose.
Notice the tab and hole set-up. It will make it easier to replace when you're done.
Now remove the two 10 mm bolts holding the grab handles on.
Mine are already installed but you can see where to run the wires from the converter to the bulbs. Just tuck it up under the head liner after running it through the hole for the grab handles.
Then continue the wire run down the door post. I used blue masking tape to hold the wires against the post.
Mount your converter (mine is a double) here on the door post. I used 3M grey double sided tape, the stuff works awesomely!
*Note: The lead from the converter to the bulbs will need to be extended by splicing in extra wire. The provided leads are too short. This is not recommended on the 12 inch bulbs but will work with the 4 inch bulbs. Splice just enough to make it reach, the longer the lead, the dimmer the lighting.
The ports for the bulbs are mounted facing up and the port for the power/ground is facing down. Run your power/ground wires under the door sill and kick panel, up under the dash and down to the power and ground source of your choosing.
I chose to splice my with butt connectors to the existing power/ground leads for the under dash LED's. Remove the center kick panel and you'll find those wires or use the lighter leads.
If you don't already have a switch, you'll need to install one. I used this one in my center console that controls all my inside lighting.
Hold the cold cathode in place with one hand while replacing the grab handle with the other hand...you'll find the wire fits nicely into the hole in the headliner even with the grab handle in place.
The 4 inch cold cathode fits snugly into the grab handle and doesn't require anything else to hold it in place. If you would feel more secure with something holding it, you use a small square of the 3M tape on each end.
When you tighten down the 10 mm bolts, leave the rear one a few turns from completely tight. The front, if tightened all the way will hold the entire handle sturdily.
Here is what your completed OSH with the cold cathodes will look like...
A tip: check that your lights work before putting everything back together.
I will do a write up soon on the actual wiring of the cold cathodes for those of you who haven't used them yet. Easy as pie but instructions are always handy.
I hope this helps to answer any questions you may have had about mounting your cold cathodes. If not, feel free to ask me about it. Now, back to what vacation is really all about...

Thread Starter
Senior Member
SL Member
Joined: Nov 2005
Posts: 1,527
From: Surf City SoCal
Originally Posted by midtowndesi
Sweet write up, man!  Definitely get back to the vacation, those boards look like they're collecting dust!
- sh00k
- sh00k


Thread Starter
Senior Member
SL Member
Joined: Nov 2005
Posts: 1,527
From: Surf City SoCal
Originally Posted by BoughettiXB
Is there any room left to even grab those handles after doing this little mod?

Senior Member
SL Member
Joined: Jun 2005
Posts: 232
From: Greenville, SC
nice work, how visable is the cathode at night when you turn it on? does it shine in your eyes or is it hidden by the handle? i just want to be able to see the product of the cathode, not the cathode itself. thanks for a great write-up!

Senior Member

SL Member
Scinergy
Joined: May 2006
Posts: 1,121
From: Jacksonville, FL
I currently have 4 neon tubes for lighting (2 under dash & 2 under back of front seats). I want to swap out for a cold cathode set up. My question for the grap handle lighting is this: Couldn't you just wire all 4 up to the dome light and then you would get the fade out effect when locking the doors? This also takes up a little less wire.

Thread Starter
Senior Member
SL Member
Joined: Nov 2005
Posts: 1,527
From: Surf City SoCal
Originally Posted by emfomas
nice work, how visable is the cathode at night when you turn it on? does it shine in your eyes or is it hidden by the handle? i just want to be able to see the product of the cathode, not the cathode itself. thanks for a great write-up!
It doesn't shine in your eyes. I only have them on when parked at shows.
Thread Starter
Senior Member
SL Member
Joined: Nov 2005
Posts: 1,527
From: Surf City SoCal
Originally Posted by hotweelz4me
I currently have 4 neon tubes for lighting (2 under dash & 2 under back of front seats). I want to swap out for a cold cathode set up. My question for the grap handle lighting is this: Couldn't you just wire all 4 up to the dome light and then you would get the fade out effect when locking the doors? This also takes up a little less wire.
Thread Starter
Senior Member
SL Member
Joined: Nov 2005
Posts: 1,527
From: Surf City SoCal
Originally Posted by j0n
anyone know of a good place to buy these 4inch cathodes from? an would have a variety of colors?

Senior Member
SL Member
Joined: May 2004
Posts: 1,368
From: San Antonio, TX
and they sell sound reactive ( " beat to music " ) transformers
flashy flashy fancy!!
http://www.coolerguys.com/840556021056.html
flashy flashy fancy!!
http://www.coolerguys.com/840556021056.html

Senior Member
Scikotics
SL Member
Joined: May 2004
Posts: 1,811
From: Nor-Cal Scikotics


Junior Member
Joined: Jul 2006
Posts: 6
From: Raleigh, North Carolina
Hey, you know how the front headrests come off and the front seats slide forward and fold backward to make a bed-like platform? I was wondering how these ohsh*t lights work as ambient lighting in that set-up. What i mean to ask is, how pimp are these lights when the box is in bedmode, and might we get some visual evidence of this pimpness?
Great write-up, btw. I'm gonna knock it out sometime time this week, time allowing.
Great write-up, btw. I'm gonna knock it out sometime time this week, time allowing.

Senior Member
SL Member
Joined: May 2004
Posts: 1,368
From: San Antonio, TX
since i am now getting out of the show scene i can release some of my unfinished ideas
to REPLACE the sheet handles

they are very close to the same length
some drilling will be needed
good luck!
to REPLACE the sheet handles
they are very close to the same length
some drilling will be needed
good luck!