
Mods please move this to tech.


Thread Starter
Joined: Oct 2005
Posts: 1,263
From: Nor Cal Native in Okinawa
Hopefully this will get moved to tech.
OK, origionally I wanted to buy the "Laylight" by Napolex. For those of you who don't recognize the name here's a picture.

And here's what I came up with for much less money.


Here's the needed items for this mini mod.
A Saturday
One small flat head screw driver-Wal Mart
Four Night lights-Home Depot
One On Off switch-Wal Mart
Six or more wire taps to connect two wires-Wal Mart
Five circle end wire connectors (large)-Wal Mart
Soldering iron, and Solder-Wal Mart
Drill, or dremel
Rivets, and rivet gun. or Double sided tape-Wal Mart
Four 14V miniature light bulb sockets, and also four 14V miniature bulbs-Radio Shack.
Pinch style wire connectors (barrels)-Wal Mart
Electrical Tape.
Monster Energy Drink.
Anyways, this stuff is real nice and matches the interior, but it costs $180.00! Sorry, that's almost a DAMD grille, or headlights, and tailights. So I figured I would look for a way to achieve the same affect in an affoardable and decent looking manor.
So here is what I came up with. First I scoped local stores for "cool" looking night lights. I came across these at Home Depot...
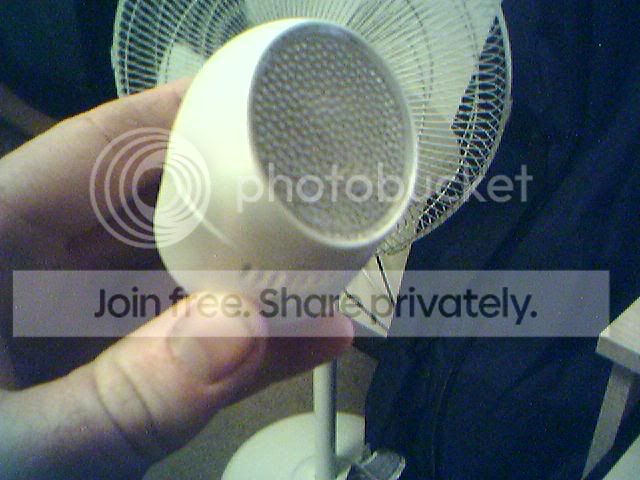
I can't remember what they were called, but that does'nt matter because they are sold under different names. What I can tell you is that they swivel 360 degrees (ooh, ahh) so the passengers can somewhat direct their light.
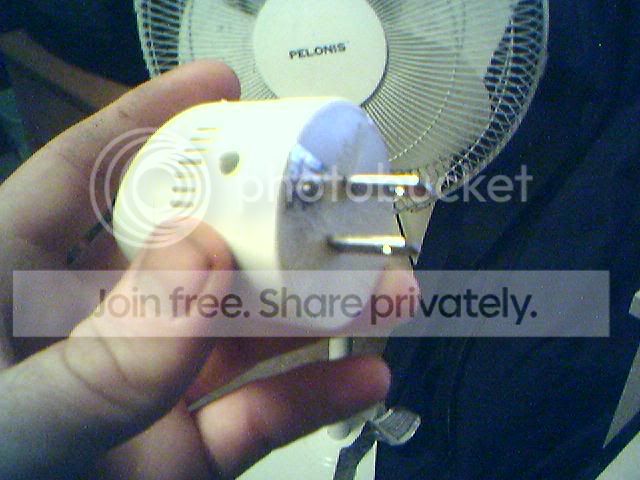
Here's what one would need to do. First get a real small flat head screwdriver. Now either use a hack saw, jeweler's file, small cutting wheel, or other metal cutting device and cut a small groove in the center of the blade in the screw driver. It should look similar to this.
This little guy will take out the "tamper proof" screw in the night light. After removing said screw, open the night light and remove the circuitboard that is attetched to the plug prongs, and bulb.
Next, take the Miniature light bulb socket and solder a black wire, about 6" in length to the Casing Prong at the base (the one that actually touches the base) and solder a red wire about 6" in length to the lowest prong under the insulator material. Do this to all four lights. And strip the dangling side of the wires.
Allrighty then, once all of the lights are wired and the red wire ends have been stripped, place the lights inside of the emptied night light housing. You will probably need to do some adjusting with the drill to get the light to close properly with the new light bulbs, and sockets.
Once all of this is acomplished the next plan of action is to run the ower wire. For safety's sake I reccomend disconnecting the negative side of the battery, and the positive side and tucking them out of the way as not to slip and make contact with the terminals. Now add a round electrical connector to an uncut red wire on a spool. Take the wire connector, and place it on one of the bolts on the positive side of the battery distribution block. Now take the wire and either lube it up with some dish soap, poke a small hole through the driver's side wire bundle grommet in the fire wall (not the wires, just the grommet) and run the wire throgh into the cab behind the dash. To do this, use a straightened wire hanger with a small loop from needle nose pliers at the end. Tie the end of the power wire to it. Oh yeah, the wire should be about 5'-7' long (that's feet). Easily "guide" the wire and hanger combo throgh the grommet, and into the cab. Next go inside and fish that wire through.
For the switch mounting location I used the little pop out panels that are in the ceneter console because I could easily access the back side. So for this write up we will use this location.
Now run the power wire to the back of the ceneter console. Pop out one of the little rectangle panels, and fish the wire through. Now take a spade connector and hook it to the power wire. Now plug that onto the coresponding location on the back of the switch.
If you've made it this far then you should be able to hook up a negative wire to the switch. I used one of the nuts on the pedal plate assembly on the floor under the pedals.
Now, Run another red wire from the switch, under the carpet, to the driver's door jamb area. This wire should be about 6' in length.
Fun time! :D Remove the rubber weather trim in the door jamb from the B pillar to just past the radius in the upper door jamb, and let it hang. Remove what you can of the black plastic Garnish piece on the inner B pillar. Unbolt the seat belt mount, and don't lose the hardware! Remove the light grey plastic garnish, drill through the garnish and the light housing and rivet it in place (one rivet or you will never be able to change the bulb) or just double sided tape the light on after drilling two hole for your wires and running them through the garnish. Once the wires are run through place a round connector on the black wire, but it has to be large enough to fit onto the seat belt mounting bolt because this will be the lights ground. Next attatch the red positive wire from the light to the red positive wire from the switch using a crimp connector. Note, use an insulated connector as not to cause a short.
Now leave that stuff some what "hanging out" for right now. Next remove the "Oh sh#t handle" and keep your hardware. There are little plastic covers on either end that pop open from the handle side to expose the bolts.
Now use the "vampire taps" to connect a new shiny red wire, about 5' in length, to the exsisting one. Next, remove the trim, weather stripping, and "oh sh#t handle" from the rear driver's side seat. You don't need to use the hanger for running the power wire to the rear seat, just use your fingers and tuck as you go. Now just hook up the next light to the light grey plastic and hook up the wires as you did with the first light. Don't forget to tap the red wire again as it will be the power to the next light.
Now pop the rear of the headliner by removing some pop in clips, and remove the trim. B carefull when working with the headliner because it will rease easily, and your hands are dirty by now.
Now take your hanger and run the tapped power wire to the other side of the car. Fish the wire out of the headliner and hook up the next light.
Now just continue to the front of the passenger side and end the power wire there.Hook up the battery, and test the lights. One of mine neede a little tap to get going. Clean all of the panels, and trim up, and enjoy. :D
This is a somewhat time consuming mod, but well worth the effort. Also I appologise for phone pics, and typos. Thanks for reading all of this, hope you like the lights.
OK, origionally I wanted to buy the "Laylight" by Napolex. For those of you who don't recognize the name here's a picture.
And here's what I came up with for much less money.
Here's the needed items for this mini mod.
A Saturday
One small flat head screw driver-Wal Mart
Four Night lights-Home Depot
One On Off switch-Wal Mart
Six or more wire taps to connect two wires-Wal Mart
Five circle end wire connectors (large)-Wal Mart
Soldering iron, and Solder-Wal Mart
Drill, or dremel
Rivets, and rivet gun. or Double sided tape-Wal Mart
Four 14V miniature light bulb sockets, and also four 14V miniature bulbs-Radio Shack.
Pinch style wire connectors (barrels)-Wal Mart
Electrical Tape.
Monster Energy Drink.
Anyways, this stuff is real nice and matches the interior, but it costs $180.00! Sorry, that's almost a DAMD grille, or headlights, and tailights. So I figured I would look for a way to achieve the same affect in an affoardable and decent looking manor.
So here is what I came up with. First I scoped local stores for "cool" looking night lights. I came across these at Home Depot...
I can't remember what they were called, but that does'nt matter because they are sold under different names. What I can tell you is that they swivel 360 degrees (ooh, ahh) so the passengers can somewhat direct their light.
Here's what one would need to do. First get a real small flat head screwdriver. Now either use a hack saw, jeweler's file, small cutting wheel, or other metal cutting device and cut a small groove in the center of the blade in the screw driver. It should look similar to this.
This little guy will take out the "tamper proof" screw in the night light. After removing said screw, open the night light and remove the circuitboard that is attetched to the plug prongs, and bulb.
Next, take the Miniature light bulb socket and solder a black wire, about 6" in length to the Casing Prong at the base (the one that actually touches the base) and solder a red wire about 6" in length to the lowest prong under the insulator material. Do this to all four lights. And strip the dangling side of the wires.
Allrighty then, once all of the lights are wired and the red wire ends have been stripped, place the lights inside of the emptied night light housing. You will probably need to do some adjusting with the drill to get the light to close properly with the new light bulbs, and sockets.
Once all of this is acomplished the next plan of action is to run the ower wire. For safety's sake I reccomend disconnecting the negative side of the battery, and the positive side and tucking them out of the way as not to slip and make contact with the terminals. Now add a round electrical connector to an uncut red wire on a spool. Take the wire connector, and place it on one of the bolts on the positive side of the battery distribution block. Now take the wire and either lube it up with some dish soap, poke a small hole through the driver's side wire bundle grommet in the fire wall (not the wires, just the grommet) and run the wire throgh into the cab behind the dash. To do this, use a straightened wire hanger with a small loop from needle nose pliers at the end. Tie the end of the power wire to it. Oh yeah, the wire should be about 5'-7' long (that's feet). Easily "guide" the wire and hanger combo throgh the grommet, and into the cab. Next go inside and fish that wire through.
For the switch mounting location I used the little pop out panels that are in the ceneter console because I could easily access the back side. So for this write up we will use this location.
Now run the power wire to the back of the ceneter console. Pop out one of the little rectangle panels, and fish the wire through. Now take a spade connector and hook it to the power wire. Now plug that onto the coresponding location on the back of the switch.
If you've made it this far then you should be able to hook up a negative wire to the switch. I used one of the nuts on the pedal plate assembly on the floor under the pedals.
Now, Run another red wire from the switch, under the carpet, to the driver's door jamb area. This wire should be about 6' in length.
Fun time! :D Remove the rubber weather trim in the door jamb from the B pillar to just past the radius in the upper door jamb, and let it hang. Remove what you can of the black plastic Garnish piece on the inner B pillar. Unbolt the seat belt mount, and don't lose the hardware! Remove the light grey plastic garnish, drill through the garnish and the light housing and rivet it in place (one rivet or you will never be able to change the bulb) or just double sided tape the light on after drilling two hole for your wires and running them through the garnish. Once the wires are run through place a round connector on the black wire, but it has to be large enough to fit onto the seat belt mounting bolt because this will be the lights ground. Next attatch the red positive wire from the light to the red positive wire from the switch using a crimp connector. Note, use an insulated connector as not to cause a short.
Now leave that stuff some what "hanging out" for right now. Next remove the "Oh sh#t handle" and keep your hardware. There are little plastic covers on either end that pop open from the handle side to expose the bolts.
Now use the "vampire taps" to connect a new shiny red wire, about 5' in length, to the exsisting one. Next, remove the trim, weather stripping, and "oh sh#t handle" from the rear driver's side seat. You don't need to use the hanger for running the power wire to the rear seat, just use your fingers and tuck as you go. Now just hook up the next light to the light grey plastic and hook up the wires as you did with the first light. Don't forget to tap the red wire again as it will be the power to the next light.
Now pop the rear of the headliner by removing some pop in clips, and remove the trim. B carefull when working with the headliner because it will rease easily, and your hands are dirty by now.
Now take your hanger and run the tapped power wire to the other side of the car. Fish the wire out of the headliner and hook up the next light.
Now just continue to the front of the passenger side and end the power wire there.Hook up the battery, and test the lights. One of mine neede a little tap to get going. Clean all of the panels, and trim up, and enjoy. :D
This is a somewhat time consuming mod, but well worth the effort. Also I appologise for phone pics, and typos. Thanks for reading all of this, hope you like the lights.


Thread
Thread Starter
Forum
Replies
Last Post
cessblood
PPC: Engine / Drivetrain
3
Sep 15, 2015 06:50 AM
user 7208230
PPC: Exterior / Styling
16
Jun 12, 2015 06:40 PM