HOW TO: Installing The DC Strut Bar In The xA (56K Warning)
 06-22-2005, 04:14 AM
#1
Senior Member
SL Member
Team ScioNRG
Thread Starter

Join Date: May 2005
Location: Rochester, NH
Posts: 812
This is the first of several how-to's I will be writing for the xA crowd this summer. This one will be detailing on the installation of the DC Sports Front Strut Bar. While there is one in the FAQ section this one is specific for the xA. Ready?
Product Used:
DC Sports CS-2 Front Strut Bar
$89.00 at ScionSport.com
Tools you will need:
- Socket Extension ( 6 inch is fine for this application)
- 10MM Socket
- 12MM Socket
- 14MM Socket
- # 2 Philips Screw Driver
- Small Flathead Screw Driver
- Needle Nose Pliers (optional)
Estimated Install Time:
- 45 Minutes
*** Disclaimer: Mods are to be done at your own risk. If you muck something up, don't point the finger at moi. You will be pimp slapped if you do. ***
***
Start by gathering your nessecary tools for the installation. Make sure that the front wheels on your egg are in the straight position, then open your hood. Located on both sides of the fenders are the strut towers. The three brass bolts hold the struts in place and you will immediately notice that there will be a problem with the rear most bolt on these strut towers. I opted to completely remove the cowling to access these bolt as my big ___ hands don't like small spaces. On each side of the cowling there are trim pieces that need to be removed to access some of the screws holding the cowling in place. Remove these pieces and set them aside. Now remove the 2 phillips head screws in the cowling and set them aside (there is one on each side that was hidden by the trim piece you just removed)

Next is to remove the windshield wipers. Use the small flat head screw driver and carefully pry the trim piece off the wiper arms. This will expose the 14MM nuts that hold the arms in place. Lift the arm into the up positioin and remove the nuts. Then carefully pull the wiper arm off the hub and repeat for the other wiper.
Next step is to remove the plastic cowl cover. Notice the foam gasket? Holding the gasket to the cowl is a set of plastic pins that also hold the front of the cowl to the metal frame underneath. Locate these pins. There should be six of them. Go under the foam trim and push the pins up through the cowl be carefull not to tear the gasket. In the middle of the cowling are two plastic phillps screws remove them and the plugs they were in as well. This should now loosen up the whole cowling trim assembly. With a little dexterity remove the trim pieces (there are two halves) and set them aside with your windshiel wipers.

Your engine bay should look like this now:

The black "tub" is the cowl faring, This area houses the wiper motor and also supplies fresh air to the cabin. If you look closely at the firewall you can see right into the dashboard ducting.
Now, Look at the Wiper motor. There are two black 10MM bolts holding it in place. First unplug the wiper harness by squeezing the pin on the underside of the electrical connector. The harness for the wiper motor is also connected by a plastic clip to the cowl faring. Unclip the connector and move the harness out of the way for now. Then unbolt the wiper motor and remove it from the faring and put it with the rest of your parts.

Looking at the black tub. Locate the silver 10MM bolts holding it to the car. There should be about 8 of them holding it in place. Also there will be one more bolt on the very front of the tub connected to a bracket holding up one of the hoses in the engine compartment. Remove the bolts and set them in a safe place for now. The grap the tub and pull it out of the engine bay. Be VERY CAREFUL the tub has sharp edges> I found out the hard way and put a nasty cut on one finger. Set the tub aside. Your pile of parts should look like the following:

And your engine bay should look like this (minus the color of course ):
):

Looking at the picture above you can note that you have full access to the strut nuts. Remove all six of them and place them with your other parts. They will be on tight.
Next, place your strut bar on the strut studs like so:


Make sure everything is in place and then put the 6 strut nuts back in place and tighten them down. I do not have a torque wrench so I did it the "German way" and tightened the nuts until they wouldn't budge. Check them every so often to make sure they don't loosen up.
Place the black tub/faring piece in place. Before putting anything else on. Do you remember the bracket that was mounted to the front of the tub? That was the one with the hose on it. Put this bracket on FIRST. I say this because once you start putting everything else back in you will have one hell of a time putting this bracket back on since the strut bar is in place.

From this point on it's pretty much just reversing the disassembly steps. Remember to clip the wiper harness back into the faring and plug it into the wiper motor. When it comes time to reinstall the cowl trim. Look at the underside of it. There will be a row of clips on one side. These need to slide into the windshield glass to ensure a tight fit. You can see what I mean in this pic:

Finish replacing all the clips, screws, and trim pieces that hold the cowling in place. We now need to attach the wiper arms again. The hubs for the wiper arms are grooved so they sit tight to the wiper motor. Place your wiper arm on the hub in a position that was close to the way they were when you took them off. You can sight how they were on the windshield if it's dirty since the wiper blades will have left a line of pollen and crap on the windshield. It may take some fiddling but once the arms are in position re-install the 14MM nuts and tighten them down. Finish the install by replacing anything else you may have taken off. Clean up your egg and most importantly before you close the hood go over to the DC Sport logo on the strut bar a peel off the plastic film and give that logo a shine. Admire your work and the go for a test drive. Oh and if you cut your self on the metal tub/faring go grab a band-aid and have a Coke and a smile.
You will now notice more of a response in your steering and the car will feel tighter. Find a nice curve and throw the car into the corner. I love the feel of the DC Sports Strut Bar and it looks tight.


Other HOW To's comin up are:
Scion Rear Bumper Applique
Gutting The Scion xA Interior
Installing Scion Security with RKE
Product Used:
DC Sports CS-2 Front Strut Bar
$89.00 at ScionSport.com
Tools you will need:
- Socket Extension ( 6 inch is fine for this application)
- 10MM Socket
- 12MM Socket
- 14MM Socket
- # 2 Philips Screw Driver
- Small Flathead Screw Driver
- Needle Nose Pliers (optional)
Estimated Install Time:
- 45 Minutes
*** Disclaimer: Mods are to be done at your own risk. If you muck something up, don't point the finger at moi. You will be pimp slapped if you do.
Start by gathering your nessecary tools for the installation. Make sure that the front wheels on your egg are in the straight position, then open your hood. Located on both sides of the fenders are the strut towers. The three brass bolts hold the struts in place and you will immediately notice that there will be a problem with the rear most bolt on these strut towers. I opted to completely remove the cowling to access these bolt as my big ___ hands don't like small spaces. On each side of the cowling there are trim pieces that need to be removed to access some of the screws holding the cowling in place. Remove these pieces and set them aside. Now remove the 2 phillips head screws in the cowling and set them aside (there is one on each side that was hidden by the trim piece you just removed)
Next is to remove the windshield wipers. Use the small flat head screw driver and carefully pry the trim piece off the wiper arms. This will expose the 14MM nuts that hold the arms in place. Lift the arm into the up positioin and remove the nuts. Then carefully pull the wiper arm off the hub and repeat for the other wiper.
Next step is to remove the plastic cowl cover. Notice the foam gasket? Holding the gasket to the cowl is a set of plastic pins that also hold the front of the cowl to the metal frame underneath. Locate these pins. There should be six of them. Go under the foam trim and push the pins up through the cowl be carefull not to tear the gasket. In the middle of the cowling are two plastic phillps screws remove them and the plugs they were in as well. This should now loosen up the whole cowling trim assembly. With a little dexterity remove the trim pieces (there are two halves) and set them aside with your windshiel wipers.
Your engine bay should look like this now:
The black "tub" is the cowl faring, This area houses the wiper motor and also supplies fresh air to the cabin. If you look closely at the firewall you can see right into the dashboard ducting.
Now, Look at the Wiper motor. There are two black 10MM bolts holding it in place. First unplug the wiper harness by squeezing the pin on the underside of the electrical connector. The harness for the wiper motor is also connected by a plastic clip to the cowl faring. Unclip the connector and move the harness out of the way for now. Then unbolt the wiper motor and remove it from the faring and put it with the rest of your parts.
Looking at the black tub. Locate the silver 10MM bolts holding it to the car. There should be about 8 of them holding it in place. Also there will be one more bolt on the very front of the tub connected to a bracket holding up one of the hoses in the engine compartment. Remove the bolts and set them in a safe place for now. The grap the tub and pull it out of the engine bay. Be VERY CAREFUL the tub has sharp edges> I found out the hard way and put a nasty cut on one finger. Set the tub aside. Your pile of parts should look like the following:
And your engine bay should look like this (minus the color of course
Looking at the picture above you can note that you have full access to the strut nuts. Remove all six of them and place them with your other parts. They will be on tight.
Next, place your strut bar on the strut studs like so:
Make sure everything is in place and then put the 6 strut nuts back in place and tighten them down. I do not have a torque wrench so I did it the "German way" and tightened the nuts until they wouldn't budge. Check them every so often to make sure they don't loosen up.
Place the black tub/faring piece in place. Before putting anything else on. Do you remember the bracket that was mounted to the front of the tub? That was the one with the hose on it. Put this bracket on FIRST. I say this because once you start putting everything else back in you will have one hell of a time putting this bracket back on since the strut bar is in place.
From this point on it's pretty much just reversing the disassembly steps. Remember to clip the wiper harness back into the faring and plug it into the wiper motor. When it comes time to reinstall the cowl trim. Look at the underside of it. There will be a row of clips on one side. These need to slide into the windshield glass to ensure a tight fit. You can see what I mean in this pic:
Finish replacing all the clips, screws, and trim pieces that hold the cowling in place. We now need to attach the wiper arms again. The hubs for the wiper arms are grooved so they sit tight to the wiper motor. Place your wiper arm on the hub in a position that was close to the way they were when you took them off. You can sight how they were on the windshield if it's dirty since the wiper blades will have left a line of pollen and crap on the windshield. It may take some fiddling but once the arms are in position re-install the 14MM nuts and tighten them down. Finish the install by replacing anything else you may have taken off. Clean up your egg and most importantly before you close the hood go over to the DC Sport logo on the strut bar a peel off the plastic film and give that logo a shine. Admire your work and the go for a test drive. Oh and if you cut your self on the metal tub/faring go grab a band-aid and have a Coke and a smile.
You will now notice more of a response in your steering and the car will feel tighter. Find a nice curve and throw the car into the corner. I love the feel of the DC Sports Strut Bar and it looks tight.
Other HOW To's comin up are:
Scion Rear Bumper Applique
Gutting The Scion xA Interior
Installing Scion Security with RKE
 06-22-2005, 04:46 AM
#2
Senior Member
SL Member

Join Date: Nov 2004
Location: Anchorage, AK
Posts: 450
Great job on that! I'll look up those torque specs for you and send them via PM, just in case anyone wants to know them.
I can't wait for the "Gutting the xA Interior" write-up! Keep up the good work!
I can't wait for the "Gutting the xA Interior" write-up! Keep up the good work!


 06-23-2005, 04:41 AM
#7
Senior Member
SL Member
Team ScioNRG

Join Date: Apr 2004
Location: The Wastelands of New Ham
Posts: 187
Originally Posted by Kremtok
Great job on that! I'll look up those torque specs for you and send them via PM, just in case anyone wants to know them.
06-23-2005, 05:31 AM
#8
Senior Member
SL Member
Team ScioNRG
Thread Starter
Join Date: May 2005
Location: Rochester, NH
Posts: 812
Thanks for the comments guys, greatly appreciated. :D
SteveK: a Loctite thread locker wouldn't hurt at all. The stuff is great and should be in any tool box. The next time I have the cowl off (which will be when I lower the egg) I'll remember to give the studs a good coating of Loctite. Always good to do a little overkill.
Stock brace plates were left on for this install.
06-23-2005, 10:30 AM
#9
Senior Member
SL Member
Team ScioNRG
Join Date: Apr 2004
Location: The Wastelands of New Ham
Posts: 187
Originally Posted by SteveK
Could/should you add any kind of thread-locker to keep the nuts tight?


 06-26-2005, 06:05 PM
#12
Senior Member
SL Member
Team ScioNRG
Join Date: Apr 2004
Location: The Wastelands of New Ham
Posts: 187
Just finished the install based on this guide... good stuff! Not very hard at all. This was just the thing I needed, because I only have one type of torque wrench and it would not have fit unless I took the assembly off. Thanks, Uber!
06-27-2005, 12:35 AM
#13
Senior Member
SL Member
Team ScioNRG
Thread Starter
Join Date: May 2005
Location: Rochester, NH
Posts: 812
Originally Posted by The Zeeness
Just finished the install based on this guide... good stuff! Not very hard at all. This was just the thing I needed, because I only have one type of torque wrench and it would not have fit unless I took the assembly off. Thanks, Uber!
04-17-2006, 01:20 AM
#14
Junior Member

Join Date: Apr 2006
Location: Melbourne, Fl USA
Posts: 27
If I may, not a professional mechanic so if anyone knows of a good reason why not to do what I did, please let me know.
Just installed my bar this weekend, in under 30 minutes. see profile for pics.
Ran across this shortcut while restoring a 72 VW.
-Remove all 6 nuts, two can be removed with a socket, the other 4 with a open end fix wrench
-take a jack and jack up the car from either the left or the right side. Make sure the front tire is off the ground about 1/2 to 1 inch
-Now, take the bar and place it as far as it will go. Take your foot, and push down on the wheel that is up in the air. (Or have an assistant push down on the wheel. The screws will slide down and allow the bar slide into position.
-Once the holes are allined, release the wheel, the screws will slide back up
-Repeat for the other side
-replace all the nuts[/list]
04-17-2006, 02:40 AM
#15
Senior Member
SL Member

Join Date: Feb 2005
Location: SFV So Cal
Posts: 299
Originally Posted by hnj_AB
If I may, not a professional mechanic so if anyone knows of a good reason why not to do what I did, please let me know.
Just installed my bar this weekend, in under 30 minutes. see profile for pics.
Ran across this shortcut while restoring a 72 VW.
-Remove all 6 nuts, two can be removed with a socket, the other 4 with a open end fix wrench
-take a jack and jack up the car from either the left or the right side. Make sure the front tire is off the ground about 1/2 to 1 inch
-Now, take the bar and place it as far as it will go. Take your foot, and push down on the wheel that is up in the air. (Or have an assistant push down on the wheel. The screws will slide down and allow the bar slide into position.
-Once the holes are allined, release the wheel, the screws will slide back up
-Repeat for the other side
-replace all the nuts[/list]
Just installed my bar this weekend, in under 30 minutes. see profile for pics.
Ran across this shortcut while restoring a 72 VW.
-Remove all 6 nuts, two can be removed with a socket, the other 4 with a open end fix wrench
-take a jack and jack up the car from either the left or the right side. Make sure the front tire is off the ground about 1/2 to 1 inch
-Now, take the bar and place it as far as it will go. Take your foot, and push down on the wheel that is up in the air. (Or have an assistant push down on the wheel. The screws will slide down and allow the bar slide into position.
-Once the holes are allined, release the wheel, the screws will slide back up
-Repeat for the other side
-replace all the nuts[/list]
we know there's not an exact scions to the proceedure but your way is also the right way....it's the same route i took
04-19-2006, 06:58 PM
#16
Senior Member
SL Member

Join Date: Dec 2005
Posts: 1,735
I just installed the DC strut bar on my xB, following DC's instructions to jack the car to lower the strut bolts so the bar can be slipped over them.
I wonder how much good this bar, maybe any of these bars, can do. It is only as good as the tightness of the nuts.
When placed over the nuts, the bar is loose and can be moved around. The openings in the bar ends fit loosely around the collars of the struts, and the slotted bolt holes in the bar ends fit loosely around the strut bolts.
The ability of the strut bar to tie the two struts together is only as good as the tightness of the 6 nuts that prevent any sliding movement around the 6 slotted bolt holes. I wonder if 6 nuts tightened to only 16 lbs can clamp the ends of the strut bar to cause enough friction to resist movement of the car's body at the stuts.
The ends of the bar have a friction connection to the body, not a rigidly locked connection.
04-19-2006, 07:13 PM
#17
Senior Member
SL Member

Join Date: Aug 2005
Location: Boston
Posts: 100
I installed my DC Strut bar while swapping in Koni Shocks. I was originally going to try to do it without taking off the cowling, except the very first nut I tried to loosen, one of the back hard to access ones, rounded. The only way to i could it was to therefore take off the cowling and drop a socket on the nut. I recommend the cowling removal approach as it makes it so much easier to do the rest!
Also, don't be a dumbass like me: Don't forget to plug the wiper power cable back in!
Also, don't be a dumbass like me: Don't forget to plug the wiper power cable back in!
04-22-2008, 10:27 AM
#18
Member
SL Member

Join Date: Oct 2007
Location: Charlotte, NC
Posts: 55
I bought my Dc strut bar a while ago ,waiting to put it on with my springs...well its going to be a while for the springs so..Im going to try to install the bar now and make use of it ,its doing me no good on the wall.I cant get in there either for those back bolts on the struts so I figure Ill just remove the cowl and such and do it this way.Thanks for the DIY !
 05-01-2008, 12:42 AM
#20
Member
SL Member
Join Date: Oct 2007
Location: Charlotte, NC
Posts: 55
Yup, this was an easier way than tring to drop the strut.It took me an hour to do and at no point did it become difficult,well except for my cheap Dollar store socket set breaking,(thanks to the guys at the Trans shop accross the street for letting me borrow tools) 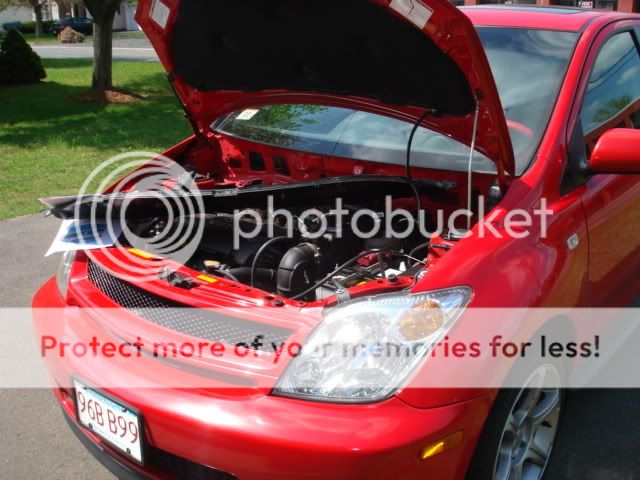
 [img][/img]
[img][/img]