Racelands and Diamonds Racing 15X8 ET15
 10-09-2012, 09:33 PM
#1
Junior Member
Thread Starter

Join Date: Apr 2006
Posts: 17
Bought the box new in 2006, paid it off last spring. The car has remained stock for the last 6 years. Recently I got some funny tire wear and a bad vibration, wasn't sure if it was alignment, cheap chinese tires or suspension that was causing the trouble. My solution is to replace everything. I got a set of Diamond Racing 15X8 ET15 wheels with 195/45 Federals and then ordered the Raceland kit for 425 shipped. I need to finish up a outboard boat motor project 1st but thought I would share with scion life my mini suspension build.
Here is what I have so far.

Here is what I have so far.


 10-25-2012, 10:35 PM
#5
Junior Member
Thread Starter
Join Date: Apr 2006
Posts: 17
Will do, Just can't seem to clear the other projects up...... I will update pics when I start the installation.
12-02-2012, 10:00 PM
#6
Junior Member
Thread Starter
Join Date: Apr 2006
Posts: 17
FINALLY installed them last night, went very easy. Had to reuse the oem shock, and strut bushings, but I knew that.
Started with the rear,
Pretty strait forward, easier to to both sides at once, no need to remove the wheels. Inside the car is under the strut covers in the cargo area is a nut and jamnut that needed removed. Next I took the lower shock nut off and poped them off the stud, once I did that on both sides the swing axle dropped down.
With the shocks out the springs fell out, I reused the rubber seats and installed the adjustable spring perches. My Kit came with no instructions so I just assumed the perch is installed correctly ?

This took 30 mins with a good buddy helping me out. The only snag in the rear was sorting out how to install the spring perches.
The front was a little more tricky, I have a tiny garage so I tried to do one side at a time but realized that with only one side in the air the swaybar was putting too much pressure on everything to get all the bits apart.
The 3 nuts on the strut tower came off easily

There are two brackets that need removed, one plastic fastener that holds the abs cable and then there is a 14mm bolt that holds the ABS and the brake line in place. I just unbolted the 14mm and unclipped the abs fastener, later I pulled the plastic fastener off on the bench.
The last step in the removal is to take the two large nuts and bolts that hold the strut to the hub.
Everything I got in the box

Cranked both adjusters to the lowest settings
Front:

Rear:

The back is higher, might flip the perch to make the rear lower or raise the front cause I already drag on the driveway.
Worst before and after images ever!
Before

After

The wheels need a spacer to clear the caliper, I have another thread about that but here is the rundown:
I can finally confirm the need for a spacer in the front, looks like 10mm will work. I went to three national auto parts stores and they all only carry the universal doorman 1/4" spacers, all were asking $9.99 for one or vatozone wanted $17.99 for two. I used these universal pot metal spacers before, they are hard to center and never fit correctly. Add the poor fitment, cheap pot metal to the fact that I don't thin 1/4 will be enough to clear the caliper and two would make things too dangerous I decided to look for an alternative.
Looking for 10mm spacers I came across two types:
No studs:

Studs included:

This makes even more questions.
Assuming that the ones with studs are longer.....
Another concern I have is will the 10mm spacer make the wheel poke too much? It would be ideal if there someone has a similar 15X8 Et 15 package and could tell me what they did so I do not have to reinvent the wheel here (no pun intended)
Started with the rear,
Pretty strait forward, easier to to both sides at once, no need to remove the wheels. Inside the car is under the strut covers in the cargo area is a nut and jamnut that needed removed. Next I took the lower shock nut off and poped them off the stud, once I did that on both sides the swing axle dropped down.
With the shocks out the springs fell out, I reused the rubber seats and installed the adjustable spring perches. My Kit came with no instructions so I just assumed the perch is installed correctly ?
This took 30 mins with a good buddy helping me out. The only snag in the rear was sorting out how to install the spring perches.
The front was a little more tricky, I have a tiny garage so I tried to do one side at a time but realized that with only one side in the air the swaybar was putting too much pressure on everything to get all the bits apart.
The 3 nuts on the strut tower came off easily
There are two brackets that need removed, one plastic fastener that holds the abs cable and then there is a 14mm bolt that holds the ABS and the brake line in place. I just unbolted the 14mm and unclipped the abs fastener, later I pulled the plastic fastener off on the bench.
The last step in the removal is to take the two large nuts and bolts that hold the strut to the hub.
Everything I got in the box
Cranked both adjusters to the lowest settings
Front:
Rear:
The back is higher, might flip the perch to make the rear lower or raise the front cause I already drag on the driveway.
Worst before and after images ever!
Before
After
The wheels need a spacer to clear the caliper, I have another thread about that but here is the rundown:
I can finally confirm the need for a spacer in the front, looks like 10mm will work. I went to three national auto parts stores and they all only carry the universal doorman 1/4" spacers, all were asking $9.99 for one or vatozone wanted $17.99 for two. I used these universal pot metal spacers before, they are hard to center and never fit correctly. Add the poor fitment, cheap pot metal to the fact that I don't thin 1/4 will be enough to clear the caliper and two would make things too dangerous I decided to look for an alternative.
Looking for 10mm spacers I came across two types:
No studs:
Studs included:
This makes even more questions.
Assuming that the ones with studs are longer.....
- Can I install the studs in my garage with basic tools or do I need to have them pressed in?
- Do I need to remove the hub to install the new studs?
- Do I really need longer studs with a 10mm spacer?
Another concern I have is will the 10mm spacer make the wheel poke too much? It would be ideal if there someone has a similar 15X8 Et 15 package and could tell me what they did so I do not have to reinvent the wheel here (no pun intended)
12-04-2012, 07:37 PM
#8
Junior Member
Thread Starter
Join Date: Apr 2006
Posts: 17
After looking around on another forum, I found that 10mm was too much poke and I could just use a zatozone spacer and grind the caliper a little
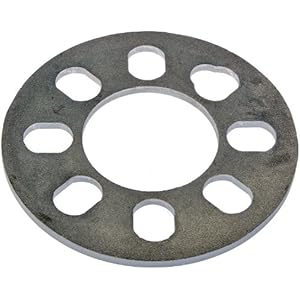
Doorman brand 2 1/4" spacers for $17.99

Grindage before:

After:

How I kept the cheap spacers centered

How it looks with the coils all the way down


Too much poke for me, I like the look but.....


The rear sits nicely.
The quality of these wheels is pretty low, they are out of balance and the tires were used so they wore funny with the PO and that cause noise and vibration.
I look the look, the poke is just too much for me, considering a camber kit but that look is not one I am a fan of. I need to look into fender spacing.
Doorman brand 2 1/4" spacers for $17.99
Grindage before:
After:
How I kept the cheap spacers centered
How it looks with the coils all the way down
Too much poke for me, I like the look but.....
The rear sits nicely.
The quality of these wheels is pretty low, they are out of balance and the tires were used so they wore funny with the PO and that cause noise and vibration.
I look the look, the poke is just too much for me, considering a camber kit but that look is not one I am a fan of. I need to look into fender spacing.


Thread
Thread Starter
Forum
Replies
Last Post
rain7905643
PPC: Engine / Drivetrain
3
06-13-2018 05:29 AM
kslim619
Scion tC 2G Suspension & Handling
0
09-18-2015 06:54 PM
Subaru86
Scion FR-S ICE & Interior
0
09-10-2015 08:11 AM
Skatermillar
Scion tC 2G Suspension & Handling
4
07-17-2015 06:03 AM