HOW-TO REMOVE DASH FOR AMP WIRE
 05-01-2009, 01:59 AM
#1
Senior Member

SL Member
Thread Starter

Join Date: Jun 2008
Location: Delaware
Posts: 1,285
Many people have asked how to get the power wire through the dash, or how to remove the radio. this will also help with sound proofing the dash. your going to need the basics for tools, screw sticks, 10mm socket and ratchet, long nose pliers. this isn't a hard job, but it will take time and patience.
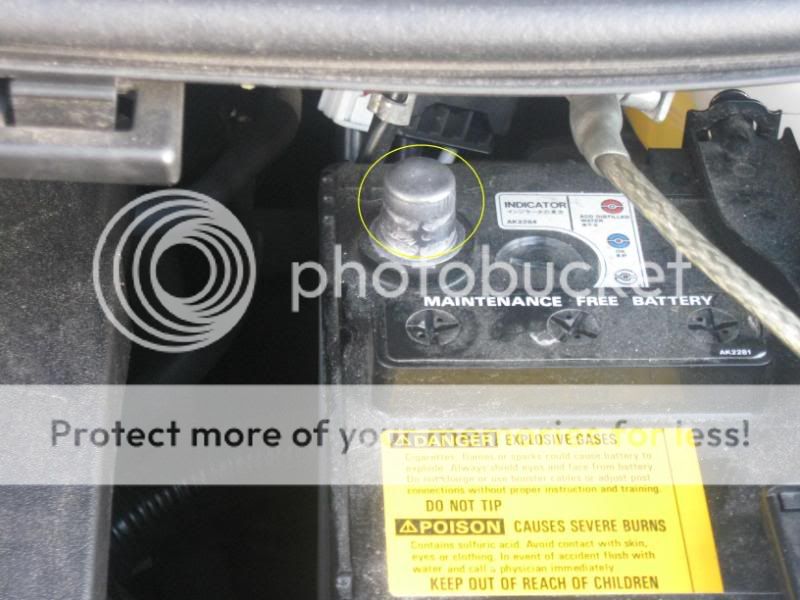
Ok, first step, disconnect the battery. do not skip this step, as you will be disconnecting the airbag- if something goes wrong, at it deploys due to still having power, your gonna be paying a couple thousand dollars to replace it. some say pull the positve side, some say pull the negitive side. when in doubt, remove both. its a 10mm nut for both.
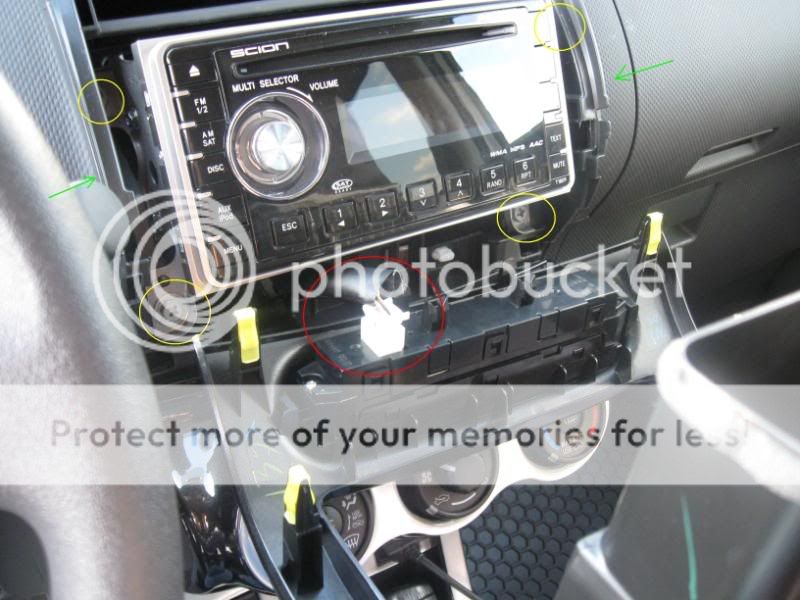
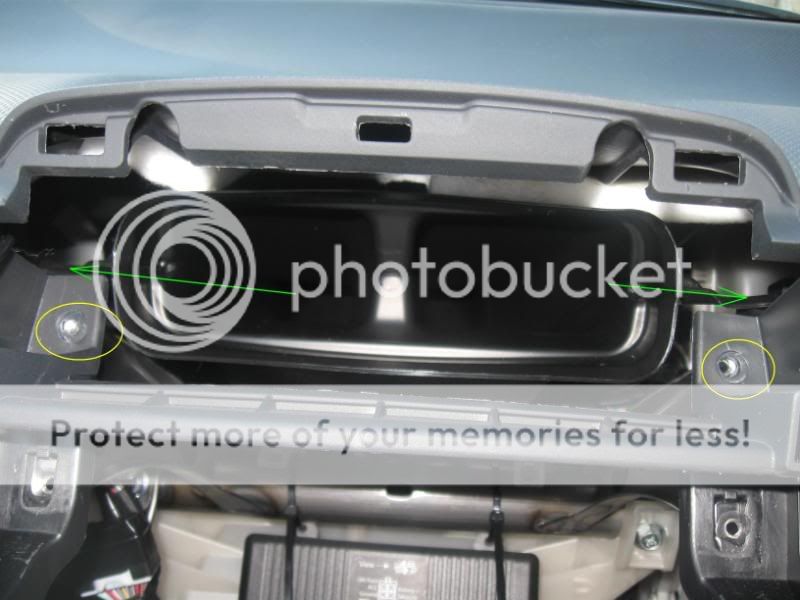
Next step is to pull the "waterfall" off. fancy name for the shiny bezel around the head unit (radio). see the green arrows? that's snapped into the bezel. it stays when you pull off the bezel. use your fingernails to find the lip of the bezel, and give it a good tug away from the dash. may take a couple tries. once it pops off, don't keep pulling. the clock assembly is pluged into the dash. thats it in the red circle. carefully unplug it. keep an eye on that plug. if you're not careful, you can accidently plug it into the back of the head unit (theres an empty socket on the back of the head unit that it will fit in. DO NOT plug it in the back of the head unit. it will blow the breaker, i.e. the fuse. which is located in the fuse panel next to the battery under the hood)i recommend pulling over to the side of the hole, and maybe hanging a tag on it to help you remember it. the yellow circles are the four screws holding the head unit into the dash
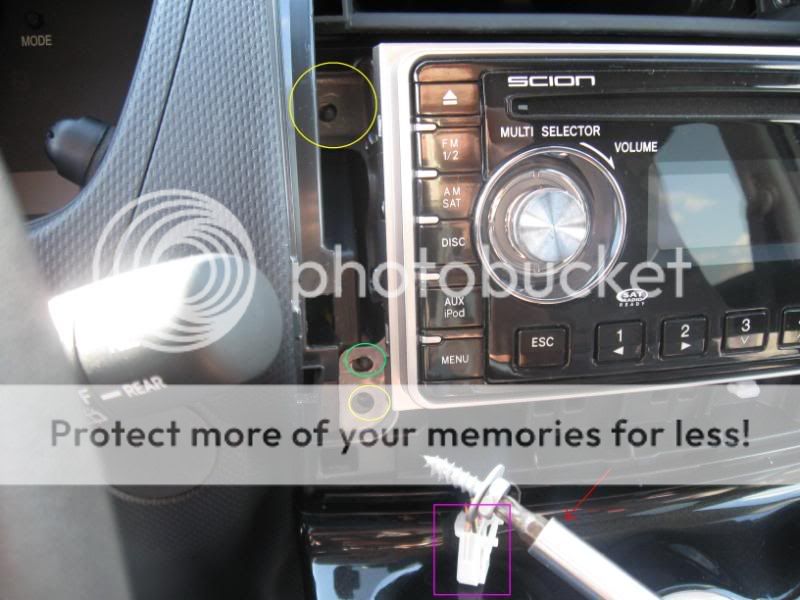
the yellow is where i'm removing the screws for the radio from. the green circle(s) are nipples the help keep the head unit in place when the screws are removed. i recommend a magnetic parts dish for these kind of jobs, to help keep track of the hardware. notice the purple boxed plug again for the clock. the screwstick i'm using here (red arrow) is a magnetic retention bit driver. it screws for the head unit are likely to fall down into the dash , so the magnet in the screw driver holds the screws on the bit.
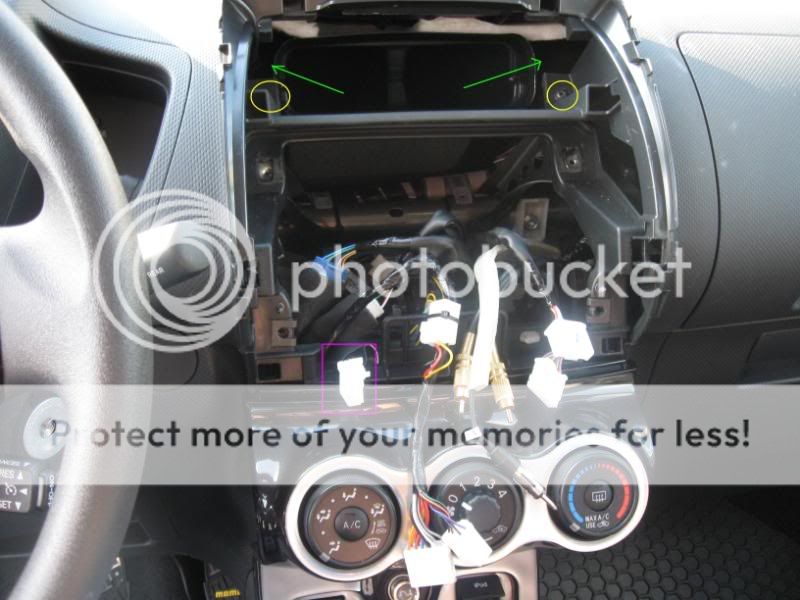
this is after you pull the head unit out and disconnect all the plugs from the back of it. remember to keep the clock one seperate. your wires may look diffrent, as i have the pre-amp output cables in there, as well as a bluetooth kit installed in there too. the yellow circles are the screws you'll be removing next. the green arrows point to the biggest cause of dash rattle, where the air duct attaches to the skeleton under the dash. more on that later.
the yellow circles are the two screws i mentioned in the last step. add them to the pile of hardware you're building, hopefully in a cup or magnetic parts bowl.

now we're going to move to the outboard area of the dash, to whats known as the A pillars. this is a aweful picture. using a panel pulling tool (avalible at harbor frieght for a pittance) or your fingers, grat the top edge of the panel and give it a good tug. it should come about 1-2 inches away from the frame and then stop. don't keep pulling. grab those long/needle nose pliers.

see the yellow clip here? the one on the left side was whie in my ride. doesn't matter what color they are, these things suck. they're there to keep the panel from flying into your face in the event the airbags behind the panel deploy. to get the panel off, you have to carefully reach behind the panel and rotate the head of the clip 90 degrees from the base of the clip to get it to release the panel. or, you might be able to pry the clip base from the frame its self. this step is a major PITA. once you get it undone, tug upward and rearward to get the panel out from in between the dash and frame. remove both sides.

now onto the gauge cluster. sitting in the driver's seat, lower the steering wheel all the way down. now reach into the gauge area. grab the the areas between the three areas. now yank on it, should pop right out. add it to the growing pile of parts in your back seat. i know what your thinking looking at this picture. whats up with the gauge?
thats optimus prime, for those of you who cant make it out. yea, its pretty cool. anyway, the yellow circles are the two each screws you need to remove the gauge pod. i'm not entirely certian you have to remove the pod, but its pretty easy none the less. the green circles are the two plugs you do need to undo, as the will stay when the dash vacates the car. kinda fold then down into the void above the steering wheel column. then grab the pod, and pull it out. easy peasy.
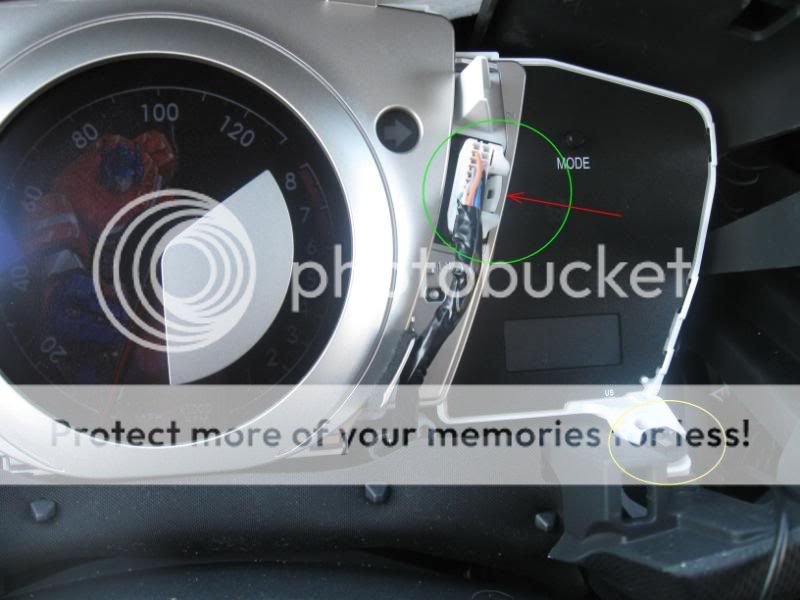
closer picture of the plugs. the red arrow points to the tab to release the plugs.
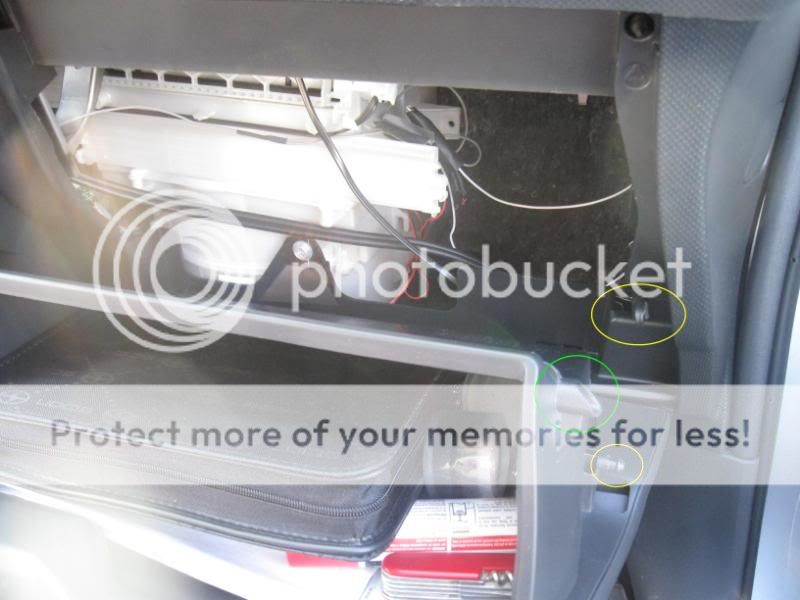
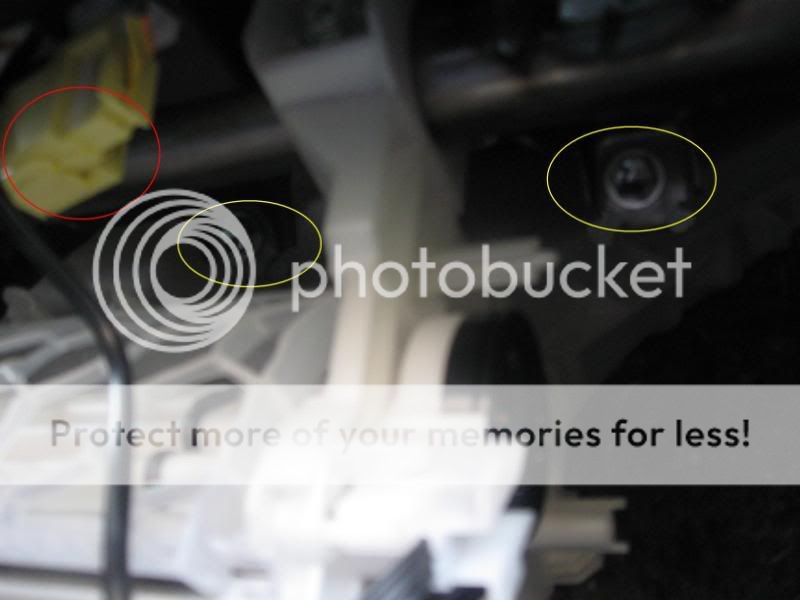
now we rip out the lower glove box. it may help to empty it first. see the yellow circles? thats a pneumatic limiter. pop it of the glove box. the top edge of the box has two tabs, one each side. (green circle) you have to flex the center of the box inward to get one tab at a time to clear the lip. add the box to the pile of parts in the back.see the white thing, with the rectangle sticking out from it? thats where your enviromental air filter goes. the one scion was too cheap to install for you, so go down to the parts shop and pick ond up before you put the glove box back in after this. down go to stealership, autozone has them.
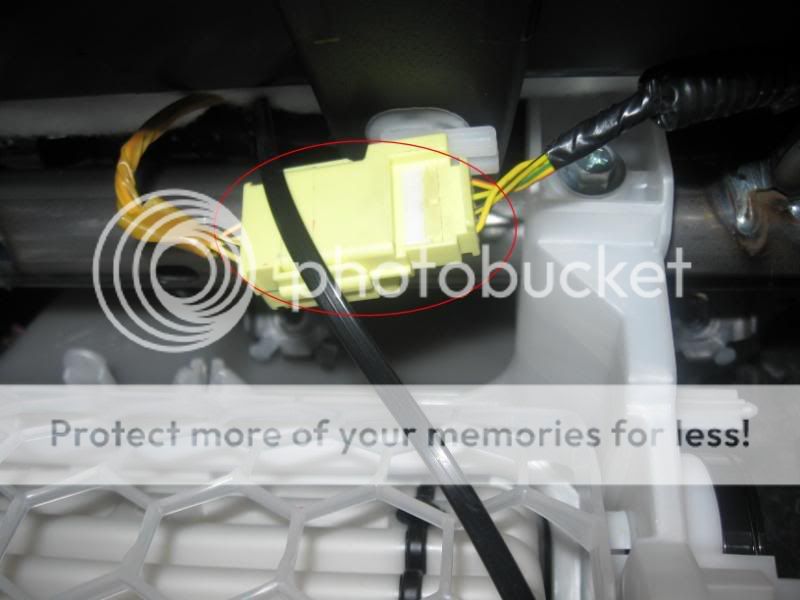
this is the passenger airback plug, it should be right inside the hole left by the glove box, and up to the left a little. just a reminder, this is why you disconnected the battery. you did disconnect it, right? unplug it.
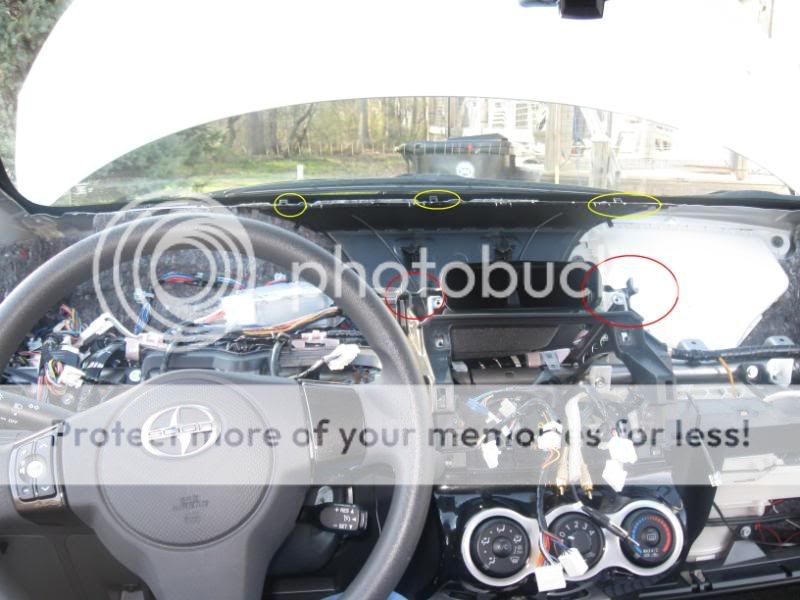
i know this ones blurry, but bear with me. see the red circle? thats the plug you just disconnected. see the two blurry yellow circles? those are two bolts that attach the airbag to the frame. i want to say they're 10mm, cause every other bolt on the car is, but i can't be sure right now. take both out.

now grap the edges of the dash and pull up. lifting the dash up and out of the car is tricky, i recommend a friend. or a wife is she isn't already ____ed about how long you've been out in the driveway "playing" with the car instead of doing the dishes. set it out in the yard or something. if your trying to get rid of rattles, nows the time to take some foam tape from lowes, half inch thick works good, and start sticking it everywhere on the underside of the dash you think might possibly come in contact with anything else. go wild this it, cant use too much.
more foam tape on the under dash is recomended. the red indicates one of the worst areas for rattles. get some elect. tape and bind the two pices of plastic together here, so they cant move. the yellow areas are also a known rattler. i padded them with more foam tape. i want to point out these pics went while i was taking everything apart, so thats why you dont see the foam tape. that came later.
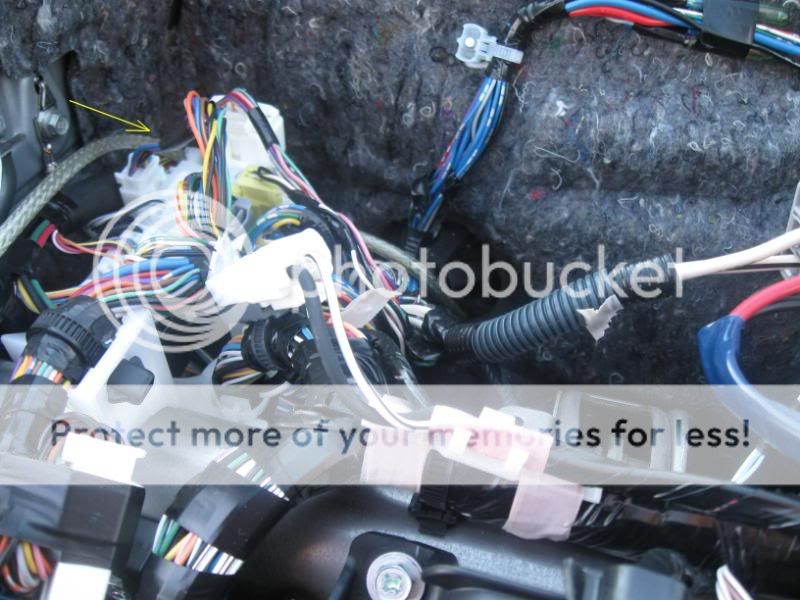
this is right up on the firewall looking down behind the steering column. the silver wire indicated is my amp wire.

this is the grommet that runs thru the fire wall on the drivers side. it comes out back behind and slightly offset from the battery. you may find it helpful to remove the wipers, the wiper moter, and the inner and outer wipper cowl. thats what i did, but its not required i guess. i recommend a wire snake or a really long screwstick that you can tape the power wire to to get it thru the grommet, as its already full of wire as it is. i cut little holes thru both sides to facilitate the wire.
ok, so there it is. as we say it the military, installation is reverse of removal. dont forget that clock plug. i hope this helps all you new owners of xD's who want a little bass but don't happen to be aircraft mechanics or work at the car dealership. remember, don't pay someone to do something your perfectly capable of doing yourself with a little hard work. also, i'm sorry for the spelling, punctuation, and grammar mistakes.
maybe an admin could sticky this....
CObalt
Ok, first step, disconnect the battery. do not skip this step, as you will be disconnecting the airbag- if something goes wrong, at it deploys due to still having power, your gonna be paying a couple thousand dollars to replace it. some say pull the positve side, some say pull the negitive side. when in doubt, remove both. its a 10mm nut for both.
Next step is to pull the "waterfall" off. fancy name for the shiny bezel around the head unit (radio). see the green arrows? that's snapped into the bezel. it stays when you pull off the bezel. use your fingernails to find the lip of the bezel, and give it a good tug away from the dash. may take a couple tries. once it pops off, don't keep pulling. the clock assembly is pluged into the dash. thats it in the red circle. carefully unplug it. keep an eye on that plug. if you're not careful, you can accidently plug it into the back of the head unit (theres an empty socket on the back of the head unit that it will fit in. DO NOT plug it in the back of the head unit. it will blow the breaker, i.e. the fuse. which is located in the fuse panel next to the battery under the hood)i recommend pulling over to the side of the hole, and maybe hanging a tag on it to help you remember it. the yellow circles are the four screws holding the head unit into the dash
the yellow is where i'm removing the screws for the radio from. the green circle(s) are nipples the help keep the head unit in place when the screws are removed. i recommend a magnetic parts dish for these kind of jobs, to help keep track of the hardware. notice the purple boxed plug again for the clock. the screwstick i'm using here (red arrow) is a magnetic retention bit driver. it screws for the head unit are likely to fall down into the dash , so the magnet in the screw driver holds the screws on the bit.
this is after you pull the head unit out and disconnect all the plugs from the back of it. remember to keep the clock one seperate. your wires may look diffrent, as i have the pre-amp output cables in there, as well as a bluetooth kit installed in there too. the yellow circles are the screws you'll be removing next. the green arrows point to the biggest cause of dash rattle, where the air duct attaches to the skeleton under the dash. more on that later.
the yellow circles are the two screws i mentioned in the last step. add them to the pile of hardware you're building, hopefully in a cup or magnetic parts bowl.
now we're going to move to the outboard area of the dash, to whats known as the A pillars. this is a aweful picture. using a panel pulling tool (avalible at harbor frieght for a pittance) or your fingers, grat the top edge of the panel and give it a good tug. it should come about 1-2 inches away from the frame and then stop. don't keep pulling. grab those long/needle nose pliers.
see the yellow clip here? the one on the left side was whie in my ride. doesn't matter what color they are, these things suck. they're there to keep the panel from flying into your face in the event the airbags behind the panel deploy. to get the panel off, you have to carefully reach behind the panel and rotate the head of the clip 90 degrees from the base of the clip to get it to release the panel. or, you might be able to pry the clip base from the frame its self. this step is a major PITA. once you get it undone, tug upward and rearward to get the panel out from in between the dash and frame. remove both sides.
now onto the gauge cluster. sitting in the driver's seat, lower the steering wheel all the way down. now reach into the gauge area. grab the the areas between the three areas. now yank on it, should pop right out. add it to the growing pile of parts in your back seat. i know what your thinking looking at this picture. whats up with the gauge?
thats optimus prime, for those of you who cant make it out. yea, its pretty cool. anyway, the yellow circles are the two each screws you need to remove the gauge pod. i'm not entirely certian you have to remove the pod, but its pretty easy none the less. the green circles are the two plugs you do need to undo, as the will stay when the dash vacates the car. kinda fold then down into the void above the steering wheel column. then grab the pod, and pull it out. easy peasy.
closer picture of the plugs. the red arrow points to the tab to release the plugs.
now we rip out the lower glove box. it may help to empty it first. see the yellow circles? thats a pneumatic limiter. pop it of the glove box. the top edge of the box has two tabs, one each side. (green circle) you have to flex the center of the box inward to get one tab at a time to clear the lip. add the box to the pile of parts in the back.see the white thing, with the rectangle sticking out from it? thats where your enviromental air filter goes. the one scion was too cheap to install for you, so go down to the parts shop and pick ond up before you put the glove box back in after this. down go to stealership, autozone has them.
this is the passenger airback plug, it should be right inside the hole left by the glove box, and up to the left a little. just a reminder, this is why you disconnected the battery. you did disconnect it, right? unplug it.
i know this ones blurry, but bear with me. see the red circle? thats the plug you just disconnected. see the two blurry yellow circles? those are two bolts that attach the airbag to the frame. i want to say they're 10mm, cause every other bolt on the car is, but i can't be sure right now. take both out.
now grap the edges of the dash and pull up. lifting the dash up and out of the car is tricky, i recommend a friend. or a wife is she isn't already ____ed about how long you've been out in the driveway "playing" with the car instead of doing the dishes. set it out in the yard or something. if your trying to get rid of rattles, nows the time to take some foam tape from lowes, half inch thick works good, and start sticking it everywhere on the underside of the dash you think might possibly come in contact with anything else. go wild this it, cant use too much.
more foam tape on the under dash is recomended. the red indicates one of the worst areas for rattles. get some elect. tape and bind the two pices of plastic together here, so they cant move. the yellow areas are also a known rattler. i padded them with more foam tape. i want to point out these pics went while i was taking everything apart, so thats why you dont see the foam tape. that came later.
this is right up on the firewall looking down behind the steering column. the silver wire indicated is my amp wire.
this is the grommet that runs thru the fire wall on the drivers side. it comes out back behind and slightly offset from the battery. you may find it helpful to remove the wipers, the wiper moter, and the inner and outer wipper cowl. thats what i did, but its not required i guess. i recommend a wire snake or a really long screwstick that you can tape the power wire to to get it thru the grommet, as its already full of wire as it is. i cut little holes thru both sides to facilitate the wire.
ok, so there it is. as we say it the military, installation is reverse of removal. dont forget that clock plug. i hope this helps all you new owners of xD's who want a little bass but don't happen to be aircraft mechanics or work at the car dealership. remember, don't pay someone to do something your perfectly capable of doing yourself with a little hard work. also, i'm sorry for the spelling, punctuation, and grammar mistakes.
maybe an admin could sticky this....
CObalt

 05-02-2009, 01:08 AM
#5

Nice write up... added it to the tech section here on the site.
Question though... I know on the tC you can get to that main grommet without removing the dash (under the dash on the driver's side)... so this is the only way to get to it on the xD? And there's no other big ones to run the wire through?
Question though... I know on the tC you can get to that main grommet without removing the dash (under the dash on the driver's side)... so this is the only way to get to it on the xD? And there's no other big ones to run the wire through?
05-02-2009, 02:45 AM
#6
Senior Member
SL Member
Thread Starter
Join Date: Jun 2008
Location: Delaware
Posts: 1,285
IMO its the only way to comfortably reach and see the grommet. there's no way I'd be able to get my hands up in there without pulling the dash. some ppl have mentioned the "grommet" on the passenger side of the dash. i checked that out today for possibly running the power wire for a 400w inverter. the only opening i see on that side of the fire wall is the drain for the environmental system, which i figure is best left as it is, to avoid clogging the drain or accidentally draining water into the cab. scion needs to take a note from jeep on this, my TJ had all kinds of holes going thru the firewall. sadly i ended up drilling a hole 4 inch's outboard of the drain and installing a rubber grommet and RTV'ing it after running my power wire thru it. i prefer not to drill, but scion left me little choice for the right side. at least i got 115 volts inside now. time to crank up the blender...
05-10-2009, 02:17 AM
#7
Senior Member
SL Member

Join Date: Dec 2006
Location: Wilmington, NC
Posts: 351
im about to run some power wire on my fiances 09 xD tomorrow. my tC was fairly easy, even with the 0awg. im definately not pullin the dash off hers, ill let you know how it goes... ill find a way... lol
05-13-2009, 12:19 AM
#8
Senior Member
SL Member

Join Date: Apr 2008
Posts: 957
AWESOME write-up! just followed it to install my amp wire through the main grommet. went flawlessly. didnt remove the windshield wiper cowling, but was able to pass a coat hangar through to yank the wire back.
scion definitely didnt help us out, this is by far the most difficult car to pass stuff through the firewall that i have ever worked on. if you are going to drill, it would definitely be easier on the passenger side.
scion definitely didnt help us out, this is by far the most difficult car to pass stuff through the firewall that i have ever worked on. if you are going to drill, it would definitely be easier on the passenger side.
05-13-2009, 03:31 PM
#9
Senior Member
SL Member
Thread Starter
Join Date: Jun 2008
Location: Delaware
Posts: 1,285
glad this is helping some folks out. is there's intrest, i could do a write up on the wiper cowl removal.hell, sent me a message for any how to write-up requests, ill try and help.
05-17-2009, 10:14 PM
#10
Member
SL Member
Join Date: Mar 2009
Location: United States
Posts: 66
Good write up.. I did this on my car as well, exactly how I did it and everything worked great. Definitely easier to remove the dash to see where the power wire is going. And not really as much work as it looks, just a few screws and nuts and everything else just pops right off.
Good post!!
Good post!!
 06-14-2009, 05:41 PM
#13
Senior Member
SL Member
Join Date: May 2007
Posts: 209
I have the stock Scion head unit and have a system hooked up to it. i had to use an RCA adapter thing and now when I have a fuse plugged into my Amp wire the radio cuts in and out until it melts the fuse.
It didn't do this when I first installed it. Anyone know how to fix this or should I just get a new head unit? And if I did get a new head unit, would that fix it?
________
It didn't do this when I first installed it. Anyone know how to fix this or should I just get a new head unit? And if I did get a new head unit, would that fix it?
________
Last edited by MR_LUV; 05-17-2019 at 07:15 PM. Reason: Awarded 10 Yr Badge
06-17-2009, 09:29 PM
#16
Junior Member

Join Date: Jun 2009
Posts: 14
from what I can tell that high low adapter takes the high level out put from you speaker and reduceds it down to a lower voltage. I know some amp's do have high level inputs on them to . They have a harness that comes with the anp that plugs in to it . But if I were you I would try to replace that high low adapter the should not be that much. The problem could be in the amp to . I have see amp work fine one minute and then just go out
05-12-2010, 08:11 PM
#17
Senior Member
SL Member

Join Date: Mar 2009
Location: Chattanooga TN
Posts: 454
I was doing this today, and realized the other article showing how to remove the wiper cowl never got stickied. So here's the link https://www.scionlife.com/forums/sho...d.php?t=185726
 06-22-2010, 08:47 PM
#20
Senior Member

SL Member

Join Date: Jun 2010
Location: VA Beach, VA
Posts: 131
IMO its the only way to comfortably reach and see the grommet. there's no way I'd be able to get my hands up in there without pulling the dash. some ppl have mentioned the "grommet" on the passenger side of the dash. i checked that out today for possibly running the power wire for a 400w inverter. the only opening i see on that side of the fire wall is the drain for the environmental system, which i figure is best left as it is, to avoid clogging the drain or accidentally draining water into the cab. scion needs to take a note from jeep on this, my TJ had all kinds of holes going thru the firewall. sadly i ended up drilling a hole 4 inch's outboard of the drain and installing a rubber grommet and RTV'ing it after running my power wire thru it. i prefer not to drill, but scion left me little choice for the right side. at least i got 115 volts inside now. time to crank up the blender...

