
One Ton Garge spacer Install


Thread Starter
Senior Member
SL Member
Joined: May 2004
Posts: 1,368
From: San Antonio, TX
Thought I would try doing a "How-to" for once.
I have been inspired by some many of them here.
here goes
Today we will be installing the One Ton Garage 10mm hub spacers for the rear of the Scion xA/xB. This kit is a fairly simple install, it requires a 12mm socket and a 17mm socket. A pick tool is helpful for the wheel speed sendor connectors but not totally necessary.

lets get started
lift the rear of the vehicle off the gound and remove the rear wheels
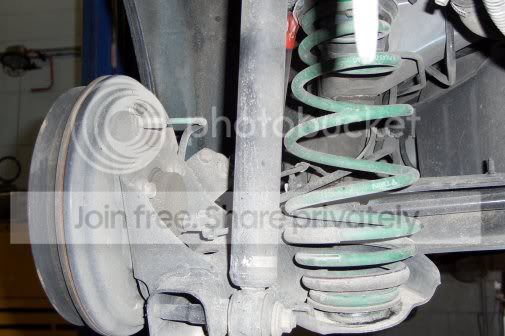
from the center of the car looking outward you should clearly (wipe the dust away) see the four bolt holding the rear hub assembly and the wheel speed sensor connector
first is to disconnect the speed sensor

four 12mm bolts are removed, you might have trouble with the one behind the shock, and we pull the assembly away from the axle beam
take care not to let this dangle, ALWAYS SUPPORT THE DRUM BRAKE ASSEMBLY
the brake line here is a steel line, NOT FLEXIBLE
you will have to bend it a little to get everything to line up correctly though


place spacer over wheel speed sensor and re-install entire assembly with bolts and lock washers included in the kit. This part can be frustrating as the inner hub that holds the threads can and will turn, causing the threaded section to not line up with the hole in the dust plate. ILLUSTRATED HERE

i used the pick tool from before to help line these up, then install all 4 bolts with lock washers finger tight and then torque to spec. I have been a mechanic for 5 years so my spec is not Toyotas. If you need to know the true specs call Toyota.

that's it, enjoy your newfound wideness and spread good cheer for all
I have been inspired by some many of them here.
here goes
Today we will be installing the One Ton Garage 10mm hub spacers for the rear of the Scion xA/xB. This kit is a fairly simple install, it requires a 12mm socket and a 17mm socket. A pick tool is helpful for the wheel speed sendor connectors but not totally necessary.
lets get started
lift the rear of the vehicle off the gound and remove the rear wheels
from the center of the car looking outward you should clearly (wipe the dust away) see the four bolt holding the rear hub assembly and the wheel speed sensor connector
first is to disconnect the speed sensor
four 12mm bolts are removed, you might have trouble with the one behind the shock, and we pull the assembly away from the axle beam
take care not to let this dangle, ALWAYS SUPPORT THE DRUM BRAKE ASSEMBLY
the brake line here is a steel line, NOT FLEXIBLE
you will have to bend it a little to get everything to line up correctly though
place spacer over wheel speed sensor and re-install entire assembly with bolts and lock washers included in the kit. This part can be frustrating as the inner hub that holds the threads can and will turn, causing the threaded section to not line up with the hole in the dust plate. ILLUSTRATED HERE
i used the pick tool from before to help line these up, then install all 4 bolts with lock washers finger tight and then torque to spec. I have been a mechanic for 5 years so my spec is not Toyotas. If you need to know the true specs call Toyota.
that's it, enjoy your newfound wideness and spread good cheer for all
Senior Member
SL Member
Scinergy
Scion Evolution
Joined: Aug 2003
Posts: 190
Great DIY.
a little something extra to make install a little easier. Get two spare 12mm bolts(longer than the one you use to install). Cut out the head and screw it in before you put on the 10mm spacer. works great on keeping everything lined up for install. Learned this trick from a service tech on repairing CNC Machines.
again great DIY
oh yeah. i wanna see some pics of the final install with you wheels


Senior Member
SL Member

Joined: Nov 2003
Posts: 3,525
From: Orlando, Florida
The torque specs can be found in OneTonGarage's installation manual
http://www.onetongarage.com/manuals/...him/index.html
http://www.onetongarage.com/manuals/...him/index.html
Thread Starter
Senior Member
SL Member
Joined: May 2004
Posts: 1,368
From: San Antonio, TX
thanks for the kind words on my write up
I always wanted to do one and finally got a camera worthy (Casio P-600)
after driving on them for a while with no other changes, I think the box handles a little better
Corner speeds that used to kick the Traction Control on are higher by 2-3mph
and it feels more stable mid-corner while accelerating...even at WOT
I am not saying these things should be autocrossed but it definitely made a slight improvement in handling
now let's see what happens when my 16x9's show up from Germany
heh heh heh heh..................................
Maybe the Moderators will grant my little article it's highest honor
a place in the Grand and Illustrious ScionLife FAQ
please....please...please...please...please...please...
<----praying to car gods
Senior Member
SL Member
Scinergy
Scion Evolution
Joined: Aug 2003
Posts: 190
Originally Posted by TXboxdriver
ahh good tip abbfanuc
where were you last weekend!?!?!?!
where were you last weekend!?!?!?!
Senior Member
SL Member
Team ScioNRG
Joined: Apr 2004
Posts: 810
From: Gainesville, FL
Originally Posted by FrankenScion
I just installed some on mine with some Goldlines.
Here's a pic:


Here's a pic:

Thread
Thread Starter
Forum
Replies
Last Post
TheRedBox
Scion xA/xB 1st-Gen Drivetrain & Power
31
Dec 2, 2003 04:53 PM