
Shifter Cage Bushing Install (Dr Isotope)


This isn't really a full DIY as I really didn't finish everything that I wanted to. But some of it is a DIY... and that part is labeled as such.
To get this out of the way...
Usual Disclaimer: I'm not responsible if you f up your car and crash or something. This is just a simple DIY... take all necessary safety precautions. And remember, it's not my problem if you do it wrong... so do your research and take your time if you're unsure.
Necessary Tools:
- Wratchet
- 4" Extension (maybe a 12" one?)
- 10mm Socket
- 12mm Socket
- 13mm Socket
- Bandaid
Here's what I'm starting with:

Dr. Isotope's Cable Shifter Bushings:

You put the two small ends together like so:

Comparison between the Doc's bushing and OEM... UH OH! Too small in the middle.

From here I proceeded to install the SSK. You've seen this DIY before... no need for me to repeat it. So in that first picture, you can see the new aligner plate that comes with the TRD kit. Apparently the new instructions included with the kit say this needs to be installed from under the car while it's on a lift. I wasn't prepared to put the car on stands or anything, so I did NOT install it right now. The bolts for it on the back side of it, so I couldn't really reach them from the engine bay.
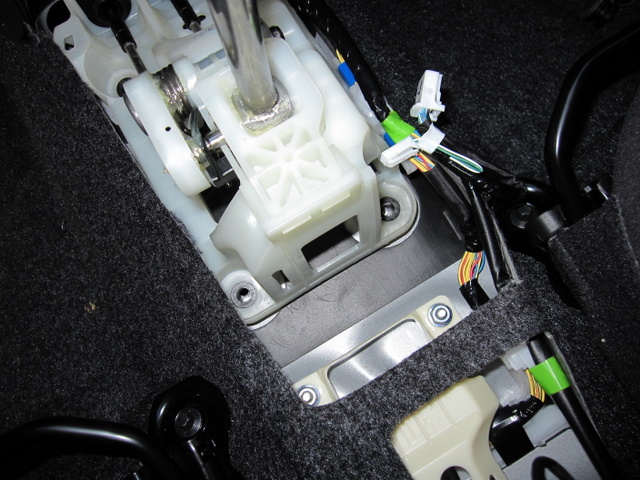
Moving on... to the interior! Time to install some shifter cage bushings (that I know already fit). This should look similar:

Unscrew the ****... lefty loosey. Then pull up on the Flint Mica-ish colored trim piece around the shifter. It will also pull toward you around the audio ports. You may have to pull hard... but still try to be gentle.

Next you need to remove the two bolts on the outside of the cup holders (not the upper ones) with a 10mm socket (or philips head screwdriver). Then go back to the cup holder and pull up the small piece of fabric on the bottom. Then remove the 10mm bolt under that - might need the extension for this one.

Then pull off the trim piece in front of the ebrake. If you grab it and pull up in the ebrake opening, it comes right up.

Then the entire center console will lift up, backwards, and out. Very simple. Pay attention to your clearances here to make sure you don't scratch anything.
Now look at the four bolts holding down the shift cage. See them? Good... now remove them with your 12mm socket (a long extension is nice to have here).


See lame rubber bushings under the four bolts you removed. There is a metal shaft that goes through the middle. It removes from the bottom. This must come out first. Then push the rubber bushing part out from the top or bottom (whatever works for you, takes a little manipulation, but it'll come out OK).

Be careful taking out those rubber bushings though... the cage edges on the bottom are sharp.
MEDIC!

After cleaning and applying bandaid... admire fancy new bushings provided by Dr. Isotope compared to lame, wussy rubber bushings from the factory.

Insert new delrin bushings into four holes in the cage from the bottom.

Proceed to bolt the cage down with new bolts included with the Doc's bushings. Mine were 13mm... so just tighten those bad boys down.
Then back up your process and reassemble your interior. Put the center console in. Screw in the 10mm bolt in the cup holder and put the piece of fabric back in. Screw in the two other 10mm bolts near the cup holders. Put the trim piece back in front of the ebrake - just snaps back in. Then put the trim piece back on around the shifter and snap down. Attach your shift **** again and you're done.
Yay!
(EDIT: See notes later in the thread about shifter cable bushings... Dr Isotope now offers a full set for the xD of both cable and cage bushings)
Shifter is about 90% better than it was. If possible I'd like to work with the Doc to get some cable bushings made - but I don't know if he can get the size. I wasn't really able to measure it, so we'll see what he can do.
Thoughts?
To get this out of the way...
Usual Disclaimer: I'm not responsible if you f up your car and crash or something. This is just a simple DIY... take all necessary safety precautions. And remember, it's not my problem if you do it wrong... so do your research and take your time if you're unsure.
Necessary Tools:
- Wratchet
- 4" Extension (maybe a 12" one?)
- 10mm Socket
- 12mm Socket
- 13mm Socket
- Bandaid
Here's what I'm starting with:
Dr. Isotope's Cable Shifter Bushings:
You put the two small ends together like so:
Comparison between the Doc's bushing and OEM... UH OH! Too small in the middle.
From here I proceeded to install the SSK. You've seen this DIY before... no need for me to repeat it. So in that first picture, you can see the new aligner plate that comes with the TRD kit. Apparently the new instructions included with the kit say this needs to be installed from under the car while it's on a lift. I wasn't prepared to put the car on stands or anything, so I did NOT install it right now. The bolts for it on the back side of it, so I couldn't really reach them from the engine bay.
Moving on... to the interior! Time to install some shifter cage bushings (that I know already fit). This should look similar:
Unscrew the ****... lefty loosey. Then pull up on the Flint Mica-ish colored trim piece around the shifter. It will also pull toward you around the audio ports. You may have to pull hard... but still try to be gentle.
Next you need to remove the two bolts on the outside of the cup holders (not the upper ones) with a 10mm socket (or philips head screwdriver). Then go back to the cup holder and pull up the small piece of fabric on the bottom. Then remove the 10mm bolt under that - might need the extension for this one.
Then pull off the trim piece in front of the ebrake. If you grab it and pull up in the ebrake opening, it comes right up.
Then the entire center console will lift up, backwards, and out. Very simple. Pay attention to your clearances here to make sure you don't scratch anything.
Now look at the four bolts holding down the shift cage. See them? Good... now remove them with your 12mm socket (a long extension is nice to have here).
See lame rubber bushings under the four bolts you removed. There is a metal shaft that goes through the middle. It removes from the bottom. This must come out first. Then push the rubber bushing part out from the top or bottom (whatever works for you, takes a little manipulation, but it'll come out OK).
Be careful taking out those rubber bushings though... the cage edges on the bottom are sharp.
MEDIC!
After cleaning and applying bandaid... admire fancy new bushings provided by Dr. Isotope compared to lame, wussy rubber bushings from the factory.
Insert new delrin bushings into four holes in the cage from the bottom.
Proceed to bolt the cage down with new bolts included with the Doc's bushings. Mine were 13mm... so just tighten those bad boys down.
Then back up your process and reassemble your interior. Put the center console in. Screw in the 10mm bolt in the cup holder and put the piece of fabric back in. Screw in the two other 10mm bolts near the cup holders. Put the trim piece back in front of the ebrake - just snaps back in. Then put the trim piece back on around the shifter and snap down. Attach your shift **** again and you're done.
Yay!
(EDIT: See notes later in the thread about shifter cable bushings... Dr Isotope now offers a full set for the xD of both cable and cage bushings)
Shifter is about 90% better than it was. If possible I'd like to work with the Doc to get some cable bushings made - but I don't know if he can get the size. I wasn't really able to measure it, so we'll see what he can do.
Thoughts?
Emailed the Doc about the cable bushings. He says the ones on the Yaris are two different sizes. I know the one the SSK is larger than the tC ones... but I don't know about the other one. Assumed it was the same size and did not test it.
I'm going to take a look at the second cable tomorrow and find out if that is smaller like I now suspect it may. Will update here and the Doc tomorrow if I get a chance to check it.
I'm going to take a look at the second cable tomorrow and find out if that is smaller like I now suspect it may. Will update here and the Doc tomorrow if I get a chance to check it.

So far, at least the Doc's cage bushings works. They're the first thing on this page:
http://www.doctorisotope.com/bushings
And like I said, he may have a set for the cables as well... just have to test.
http://www.doctorisotope.com/bushings
And like I said, he may have a set for the cables as well... just have to test.

I said 90% better because I hadn't been able to change out the cable bushings yet. Will actually be checking those again tonight though. Should be able to find out if the Doc can do up a set.
Replacing the cage bushings will make a definite difference in the sloppiness of it - though the SSK should be your first step in this direction.
Replacing the cage bushings will make a definite difference in the sloppiness of it - though the SSK should be your first step in this direction.
Confirmed just now that the xD does have two different size cable bushings (apparently like the Yaris). So I'm going to see if the Doc will send me the larger of the two.
And again, not to knock NST's stuff here (we'll probably be getting her an underdrive pulley next!) but the Doc makes a nice alternative to them... hopefully he'll get an actual product listing on his site for them.
And again, not to knock NST's stuff here (we'll probably be getting her an underdrive pulley next!) but the Doc makes a nice alternative to them... hopefully he'll get an actual product listing on his site for them.
Received the larger bushing from the Doc today. Will try a fit as soon as the g/f get's home from work. Then the whole set will be available from the Doc on his site: www.doctorisotope.com
Here's a comparison of the two sizes... the smaller one goes on the cable closest to the front of the car, on the left when viewed from the front of the car. The larger one is for the right side, where the SSK is installed.


Junior Member
Joined: Feb 2008
Posts: 13
hey ack154
was wondering if you had trouble installing the cable bushing with the ssk? I have the nst engine bey ssk and was not able to fit the dr isotope bushing on the the end of the linkage cable and fit over the ssk. It seemed like the cable needs to be remove from the bracket in the engine bey to make it fit with the ssk. any suggestions or could you some direction in how to remove the cable from the bracket ?
thanks
Ya, I had a hell of a time with that part - exactly as you're describing. Which actually led me to remove the SSK. So far she likes it without it anyway and we may consider getting NST's "in cabin" one down the road.
But I don't know what the problem is. To remove the cable, you should only need to remove the U clip that holds it in place, but I don't know if there's some secret to that or something. The directions in the TRD kit weren't exactly clear on it.
I was hoping this was something the TRD aligning plate would cure, but never got around to installing it and like I said, ended up just taking the SSK out.
Sorry I can't be more help with that, but it frustrated the crap out of me for something that seemed like it should be so simple.

Senior Member

SL Member
Joined: Jun 2008
Posts: 1,285
From: Delaware
i installed the nst ssk and the cable bushings a while back, had the same problem fitting the bushing over the ssk. after about 3 months, the stainless steel bushings had eaten into the alum ssk (about an 1/8th of an inch) and i had to "force" the shifter to switch gears. these two items are not compatible. the ssk from nst works fine by itself, but will be destroyed by the ss bushings without the aligner plate from trd. the u clip can be removed to lift out the cable ( use a short nail bar to wiggle the u clip out, hammer tap back in) but it still eats the ssk. i bought ack's trd ssk, installed it in about 20 mins, have had no problems so far between the trd ssk and the nst bushings. the aligner plate really makes everything better; i get the ssk's short throws while the nst bushings help reduce the slop. if dr isotope has delrin bushings for the cables, that would work even better, as delrin wont wear on the alum ssk pin. trd's kit wins in my book, as the aligner plate cures the problem, while the nst ssk fails to work with the companys other products.
That's good to hear. Glad you like it!
I was really hoping that aligner would help things out - glad it did. We still may try NST's in cabin SSK, but it's just not a priority yet. That way we should still be able to get the benefits of the bushings AND the SSK.
Oh and it looks like the Doc has bushings available now:
http://www.doctorisotope.com/
Can just send him an email about it!

Senior Member
SL Member
Joined: Jun 2008
Posts: 1,285
From: Delaware
Breaking Update: NST's SS bushings destroy everything they touch! I've had the new TRD SSK with bracket installed for aprox a week, and the SS cable bushings are already starting to wear the TRD SSK pin. as an aircraft mechanic, i should of realized that no amount of aligning and machining can stop stainless steel from destroying aluminum. i ordered the delrin (the super durable plastic used in almost all paintball markers made today) bushings from Dr. Isotope yesterday and will be mailing NST the SSK and bushings back. maybe they'll realize WTF went wrong with that idea. the SSK itself is the same as the TRD unit, but the bushings were never a good idea in SS. just like my wife's white gold engagement ring and the titanium wedding ring. the harder metal will eat the softer in given enough time and pressure. thank you ack and Dr. isotope for getting us these new bushings. NST, this was an epic fail on your part.