
DIY Smoking your tails w/headlightarmor step by step photos


Thread Starter
Former Sponsor
SL Member
Joined: Sep 2005
Posts: 161
From: www.headlightarmor.com
Hello from the folks at HeadlightArmor!
Smoking your tails is a popular DIY project and with our pre-cut kits, a pretty straightforward install. There are a wide variety of materials being used today and each has its own preferred application method. The most important tip I can offer is to follow the instructions for whomever's product you go with. Depending on what the material is made from you will see a variety of processes needed for installation. These steps are specifically designed to work with our film.
Items required not included with our kit.
-Clean spray bottle (plant mister works great) fill with just plain old water.
-Sharp razor knife
-patience and a positive attitude ;)
-your car of course LOL
First off, clean everything, your lamps, the area around them, your hands etc. Installation is best preformed out of the wind in a clean, calm and well lit area. The film is much happier when warm - 80-90 is a nice sweet spot. If you are working in a hotter environment (we are in TX sun) the adhesive is a bit more sensitive - it is more pliable but the adhesive is a bit more sensitive (pressure sensitive). If it is cool gentle warming with a hair dryer works wonders. You don't want to go wild with the heat, if the film is too hot to touch it is too hot.
After cleaning everything - Without removing the lens cover from the backing paper hold it up to the lens and make sure you have the correct side and the correct orientation. Wet down one lens with water .

Wet down your hands and peel the kit part way off the backing paper (hold the edges with wet hands or the handling tabs) and mist with water. When the piece is off the backing paper mist down both the kit and the taillight and them place the piece on the taillight.

Handling the edges align the front portion of the piece - (right side of the above photo) then generally align the remaining edges. The piece will be 'floating' on the beads of water on the lens. Be gentle the adhesive is pressure sensitive. Now squeegee the 'front' corner as shown below.

You want to just squeegee the top 3-4 inches and no more at this time. Next re-wet the adhesive side of the kit and align the inside vertical edge to the bottom.

With the edge and lower inner corner aligned squeegee from the top where you started down to the bottom of the kit as shown. Use firm pressure to minimize the chances of trapping moisture.

Align the outside and squeegee around the corner from the flat back section around the corner toward the front of the vehicle. Use firm even pressure to avoid bubbles. If it is below 70 degree F out gentle warming with a hair dryer will help the process along.

Verify alignment and then squeegee the front corner - the same as in step 5.

Continue the process from steps 5-6 down the side of the taillight in firm overlapping strokes.

With a sharp razor knife carefully trim off the handling tabs. If you have any areas that are misaligned or overhanging you can either wrap the edge if it a flat surface or simply trim off the excess.
Go over the edges with a suede detail cloth / paper towel wrapped squeegee to make sure the edge is fully set. Gentle heat from a hair dryer on low can help things along if it is cool out.

Now you are done, stand back and enjoy!
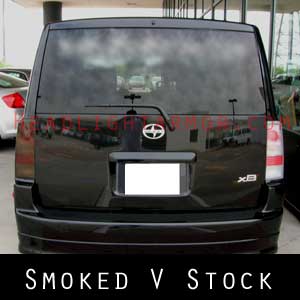
With our Smoked Taillight kits you will be able to change to look of your vehicle while protecting your taillights at the same tine.
Photos are of our Standard Smoke (30%) version, we also have a Stealth Smoke (20%) version if you are looking for something darker. If you have the crystal like lenses shown the covers will look lighter then if you have the optional black housing versions.
Unlike painting your tails these can be removed at some point if you or the next owner is so inclined - though they can only be used once.
Now that they are done just refrain from washing the vehicle for a few days and you will good to go. A periodic wipe down with a high quality non-petroleum based vinyl conditioner will keep them looking good for years.
While we do try and make our kits as 'installable' as possible we realize that even an easier kit can be harder than it needs to be if you install them from the seat of your pants. We hope the photos of the process were helpful, and please let us know if you have any questions about the process.
HeadlightArmor.com
Smoking your tails is a popular DIY project and with our pre-cut kits, a pretty straightforward install. There are a wide variety of materials being used today and each has its own preferred application method. The most important tip I can offer is to follow the instructions for whomever's product you go with. Depending on what the material is made from you will see a variety of processes needed for installation. These steps are specifically designed to work with our film.
Items required not included with our kit.
-Clean spray bottle (plant mister works great) fill with just plain old water.
-Sharp razor knife
-patience and a positive attitude ;)
-your car of course LOL
First off, clean everything, your lamps, the area around them, your hands etc. Installation is best preformed out of the wind in a clean, calm and well lit area. The film is much happier when warm - 80-90 is a nice sweet spot. If you are working in a hotter environment (we are in TX sun) the adhesive is a bit more sensitive - it is more pliable but the adhesive is a bit more sensitive (pressure sensitive). If it is cool gentle warming with a hair dryer works wonders. You don't want to go wild with the heat, if the film is too hot to touch it is too hot.
After cleaning everything - Without removing the lens cover from the backing paper hold it up to the lens and make sure you have the correct side and the correct orientation. Wet down one lens with water .
Wet down your hands and peel the kit part way off the backing paper (hold the edges with wet hands or the handling tabs) and mist with water. When the piece is off the backing paper mist down both the kit and the taillight and them place the piece on the taillight.
Handling the edges align the front portion of the piece - (right side of the above photo) then generally align the remaining edges. The piece will be 'floating' on the beads of water on the lens. Be gentle the adhesive is pressure sensitive. Now squeegee the 'front' corner as shown below.
You want to just squeegee the top 3-4 inches and no more at this time. Next re-wet the adhesive side of the kit and align the inside vertical edge to the bottom.
With the edge and lower inner corner aligned squeegee from the top where you started down to the bottom of the kit as shown. Use firm pressure to minimize the chances of trapping moisture.
Align the outside and squeegee around the corner from the flat back section around the corner toward the front of the vehicle. Use firm even pressure to avoid bubbles. If it is below 70 degree F out gentle warming with a hair dryer will help the process along.
Verify alignment and then squeegee the front corner - the same as in step 5.
Continue the process from steps 5-6 down the side of the taillight in firm overlapping strokes.
With a sharp razor knife carefully trim off the handling tabs. If you have any areas that are misaligned or overhanging you can either wrap the edge if it a flat surface or simply trim off the excess.
Go over the edges with a suede detail cloth / paper towel wrapped squeegee to make sure the edge is fully set. Gentle heat from a hair dryer on low can help things along if it is cool out.
Now you are done, stand back and enjoy!
With our Smoked Taillight kits you will be able to change to look of your vehicle while protecting your taillights at the same tine.
Photos are of our Standard Smoke (30%) version, we also have a Stealth Smoke (20%) version if you are looking for something darker. If you have the crystal like lenses shown the covers will look lighter then if you have the optional black housing versions.
Unlike painting your tails these can be removed at some point if you or the next owner is so inclined - though they can only be used once.
Now that they are done just refrain from washing the vehicle for a few days and you will good to go. A periodic wipe down with a high quality non-petroleum based vinyl conditioner will keep them looking good for years.
While we do try and make our kits as 'installable' as possible we realize that even an easier kit can be harder than it needs to be if you install them from the seat of your pants. We hope the photos of the process were helpful, and please let us know if you have any questions about the process.
HeadlightArmor.com


Thread Starter
Former Sponsor
SL Member
Joined: Sep 2005
Posts: 161
From: www.headlightarmor.com
Originally Posted by DJ_SpaRky
ScionLife discounts??
do you have a Headlight & Tailight combo package??
do you have a Headlight & Tailight combo package??
Let me know if you have any additional questions.
Greg


Senior Member

Scikotics
SL Member
Joined: Feb 2005
Posts: 591
From: Sterling, IL
got mine in and installed i scrathed the film with the squeegee then i decided some firm pressure and a paper towel or cloth works much better, unless you do have a big bubble i would use the squeegee but wrap in in a microfiber or paper towel to elimate scrathes, otherwise a decent product. I have the tyc lights and there still a little root beer looking, wish they were blacker and i did get the real dark ones
Senior Member
Scikotics
SL Member
Joined: Feb 2005
Posts: 591
From: Sterling, IL
Well i finally got it finished and yes diffently use a blow dryer it helps out a bunch, very nice looking, you diffently cant beat it for the the money, great product will get pics up soon
Thread Starter
Former Sponsor
SL Member
Joined: Sep 2005
Posts: 161
From: www.headlightarmor.com
Great to hear! It is very hard to scratch the film with the squeegee we include if you follow the above steps, as both are made from vinyl. Keeping the outside wet also can help. You might have seen transfer from the squeegee to the vinyl it you were getting into it. A vinyl cleaner conditioner will take care of it.
If you are going to wrap the squeegee a microfiber suede detail cloth would be our first choice. Be careful not to let it touch the adhesive side.
Thanks for posting!
If you are going to wrap the squeegee a microfiber suede detail cloth would be our first choice. Be careful not to let it touch the adhesive side.
Thanks for posting!

Thread
Thread Starter
Forum
Replies
Last Post
rancur3p1c
Scion tC 1G Drivetrain & Power
1
Jul 12, 2015 07:59 PM