
DIY Front License plate bracket


Thread Starter
Senior Member

SL Member
Scion Evolution
Joined: Jan 2004
Posts: 5,736
From: In the Hot Tub
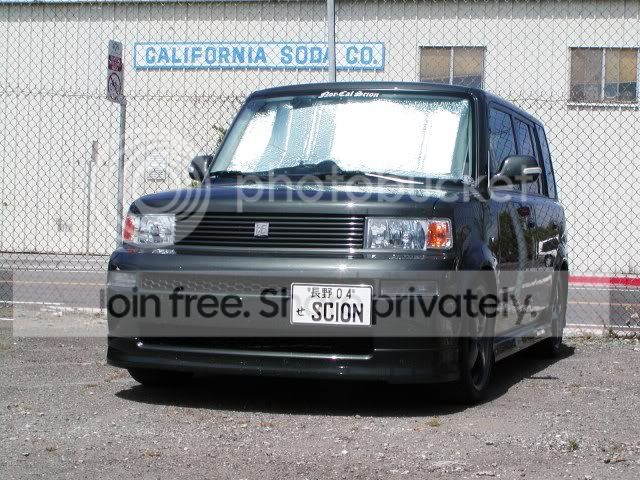
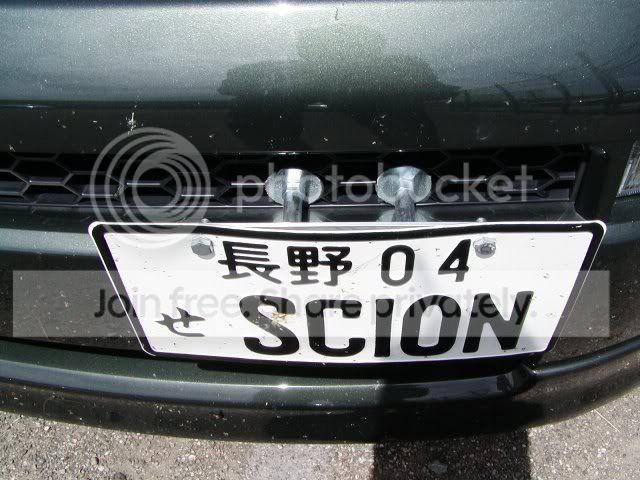
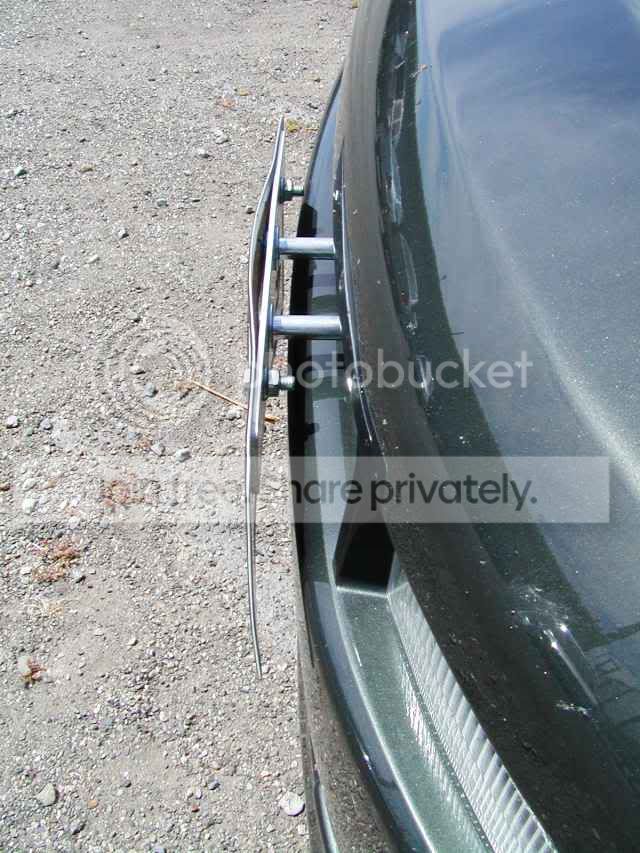
I finally made a bracket for my front license plate. I was lucky enough to get my Box without the bumper getting screwed. I've been wanting to make something that would incorporate the "Nor*Cal mounting" look but with a little more refinement. Here's what I came up with.
Items needed: (I purchased all items listed at Lowes)
2 - 4 or 5 inch 3/8ths carriage bolts (I used 5 inch, maybe a little longer than needed)
4 - Large flat washers ( I covered one side of each with vinyl sticker for scratch protection)
2 - smaller washers (fender washers ?)
2 - 1.5 inch steel spacers
4 - 3/8ths nuts ( I used two regular and two with the locking plastic ring inside)
OPTIONAL: Mounting bar (I used some flat aluminum, NOT fun to work with)
I say the mounting bar is optional because you could just use the bolts thru the license plate holes and mount it straight up that way.
Drill holes in the mounting bar and dremel or file holes to accomodate square part of carriage bolt head. Insert carriage bolts, put small washers on the bolts. Follow with steel spacers and regular 3/8ths nuts. Tighten nuts to hold carriage bolts and spacers in place. Add one large washer to each bolt. Insert bolts thru honeycomb at desired location. Place large washer on each carriage bolt behind honeycomb, follow with locking nuts. Tighten deez nuts until it sandwiches the honeycomb between the large washers. Add additional nut to lock if desired.
You should end up with something like this:

The reason I wanted the bar was originally so I could swap between my Cali plate and my JDM looking one when needed without having to take the whole thing apart. As i got down to the end of the project, I used two LED lighted bolts for the plate. It looks good except that It's not going to be easy to hide the wiring with this bracket and by running the wires thru the holes, it makes it hard to quickly swap the plates. I may have to rethink the lights on here...
Anyway, hope this helps. I planned it all out as I was browsing thru Lowe's. Hopefully this will help someone else save some time. I thought about making a kit, but with the weight of these little things, it'd probably cost more just to ship than to buy the parts locally.
Please feel free to refine my process here too...
I don't say "Show me da money" I prefer "Save me some money"
Items needed: (I purchased all items listed at Lowes)
2 - 4 or 5 inch 3/8ths carriage bolts (I used 5 inch, maybe a little longer than needed)
4 - Large flat washers ( I covered one side of each with vinyl sticker for scratch protection)
2 - smaller washers (fender washers ?)
2 - 1.5 inch steel spacers
4 - 3/8ths nuts ( I used two regular and two with the locking plastic ring inside)
OPTIONAL: Mounting bar (I used some flat aluminum, NOT fun to work with)
I say the mounting bar is optional because you could just use the bolts thru the license plate holes and mount it straight up that way.
Drill holes in the mounting bar and dremel or file holes to accomodate square part of carriage bolt head. Insert carriage bolts, put small washers on the bolts. Follow with steel spacers and regular 3/8ths nuts. Tighten nuts to hold carriage bolts and spacers in place. Add one large washer to each bolt. Insert bolts thru honeycomb at desired location. Place large washer on each carriage bolt behind honeycomb, follow with locking nuts. Tighten deez nuts until it sandwiches the honeycomb between the large washers. Add additional nut to lock if desired.
You should end up with something like this:
The reason I wanted the bar was originally so I could swap between my Cali plate and my JDM looking one when needed without having to take the whole thing apart. As i got down to the end of the project, I used two LED lighted bolts for the plate. It looks good except that It's not going to be easy to hide the wiring with this bracket and by running the wires thru the holes, it makes it hard to quickly swap the plates. I may have to rethink the lights on here...
Anyway, hope this helps. I planned it all out as I was browsing thru Lowe's. Hopefully this will help someone else save some time. I thought about making a kit, but with the weight of these little things, it'd probably cost more just to ship than to buy the parts locally.
Please feel free to refine my process here too...
I don't say "Show me da money" I prefer "Save me some money"

Senior Member
SL Member
Scion Evolution
Joined: Aug 2003
Posts: 920
From: ::L.B.C.::
OH damn. that looks nice! You said you got the steel spacer from Lowes also? Hmm...I browsed them today and i didnt see any....
I also made my own, but doesnt quite look as nice as yours. Nice Job!
I also made my own, but doesnt quite look as nice as yours. Nice Job!


Senior Member
SL Member
sIcKsCiOnS
Joined: Apr 2004
Posts: 300
From: Rehoboth, MA
nice work.....really clean. Ive been running mine without a plate up front since i got it (havent had the ho9les drilled yet) Ive got a few warnings from cops to put it on, so i guess im pushing my luck..i think ill be building one of those


Thread Starter
Senior Member
SL Member
Scion Evolution
Joined: Jan 2004
Posts: 5,736
From: In the Hot Tub
I haven't mounted mine but you can basically put it anywhere along the bumper. I like the "to the side" look, but i will probably center it in the middle for symmetry and balance.

This is basically where I got the design idea, but they put the bolt heads behind the grill and have the threaded end going out the front, whereas mine go the other way. I'll try to get a pic of mine when I put it on.
This is basically where I got the design idea, but they put the bolt heads behind the grill and have the threaded end going out the front, whereas mine go the other way. I'll try to get a pic of mine when I put it on.

Banned
SL Member
Joined: Dec 2003
Posts: 2,202
From: Motel 6
I came up with my own style, which is a lot easier then the first method i tried. The first method used many bolts and nuts and stuff, took forever to install and i ended up taking it off the next day anyway.
Here is what i used. At Home Depot there are these metal strips that have the holes about every inch. Cost like 3 bucks. Get one and 2 nut/bolts that will fit through your plate. Use the nuts that have the plastic inside so they wont back off. Pick up 2 large diameter bolts that have a wood tip at the end, like the ones that you can kinda see in my pic. Take the metal strip and cut it so there are 7 holes in the strip, then cut another to match. Bend at the 4th hole a 90 degree angle. Mark your holes under the bumper, and predrill pilot holes so you dont crack the bumper ( not too big though, you want a good bite from the screws). Install the plate to one side of the bent metal strip. The other side gets attached like the pic under the front bumper. Thats it! about 4 dollars in materials, and 1/2 hours work.
Pics of brackets and plate installed ==> http://www.imagestation.com/album/?id=4286583027


 very clean looking.

Guest
Posts: n/a
Originally Posted by WildBillT
Wow, that's sweet.  I sure could have used that setup before on past cars. I'll have to try that out soon.
Keep crusin and keep the rubber side down!
Wild Bill
Keep crusin and keep the rubber side down!
Wild Bill

Thread Starter
Senior Member
SL Member
Scion Evolution
Joined: Jan 2004
Posts: 5,736
From: In the Hot Tub
Originally Posted by bofa
get that poor thing to a car wash :D
On the plus side tho, look at the first picture. From 10 feet away you can't hardly tell there's bugs on it.
CAMO RULEZ!!!

Senior Member
OhioScions
SL Member
SL Member
Joined: Jun 2003
Posts: 146
From: Centerville, OH
Nice setup. I did not have the dealer punch holes in my front bumper and I have been looking for a front plate solution. This is it!!
One question, how did you get behind the front bumper???? Did you have to take it off, or did you get it from underneigth?
One question, how did you get behind the front bumper???? Did you have to take it off, or did you get it from underneigth?

Senior Member

SL Member
Team N.V.S.
Joined: Sep 2004
Posts: 13,706
From: Sacramento, CA / Nor*Cal
i know these are simple to make but anyone wanna make em and sell em? im bein lazy right now . lol . they got em on ebay but they look ____tier and cost like 20 . i wish i had the option of having the dealer not drill holes. a lot of dealers do it as soon as they get it onto their back lot. bastards!!!!!