Cargo Cover (custom, hard)
 07-20-2005, 03:53 AM
#41
Senior Member

SL Member
Join Date: Feb 2005
Location: Lancaster, CA
Posts: 595
Some very inventive thinking, and a great ideas. Everyone modifies and changes to their own liking. That is great. Will have to put this on my list of personally engineered (home-made) items. Try to keep all my items as personally engineered as possible. Allows for more mods quicker, due to expense, and lets me spend time with the box, which I enjoy. The CAI, graphic, tails, and bug deflector (covered in white, trimmed in black) are purchased, but I installed them with some minor changes. Arm rest, panic handle covers, visor covers, headrest covers, shift boot, CAI grill and a few painting mods are all personally engineered. About 20 mods, and 20+ to go. Wheels are expensive, so they will be a while. Due the stock ones are painted. Enjoy the Box, and as someone said. "Have it your way".
 07-20-2005, 01:31 PM
#43
Senior Member

SL Member
Thread Starter
Join Date: Dec 2004
Location: Atlanta, GA
Posts: 4,971
Woohoo! No squeaks or rattles.
And for those not wanting to measure the distance between the sides, I used 51 1/4" from end to end and it's a good tight fit.
The fabric has the same texture as the seats, but it is darker. Pics tonight after work.
And for those not wanting to measure the distance between the sides, I used 51 1/4" from end to end and it's a good tight fit.
The fabric has the same texture as the seats, but it is darker. Pics tonight after work.
07-20-2005, 10:13 PM
#44
Senior Member
SL Member
Thread Starter
Join Date: Dec 2004
Location: Atlanta, GA
Posts: 4,971
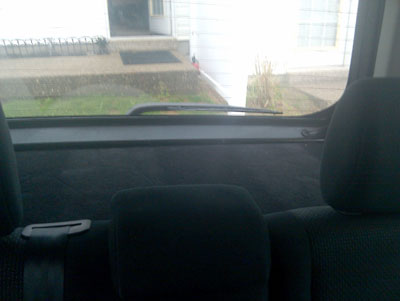
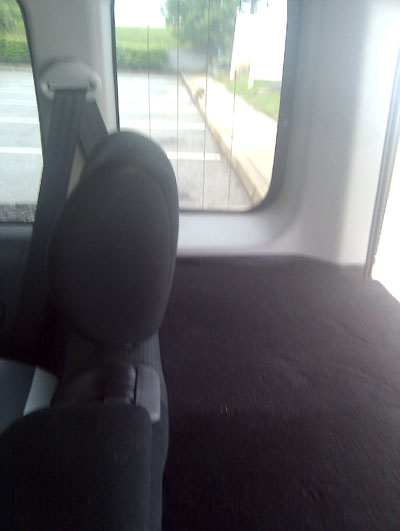
I got some pics!
The first shows the whole thing, the second shows the gap I left on the side, and the last two show the comparison between the seat fabric and the cover fabric. The texture appears the same in person, but it is darker than the seat fabric. The difference in color is not as noticeable in person as it is in the picture, but there is a slight difference.


The first shows the whole thing, the second shows the gap I left on the side, and the last two show the comparison between the seat fabric and the cover fabric. The texture appears the same in person, but it is darker than the seat fabric. The difference in color is not as noticeable in person as it is in the picture, but there is a slight difference.
 12-05-2005, 07:28 AM
#46
Senior Member
SL Member

Join Date: Nov 2005
Posts: 146
Very Nice Job!!!
I was thinking of trying something close to what you've done, but gotta wait for warmer weather. Just To darn cold in Michigan right now to be working in the shop.
I was thinking of using fiberglass or MDF, and putting some cup holders in it for tailgate parties. Maybe even try to put an extension that would fold out a little farther. As you can tell, it would not be for everyday use, just a handful of weekends a season. If anyone has an extension or suggestions, let us know.
Again, very nice and thanks for the inspiration.
I was thinking of trying something close to what you've done, but gotta wait for warmer weather. Just To darn cold in Michigan right now to be working in the shop.
I was thinking of using fiberglass or MDF, and putting some cup holders in it for tailgate parties.
Again, very nice and thanks for the inspiration.


 08-24-2006, 07:37 PM
#53
Senior Member
SL Member

Join Date: Oct 2005
Location: Long Beach, CA
Posts: 380
I'm thinking about making one that has a dished tray built into it to hold the kids toys and snacks when on road trips. I suppose it would be as easy as making the basic tray, cutting a hole and screwing something like a shallow rubbermaid tray to the underside.
10-15-2007, 04:16 PM
#54
Junior Member

Join Date: May 2007
Location: atlanta
Posts: 5
can some one post a copy of the pattern where i can download it, or email it to me at jagonza@aol.com. i want to make a hard cover but need a good pattern
06-10-2011, 03:33 PM
#55

Reviving an old thread here, seen this one on here for a while and can't believe there's not been more input on it! So I took a shot at it with an old piece of plywood and some trial n error...
After fooling with several curtain and shower rods I decided on one of those walmart car clothes rods (happened to have 1 I never used) and bought a second after I got the 1st to fit to my liking. Then picked up some black rubber stoppers like you'd find on the end of a stool leg at home depot. I reversed them though by drilling/dremeling out the wider flat end to fit over the clothes bar, so the originally open end would better wedge itself into the walls of the xB. Once I liked how they fit, epoxied them on to the bar permanently.
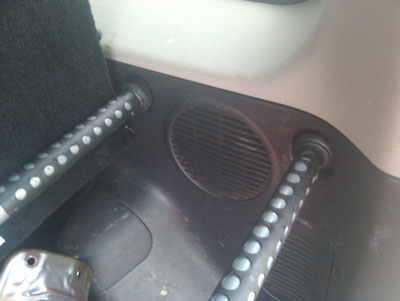
The stoppers fit perfect in the stock holes.
For now, in order to hold the extended rod in place I drilled 2 holes in each rod, and added 2 bolts, lock washers, and butterfly nuts.
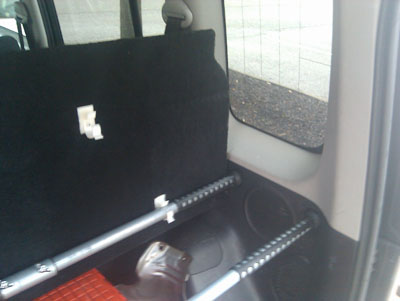
They're rock solid once in place... forgive the junk in the trunk Used plastic electrical conduit clips also found at home depot to hold the board to the rods. Staggered the the back a little wider than the front and it also works as a hinge so the shelf can be easily flipped up for rear access.
With the auto/speaker/trunk carpet I purchased and spray glued to the board the gaps are minimal and the black goes with the interior nicely.
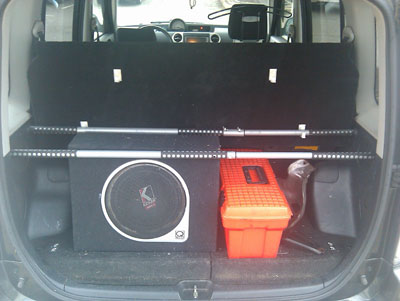
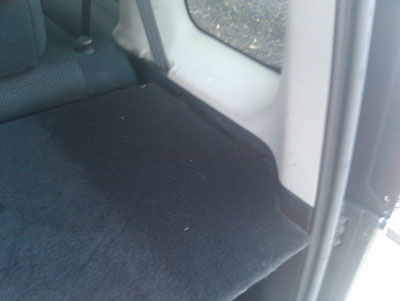
Smooth & solid support behind the back seat, looks stock, slight gap where it meets the hatch since there's a slight curve to the hatch I didn't realize when cutting the board.
Another look from the back seat.
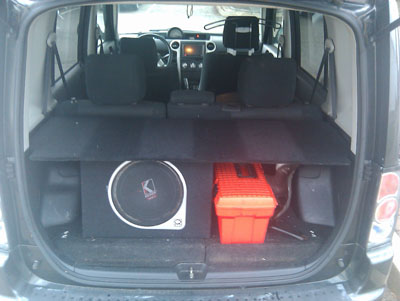
Flipped down with the hatch open, stripes effect is from how the carpet was packaged and has since faded so not as noticeable. Sub hits harder too, but it'll be going under the passenger seat soon.
In all took me about an afternoon to make, mostly due to several home depot trips but like the result, it's very sturdy and really cleans up the look of the interior.
Hmm, now the more I look at it I could possibly do away with the front rod altogether if I could just have the stoppers or something else sticking out for the front to rest on, freeing up even more space....
After fooling with several curtain and shower rods I decided on one of those walmart car clothes rods (happened to have 1 I never used) and bought a second after I got the 1st to fit to my liking. Then picked up some black rubber stoppers like you'd find on the end of a stool leg at home depot. I reversed them though by drilling/dremeling out the wider flat end to fit over the clothes bar, so the originally open end would better wedge itself into the walls of the xB. Once I liked how they fit, epoxied them on to the bar permanently.
The stoppers fit perfect in the stock holes.
For now, in order to hold the extended rod in place I drilled 2 holes in each rod, and added 2 bolts, lock washers, and butterfly nuts.
They're rock solid once in place... forgive the junk in the trunk
With the auto/speaker/trunk carpet I purchased and spray glued to the board the gaps are minimal and the black goes with the interior nicely.
Smooth & solid support behind the back seat, looks stock, slight gap where it meets the hatch since there's a slight curve to the hatch I didn't realize when cutting the board.
Another look from the back seat.
Flipped down with the hatch open, stripes effect is from how the carpet was packaged and has since faded so not as noticeable. Sub hits harder too, but it'll be going under the passenger seat soon.
In all took me about an afternoon to make, mostly due to several home depot trips but like the result, it's very sturdy and really cleans up the look of the interior.
Hmm, now the more I look at it I could possibly do away with the front rod altogether if I could just have the stoppers or something else sticking out for the front to rest on, freeing up even more space....
06-12-2011, 01:32 PM
#56
Senior Member
SL Member
Team ScioNRG

Join Date: Feb 2004
Location: Fortress of ScioNRG
Posts: 5,274
great DIY there.
as for the thought of removing one of the bars and just letting it rest on something, i think that will cause a few issues.
it needs to be held in place from and back to keep it from rattling. it will bounce up with rough roads and good bass hits (even if under the pass seat.).
if you could put some kind of spring loaded catch on the shelf instead of a bar, i think you got it covered. making sure the board will not flex from strong springs..
 08-08-2015, 10:30 PM
#58
Junior Member

Join Date: Aug 2015
Posts: 1
Not to hijack the thread but here's my attempt on the cargo cover/shelf.
List of items needed to make it for My 2005 Scion Xb First Gen
Tools needed
1. Remove two of the bolts on one side of the trunk that hold the Plastic Cargo Net hooks in place and measure the Diameter.
The radius of the plastic cargo nets is where you'll make the blue mark from the angle brackets end hole (visible on the second image below).
2. Straighten and Flatten the brackets as much as possible (use the hammer if necessary)

3. Using the appropriate sized drill-bit to match the Cargo-net bolt diameter drill out the existing hole to the appropriate size, use the file to remove any burrs left

4. place the metal brackets in the vice (blue short side in it) and bend them at the blue mark using the hammer.
5. The other hole you'll have to drill on the long side of the custom metal brackets depends on the following factors
7. With both of the bolts on one side of your trunk previously removed pop the plastic interior out
8. line the top or bottom (your choice) of the plastic near the taper with duct-tape (prevents marking up your plastic interior with marker/pen)
9. Wedge the the scrap piece of Flat piece of plastic or cardboard
in-between the top and bottom piece of plastic near the taper.
10. Using a marker (plastic) or Pen (cardboard) trace the curvature on the side of the taper lined with duct-tape
11. Cut out the taper on the plastic/cardboard with scissors
12. Cut your MDF board down to size of the overall trunk (excluding taper)
13. Using the most powerful computer on earth (your mind) along with a measuring tape figure out where the taper needs to be and mark/cut it out with a Jig-saw (measure twice cut once as visible by the existing pen line below in the following image)
(optional but recommended step) sand the edges/corners of the MDF board to remove the sharp edges that may or may not cut over time the cloth you'll wrap it in later
14. Dry fit: Remove the remaining cargo net bolts in the trunk and mount in the customized angle brackets in all four holes, Place the wood on the brackets and center the wood as much as possible. Mark with pen/marker where you intend to mount the bolts.
15. At this point you'll trace the outline of the hood pin kit onto the MDF board, using the marks where your bolts are going to be at
16. As I learned the hard way you also want to at this stage mark and bore out partially where the bolts will go that will hold the pin kit Prior to cutting out the hole for it to go into (unlike what I did)...

17. once you've got the bolt holes bored down partially to the depth needed to go ahead and cut out the holes for the Pin kit to mount through (remember to not take off too much so it will be a snug fit)

 (at this point I began the trial and error of drilling out the holes for the bolts and boring to the depth needed for the washers)
18. Dry fit #2: go ahead and mount the pin kit's to make sure the bolts/washers are bored to the correct depth. when satisfied move on to step 19
19. Remove pin kits from MDF board and use a dampened rag (clean rag with water) wipe down board to remove any sawdust/dirt.
20. Get a second pair of hands (another person for these next few steps or be prepared to have the 3M applicator handy)
21. Spray MDF board (one side) with Spray Adhesive (note: do not over spray too much it will soak through your cloth material)
Note: I chose to wrap it from trunk door side of the MDF board to back with the material's edges (aside from the sides) heading towards the back seats
22. grab the other side of the cloth with your assistant holding the other and drape cloth over the adhesive to prevent wrinkles (if you do not have an assistant the 3M applicator can be used to smooth out the wrinkles) let it dry for the recommended amount
23. flip over mdf board and use the X-ACTO knife to cut the holes where your Hood Pin kit will go.
24. Spray underside with MDF board and use your assistant to wrap the bottom (remember: do not over-spray)
25. Trim the sides of the cloth leaving enough room to Roll the edges and staple them to the underside of the board. At this point Repeat step 23
26. Re-place the Hood pin kits in the MDF board and mount them for the final time. Note: the stains on the cloth at the bottom are from glue seeping through the material from over-spraying

27. Cut the rubber bushings (included in the Pin-Kit) down to desired height and mount in Car

final result is a quick release trunk shelf that makes zero-noise while driving, sturdy enough to hold groceries and can be quickly (without tools) removed in a moments notice from obstructing your need to fold down the back seat and transport larger cargo.
List of items needed to make it for My 2005 Scion Xb First Gen
- Keyless Car racing Bonnet Plus Hood Pin flush Latch Kit x2 22.89ea (43.50 total) found on ebay
- 3" Corner Braces x1 2.06
- 4'-5'x15.5" 1/2" thick MDF board (I got a 4'x4' piece @14.00)
- Cloth Material ~20.00 (I got almost double the mount needed)
- Spray Adhesive 9.00
- a piece of disposable flat plastic (cardboard could suffice) to make a template of the trunk's taper
Tools needed
- Circular Saw (optional if lacking)
- Jig Saw
- Drill
- Vice
- Hammer
- Palm sander or sand paper (optional but advisable)
- 15/32" drill bit in my case to match the Hood Kit's bolt diameter
- 25/64" drill bit in my case to match the diameter of the bolts that are holding the plastic cargo net hooks to the sidewalls
- wood boring drill bit sized to the washers in the Hood Kit (or the socket you'll need for hood kit's bolts)
- Allan Wrench to remove the Bolts holding the cargo net hooks
- Metal File
- Pen/Marker
- Staple gun
- Scissors
- 3M Applicator (can be optional, but handy for the last steps)
- Tape measure
- Paper
- Knife
- Duct-tape
- Sawhorses or a elevated surface to work on
- X-ACTO knife
- Patience
1. Remove two of the bolts on one side of the trunk that hold the Plastic Cargo Net hooks in place and measure the Diameter.
The radius of the plastic cargo nets is where you'll make the blue mark from the angle brackets end hole (visible on the second image below).
2. Straighten and Flatten the brackets as much as possible (use the hammer if necessary)
3. Using the appropriate sized drill-bit to match the Cargo-net bolt diameter drill out the existing hole to the appropriate size, use the file to remove any burrs left
4. place the metal brackets in the vice (blue short side in it) and bend them at the blue mark using the hammer.
5. The other hole you'll have to drill on the long side of the custom metal brackets depends on the following factors
a. the length of wood
b. how far in you want to place the pin kit on the wood
6. Using the Tape measure and a piece of paper record the general size of your trunk. b. how far in you want to place the pin kit on the wood
7. With both of the bolts on one side of your trunk previously removed pop the plastic interior out
8. line the top or bottom (your choice) of the plastic near the taper with duct-tape (prevents marking up your plastic interior with marker/pen)
9. Wedge the the scrap piece of Flat piece of plastic or cardboard
in-between the top and bottom piece of plastic near the taper.
10. Using a marker (plastic) or Pen (cardboard) trace the curvature on the side of the taper lined with duct-tape
11. Cut out the taper on the plastic/cardboard with scissors
12. Cut your MDF board down to size of the overall trunk (excluding taper)
13. Using the most powerful computer on earth (your mind) along with a measuring tape figure out where the taper needs to be and mark/cut it out with a Jig-saw (measure twice cut once as visible by the existing pen line below in the following image)
(optional but recommended step) sand the edges/corners of the MDF board to remove the sharp edges that may or may not cut over time the cloth you'll wrap it in later
14. Dry fit: Remove the remaining cargo net bolts in the trunk and mount in the customized angle brackets in all four holes, Place the wood on the brackets and center the wood as much as possible. Mark with pen/marker where you intend to mount the bolts.
15. At this point you'll trace the outline of the hood pin kit onto the MDF board, using the marks where your bolts are going to be at
16. As I learned the hard way you also want to at this stage mark and bore out partially where the bolts will go that will hold the pin kit Prior to cutting out the hole for it to go into (unlike what I did)...
17. once you've got the bolt holes bored down partially to the depth needed to go ahead and cut out the holes for the Pin kit to mount through (remember to not take off too much so it will be a snug fit)
(at this point I began the trial and error of drilling out the holes for the bolts and boring to the depth needed for the washers) 18. Dry fit #2: go ahead and mount the pin kit's to make sure the bolts/washers are bored to the correct depth. when satisfied move on to step 19
19. Remove pin kits from MDF board and use a dampened rag (clean rag with water) wipe down board to remove any sawdust/dirt.
20. Get a second pair of hands (another person for these next few steps or be prepared to have the 3M applicator handy)
21. Spray MDF board (one side) with Spray Adhesive (note: do not over spray too much it will soak through your cloth material)
Note: I chose to wrap it from trunk door side of the MDF board to back with the material's edges (aside from the sides) heading towards the back seats
22. grab the other side of the cloth with your assistant holding the other and drape cloth over the adhesive to prevent wrinkles (if you do not have an assistant the 3M applicator can be used to smooth out the wrinkles) let it dry for the recommended amount
23. flip over mdf board and use the X-ACTO knife to cut the holes where your Hood Pin kit will go.
24. Spray underside with MDF board and use your assistant to wrap the bottom (remember: do not over-spray)
25. Trim the sides of the cloth leaving enough room to Roll the edges and staple them to the underside of the board. At this point Repeat step 23
26. Re-place the Hood pin kits in the MDF board and mount them for the final time. Note: the stains on the cloth at the bottom are from glue seeping through the material from over-spraying
27. Cut the rubber bushings (included in the Pin-Kit) down to desired height and mount in Car
final result is a quick release trunk shelf that makes zero-noise while driving, sturdy enough to hold groceries and can be quickly (without tools) removed in a moments notice from obstructing your need to fold down the back seat and transport larger cargo.
Last edited by T3MPEST; 08-08-2015 at 10:42 PM.


Thread
Thread Starter
Forum
Replies
Last Post
xa007xa
PPC: Engine / Drivetrain
0
03-31-2015 09:24 PM
CONCRETETC
PPC: Interior / Electronics
1
02-09-2015 08:05 PM
carid
Exclusive Sponsored Sales
0
01-22-2015 12:49 PM