
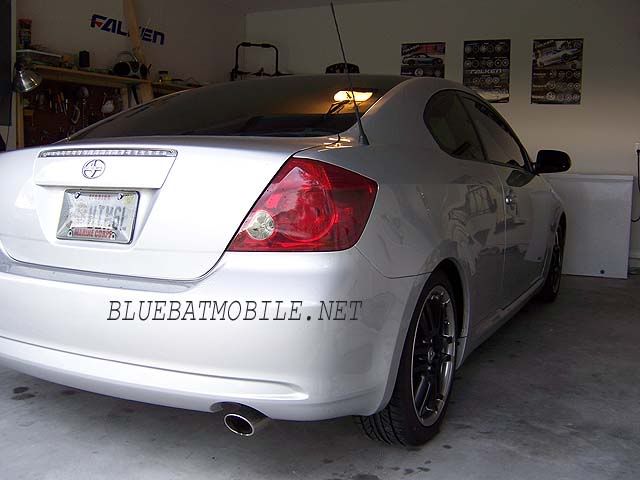
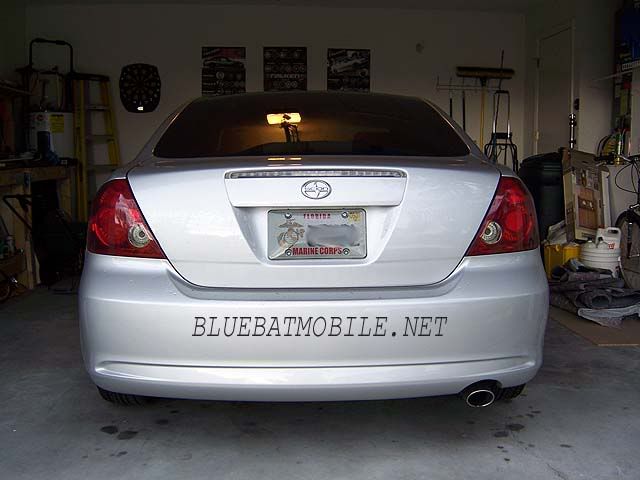
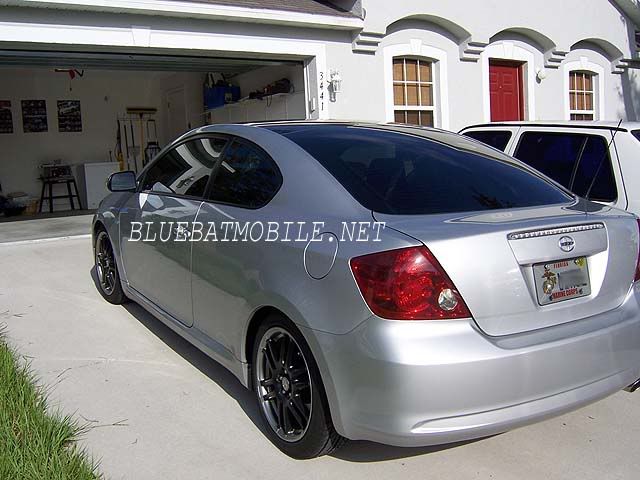
Bat's Full Smoke Taillight Overlay in lighter 3/10 tint!


Thread Starter
Senior Member
SL Member
Joined: Jul 2003
Posts: 2,641
From: San Diego, CA
Finally have pics of my Full Smoke Taillight Overlay in my Lighter 3/10 tint. Subtle but quite noticable  . Enjoy!
Bat�
. Enjoy!Bat�

Member

SL Member
Joined: Dec 2004
Posts: 57
From: Lakeland, FL
Thanks for posting these Bat. The car shown is mine, and I am perfectly pleased with how they came out. I've actually used vinyl on taillights before, but this was still challenging. It took close to three hours to get them looking decent, and they still weren't perfect. However, sitting out in the hot sun has fixed any small imperfections left behind from me stretching these to fit. These are the perfect alternative to paint, which is all too permanent for me. I also don't like the dark tint, as it is too noticeable (especially to law enforcement), and minimizes output a little. While these don't pop out at you like the dark tint does, it is the nice, subtle difference I was looking for.
Thread Starter
Senior Member
SL Member
Joined: Jul 2003
Posts: 2,641
From: San Diego, CA
Originally Posted by Speedpunk
Thanks for posting these Bat. The car shown is mine, and I am perfectly pleased with how they came out. I've actually used vinyl on taillights before, but this was still challenging. It took close to three hours to get them looking decent, and they still weren't perfect. However, sitting out in the hot sun has fixed any small imperfections left behind from me stretching these to fit. These are the perfect alternative to paint, which is all too permanent for me. I also don't like the dark tint, as it is too noticeable (especially to law enforcement), and minimizes output a little. While these don't pop out at you like the dark tint does, it is the nice, subtle difference I was looking for.
. Semper Fidelis!Bat�

Member
SL Member
Joined: Jun 2006
Posts: 26
Originally Posted by Blue_Batmobile
Originally Posted by Speedpunk
Thanks for posting these Bat. The car shown is mine, and I am perfectly pleased with how they came out. I've actually used vinyl on taillights before, but this was still challenging. It took close to three hours to get them looking decent, and they still weren't perfect. However, sitting out in the hot sun has fixed any small imperfections left behind from me stretching these to fit. These are the perfect alternative to paint, which is all too permanent for me. I also don't like the dark tint, as it is too noticeable (especially to law enforcement), and minimizes output a little. While these don't pop out at you like the dark tint does, it is the nice, subtle difference I was looking for.
. Semper Fidelis!Bat�

Senior Member
SL Member
Joined: Apr 2006
Posts: 716
From: Dulles, VA
wow! I may finally have to pick up a set of these. I always thought the dark ones were just too dark, and that has kept me away. Now the only thing stopping me is the fear of messing it up! How easy do they go on?
Member
SL Member
Joined: Dec 2004
Posts: 57
From: Lakeland, FL
It wasn't very difficult, just time consuming.
The items I used were:
chair (start with one, or you'll just end up interrupting to go get one),
blow dryer,
spray bottle with soapy water,
blue 3M squeegee (I asked my local sign shop and they gave me one. They have them by the dozens. Tint shops also carry them),
and frosty beverages of your choice.
After cleaning my taillights, I sprayed both the light and the adhesive side of the overlay and lined everything up. Once lined up, squeegee some of the water out of the middle, enough to get the overlay to stick. To ensure that the squeegee doesn't rip the vinyl, apply soapy water to the outside of the overlay once in position. Crank up the dryer on medium heat, and start gently pulling as you squeegee. Be sure to keep any area that is not squeegee'd out wet with soapy water (failure to do so will leave fingerprints). If you get creases, pull the overlay back up to the crease and start again, making sure to apply soapy water (again). The vinyl can stretch quite a bit, as long as the heat is not too high or it is not pulled too hard too fast I hope this helps some. The top is the most difficult, but heat, soapy water, and patience is the key.
The items I used were:
chair (start with one, or you'll just end up interrupting to go get one),
blow dryer,
spray bottle with soapy water,
blue 3M squeegee (I asked my local sign shop and they gave me one. They have them by the dozens. Tint shops also carry them),
and frosty beverages of your choice.
After cleaning my taillights, I sprayed both the light and the adhesive side of the overlay and lined everything up. Once lined up, squeegee some of the water out of the middle, enough to get the overlay to stick. To ensure that the squeegee doesn't rip the vinyl, apply soapy water to the outside of the overlay once in position. Crank up the dryer on medium heat, and start gently pulling as you squeegee. Be sure to keep any area that is not squeegee'd out wet with soapy water (failure to do so will leave fingerprints). If you get creases, pull the overlay back up to the crease and start again, making sure to apply soapy water (again). The vinyl can stretch quite a bit, as long as the heat is not too high or it is not pulled too hard too fast


Member
SL Member
Joined: Jun 2006
Posts: 26
Originally Posted by Blue_Batmobile
Originally Posted by mew_ricle
thanks for the tips! I will post pics of mine as soon as I get them on this week. Woot! Thanks again Bat! :D
Bat
Finally after trying to fix it over and over again, it got to the point where I couldn't "fix" it anymore so I had to pull it all out. T.T I'm so sad...the other parts looked great too, just....not the top. So sorry, no pics of the taillights. But I will post pics of the sidemarker overlays. They're so hawt! (Thanks again Bat). Looks like I put eyeshadow on it, hehe
Member
SL Member
Joined: Jun 2006
Posts: 26
Currently I'm back at home for the summer, so that means that I have to deal with dial up internet (T.T). I recently got my car windows tinted, so I need to wash my car to get their solution off my car. I will post pics as soon as I can, I promise. :D As for the other set, I think it's best that I just leave them alone for now, hehe. Thank you tho very much Bat. Pics soon!


Senior Member
SL Member
Joined: Jun 2006
Posts: 101
From: San Jose, CA
does anyone have any pics of a tc with only the top part of tail lights smoked or painted? Do you guys think it would look good to smoke or paint over the top part of the tail lights which is the part where our left/right turn signals light up in the tail lights? It is just a mod idea that im considering.