
Rewiring Taillights ?

Senior Member
SL Member
Scion Evolution
Joined: Oct 2006
Posts: 542
From: Chicago, IL
Power.. the bulb for the brakes are also used for the parking lights.. The brake wire is blue, and the parking light would be brown.. so you would need to use a relay for the turn signal.. but it won't be so easy.. when the brake is depressed and the parking lights are on you have two 12v's on, so would need to cut power to both via a relay to make the light flash..
OO.. thats something that might need some thought on how to wire that one.
OO.. thats something that might need some thought on how to wire that one.

Senior Member
Team Hamster
SL Member
Team ScioNRG
Joined: Dec 2006
Posts: 898
From: Burlington, MA
Yep, I found that out the hard way last night. I spent a good while wiring up the left taillight and taking pictures along the way. When I had the left one wired up, I tested it (with my camera filming a video while I was in the car) only to find that when my foot was on the brake it did the hyperblink (i.e. when you need to replace the bulb) but was fine when my foot was off the brake (even when my parking lights were on). So as it was 1am and I didn't know what else to do I quit for the night and put it back to the stock setup (I put male/female connectors on the stop wires to put it back to stock at any point).
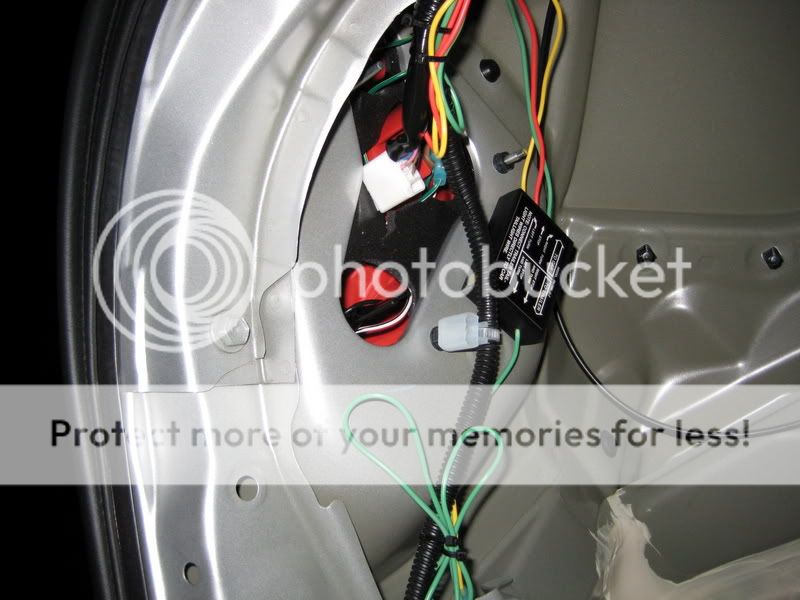
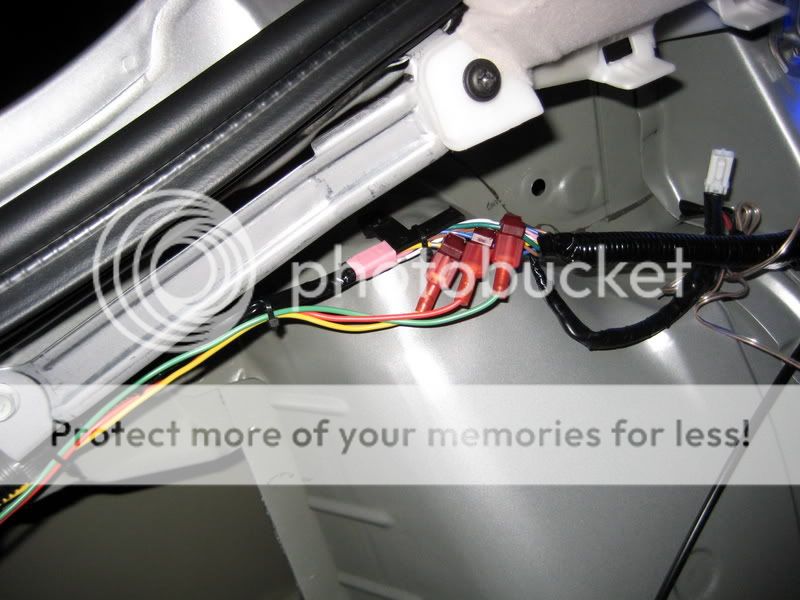
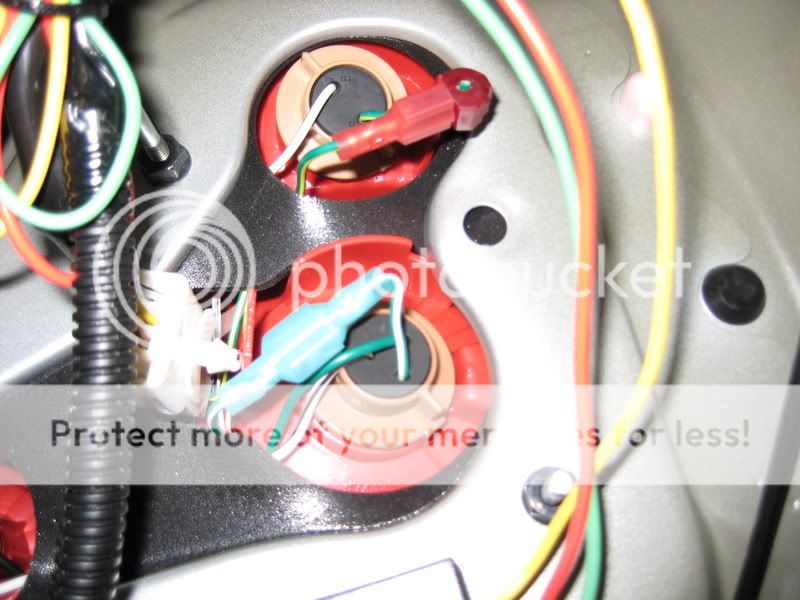
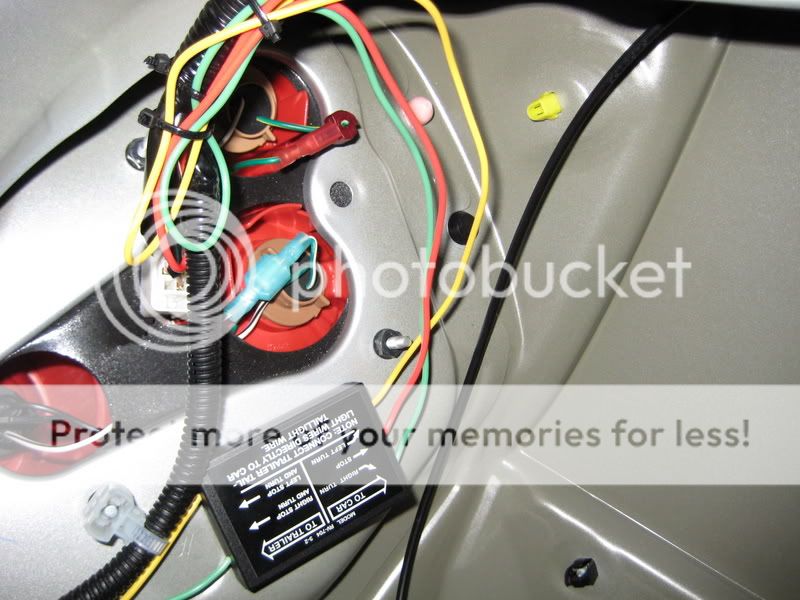
Good news was the some of the wiring I described yesterday was more complicated than it needs to be. When you take out the side panels in the trunk all the taillight wires are run together down the left side of the trunk. Half of them stop at the left taillight and the other half continue across the back of the trunk to the right taillight. There is one perfect spot where all the wires are together and are not covered by either wireloom or by electrical tape. I tapped into the 3 wires (green, yellow, and blue) in that spot and connected it to the converter box which I placed on the body directly underneath the left taillight inside in the trunk. From there it is a short distance from the converter box to the left taillight and then only one wire needs to be run across the bottom to the right taillight. Definitely easier than I had thought it would be.
So things went well other than the fact that we'll need to include the relay Rage mentioned. I actually know nothing about relays so hopefully someone else can help with that. As I mentioned before, my car is going into the shop today for at least a week so I won't be able to do more testing until I get it back. That's the best I can do, lol.
Here are an assortment of pics I took along the way, with the video link included in the end:
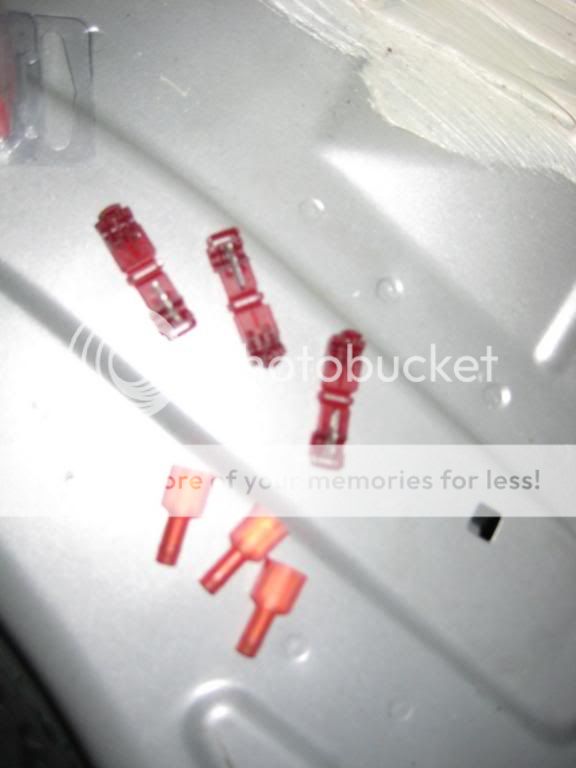
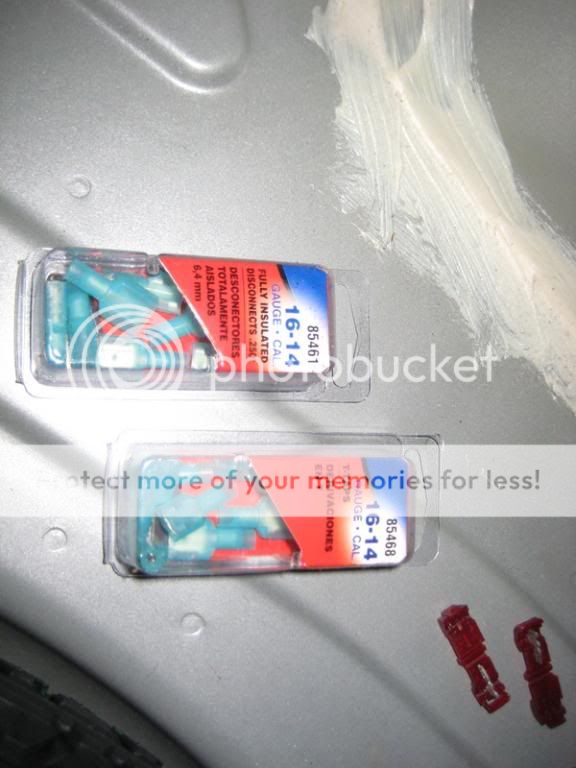
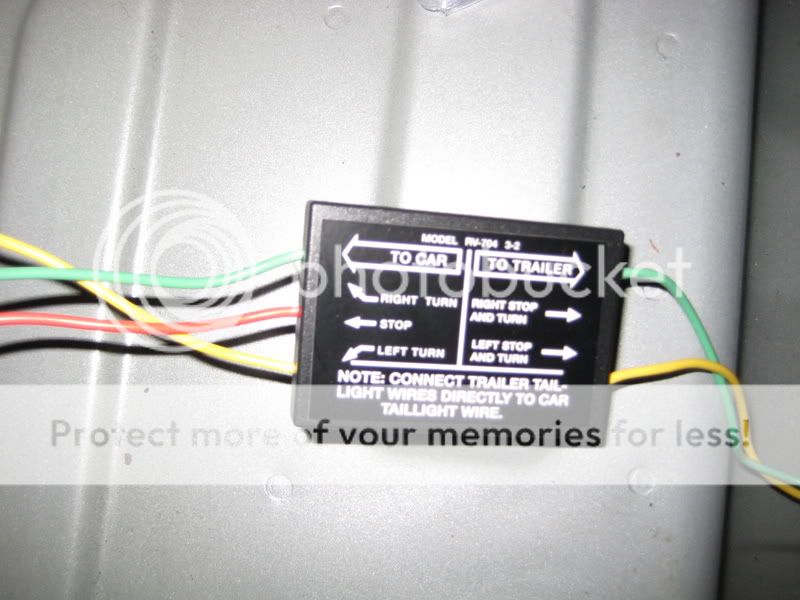
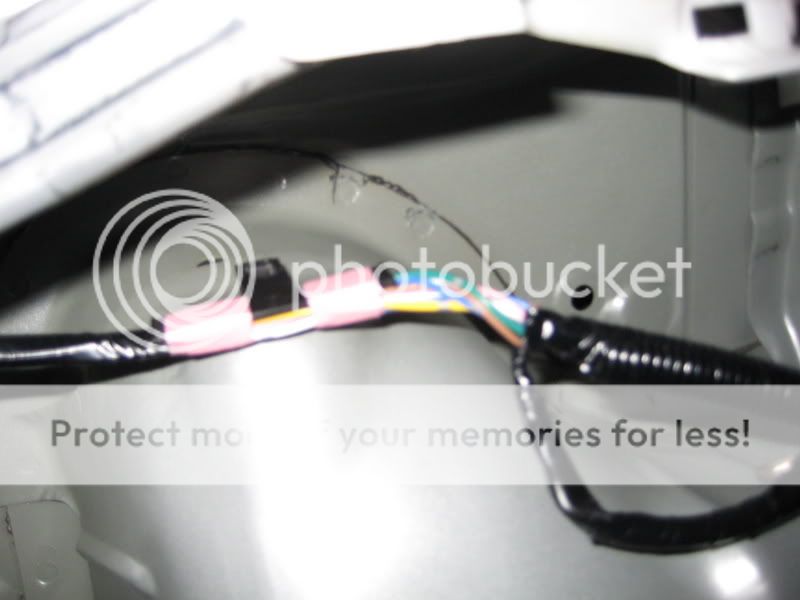
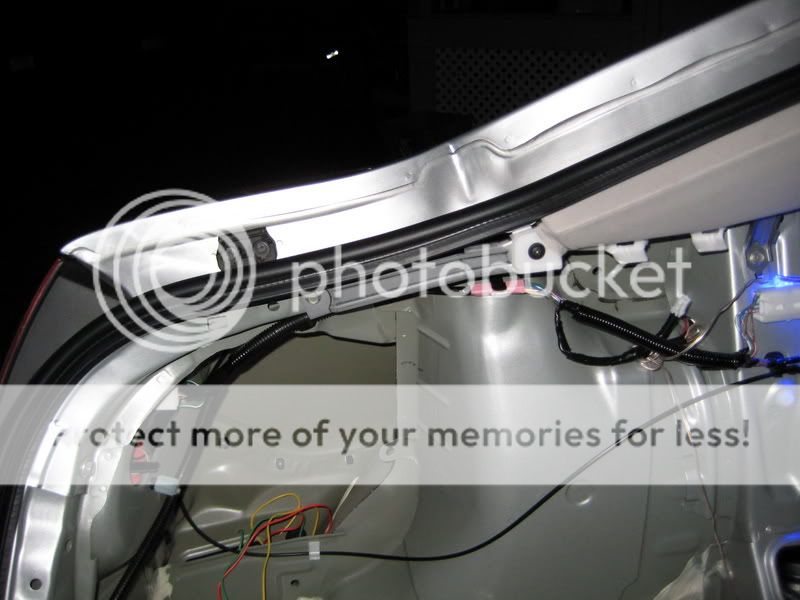
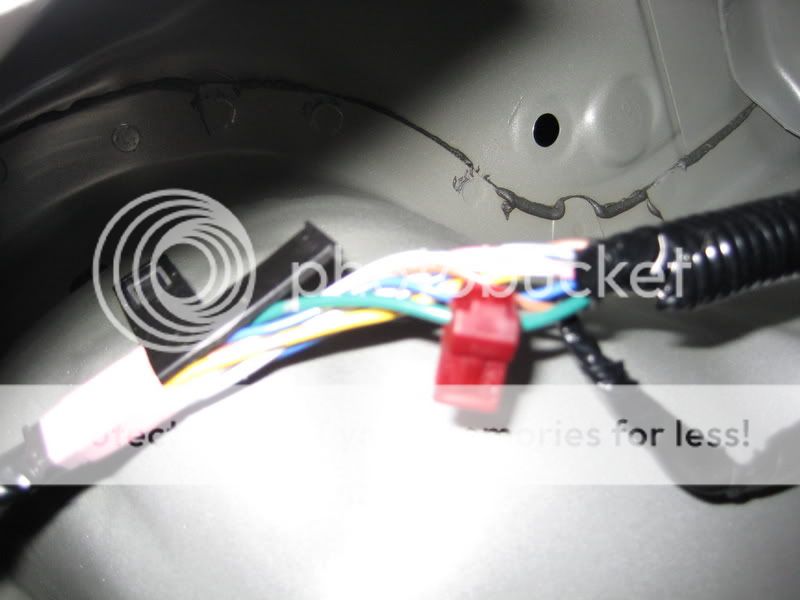
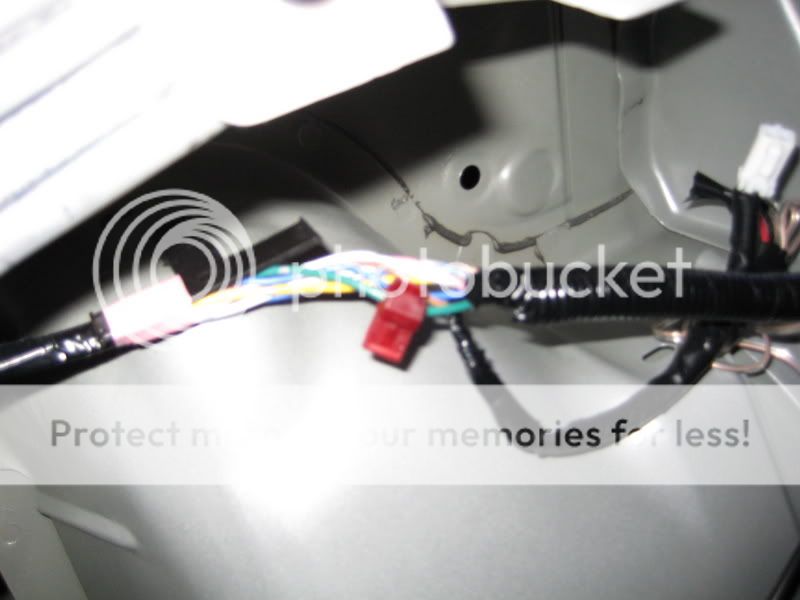
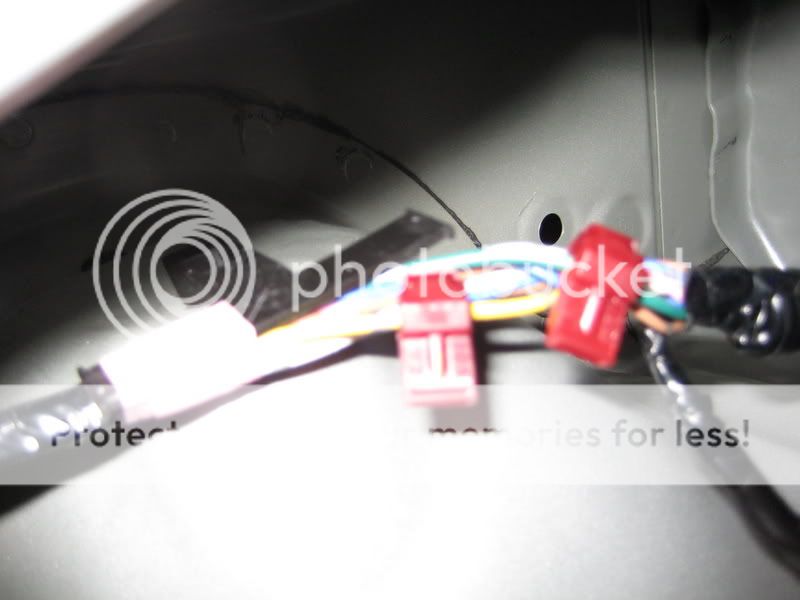
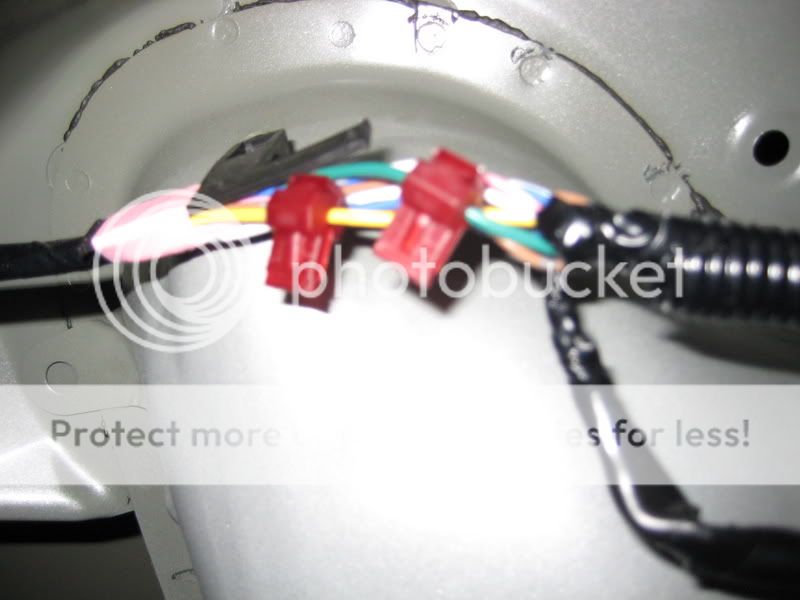
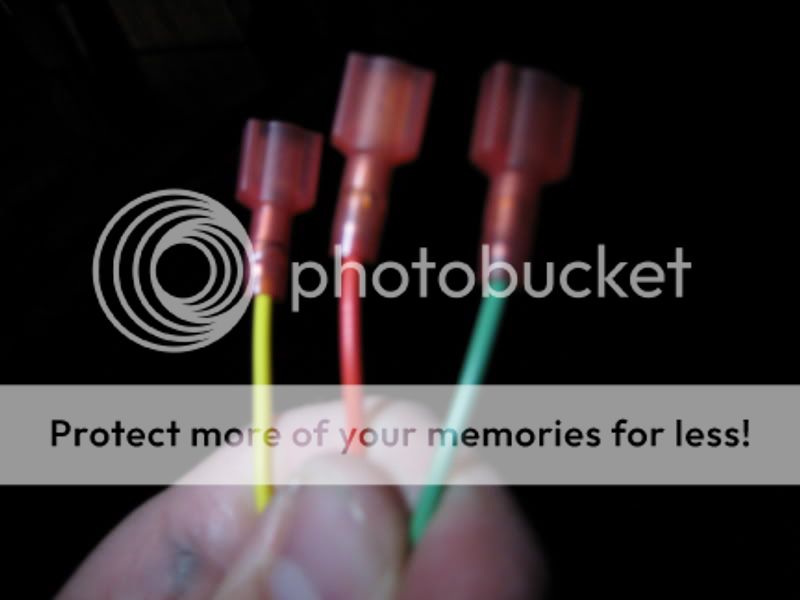
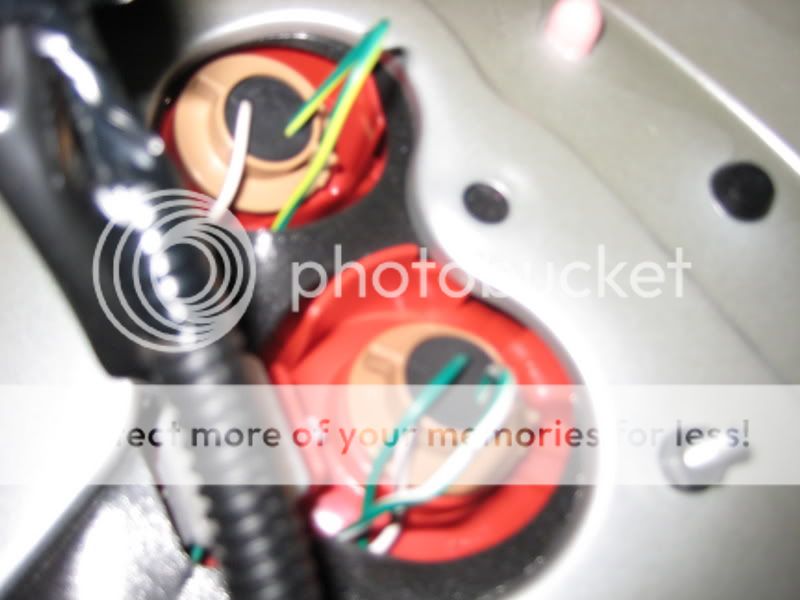
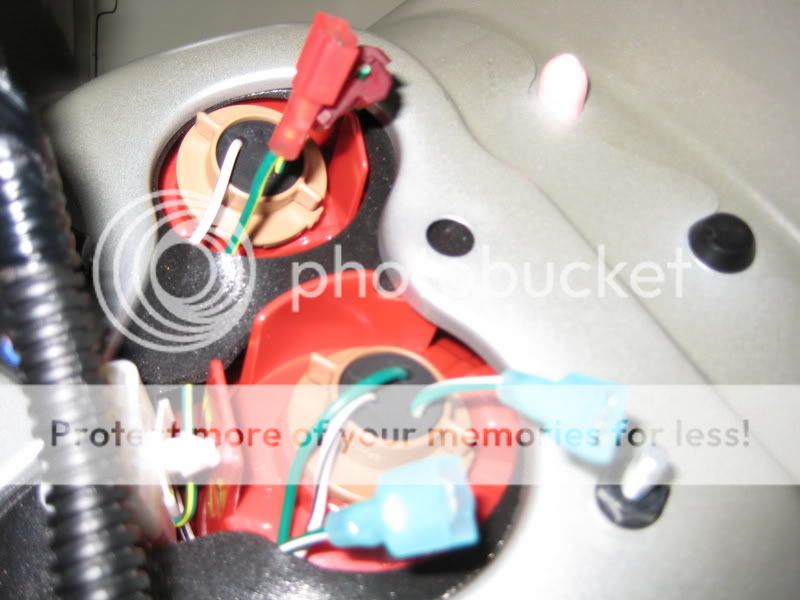
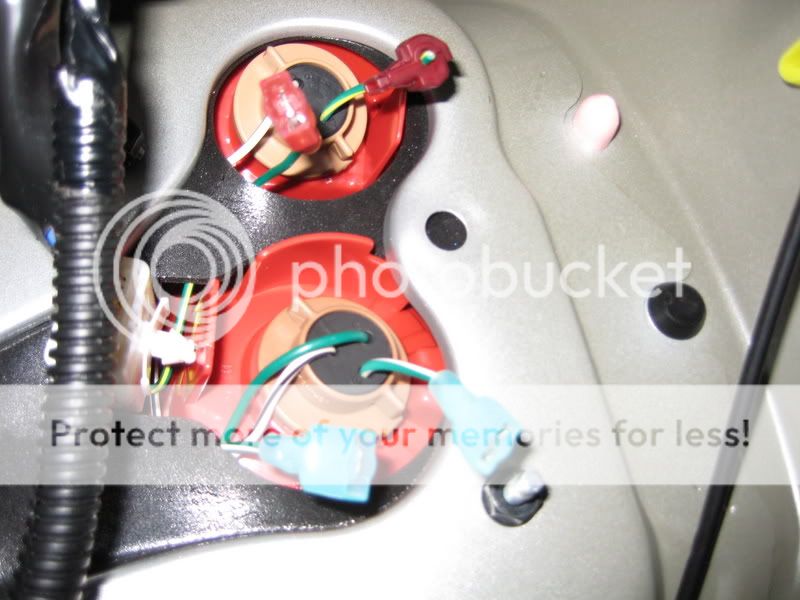
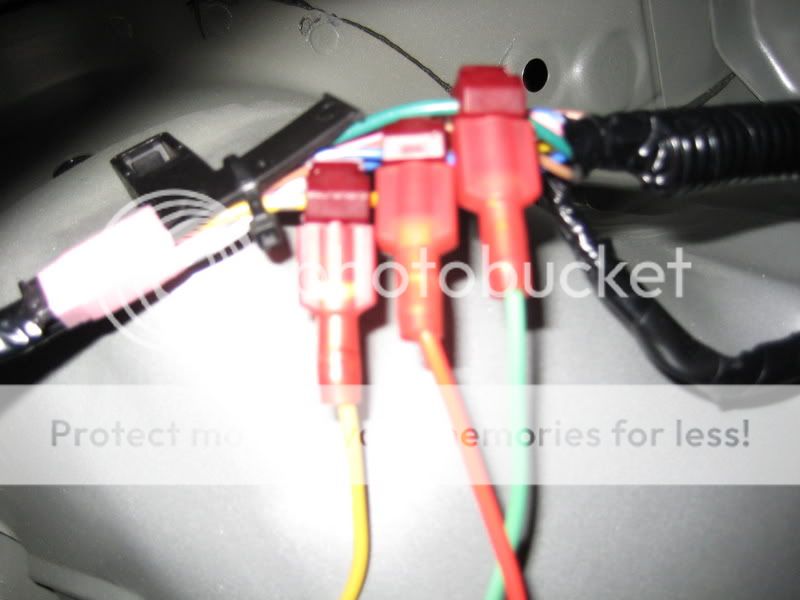
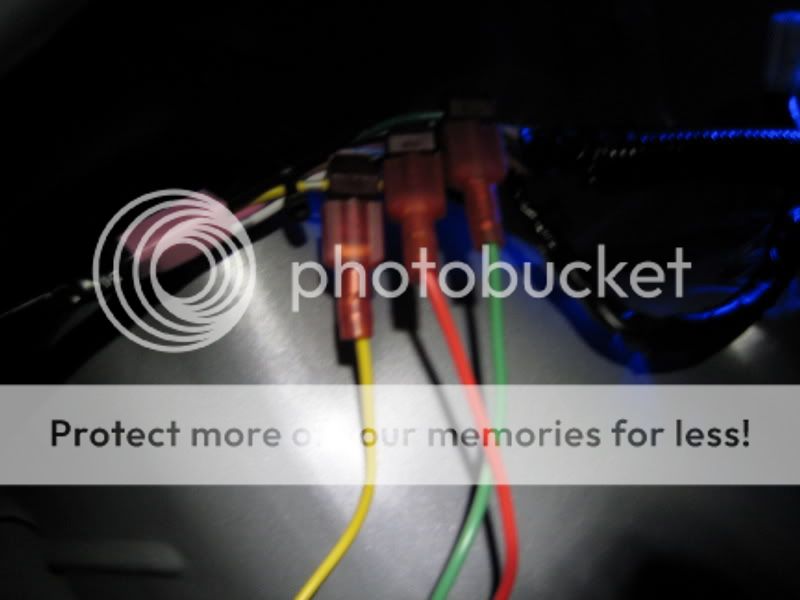
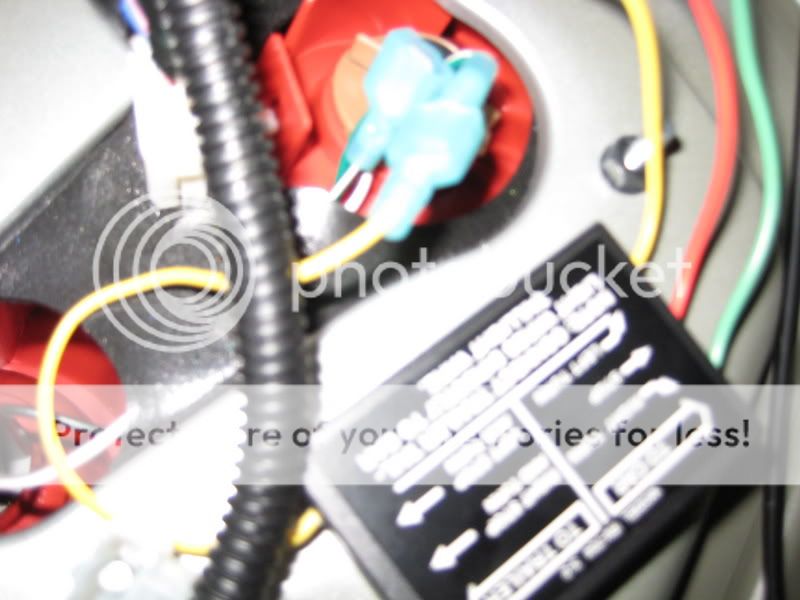

Senior Member
SL Member
Joined: Dec 2006
Posts: 596
From: Streamwood, IL
This really isn't that complicated. It's a dual filament bulb, so there should be two positives and a ground. On the turn signals, you have a positive and a negative.
Get one of these:
http://www.acehardware.com/sm-hoppy-...i-1288819.html

Wire up the two postives from the turn signals to the left and right turn signal input (Make sure you wiring the correct left and right to the left and right) on the converter. Hook up the positive from the brake light (NOT the positive for the parking lights) to the brake input on the converter. You won't need the 'tail' input on the converter as it's just a pass through.
Now hook the left and right turn/brake cables to the brake wire leading to the bulb. And you're good to go! :D
Of course, if you want me to do it for you, just let me know. I'll make sure to get the "Sponsored by Dustin's garage" vinyl stickers ready.
Get one of these:
http://www.acehardware.com/sm-hoppy-...i-1288819.html
Wire up the two postives from the turn signals to the left and right turn signal input (Make sure you wiring the correct left and right to the left and right) on the converter. Hook up the positive from the brake light (NOT the positive for the parking lights) to the brake input on the converter. You won't need the 'tail' input on the converter as it's just a pass through.
Now hook the left and right turn/brake cables to the brake wire leading to the bulb. And you're good to go! :D
Of course, if you want me to do it for you, just let me know. I'll make sure to get the "Sponsored by Dustin's garage" vinyl stickers ready.

Senior Member
SL Member
Joined: Dec 2006
Posts: 596
From: Streamwood, IL
I tried to think the 5-pin relay through as well. The problem was using the normally closed side of the relay from the brakes, only gets energized when you have the brake pedal pressed. In other words, if you just hit the signal without the brakes, you wouldn't get anything. This is assuming you're using the signal input to switch the relay.
I think the easiest way would be the method I posted above. No relays, no hyperflashing.
I think the easiest way would be the method I posted above. No relays, no hyperflashing.
Senior Member
Team Hamster
SL Member
Team ScioNRG
Joined: Dec 2006
Posts: 898
From: Burlington, MA
Originally Posted by theunclesam
This really isn't that complicated. It's a dual filament bulb, so there should be two positives and a ground. On the turn signals, you have a positive and a negative.
Get one of these:
http://www.acehardware.com/sm-hoppy-...i-1288819.html
Wire up the two postives from the turn signals to the left and right turn signal input (Make sure you wiring the correct left and right to the left and right) on the converter. Hook up the positive from the brake light (NOT the positive for the parking lights) to the brake input on the converter. You won't need the 'tail' input on the converter as it's just a pass through.
Now hook the left and right turn/brake cables to the brake wire leading to the bulb. And you're good to go! :D
Of course, if you want me to do it for you, just let me know. I'll make sure to get the "Sponsored by Dustin's garage" vinyl stickers ready.
Senior Member
SL Member
Joined: Dec 2006
Posts: 596
From: Streamwood, IL
The only problem you were having was the hyperflashing right? If so, all you need is one of these:
http://www.superbrightleds.com/cgi-b...gi?product=CAR
^^ Go to the page above, scroll down to the LED bulb Flasher Unit, change the drop down to CF18-08.
http://www.superbrightleds.com/cgi-b...gi?product=CAR
^^ Go to the page above, scroll down to the LED bulb Flasher Unit, change the drop down to CF18-08.
Senior Member
Team Hamster
SL Member
Team ScioNRG
Joined: Dec 2006
Posts: 898
From: Burlington, MA
I wasn't using any LEDs so why would it require that unit?
Why would your solution a couple posts above be any different than what I did? What you explained is exactly what I did. I wired the output of the converter to the brake wire going into the dual filament bulb. During my test my headlights were on and the turns worked fine (i.e. parking lights caused no interference). When I depressed the brake the turns blinked fast.
I'm just lost how your solution would cause a different result than mine. Feel me?
Senior Member
SL Member
Joined: Dec 2006
Posts: 596
From: Streamwood, IL
Originally Posted by powerofSHN
I wasn't using any LEDs so why would it require that unit?
Why would your solution a couple posts above be any different than what I did? What you explained is exactly what I did. I wired the output of the converter to the brake wire going into the dual filament bulb. During my test my headlights were on and the turns worked fine (i.e. parking lights caused no interference). When I depressed the brake the turns blinked fast.
I'm just lost how your solution would cause a different result than mine. Feel me?
Why would your solution a couple posts above be any different than what I did? What you explained is exactly what I did. I wired the output of the converter to the brake wire going into the dual filament bulb. During my test my headlights were on and the turns worked fine (i.e. parking lights caused no interference). When I depressed the brake the turns blinked fast.
I'm just lost how your solution would cause a different result than mine. Feel me?
The only downside to my method is that you will not know if your bulb is blown. Even if the blub blows, the turn signals will still blink normally. Most manufacturers use the hyperflashing as a way to tell the driver a bulb is blown.
So basically Maria, you need the taillight converter posted above, and the LED flasher unit I posted. Then you should be good to go.
Senior Member
Team Hamster
SL Member
Team ScioNRG
Joined: Dec 2006
Posts: 898
From: Burlington, MA
Hmm okay. So if the flasher unit will help than I do appreciate the assistance.
Maybe I'm missing something, but I still don't see how your method is different than what I did. I don't care that my doesn't work and I'm not taking anything personal, I'm just confused how you keep talking about your's working fine yet I did the exact same thing and mine didn't.
Maybe I'm missing something, but I still don't see how your method is different than what I did. I don't care that my doesn't work and I'm not taking anything personal, I'm just confused how you keep talking about your's working fine yet I did the exact same thing and mine didn't.
Senior Member
SL Member
Joined: Dec 2006
Posts: 596
From: Streamwood, IL
I didn't try my method, so I was assuming the converter unit didn't add any measurable amount of resistance to the circuit. Apparently it does and that's why you got the hyperflashing. I didn't read all they way through your method, but if you did the same wiring setup I did, then it should work (pending the use of the LED flasher unit).
BTW, if yours is the same, having the parking lights on or off should make no difference as you are not touching this circuit.
To test , do the following with the parking lights off:
1. Turn signals each way by themselves (right turn, left turn) Should flash normally
2. Hazard lights on (Should flash normally)
3. Brake depressed, turn signals on each way (Should hyperflash)
If this is the case, you need the flasher unit I posted.
Senior Member
Team Hamster
SL Member
Team ScioNRG
Joined: Dec 2006
Posts: 898
From: Burlington, MA
Lol yeah I was writing some long posts so I can see how someone wouldn't read the whole thing (and probably why nobody responded to my update on Friday). My bad. :D
So yes I did the exact same method as you described and it must add enough resistance to the circuit to cause the hyperflash.
I only mentioned having the parking lights on to help identify that I hooked the output of the converter to the proper wire on the brake light bulb (in my quest to get you on the same page, lol). I know it shouldn't have touched the parking light circuit, and it clearly had no effect as expected.
My car is currently in the shop so I can't retest the setup, but watch the video I took to see how I tested it last week (all with the parking lights on; only left taillight wired up):
Based on what you're saying, the flasher is needed. Now the next question is how to wire in the flasher. Do you know how to do that?
Senior Member
SL Member
Joined: Dec 2006
Posts: 596
From: Streamwood, IL
The flasher just replaces the stock one. It's located in the same panel as the fuses next to the driver's left knee. I think the stock one is blue. You just pull it out and replace it with the one above.
I have replaced all my turn signals with LEDs, so I use the flasher unit above. I have TYCs, so I'm not sure I could do a good test with the converter.
Anyways, Maria, our two methods should work for you. Wire in the converter as powerofSHN did, and then get the flasher unit I posted to get rid of the hyperflashing. That should put you on your way!
Senior Member
Team Hamster
SL Member
Team ScioNRG
Joined: Dec 2006
Posts: 898
From: Burlington, MA
The flasher is just a simple plug-n-play? Nice. Only one flasher is needed and will work for both turns correct?
Perhaps I'll order one today and do the final test next week sometime.
Perhaps I'll order one today and do the final test next week sometime.

Senior Member
Team Hamster
SL Member
Team ScioNRG
Joined: Dec 2006
Posts: 898
From: Burlington, MA
I won't have my car back from the shop until the end of next week at the earliest. I did order the flasher though which I should definitely have in hand when I get my car back. I'll test it out and post up the results.
Flint Mica painted tails will ensue shortly after. :D
Flint Mica painted tails will ensue shortly after. :D