DIY: Tenzo R Cold Air Intake installation guide 07+ tC
 06-15-2008, 05:57 AM
#1
Senior Member
SL Member
Thread Starter

Join Date: Sep 2007
Location: Houston, TX
Posts: 102
Hello, I just bought a Tenzo R Cold Air Intake system for my '08 tC. Tenzo R is new in the CAI market, but is known long since for their racing wheels, seats, etc... First off, this CAI is not the easiest to install. It also has major issues with fitting with the stock parts. It took my cousins and I a couple hours from start to finish.
Let's begin!
1) Check to make sure you have everything. There should be two tubes both 3inch in diameter and with a sexy gunmetal color. You will also find a couple accessories (4 rings, some bolts and washers, 2 rubber extension pieces) and the air filter (which is not yet oiled--I would suggest going out and buying some oil before taking apart your car!)


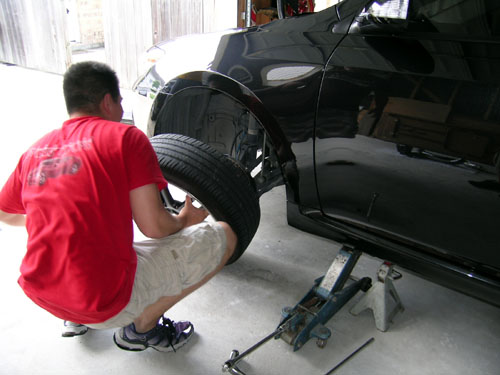
2) Begin by lifting up your '07+ tC and removing the wheels
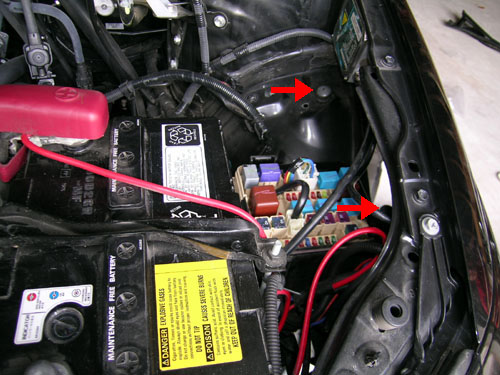
3) Take out the negative side of the battery just in case. Remove the engine cover and I also find that it is easier to access the inside of the engine if you remove the top compartment cover as you would when installing a TRD strut bar. A quick run through in how to do this: remove the wipers first then find 2 plugs on each side of the compartment and push the center piece down then pop those plugs out. There one hook on each end of the cover that has a pin holder, push those out. Look in the middle for 2 pin holders and 4 hooks--pop those up and remove the compartment.

4) Unhook the tubes that are held in place near the back of the stock air tube.
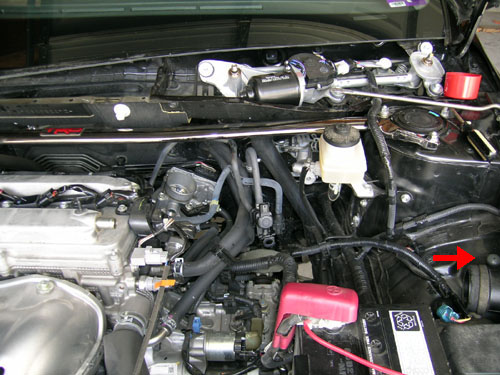
5) Remove the electricity plugs for the MAF sensor and the other sensor (not sure what it is called).

6) Unscrew and remove the MAF sensor.

7) Remove the stock air box. There are a 3 screws on the inside of the air box.

8 ) Remove the other sensor. It is kind of hard to get it out. Use some WD-40 if you need to loosen it up. Pry it straight up.

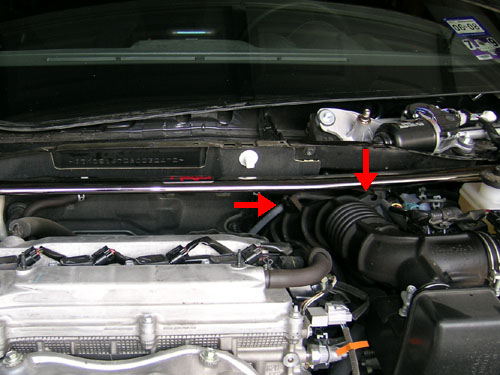
9) Remove the hose that connects to the engine. Then unscrew the bolts all the way in the back behind the engine that connects the stock air tube. There are (2) screws.

10) Now you have a roomy engine. Remove the last stock air tube that goes into the fender. There are 2 non-removable plastic screws holding it in place. One is right there, the other is very hard to reach. I find that removing the fuse box allows more access to it. Just loosen the screws and pull the tube up and outwards.
Now for installing the CAI.
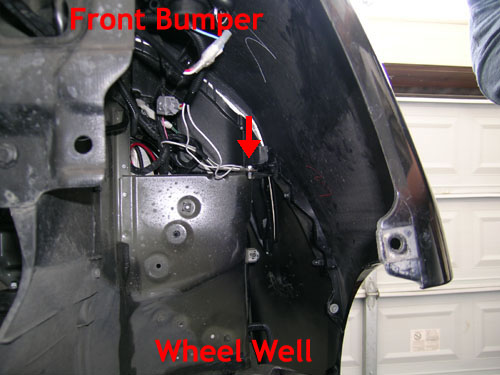
11) Remove the front wheel well cover. I did not remove the bumper. However, I do not think it would make that much of a difference because there is still a metal piece that juts inwards from the fender. I only removed half of the wheel well cover and pushed it back. There are a couple screws and plugs you gotta take out as well as some underneath the front bumper cover.

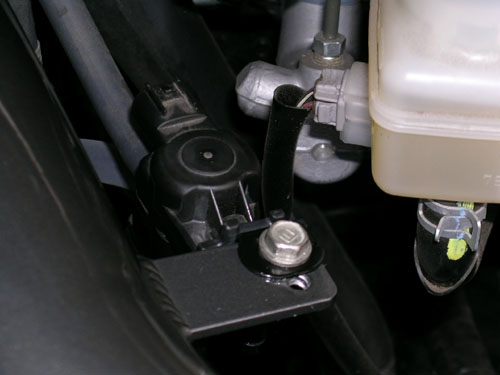
12) Locate the Ground Bolt. This is where you will screw on the hook from the bottom CAI tube.
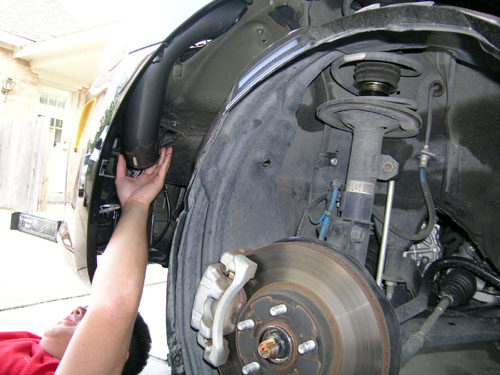
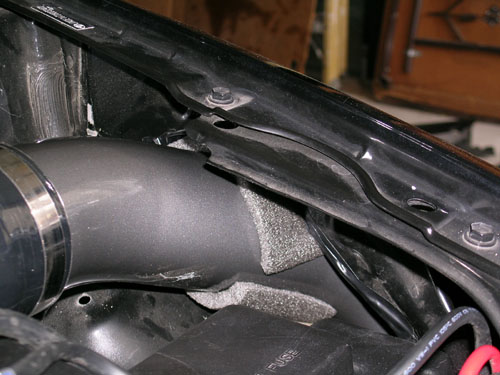
13) This is the hardest part--getting the tube through the fender wall. I highly suggest taping the upper portion of the tube up to keep it from scratching. Also tape up the corners of the fender wall where the tube will pass through. Wiggle it in first and move it around to see if you can find the correct placement. You will have to use some force to push the tube in. Because of the 3inch diameter of the pipe, this will be extremely hard, but not impossible. (Again, you can take off the bumper to see if it will help--I left my bumper on).

14) Once the tube is in, screw in the hooks to the ground bolt. I tried both ways (in front and behind the ground bolt. It doesn't matter which way you do it, you will still have the same problem which will be mentioned later). You will replace the entire stock ground bolt with the plug and screws that come with the CAI. DO NOT tighten the bolts all the way yet.


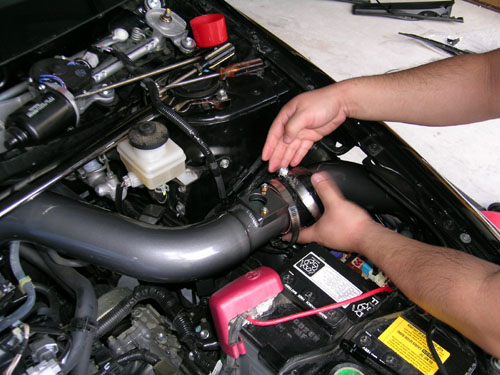
15) Now connect the upper tube (which can be converted to short ram--just skip all the steps before this to leave out the bottom tube). You will use the smaller connecting peice with the smaller ring for the inside portion behind the engine. Connect the hose from the engine to the CAI. Then connect the main tube with the lower tube the same way. Use two larger rings for this.

16) You will now find a major problem with the Tenzo R CAI. The metal piece is not long enough to reach the body...even with the rubber extension piece! As mentioned before, I tried moving the bottom CAI mount pieces to the other side of the Grounding Bolt, but it still does not fit... it actually moves it more away! And due to it's huge diameter, it barely has any room to move in the fender wall. We left it hanging for now.


17) Now you will find yet ANOTHER problem! The 2nd sensor does NOT fit into the holes on top! The stock piece was rubber so it could bend and fit in. But the CAI is metal and the holes DO NOT align up correctly. There is no way this thing was going to fit in (you already saw how hard it was to remove it from the rubber stock piece.) We decided to screw it in from the bottom instead. So, go find an extra screw and that should be good enough to hold it in place.
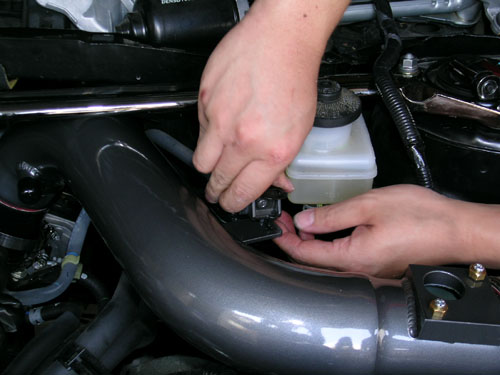
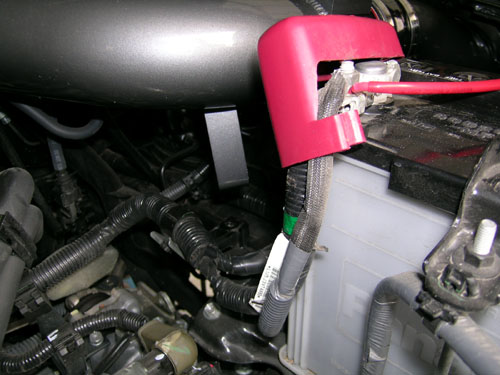
18 ) Connect the MAF sensor and then connect the electric wires to both the MAF sensor and the other sensor.

19) Now back to the dangling tube. I would highly recommend purchasing Doctor Isotope's CAI mounts. I have purchased one from him, but it will be coming in later and I was just too eager to put my CAI on so I could not wait. For now, I cut up some pieces of PVC pipe covers and pushed it into the fender wall to hold the CAI in place so it would not move.
20) You are now done! Go back and put on the air filter. Remember, it is not oiled yet so you should/must oil it first! Make sure everything is connected again and screw back everything on tight. Plug the negative side of the battery back in, wheels back on, lower the car, and reprogram your windows, etcs...

21) Add in the Tenzo R Air Intake System sticker for an extra 5HP!

Overall, this CAI is a hassle to deal with. There are major fitment issues and just the size of the pipe makes it hard to work with. I am not sure if there will be a CEL problems yet, but will update if it comes up.
Pros: Cheap, Can be converted to Short Ram, Gunmetal color.
Cons: Major fitment issues! (if using short ram, you should not have a problem with anything though.)
Let's begin!
1) Check to make sure you have everything. There should be two tubes both 3inch in diameter and with a sexy gunmetal color.
2) Begin by lifting up your '07+ tC and removing the wheels
3) Take out the negative side of the battery just in case. Remove the engine cover and I also find that it is easier to access the inside of the engine if you remove the top compartment cover as you would when installing a TRD strut bar. A quick run through in how to do this: remove the wipers first then find 2 plugs on each side of the compartment and push the center piece down then pop those plugs out. There one hook on each end of the cover that has a pin holder, push those out. Look in the middle for 2 pin holders and 4 hooks--pop those up and remove the compartment.
4) Unhook the tubes that are held in place near the back of the stock air tube.
5) Remove the electricity plugs for the MAF sensor and the other sensor (not sure what it is called).
6) Unscrew and remove the MAF sensor.
7) Remove the stock air box. There are a 3 screws on the inside of the air box.
8 ) Remove the other sensor. It is kind of hard to get it out. Use some WD-40 if you need to loosen it up. Pry it straight up.
9) Remove the hose that connects to the engine. Then unscrew the bolts all the way in the back behind the engine that connects the stock air tube. There are (2) screws.
10) Now you have a roomy engine. Remove the last stock air tube that goes into the fender. There are 2 non-removable plastic screws holding it in place. One is right there, the other is very hard to reach. I find that removing the fuse box allows more access to it. Just loosen the screws and pull the tube up and outwards.
Now for installing the CAI.
11) Remove the front wheel well cover. I did not remove the bumper. However, I do not think it would make that much of a difference because there is still a metal piece that juts inwards from the fender. I only removed half of the wheel well cover and pushed it back. There are a couple screws and plugs you gotta take out as well as some underneath the front bumper cover.
12) Locate the Ground Bolt. This is where you will screw on the hook from the bottom CAI tube.
13) This is the hardest part--getting the tube through the fender wall.
14) Once the tube is in, screw in the hooks to the ground bolt. I tried both ways (in front and behind the ground bolt. It doesn't matter which way you do it, you will still have the same problem which will be mentioned later). You will replace the entire stock ground bolt with the plug and screws that come with the CAI. DO NOT tighten the bolts all the way yet.
15) Now connect the upper tube (which can be converted to short ram--just skip all the steps before this to leave out the bottom tube). You will use the smaller connecting peice with the smaller ring for the inside portion behind the engine. Connect the hose from the engine to the CAI. Then connect the main tube with the lower tube the same way. Use two larger rings for this.
16) You will now find a major problem with the Tenzo R CAI. The metal piece is not long enough to reach the body...even with the rubber extension piece!
17) Now you will find yet ANOTHER problem!
18 ) Connect the MAF sensor and then connect the electric wires to both the MAF sensor and the other sensor.
19) Now back to the dangling tube. I would highly recommend purchasing Doctor Isotope's CAI mounts. I have purchased one from him, but it will be coming in later and I was just too eager to put my CAI on so I could not wait. For now, I cut up some pieces of PVC pipe covers and pushed it into the fender wall to hold the CAI in place so it would not move.
20) You are now done! Go back and put on the air filter. Remember, it is not oiled yet so you should/must oil it first! Make sure everything is connected again and screw back everything on tight. Plug the negative side of the battery back in, wheels back on, lower the car, and reprogram your windows, etcs...
21) Add in the Tenzo R Air Intake System sticker for an extra 5HP!
Overall, this CAI is a hassle to deal with. There are major fitment issues and just the size of the pipe makes it hard to work with. I am not sure if there will be a CEL problems yet, but will update if it comes up.
Pros: Cheap, Can be converted to Short Ram, Gunmetal color.
Cons: Major fitment issues! (if using short ram, you should not have a problem with anything though.)

 06-15-2008, 08:38 PM
#3
Senior Member
SL Member

Join Date: Jan 2005
Location: Palmdale, CA
Posts: 129
I've contacted tenzo and I took my car and showed them the problems that I was having with the intake, they would contact me on what they are going to do. I ask them if there will be a recall and they said that they might if others keep on having the same issues.
I have my intake set up for short ram because I just can't fit the tubing inside the fender.
I have my intake set up for short ram because I just can't fit the tubing inside the fender.
06-16-2008, 12:35 AM
#4
Senior Member
SL Member
Thread Starter
Join Date: Sep 2007
Location: Houston, TX
Posts: 102
yea, fitting the lower tube into the fender wall was really hard. if you look closely, you'll see i scratched it up badly. that's why i suggest you guys to tape up your pipe and the edge of the fender wall to reduce the damage that might incur.
major fail on fitment indeed.
major fail on fitment indeed.
 06-16-2008, 04:35 AM
#6
Senior Member
SL Member
Join Date: Jan 2005
Location: Palmdale, CA
Posts: 129
I know I scratch the crap out of mine I was just frustrated on how it went. There was no test fitting at all, when I talked to the guys they just took another competitor intake and went to production. I offered to loan my car to them to test fit since I already have the intake installed, so I just waiting on whats going to happen.
 06-16-2008, 06:39 AM
#11
Senior Member
SL Member
Join Date: Jan 2005
Location: Palmdale, CA
Posts: 129
We will see whats going to happen. I know that when I went to tenzo it wasn't a shop just a distribution center. So they really didn't have the tools to work on the car, but they took a look and snap some pictures of the problems that I was having and looks like others also. So we will see whats going on.
06-21-2008, 02:12 AM
#12
Junior Member

Join Date: Jun 2008
Posts: 12
Great write up and pics! I just installed this on the Scion today and I had the same problems you ran into. lets all hope Tenzo recalls these and fixes the issues...
BTW the wrap is a good idea on the fender there.. Im going to have to give that a try until I can find a better solution.
BTW the wrap is a good idea on the fender there.. Im going to have to give that a try until I can find a better solution.

 06-24-2008, 05:54 AM
#17
Senior Member
SL Member
Thread Starter
Join Date: Sep 2007
Location: Houston, TX
Posts: 102
okay, so i am getting a bit frustrated. i called and then emailed them. the only reply i got was them saying thankyou for the pictures and writeup and that they, "hope that we can help others with it."
i emailed them back asking what about me, your current customer?
no response...
i emailed them back asking what about me, your current customer?
no response...