
DIY: LEDs in cupholders. Lots of pics. Very detailed.


Thread Starter
Senior Member
SL Member
Joined: Mar 2007
Posts: 283
I know this DIY write-up has already been done, but I wanted to do it a little differently so i figured I'd take some pictures and make a DIY. This will only cover putting LEDs in the cup holders. I also wanted to wire the LEDs to the cigarette lighter in the center console as well as hide my switch in there. So here it is.
Do this at your own risk. I have made these instructions as complete and detailed as possible but there is always the possibility of a problem.
Materials Needed:
- 2 LEDs (obviously� I�m using rectangular LEDs but you can use the round ones if you like)
- 20 gauge Wire (preferably stranded)
- A switch (make sure it�s a smaller switch or you will have some problems� I�ll explain later)
- 330 ohm � watt 5% resistors
- 26 � 22 gauge butt connectors
- Super glue
- Razorblade (or drill if you are using round LEDs)
Take apart your center console by first putting your shifter in neutral and unscrewing the ****. Pull off the piece with the shifter boot. Undo any wires to completely remove the piece or just let it hang. Your choice.
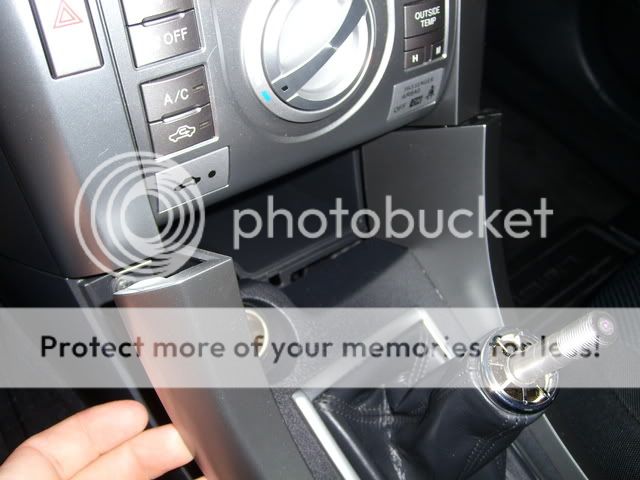
Then make sure your e-brake is on, grab the cup holder and pull upwards. You may need to use a little force but there isn�t any delicate parts that can break off so don�t worry.
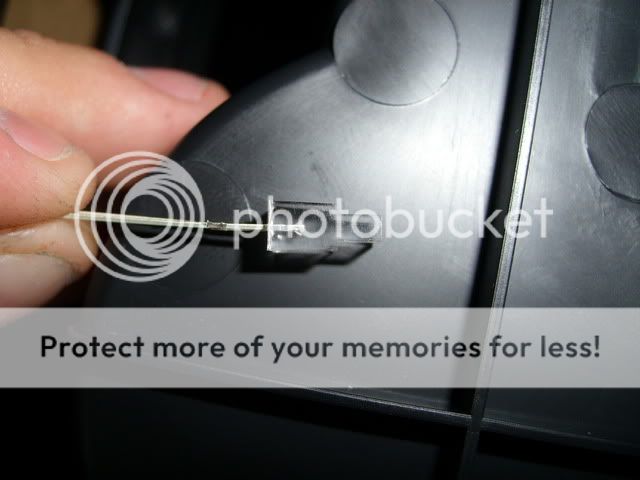
Now take the cup holder where you can work on it. Decide where you want your LEDs to go and mark it in pencil. Take your razorblade (or drill) and make the hole for the LED. For the rectangular LEDs I made the holes tight so the LEDs fit snugly. I suggest you do the same if you use round ones. Here is a picture of the LED. Cut the hole only as big as the upper, thinner part of the LED so the wide part will limit how far into the cup holder it will go.
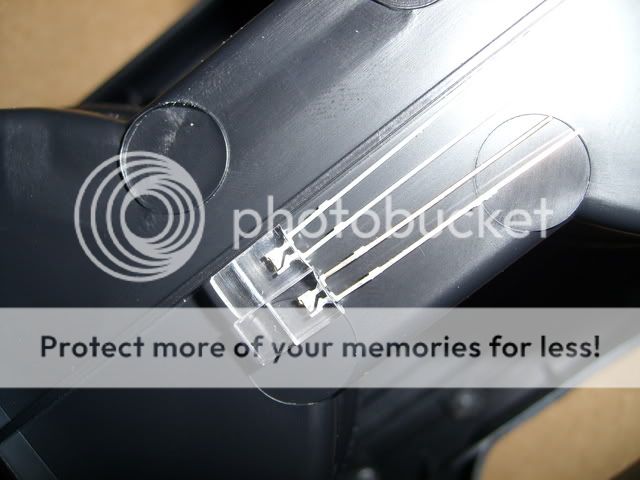
This is the led through the hole.

I didn�t like how far into the cup holder it went so I filed it down about a millimeter and then used a fine (2000 grit) sandpaper to make it perfectly smooth again while rounding the edges a little.
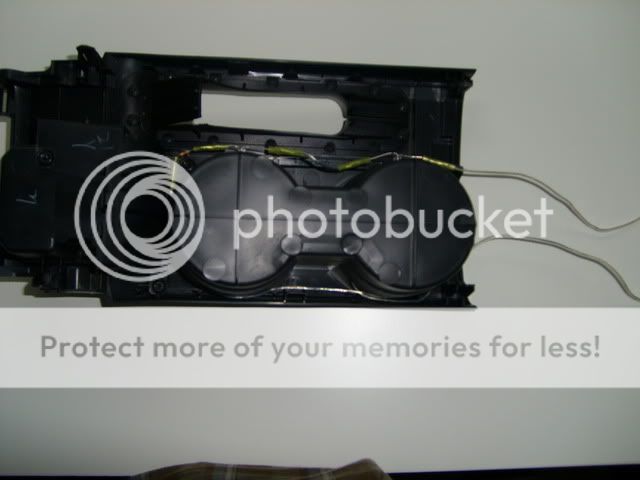
Now, I found it easier to do all the wiring before putting the LEDs into the holes. It should look like this.
The small piece of wire is about 2 inches.
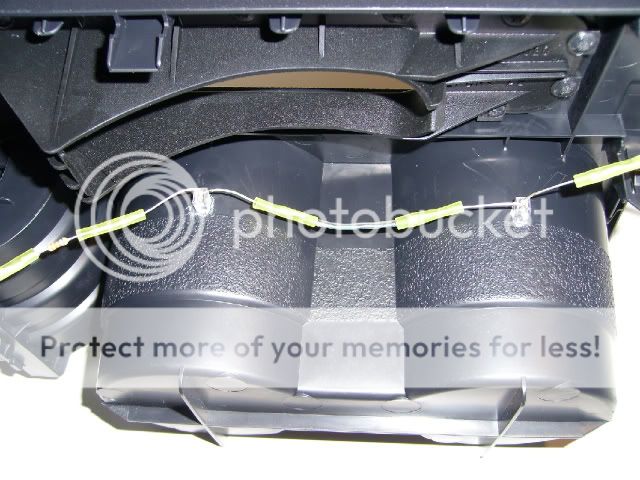
Now cut two more pieces of your 20 gauge wire. Make them long enough to reach the cigarette lighter. Strip the ends and crimp one in the butt connector of the resistor. Put a tiny amount of super glue on the outside of your holes and push the LEDs through and hold them until they stick.
Pull both wires toward the back of the cup holder so you can connect them to the cigarette lighter. Be careful you don�t leave any of the LED legs touching. To avoid any issues I pulled the wire all the way around. Another thing to keep an eye out for is the resistor touching anything. Pull the wire around like this and you shouldn�t have any problems. Plus, there are grooves to stuff the wire into so it stays put.
This is how you want the resistor to be positioned.
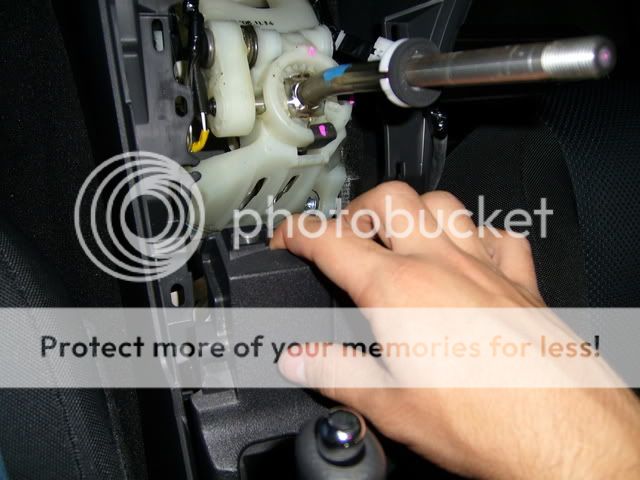
Pop out the plastic piece that holds your aux input, iPod input, and 12v cigarette lighter.
Then remove all of these plugs. The blue one is the aux, white is the 12v. Also, look just in front of the e-break and remove the iPod plug. Then carefully pull them through the center console and remove each set of wires from the small plastic piece. Like so.
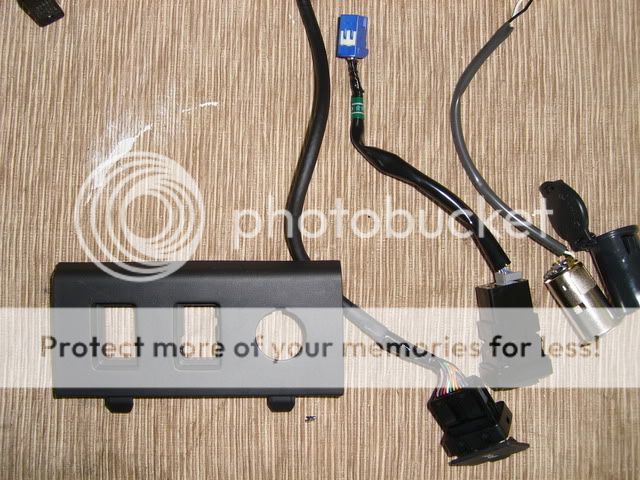
Drill a hole to fit your switch through. I put mine on the bottom corner but it can go anywhere that it will fit. I used a switch I had laying around which was fairly big so I had to cut more space for it to fit through. So get a small one. Mine already had wires coming out of it which saves a bunch of work. I believe I got it from home depot.
Loosen the small nut on the back of the 12v cigarette lighter and loop one wire from the switch around it and tighten it down. Make sure it�s under there good so it doesn�t come loose and also that it is not touching the black wire. Attach your switch to the plastic piece, put the cigarette lighter back in and put the whole thing back into the center console (the iPod and aux wires can be put back in later). Use another butt connector and attach the wire coming off your resistor to the other wire coming from your switch. (Again, if your switch doesn�t have wires coming off of it you will have to solder them on. Make them about 6 inches so you have a little slack. Also make sure the switch only has 2 prongs coming off the bottom.) Here is what you should have so far.

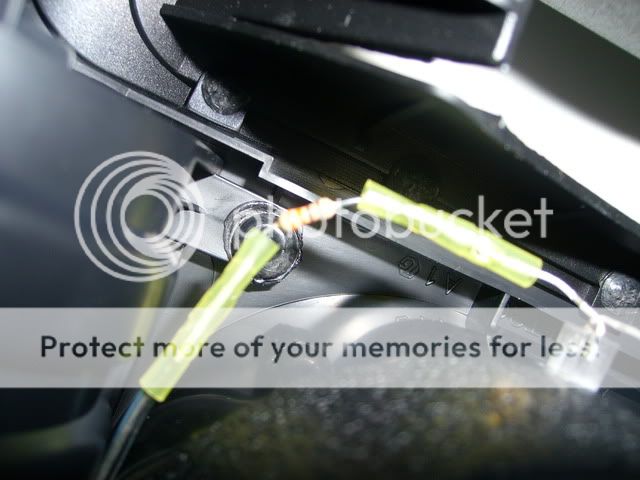
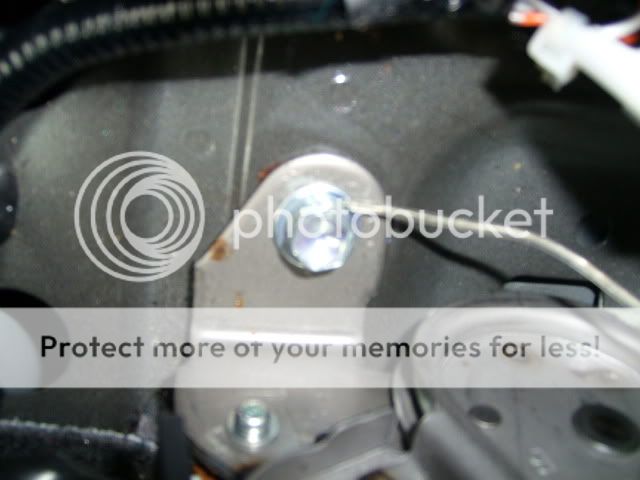
Find a good spot to attach your ground. I used the bolt holding my e-brake in place. Loosen it and take the only other wire coming from your LEDs and strip a little more than an inch off the end to expose bare wire. Wrap the bare wire around the bolt, preferable between the two washers and tighten the bolt back down.
Now your circuit is complete and this is probably a good time to test it. Plug the white plug back into the socket, turn your car to ON and toggle your switch. It should turn on and off. If it doesn�t, you made a mistake or your LEDs are bad. If they work, you�re done, put everything back together. Be sure your wires are neat and not excessively long so they don�t get caught on anything.
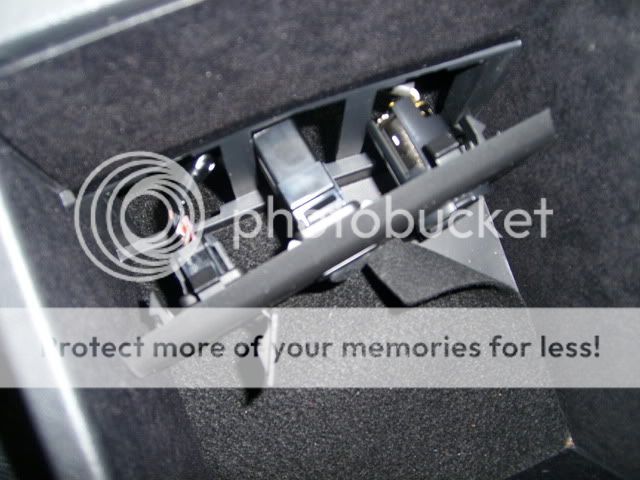
Here is a picture of my switch.
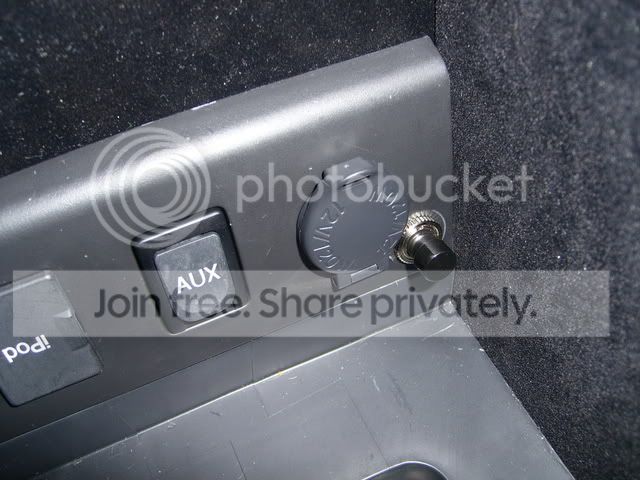
Yes I know my iPod cable is upside down. I didn�t realize I did that until I saw the picture.
This took about 2 hours. I spent a lot of time making the holes for the LEDs and keeping everything very neat. I would recommend using the round LEDs to cut down on time. I also had a few hiccups with the order I was putting everything back in and I had to undo my wires a few times. I m pretty sure I covered the order pretty well in here though. Good luck!
here are the pictures in the dark. my camera is crappy and it takes like 30 seconds to take pictures in the dark so they look WAYYY brighter than they are.


UPDATE: If your going to do this, make your holes lower into the cup holder. it will be just as bright. If you do it as i did above, you will light up your passenger with what ever color LED you use. Its not really bad but i personally don't like it that much.
Do this at your own risk. I have made these instructions as complete and detailed as possible but there is always the possibility of a problem.
Materials Needed:
- 2 LEDs (obviously� I�m using rectangular LEDs but you can use the round ones if you like)
- 20 gauge Wire (preferably stranded)
- A switch (make sure it�s a smaller switch or you will have some problems� I�ll explain later)
- 330 ohm � watt 5% resistors
- 26 � 22 gauge butt connectors
- Super glue
- Razorblade (or drill if you are using round LEDs)
Take apart your center console by first putting your shifter in neutral and unscrewing the ****. Pull off the piece with the shifter boot. Undo any wires to completely remove the piece or just let it hang. Your choice.
Then make sure your e-brake is on, grab the cup holder and pull upwards. You may need to use a little force but there isn�t any delicate parts that can break off so don�t worry.
Now take the cup holder where you can work on it. Decide where you want your LEDs to go and mark it in pencil. Take your razorblade (or drill) and make the hole for the LED. For the rectangular LEDs I made the holes tight so the LEDs fit snugly. I suggest you do the same if you use round ones. Here is a picture of the LED. Cut the hole only as big as the upper, thinner part of the LED so the wide part will limit how far into the cup holder it will go.
This is the led through the hole.
I didn�t like how far into the cup holder it went so I filed it down about a millimeter and then used a fine (2000 grit) sandpaper to make it perfectly smooth again while rounding the edges a little.
Now, I found it easier to do all the wiring before putting the LEDs into the holes. It should look like this.
The small piece of wire is about 2 inches.
Now cut two more pieces of your 20 gauge wire. Make them long enough to reach the cigarette lighter. Strip the ends and crimp one in the butt connector of the resistor. Put a tiny amount of super glue on the outside of your holes and push the LEDs through and hold them until they stick.
Pull both wires toward the back of the cup holder so you can connect them to the cigarette lighter. Be careful you don�t leave any of the LED legs touching. To avoid any issues I pulled the wire all the way around. Another thing to keep an eye out for is the resistor touching anything. Pull the wire around like this and you shouldn�t have any problems. Plus, there are grooves to stuff the wire into so it stays put.
This is how you want the resistor to be positioned.
Pop out the plastic piece that holds your aux input, iPod input, and 12v cigarette lighter.
Then remove all of these plugs. The blue one is the aux, white is the 12v. Also, look just in front of the e-break and remove the iPod plug. Then carefully pull them through the center console and remove each set of wires from the small plastic piece. Like so.
Drill a hole to fit your switch through. I put mine on the bottom corner but it can go anywhere that it will fit. I used a switch I had laying around which was fairly big so I had to cut more space for it to fit through. So get a small one. Mine already had wires coming out of it which saves a bunch of work. I believe I got it from home depot.
Loosen the small nut on the back of the 12v cigarette lighter and loop one wire from the switch around it and tighten it down. Make sure it�s under there good so it doesn�t come loose and also that it is not touching the black wire. Attach your switch to the plastic piece, put the cigarette lighter back in and put the whole thing back into the center console (the iPod and aux wires can be put back in later). Use another butt connector and attach the wire coming off your resistor to the other wire coming from your switch. (Again, if your switch doesn�t have wires coming off of it you will have to solder them on. Make them about 6 inches so you have a little slack. Also make sure the switch only has 2 prongs coming off the bottom.) Here is what you should have so far.
Find a good spot to attach your ground. I used the bolt holding my e-brake in place. Loosen it and take the only other wire coming from your LEDs and strip a little more than an inch off the end to expose bare wire. Wrap the bare wire around the bolt, preferable between the two washers and tighten the bolt back down.
Now your circuit is complete and this is probably a good time to test it. Plug the white plug back into the socket, turn your car to ON and toggle your switch. It should turn on and off. If it doesn�t, you made a mistake or your LEDs are bad. If they work, you�re done, put everything back together. Be sure your wires are neat and not excessively long so they don�t get caught on anything.
Here is a picture of my switch.
Yes I know my iPod cable is upside down. I didn�t realize I did that until I saw the picture.
This took about 2 hours. I spent a lot of time making the holes for the LEDs and keeping everything very neat. I would recommend using the round LEDs to cut down on time. I also had a few hiccups with the order I was putting everything back in and I had to undo my wires a few times. I m pretty sure I covered the order pretty well in here though. Good luck!
here are the pictures in the dark. my camera is crappy and it takes like 30 seconds to take pictures in the dark so they look WAYYY brighter than they are.
UPDATE: If your going to do this, make your holes lower into the cup holder. it will be just as bright. If you do it as i did above, you will light up your passenger with what ever color LED you use. Its not really bad but i personally don't like it that much.


Thread Starter
Senior Member
SL Member
Joined: Mar 2007
Posts: 283
Originally Posted by Jlowe
I like it better on the side actually. If you look right down into the cupholders, its illuminated and your not looking right down at the source of the light.
looks good!
looks good!
if there were in the bottom it would have lit the whole car. these LEDs are pretty bright.

Thread Starter
Senior Member
SL Member
Joined: Mar 2007
Posts: 283
Originally Posted by BZinn1
careul using wire nuts for connections in cars......shrink tubing works great and solder is best......I just never had good luck using them in cars.......

Senior Member
Scikotics
SL Member
Joined: Aug 2005
Posts: 666
From: Fishkill, Ossining, NY
you are actually never supposed to use wire nuts in car installations. You should have used a male/female quick disconnect on the wire.
Wire nuts can come off very easily in a car becuase of all the bumps and jolting from driving, if that wire nut comes off and it is a 12V source you can easily start a fire in the car, I don't think you want that.
Other than that, it looks really good.
Wire nuts can come off very easily in a car becuase of all the bumps and jolting from driving, if that wire nut comes off and it is a 12V source you can easily start a fire in the car, I don't think you want that.
Other than that, it looks really good.
Thread Starter
Senior Member
SL Member
Joined: Mar 2007
Posts: 283
Originally Posted by scioncraze05
you are actually never supposed to use wire nuts in car installations. You should have used a male/female quick disconnect on the wire.
Wire nuts can come off very easily in a car becuase of all the bumps and jolting from driving, if that wire nut comes off and it is a 12V source you can easily start a fire in the car, I don't think you want that.
Other than that, it looks really good.
Wire nuts can come off very easily in a car becuase of all the bumps and jolting from driving, if that wire nut comes off and it is a 12V source you can easily start a fire in the car, I don't think you want that.
Other than that, it looks really good.

Senior Member
Fail, INC
teamNJCT
Fresh Crew
SL Member
Joined: Dec 2007
Posts: 6,972
From: A dumpster
Originally Posted by Mikeydizzle
thats what i did. i didnt use a wire tap but its connected to the 12v source on the cigarette lighter.

Thread Starter
Senior Member
SL Member
Joined: Mar 2007
Posts: 283
if you put them directly in the bottom it will light up your whole car, especially with the blue. its completely your preference though. i would just roughly wire them up and sit them in the bottom of your cup holders pointing up and see how you feel about it. I'm actually thinking about painting the top half of the leds with a little black touch up paint because they are so bright.
