
Hornet 727T installation in 2005 TC. Dial-up fear this!

Thread Starter
Senior Member
SL Member
Joined: Nov 2004
Posts: 230
From: Miramar, FL
Over this past weekend I have installed an alarm in my TC. I really like having the remote buttons integrated into the key because I hate carrying things in my pocket. I installed this alarm because I wanted to increase the security features without an extra remote. This alarm seemed to fit the bill. I have no idea how much this retails for, but I assume it's in the $60 - $100 price range. Crutchfield sells a Crime Guard alarm which does the same thing for $100 without sensor.
My purpose for posting this is not to educate the world on alarm installation. If you do not have the proper tools, you can cause some very expensive damage to the car. Professional installation is far cheaper than the cost of these repairs! If you are comfortable with installation, perhaps these photos will make your job easier.
Some of the things that I have done in the installation are not necessarily the only way to do it, but my installation was not conventional. If you have any questions about my experiences, feel free to ask. I did not take photos of everything like siren location, alarm brain location, LED location and valet switch location. Sharing some of these things on the internet would be counter to my efforts of trying to hide them away. The installation of an alarm can make or break it's effectiveness!
Here's the diagram:

The wires I did not use for this installation are:
Yellow/Black
Voilet/Black
Gray
Dook lock outputs (green and blue)(yet)
Optional sensor input plug
White/Blue
Black/White
Violet
Red/White (yet)
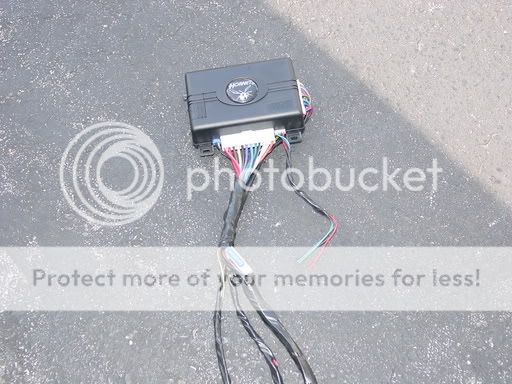
After cutting short all the wires I would never use and harnessing together all the wires that I would into location groups, the alarm brain looked like this:
The horn wire, power and ignition can all be found at the steering colum. Here's the plug with ignition and constant +12V:

It will be plugged into the key cylinder.
In this case, the colors match (ignit yellow, constant red). The alarm does not come with a fuse holder (lame) so you're going to want to add one:

The horn wire is white with silver trace. The brown wire on the smaller plug on the brain gets connected to it. It can be located on this small black plug:


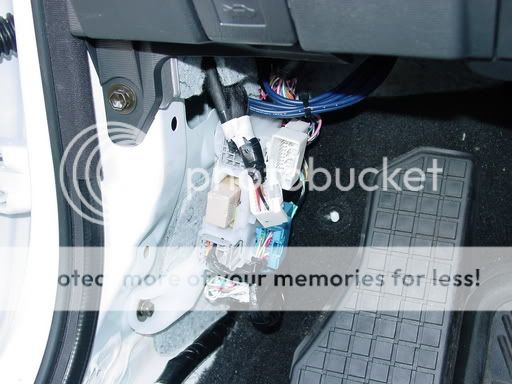
If you were doing a standard type alarm with door locks, the negative trigger wires are here in the drver's kick (these were not wires I used for the 727T):
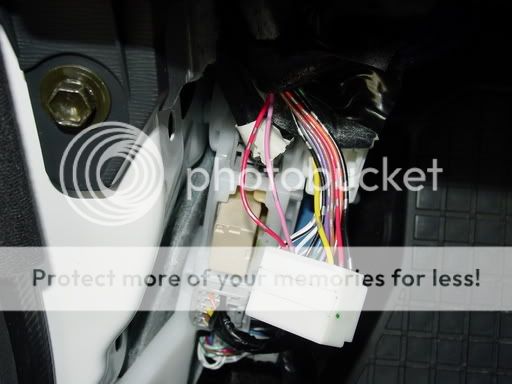
These wires located int he same area on in the gray plug is what I used for arm/disarm signal input (green and blue from the big plug on the brain):
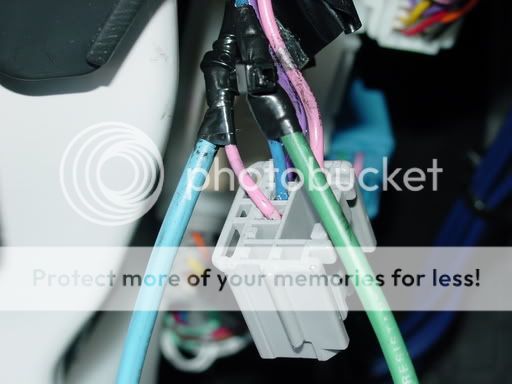
The red wire (small plug) needs to be connected to the passenger side door lock motor. It's located in the passenger side kick panel, unfortunately, I forgot to note it. It will be on the gray plug and will pulse +12V only when you hit the remote a second time to unlock the passenger door:

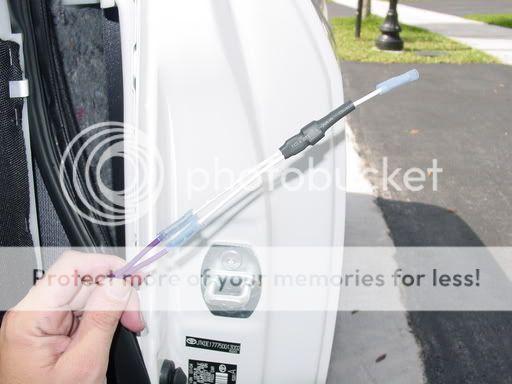
For door trigger, I went directly to the door pins and diode isolated them. The 727T comes with diodes for light flash connections in european cars (seperated left and right). Due to the fact that Scion uses negative trigger door pins, this diode set up works as well. **NOTE** The alarm connection is the green wire. Do not connect to the violet wire! The two door wires are shown here conneted to the diodes. What is not shown is the connection to the alarm (green wire) and the connections to the actual door pins. You can find the door wires in the kicks as well:
If you own a 5spd, started disable wont do you much good. Bad guys usually work in groups. once the steering lock is broken and ignition wires are energized, the other guy bumps it with another car and they pop the clutch. I decided to do a fuel pump cut off instead. It is not recommended to interupt any wire except the starter. If the circuit fails loss of control can occur if the car is in motion! The wires are located under the rear seat, the larger black wire is the one you want (wired through the supplied relay):
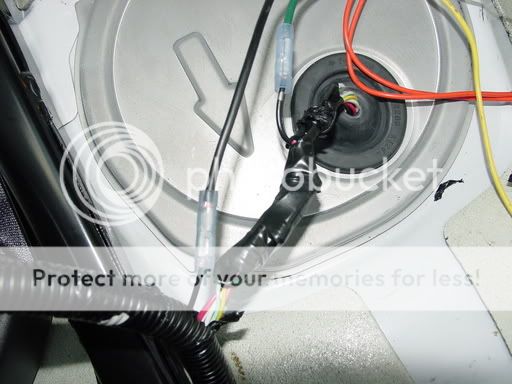
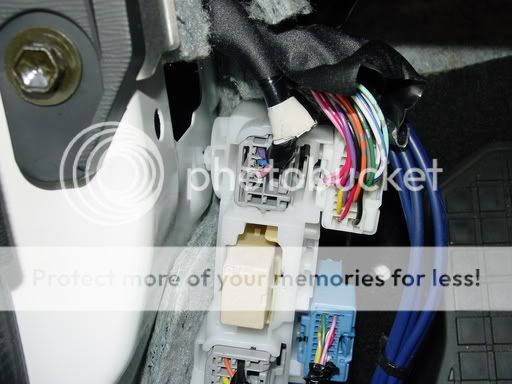
For trunk trigger, I simply tapped the trunk light. Connect the blue wire (on the large plug) to the red wire (or is it pink?):

This alarm had a dual stage shock sensor built into the brain which saves some install time. There is a harness designed for additional sensors. Adding a glass-break sensor would be a nice touch. A hood pin is not included (very lame) but should be added as this is usually the first place the bad guys attack. Once under the hood, the siren can be destroyed (usually with a big rock) or the power disconneted. This is one of the reasons I did not mount the siren under the hood! I plan on posting updates to this installation.
Here is what is on the agenda:
Window control
Sunroof control
Pager
Battery back-up
Remote Start (not intended for manual trans) ;)
Stay tuned for updates!
My purpose for posting this is not to educate the world on alarm installation. If you do not have the proper tools, you can cause some very expensive damage to the car. Professional installation is far cheaper than the cost of these repairs! If you are comfortable with installation, perhaps these photos will make your job easier.
Some of the things that I have done in the installation are not necessarily the only way to do it, but my installation was not conventional. If you have any questions about my experiences, feel free to ask. I did not take photos of everything like siren location, alarm brain location, LED location and valet switch location. Sharing some of these things on the internet would be counter to my efforts of trying to hide them away. The installation of an alarm can make or break it's effectiveness!
Here's the diagram:
The wires I did not use for this installation are:
Yellow/Black
Voilet/Black
Gray
Dook lock outputs (green and blue)(yet)
Optional sensor input plug
White/Blue
Black/White
Violet
Red/White (yet)
After cutting short all the wires I would never use and harnessing together all the wires that I would into location groups, the alarm brain looked like this:
The horn wire, power and ignition can all be found at the steering colum. Here's the plug with ignition and constant +12V:
It will be plugged into the key cylinder.
In this case, the colors match (ignit yellow, constant red). The alarm does not come with a fuse holder (lame) so you're going to want to add one:
The horn wire is white with silver trace. The brown wire on the smaller plug on the brain gets connected to it. It can be located on this small black plug:
If you were doing a standard type alarm with door locks, the negative trigger wires are here in the drver's kick (these were not wires I used for the 727T):
These wires located int he same area on in the gray plug is what I used for arm/disarm signal input (green and blue from the big plug on the brain):
The red wire (small plug) needs to be connected to the passenger side door lock motor. It's located in the passenger side kick panel, unfortunately, I forgot to note it. It will be on the gray plug and will pulse +12V only when you hit the remote a second time to unlock the passenger door:
For door trigger, I went directly to the door pins and diode isolated them. The 727T comes with diodes for light flash connections in european cars (seperated left and right). Due to the fact that Scion uses negative trigger door pins, this diode set up works as well. **NOTE** The alarm connection is the green wire. Do not connect to the violet wire! The two door wires are shown here conneted to the diodes. What is not shown is the connection to the alarm (green wire) and the connections to the actual door pins. You can find the door wires in the kicks as well:
If you own a 5spd, started disable wont do you much good. Bad guys usually work in groups. once the steering lock is broken and ignition wires are energized, the other guy bumps it with another car and they pop the clutch. I decided to do a fuel pump cut off instead. It is not recommended to interupt any wire except the starter. If the circuit fails loss of control can occur if the car is in motion! The wires are located under the rear seat, the larger black wire is the one you want (wired through the supplied relay):
For trunk trigger, I simply tapped the trunk light. Connect the blue wire (on the large plug) to the red wire (or is it pink?):
This alarm had a dual stage shock sensor built into the brain which saves some install time. There is a harness designed for additional sensors. Adding a glass-break sensor would be a nice touch. A hood pin is not included (very lame) but should be added as this is usually the first place the bad guys attack. Once under the hood, the siren can be destroyed (usually with a big rock) or the power disconneted. This is one of the reasons I did not mount the siren under the hood! I plan on posting updates to this installation.
Here is what is on the agenda:
Window control
Sunroof control
Pager
Battery back-up
Remote Start (not intended for manual trans) ;)
Stay tuned for updates!


Junior Member
Joined: Feb 2005
Posts: 11
sorry this is off-topic but i cant seem to find answers anywhere else....
the red 12v Constant coming from the ignition, is that constant no matter whether the car is started and/or if the key is in the ignition (ACC or ON)
and... the red 12v Constant, can that wire be used to power switches on aftermarket lights requiring a 12v constant source for their switches? (ie PIAA lights)
again pardon my ignorance but i cant see to find the answers i seek...
thanks for your time
Thread Starter
Senior Member
SL Member
Joined: Nov 2004
Posts: 230
From: Miramar, FL
rampagesd
I use a Sony Mavica, not sure of the model# off hand, but it's the type that burns directly to small CD's. It's a large camera as far as digital cams go and is great for stills but not for action.
TheKnown:
I don't actually live in Miramar, that's where I work. I live very close to you in Parkland.
OptimusPrimeTC:
Constant means there is +12.5V available regardless of key position. With something high current like fog lights, I recommend going directly to the battery. Remember to always fuse your supply wires.
Junior Member
Joined: Feb 2005
Posts: 11
Thanks for the info.
The 12v wire it needs for the switch is independent of the 12v needed for the lights.... the lights are connected to the battery but the switch must then be spliced into another light's 12v constant wire... so that answered my question and i think solved my problem. Thanks!
The 12v wire it needs for the switch is independent of the 12v needed for the lights.... the lights are connected to the battery but the switch must then be spliced into another light's 12v constant wire... so that answered my question and i think solved my problem. Thanks!


Senior Member
SL Member
Joined: Jun 2006
Posts: 232
From: Glendale, AZ
sorry to bring up an old post, but how similar would these installation instructions be for an xB?
im looking to get this alarm put in but i would rather pay under a hundred bucks and install it myself than pay close to 200 bucks to have someone put it in for me
im looking to get this alarm put in but i would rather pay under a hundred bucks and install it myself than pay close to 200 bucks to have someone put it in for me

Senior Member
SL Member
Joined: Sep 2006
Posts: 232
thank you so much for this DIY! This has saved me a bunch of time and I just wanted to add that the driver's side door pin is colored orange w/silver stripes, and the passenger's side door pin is blue. Also - I'm not sure exactly how the diode part works but I think you have to splice into each door pin, then run that cable into the two-sided part of the diode (and then connect the single wire side of the diode to the green wire on the alarm system).

Junior Member
Joined: Nov 2009
Posts: 17
From: SW AR
On the one pic where the white plug is unplugged and it has the red and pink wire showing. Are those the wires we connect to lock and unlock the doors? I thought the colors that im suppose to look for are green and violet? Please help?

Junior Member
Joined: Nov 2009
Posts: 17
From: SW AR
Yeah I know. But from what I heard that the new viper alarm wont have the installation manual because DEI says its too complicated. So you will have to go to a dealer to get it install if you really want it. Kind of sucks if you know how to install alarms and stuff. Well thats what I heard.

Thread
Thread Starter
Forum
Replies
Last Post
reagan9000
Scion xA/xB 1st-Gen ICE & Interior
0
Jan 28, 2015 06:20 PM
minter66
PPC: Vehicles
0
Dec 15, 2014 01:45 PM
TheRedBox
Scion xA/xB 1st-Gen Drivetrain & Power
31
Dec 2, 2003 04:53 PM