
HOW TO: auto-dim your radio with sunlight


Hey guys a few days ago I completed a little mod I wanted to share.
Sometime ago I swapped out my Kenwood DNX5120 for a new Pioneer AVIX-X930BT. I absolutely love the new head unit but one of my only problems with it was how it dimmed. I had my Kenwood unit would dim the display and change the navigation color scheme to night mode based on time, the Pioneer unit however is not capable of this setting and dims whenever the parking lights are on. I usually drive with at least my parking lights and sometimes even my headlights on even if its daylight. This meant the unit was always dimmed and the navigation color scheme was always set to the white on black night color scheme. This was driving me crazy for sometime as during the day I could hardly read the screen to see what song was playing but I finally figured out a solution.
DEI, the company that makes Viper, Python, Clifford etc. makes a unit for making your headlights come on automatically based on daylight. Its the DEI 545T. Its a pretty cool unit that is capable of not only controlling your headlights based on sunlight, but you can also set it to turn them on with your windshield wipers or AUX outputs from your alarm. For information concerning actually using this unit for your headlights hit up google.I however reappropriated the unit to dim my radio.
For this how to I'll be assuming that this is not your first wiring project and that you have some experience either soldering or using crimp connectors
This is what you get in the box:
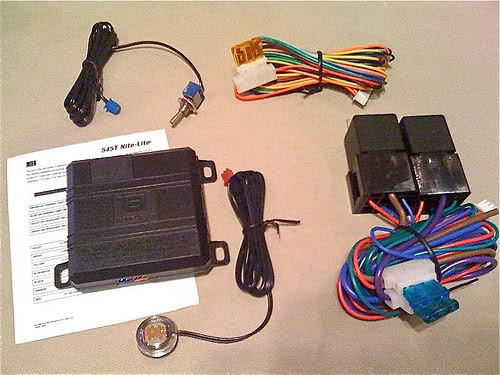
Included is control module, an external photocell, two external relays (one for the headlight circuit and one for the parking light circuit) and one switch.
Here is the wiring diagram provided with the unit:
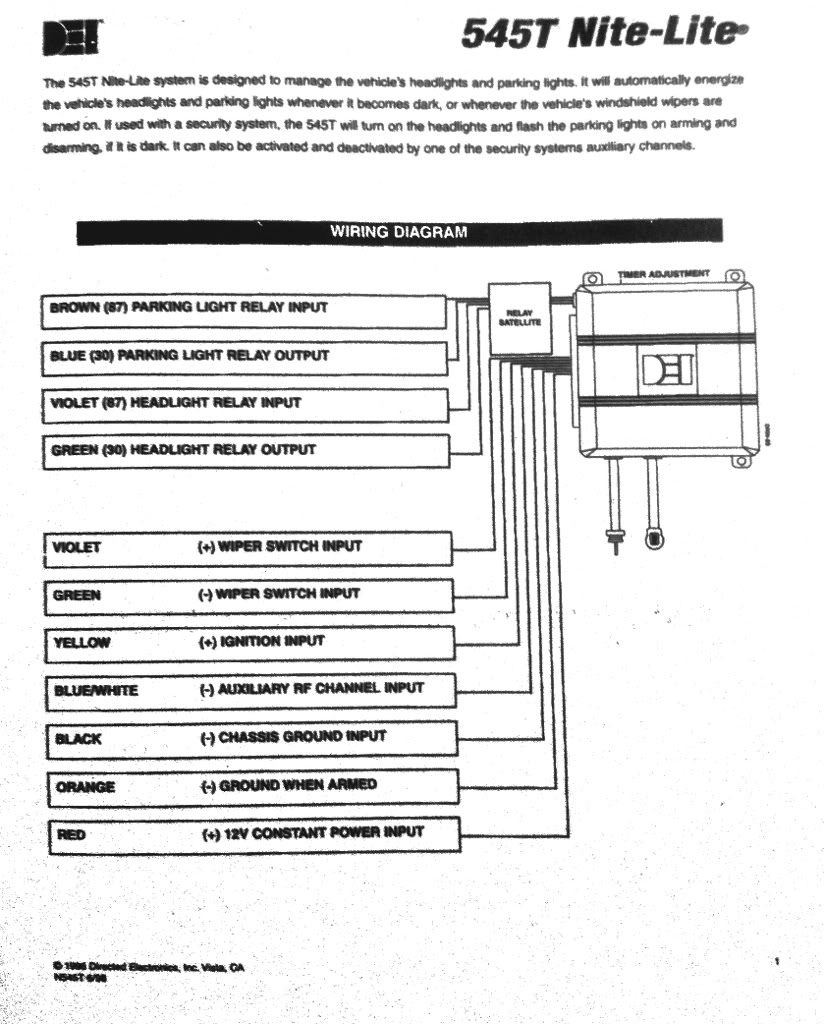
There are several features that are not needed. The Orange, Blue/White, Violet, and Green wires on the main control harness are needed, cut em and tape em off. You also only need to make use of one of the relays for this mod so go ahead and cut and tape off the input and output wires of one of the relays. I chose to use the headlight relay so I cut and taped off the Brown and Blue wire coming out of the relays. If you dont want the unused relay needlessly activating and deactivating you could also cut one of the trigger wires on the harness that connects the relay to the main control module. Cut the Blue wire on this harness to disable the parking light relay or cut the Green to disable the headlight relay. I chose not to bother as I might use the other relay for something else later on...
Moving on its time to start splicing. Start by wiring the main harness into your stereo wiring. If you have an after market stereo, I recommend splicing into your vehicle specific head unit installation harness rather than into your cars stock wiring harness. The typical color codes for the wires we'll be using are as follows:
Memory / Constant 12V(+) Yellow
Switch / Accessory Red
Ground Black
Illumination Orange/White
Now this sounds a litte backward but you want to connect the Red wire of the main 545T harness (+12V constant power input) to the yellow wire of your headunit harness and then connect the yellow wire on the main 545T harness (+ignition input) to the red wire of your headunit harness. Connect the black wire to the black wire and your done with the main harness for the 545T. For these 3 connections you can either use quick tap or strip away some wire and solder. The point is to not interrupt the connection between the car and the head unit and simply make a three way junction. You are now done with the main harness, plug it into the 545T control unit.
For this part, however, you do want to interrupt the connection between the car and head unit.. Cut the Orange/White wire on your headunit harness. Connect the end that goes to the vehicle to the input of the relay you are using. Assuming you are using the headlight relay, connect to the Violet wire. Connect the other end of the Orange/White wire (the one that goes to the headunit itself) to the output wire of the relay -- Green for the headlight relay. Mount the relays where you see fit. I secured them as shown below so I can access the other one easily incase I want to connect another circuit to be controlled by the 545T.
Go ahead and plug the relay harness into the main control unit.
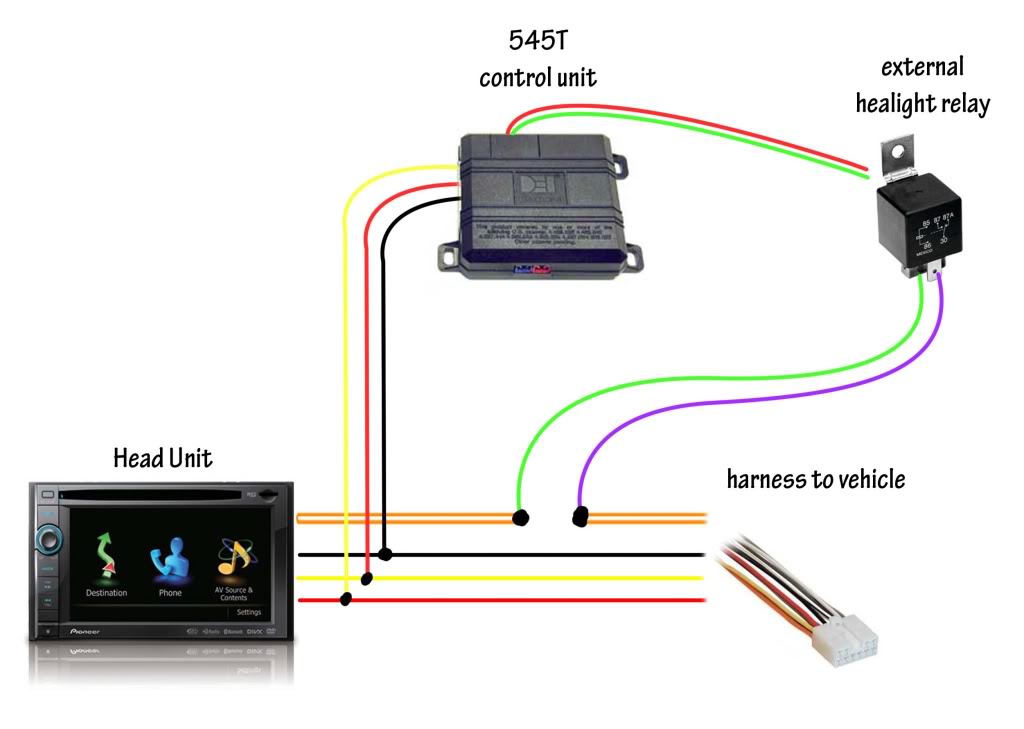
A full wiring diagram (showing only applicable wires) would look like this
Place the external photocell in a spot that it will be able to sense ambient light. I chose the corner of the dash board by the passenger side A-pillar
{I will get a pic of photocell placement soon}
Route the wires coming from the photocell back to the main harness and plug it in to the red plug.
For the external switch you can either just leave it disconnected or plug it in to the blue plug and make sure is is flipped OFF.
Now, if you chose to use the headlight circuit as I did, make sure to complete this step to save yourself confusion and frustration. Unscrew the four screws on the bottom of the 545T control unit and remove the plastic casing to reveal the circuit board. You will see a red loop. Cut the red loop
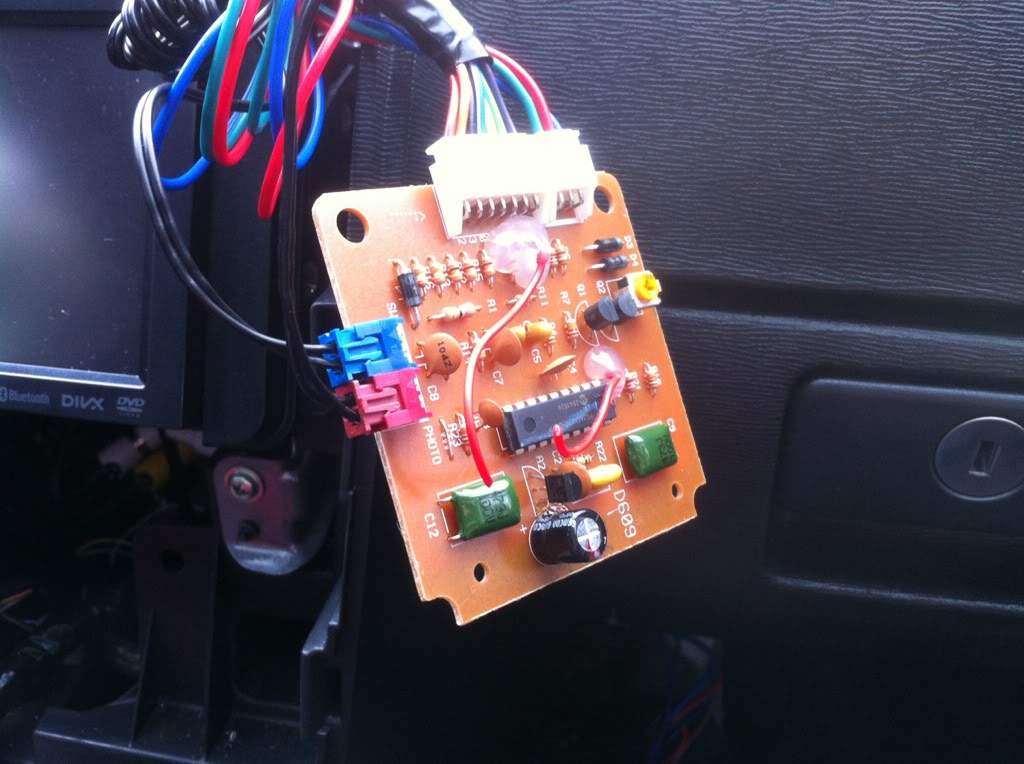
Put the plastic casing back on the circuit board.
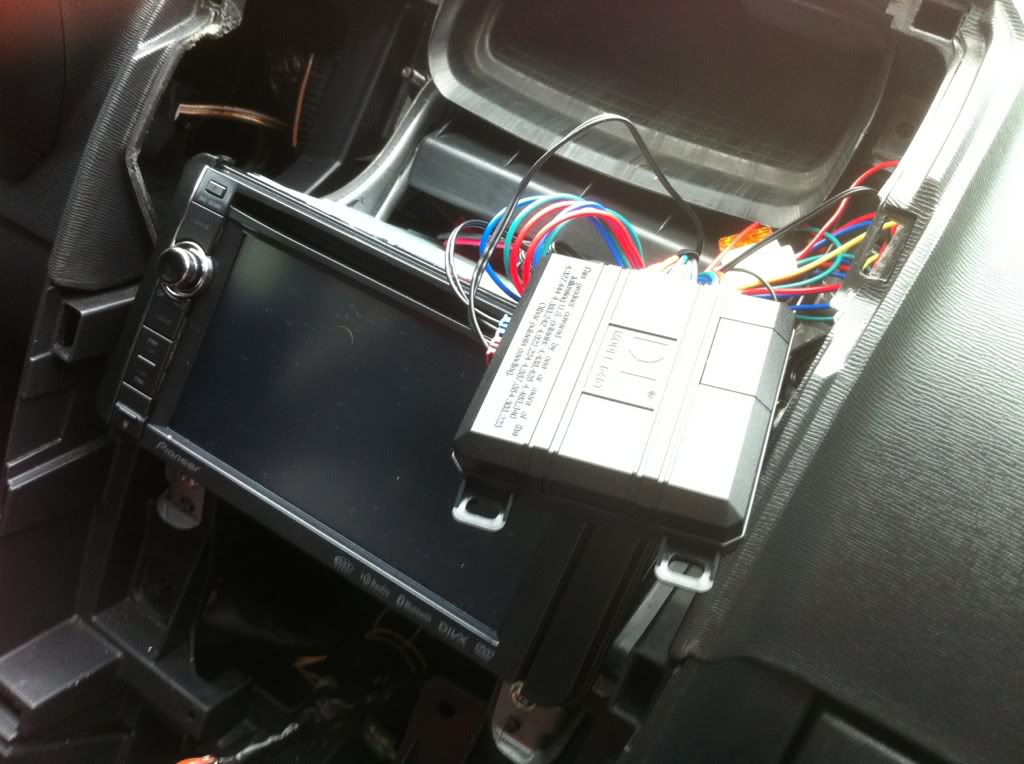
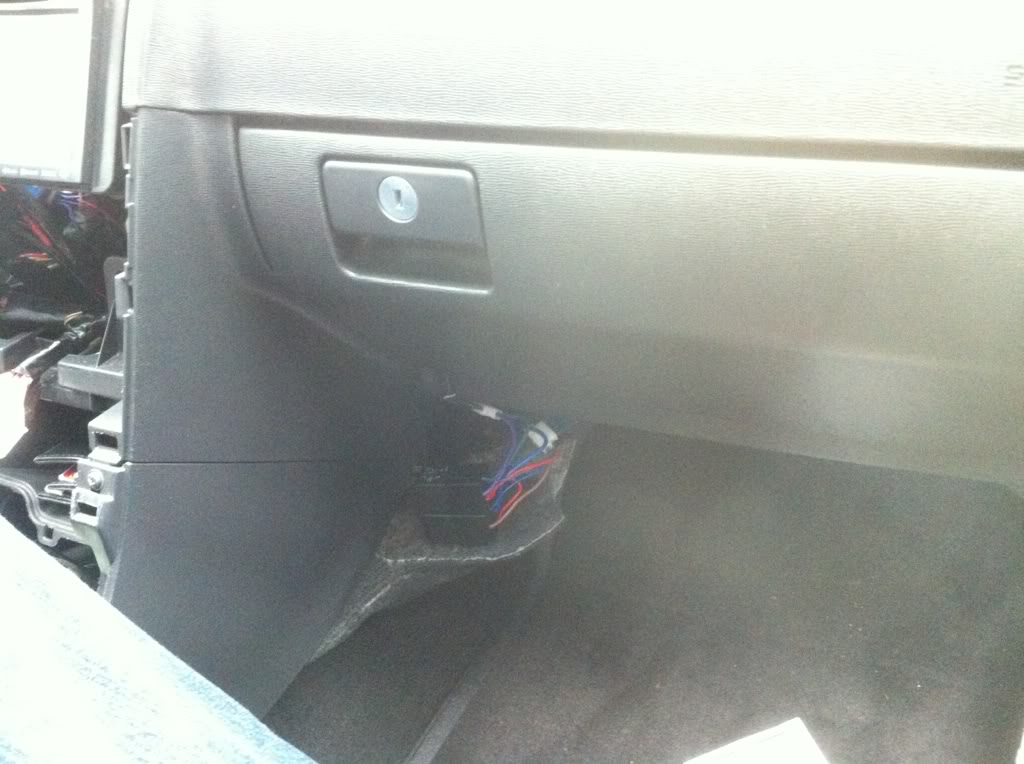
Use zipties and electrical tape to keep all your wires together and tuck away the unit. I used the velcro to secure the unit as shown here

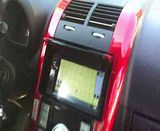
Put your dash back together and test everything out. When it is dark enough, the 545T will allow for a connection of the illumination wire to the head unit so if your parking lights are on, it will dim normally. When it is bright out, the unit will interrupt the signal, and the head unit will not dim even if the parking lights are on.
The 545T is programmed so that when exposed to light there is a 30 second delay before the relay interrupts the connection. This prevents "flutter" if you drive under a particularly bright street light or something.
Below is a video showing the function of this mod.
Overall I'm pretty happy with how it came out. It works well, driving as the sun sets its pretty cool when the head unit automatically dims itself. Hope this is helpful, if you have any questions feel free to ask
Sometime ago I swapped out my Kenwood DNX5120 for a new Pioneer AVIX-X930BT. I absolutely love the new head unit but one of my only problems with it was how it dimmed. I had my Kenwood unit would dim the display and change the navigation color scheme to night mode based on time, the Pioneer unit however is not capable of this setting and dims whenever the parking lights are on. I usually drive with at least my parking lights and sometimes even my headlights on even if its daylight. This meant the unit was always dimmed and the navigation color scheme was always set to the white on black night color scheme. This was driving me crazy for sometime as during the day I could hardly read the screen to see what song was playing but I finally figured out a solution.
DEI, the company that makes Viper, Python, Clifford etc. makes a unit for making your headlights come on automatically based on daylight. Its the DEI 545T. Its a pretty cool unit that is capable of not only controlling your headlights based on sunlight, but you can also set it to turn them on with your windshield wipers or AUX outputs from your alarm. For information concerning actually using this unit for your headlights hit up google.I however reappropriated the unit to dim my radio.
For this how to I'll be assuming that this is not your first wiring project and that you have some experience either soldering or using crimp connectors
This is what you get in the box:
Included is control module, an external photocell, two external relays (one for the headlight circuit and one for the parking light circuit) and one switch.
Here is the wiring diagram provided with the unit:
There are several features that are not needed. The Orange, Blue/White, Violet, and Green wires on the main control harness are needed, cut em and tape em off. You also only need to make use of one of the relays for this mod so go ahead and cut and tape off the input and output wires of one of the relays. I chose to use the headlight relay so I cut and taped off the Brown and Blue wire coming out of the relays. If you dont want the unused relay needlessly activating and deactivating you could also cut one of the trigger wires on the harness that connects the relay to the main control module. Cut the Blue wire on this harness to disable the parking light relay or cut the Green to disable the headlight relay. I chose not to bother as I might use the other relay for something else later on...
Moving on its time to start splicing. Start by wiring the main harness into your stereo wiring. If you have an after market stereo, I recommend splicing into your vehicle specific head unit installation harness rather than into your cars stock wiring harness. The typical color codes for the wires we'll be using are as follows:
Memory / Constant 12V(+) Yellow
Switch / Accessory Red
Ground Black
Illumination Orange/White
Now this sounds a litte backward but you want to connect the Red wire of the main 545T harness (+12V constant power input) to the yellow wire of your headunit harness and then connect the yellow wire on the main 545T harness (+ignition input) to the red wire of your headunit harness. Connect the black wire to the black wire and your done with the main harness for the 545T. For these 3 connections you can either use quick tap or strip away some wire and solder. The point is to not interrupt the connection between the car and the head unit and simply make a three way junction. You are now done with the main harness, plug it into the 545T control unit.
For this part, however, you do want to interrupt the connection between the car and head unit.. Cut the Orange/White wire on your headunit harness. Connect the end that goes to the vehicle to the input of the relay you are using. Assuming you are using the headlight relay, connect to the Violet wire. Connect the other end of the Orange/White wire (the one that goes to the headunit itself) to the output wire of the relay -- Green for the headlight relay. Mount the relays where you see fit. I secured them as shown below so I can access the other one easily incase I want to connect another circuit to be controlled by the 545T.
Go ahead and plug the relay harness into the main control unit.
A full wiring diagram (showing only applicable wires) would look like this
Place the external photocell in a spot that it will be able to sense ambient light. I chose the corner of the dash board by the passenger side A-pillar
{I will get a pic of photocell placement soon}
Route the wires coming from the photocell back to the main harness and plug it in to the red plug.
For the external switch you can either just leave it disconnected or plug it in to the blue plug and make sure is is flipped OFF.
Now, if you chose to use the headlight circuit as I did, make sure to complete this step to save yourself confusion and frustration. Unscrew the four screws on the bottom of the 545T control unit and remove the plastic casing to reveal the circuit board. You will see a red loop. Cut the red loop
Put the plastic casing back on the circuit board.
Use zipties and electrical tape to keep all your wires together and tuck away the unit. I used the velcro to secure the unit as shown here
Put your dash back together and test everything out. When it is dark enough, the 545T will allow for a connection of the illumination wire to the head unit so if your parking lights are on, it will dim normally. When it is bright out, the unit will interrupt the signal, and the head unit will not dim even if the parking lights are on.
The 545T is programmed so that when exposed to light there is a 30 second delay before the relay interrupts the connection. This prevents "flutter" if you drive under a particularly bright street light or something.
Below is a video showing the function of this mod.
Overall I'm pretty happy with how it came out. It works well, driving as the sun sets its pretty cool when the head unit automatically dims itself. Hope this is helpful, if you have any questions feel free to ask
Last edited by x_Batman_x; Mar 4, 2012 at 07:24 PM.


cool mod. i have the same problem with my avic z1. but i was thinking of just adding a switch in between the dimmer wire on the raido harness. this way with your parking lights on, you can flip the switch for the dimmer wire so that it reverts to daytime on the screen.
but i suppose yours is automatic so +1 on that lol
but i suppose yours is automatic so +1 on that lol

Thats actually a pretty cool idea never thought of that.
I would have just put your purple wire in the diagram to ground though so whenever the sun was down it would dim the radio screen regardless of whether you had the lights on or not.
If I ever save up enough to get another in dash nav unit I will probably go this route. Thanks for the write up.
I would have just put your purple wire in the diagram to ground though so whenever the sun was down it would dim the radio screen regardless of whether you had the lights on or not.
If I ever save up enough to get another in dash nav unit I will probably go this route. Thanks for the write up.

I dont have any experience with an avic D3, so I cant draw comparisons. However I do love the headunit. Its fast, it looks good, and has amazing sound quality. I was rockin a Kenwood before, which was good and all, but this new Pioneer HU just sounds wayyy better.

Thread
Thread Starter
Forum
Replies
Last Post
rhino8648
Scion xA/xB 1st-Gen ICE & Interior
1
Sep 6, 2015 04:04 AM
semlin
Scion xB 2nd-Gen ICE & Interior
7
Jul 29, 2015 02:07 AM