
Thinkin about building my own box (first timer)


Senior Member
Strictly Scionized
SL Member
Joined: Oct 2004
Posts: 1,284
From: White Marsh, Balti Co., MD
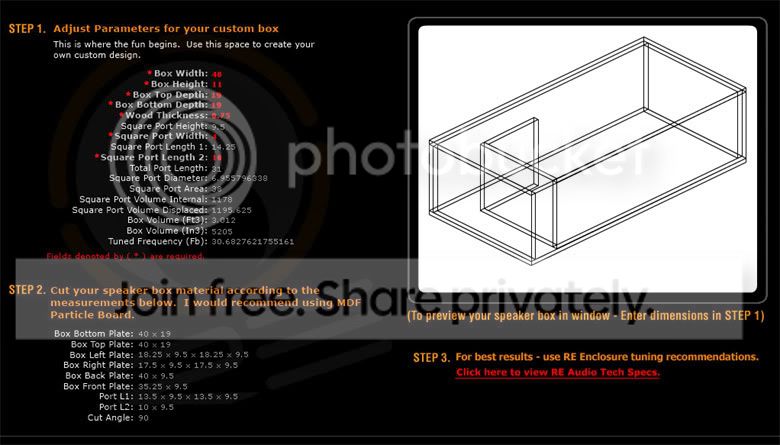
If you wanna keep the dimension of 40x19x11
Do that build the box with a common chamber and one port to the left. So sub up port back.
Go back to REaudio.com and put in your dimension make the port 4" wide and 10" it will tune it to 30hz and a total internal space of 3.012cuft so 1.5cuft per sub. Also in this way it will be 38sqin of port area too.

Thread Starter
Senior Member
SL Member
Joined: Jul 2006
Posts: 2,892
From: Long Island/Daytona Beach
hmmm aright. well tomorrow morning I'll go ahead and cut off an extra .25 of an inch off the cover. Assuming it doesn't snow. Its supposed to snow starting tonight all through tomorrow here  Actually I got a question.
What if I were to move the ports up the .25 of an inch. and leave the cover as is. Meaning the cover would have the port size be 10 sq inches while inside the ports would be 15 sq inches. That way once its all sealed, if I find I need to open up the ports more I could just cut back on the cover revealing those extra 5 sq inches. Would that work or does the entire port have to be exactly the same?
What if I were to move the ports up the .25 of an inch. and leave the cover as is. Meaning the cover would have the port size be 10 sq inches while inside the ports would be 15 sq inches. That way once its all sealed, if I find I need to open up the ports more I could just cut back on the cover revealing those extra 5 sq inches. Would that work or does the entire port have to be exactly the same?

Senior Member
SL Member
Joined: Aug 2006
Posts: 2,434
From: Hyde Park, NY
Originally Posted by a_german_named_hans
hmmm aright. well tomorrow morning I'll go ahead and cut off an extra .25 of an inch off the cover. Assuming it doesn't snow. Its supposed to snow starting tonight all through tomorrow here Actually I got a question.
What if I were to move the ports up the .25 of an inch. and leave the cover as is. Meaning the cover would have the port size be 10 sq inches while inside the ports would be 15 sq inches. That way once its all sealed, if I find I need to open up the ports more I could just cut back on the cover revealing those extra 5 sq inches. Would that work or does the entire port have to be exactly the same?
What if I were to move the ports up the .25 of an inch. and leave the cover as is. Meaning the cover would have the port size be 10 sq inches while inside the ports would be 15 sq inches. That way once its all sealed, if I find I need to open up the ports more I could just cut back on the cover revealing those extra 5 sq inches. Would that work or does the entire port have to be exactly the same?
thats one way to surely get port noise. you want it to be the same all the way through. doing the opposite isn't a bad idea. flaring it i mean. i'd do like trialsindude suggested.
Senior Member
SL Member
Joined: Aug 2006
Posts: 2,434
From: Hyde Park, NY
Originally Posted by a_german_named_hans
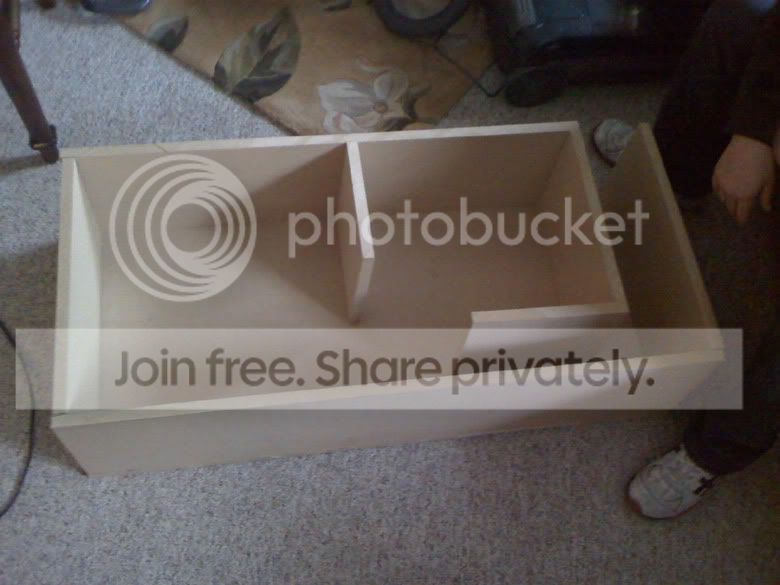
I'm assuming this is what you mean?
I heard a common chamber isn't too good tho? Like individual chambers are supposed to be better.
I heard a common chamber isn't too good tho? Like individual chambers are supposed to be better.
Thread Starter
Senior Member
SL Member
Joined: Jul 2006
Posts: 2,892
From: Long Island/Daytona Beach
aright ima do what trials said. I'll cut a new top to cover the entire thing. Cut down the front, make a new left side, and I'll just reuse and re cut the ports and the separator and I should be good. Hopefully I'll be able to do it tomorrow if it doesn't snow. I'll keep you guys up to date. Thanks for the help. You have no idea how much I appreciate it.
Senior Member
SL Member
Joined: Aug 2006
Posts: 2,434
From: Hyde Park, NY
Originally Posted by trialsindude
You might need to do some internal bracing also with a box that big...
Thread Starter
Senior Member
SL Member
Joined: Jul 2006
Posts: 2,892
From: Long Island/Daytona Beach
You mean kinda like support columns inside the box? Could do that too. I got a lot of MDF left lol. I probably got enough to make two whole new tops  I think I might a bought too much. but hey. too much is better then too little.
Senior Member
SL Member
Joined: Aug 2006
Posts: 2,434
From: Hyde Park, NY
Originally Posted by a_german_named_hans
You mean kinda like support columns inside the box? Could do that too. I got a lot of MDF left lol. I probably got enough to make two whole new tops I think I might a bought too much. but hey. too much is better then too little.

Senior Member
Strictly Scionized
SL Member
Joined: Oct 2004
Posts: 1,284
From: White Marsh, Balti Co., MD
Much better, but that center divider, make some holes cut a square out of it or something, because when you place your subs in there you might create a choke point for the one sub that will sit in that spot.
Thread Starter
Senior Member
SL Member
Joined: Jul 2006
Posts: 2,892
From: Long Island/Daytona Beach
Yea aright. So once I cut down on that ya figure I'm good to screw it together, glue, silicone it and all that? Anything else I should do to the wood before I clue it together.
Senior Member
Strictly Scionized
SL Member
Joined: Oct 2004
Posts: 1,284
From: White Marsh, Balti Co., MD
If you have a router, you can route the inside of that port board and the corner! But thats if you have a router! Or cut a 3.3" piece of wood with 45* angles and put it in where the port is bent 90* degrees. Thats to create a more even air flow. And it will also keep the port 4" wide through out the whole thing I believe. Check my thread of my TTB box and you see what I mean. But besides that use wood glue!! Thats important, even better use TiteBond III, thats what everyone use and most happy about, especially with someone that did a strength test on wood glue and the TiteBond comes out first. Remember that it is the glue that holds the box together, when you use screws it is only there just to hold the box til the glue dries! You can evenly space out the screws about 4" from each other. To make everything clean, pre-drill the holes and countersink the holes before you screw it in so that you can fill it in with wood putty and sand afterwards. Like I said check out my TTB box thread and you will see what I am talking about.
Senior Member
SL Member
Joined: Aug 2006
Posts: 2,434
From: Hyde Park, NY
looks great! do what trials said with that divider. either put a few
BIG holes in it or cut the center out leaving like an inch or 2 all the way around. but looks great. keep us informed!
BIG holes in it or cut the center out leaving like an inch or 2 all the way around. but looks great. keep us informed!
Thread Starter
Senior Member
SL Member
Joined: Jul 2006
Posts: 2,892
From: Long Island/Daytona Beach
I finished it. Its in my car at the moment, takes up the entire trunk LOL! I'll cover it up with carpet some other time, right now I'm just enjoying it.
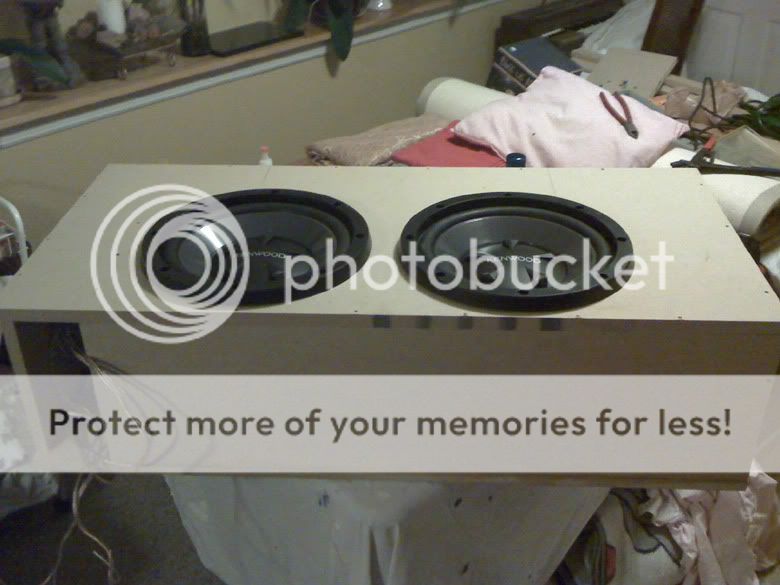

It is exactly what I was looking for. The bass is a lot more solid and you can definitely feel it more, Before the bass was kinda weak and sounded, well kinda fake, not sure how to explain it. It sounds perfect right now.
trialsindude &Tcguy85: you guys are the best, thank you so much for your help, I seriously couldn't have done it with-out you guys. I appreciate it so much.