
Supertek Short Shift kit - Review and install notes (with pictures)


Thread Starter
Member
SL Member
Joined: Mar 2012
Posts: 97
Hi all. I got my Supertek short shift kit in yesterday. here I'll post a review for those of you who wanted some input on the product before trying it yourself, since it is fresh on the market.
Supertek Short Shift Kit
Parts came in a small box. Here is what was included:
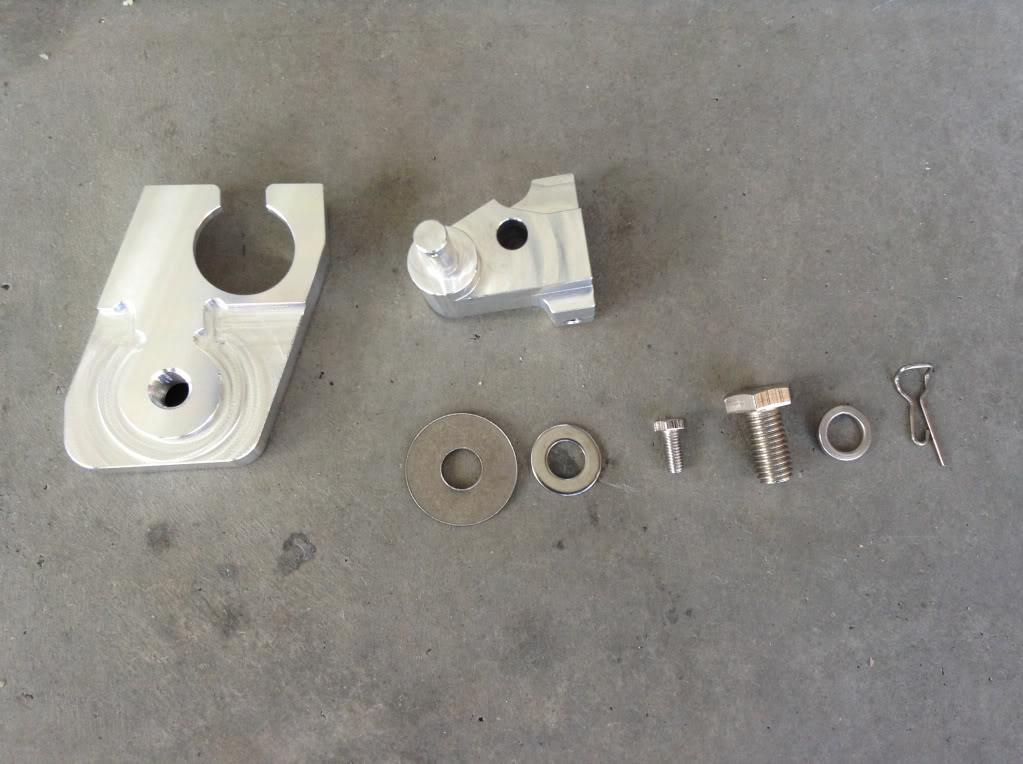
Not pictured is the installation guide brochure. I was surprised at how detailed the guide was. Literally step by step notes. The guide also included pictures with arrows pointing at the part being referred to.
I'll post the steps for those of you that are not sure if you want to install such a part yourself. I really recommend installing it yourself, as the process was very simple, aside from that darn u-clip (read ahead).
Install Notes
To begin, disconnect the negative line from the battery.
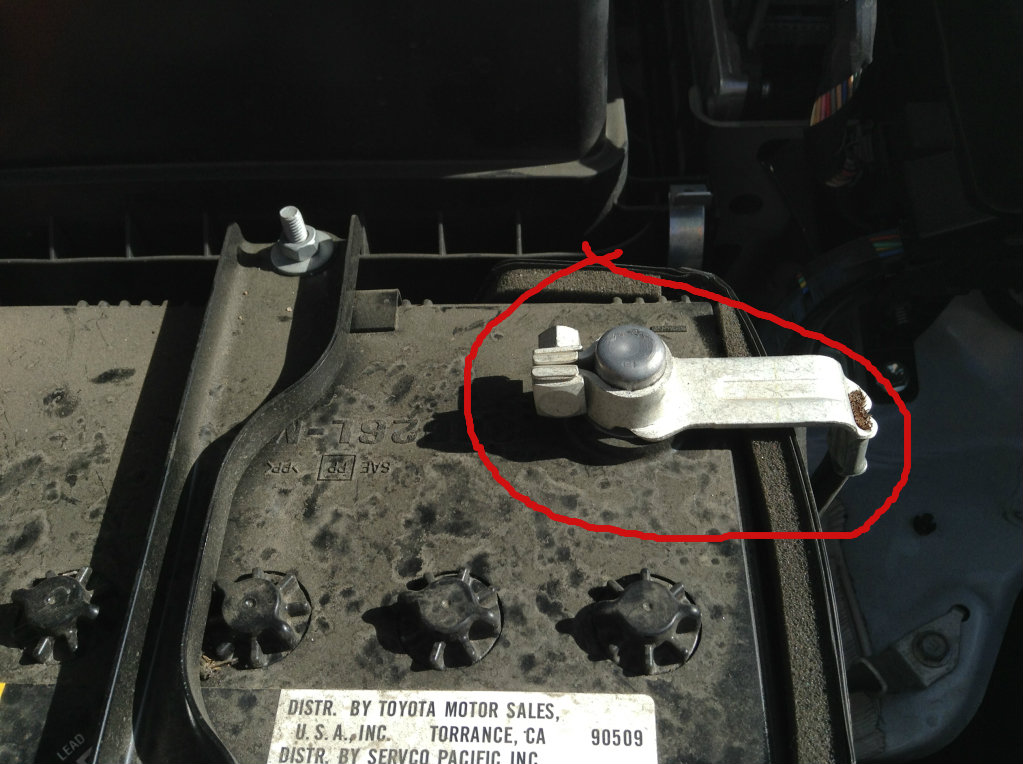
10mm socket wrench for that bolt. Remove the bolt and take the clamp off of the post.
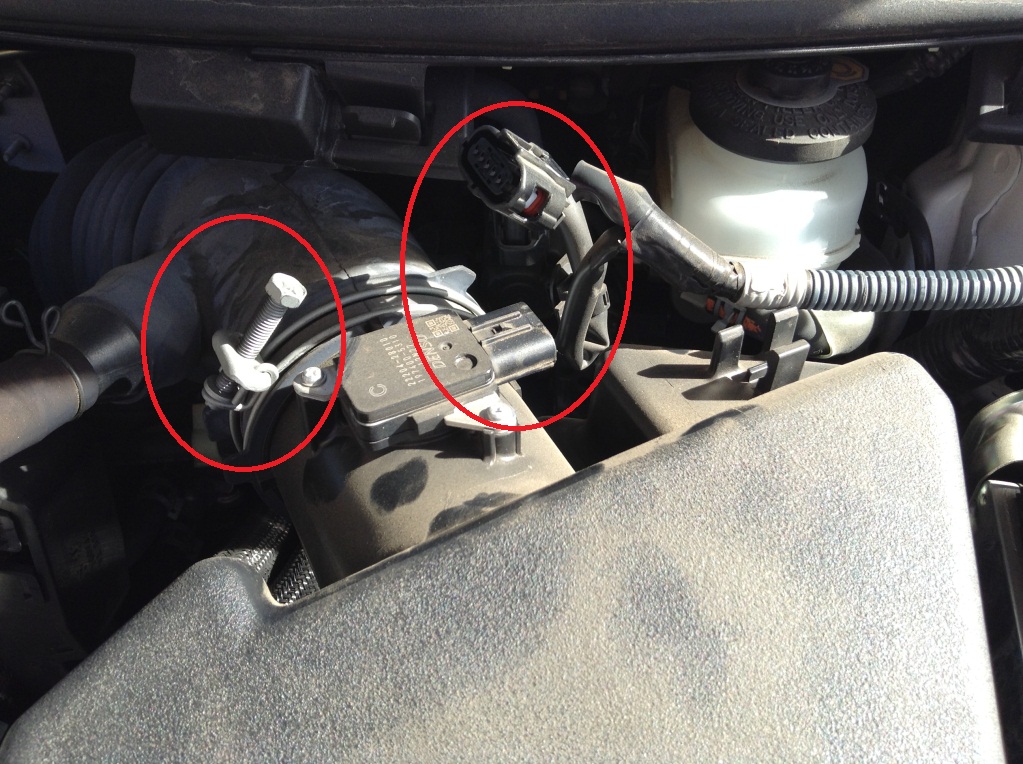
Next, remove the factory air box. This part obviously would be different for those of you with aftermarket intakes. But from factory, you need to undo the two clips at front, and unclip the MAF sensor. Also loosen up the hose clamp, 10mm socket (in the second picture down).
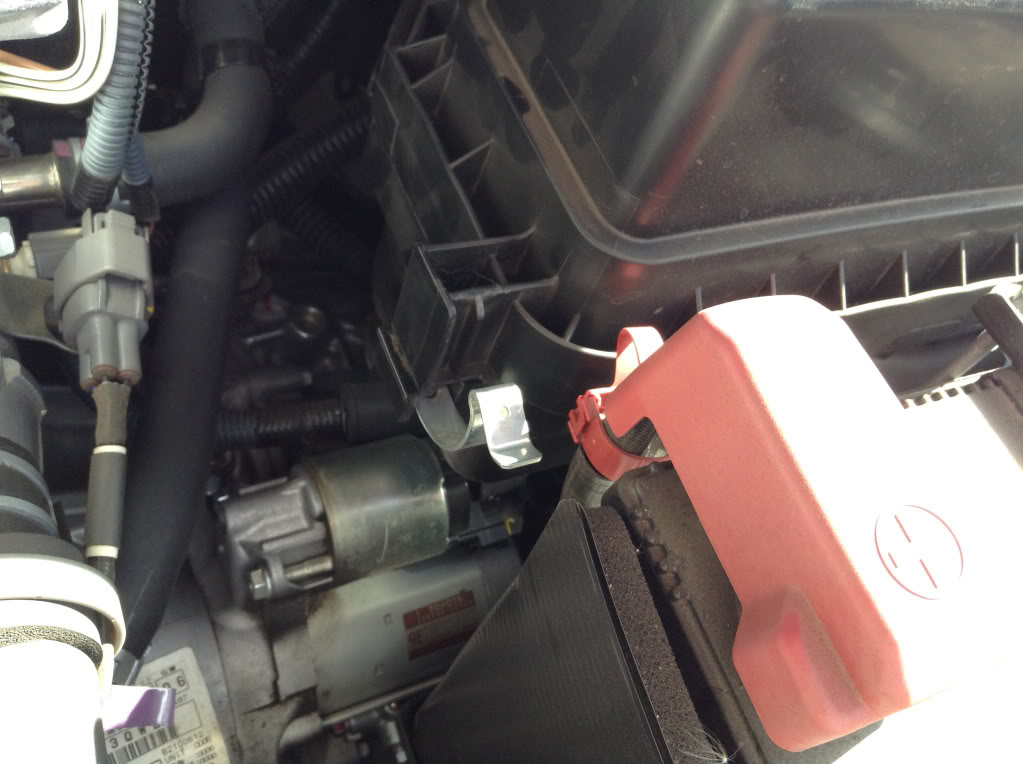
Remove the top portion of the airbox, and take out the three 10mm bolts on the bottom.
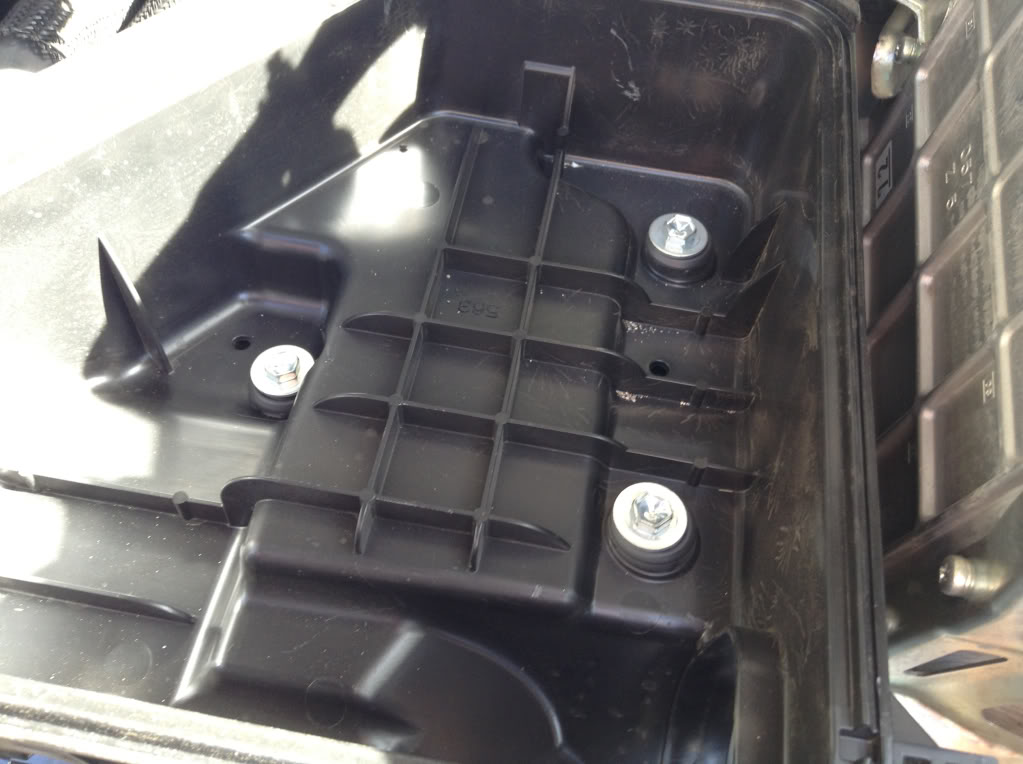
Remove the bottom, and underneath you will be able to see the shifter cables.
The one on the right is the one we will be adjusting. I imagine the left one is our reverse gear. Anyways, we will not be touching the one on the left.
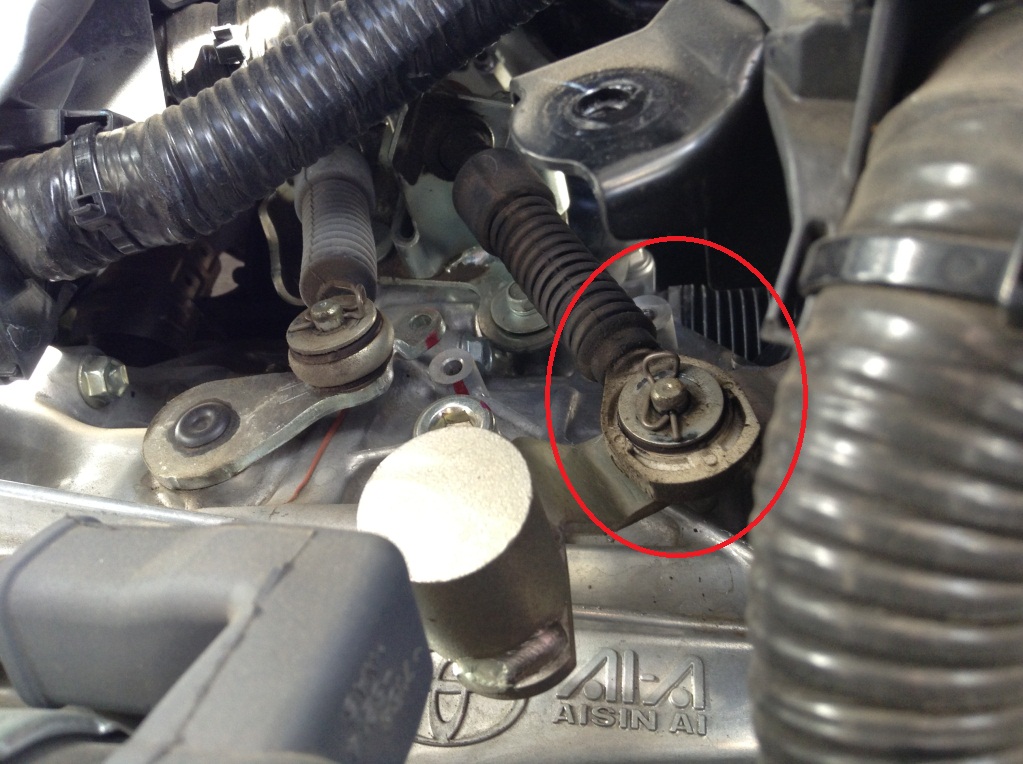
Remove the little clip (comes off fairly easily. If you are having trouble, a flathead screwdriver will help) and pull the cable off of the post.
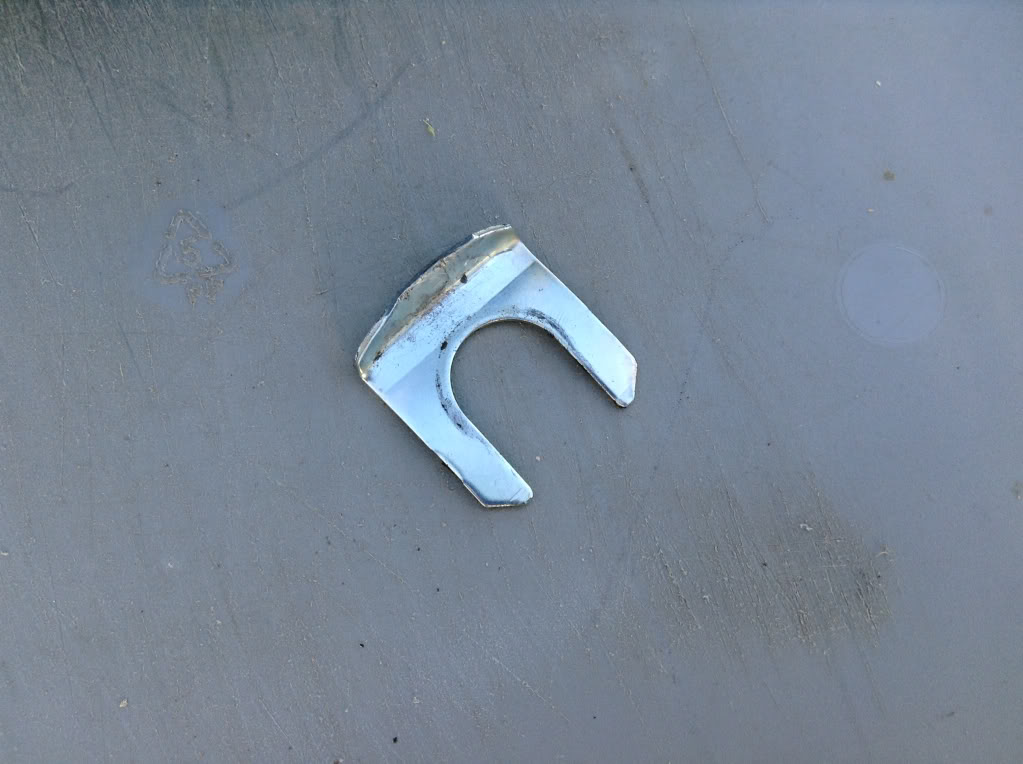
next is the toughest part. the removal of the infamous tc2 "u-clip"
It is the piece with the bent lip. People have removed this a couple different ways. Some suggest a large flathead screwdriver, others have mentioned channel lock pliers. I used a combination of the two. I wish i took more pictures to better explain the placement of the tools, but i will do my best with words. Basically, I clamped my pliers onto the small lip, pulled out (towards the front of the car), and while pulling, I started to rotate the clip. I rotated the clip 180 degrees so that the clip was upside down. After that, it was only a matter of placing my flathead on the clip, and hammering it out.

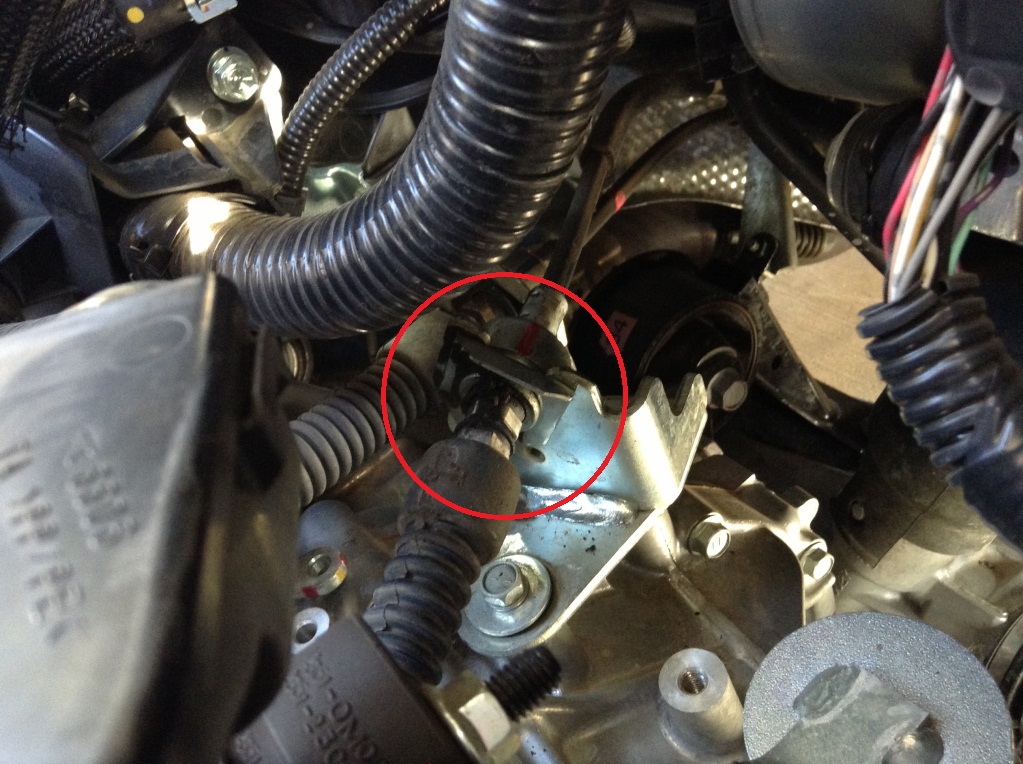
Once the u-clip is off, pull out the shifter cable, grab your relocation bracket, larger bolt (17mm) and washers. Place the bracket like so:
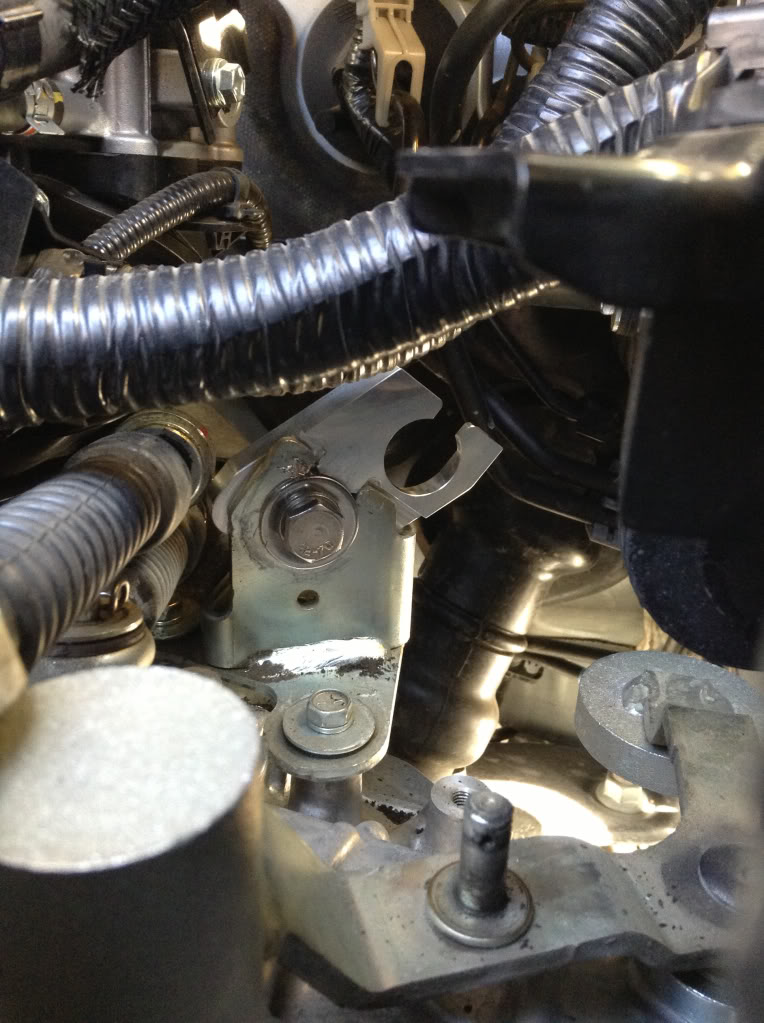
and bolt her in tight. Reinstall the shifter cable in the extended slot. Once in, reinstall the u-clip.
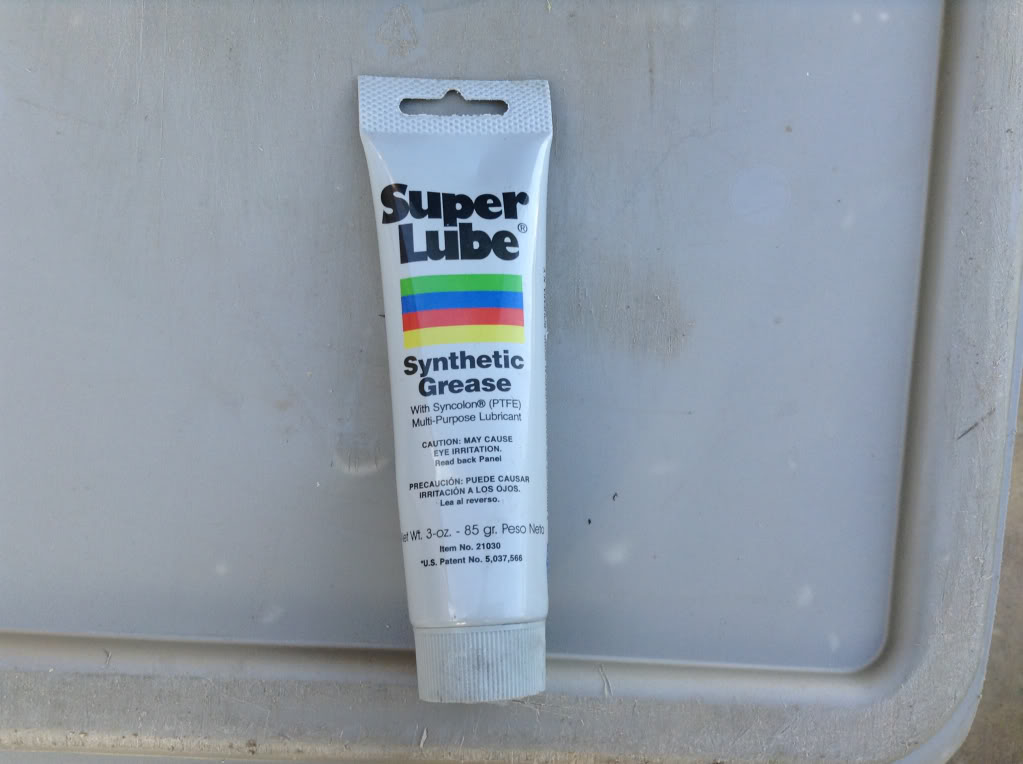
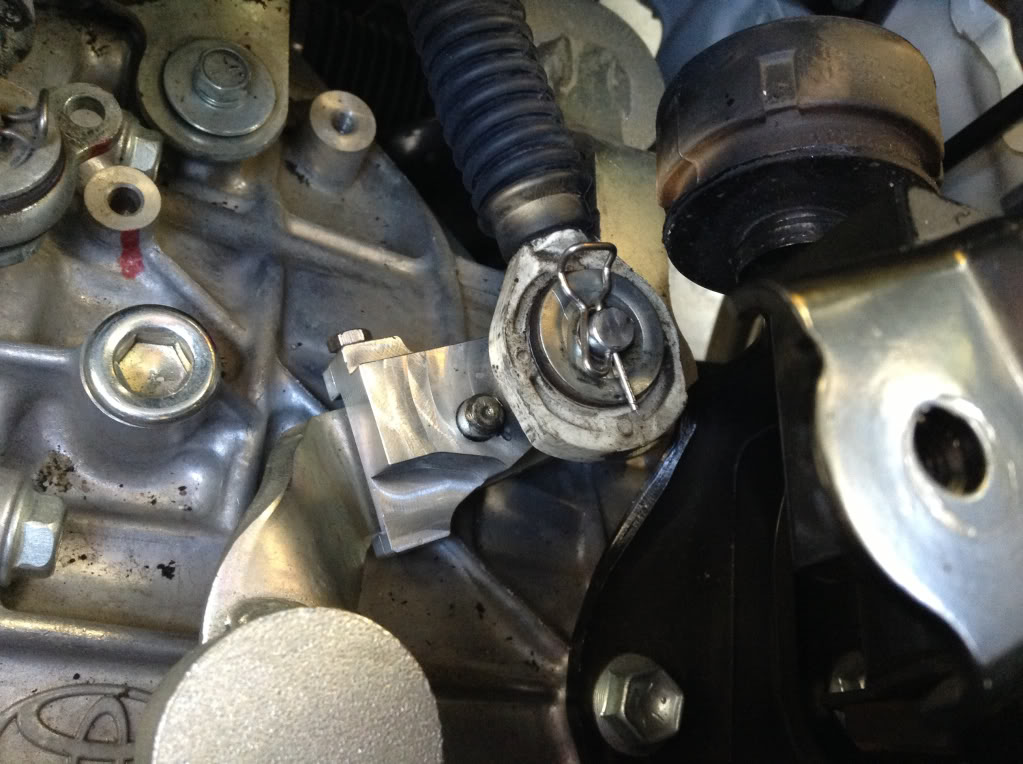
Finally, the short shifter has to be installed. Remember that post that we took the shift cable off of? The short shifter slides right onto that post. It is advised to apply some fresh grease onto the post before putting on the short shifter. I used "superlube" found in most hardware stores.
Once in, screw in the supplied 8mm bolt into the side of the short shifter to clamp it down. Place the shifter cable onto the new post (with grease) and replace the clip.
And that is it! The shifter is completely installed. Hop in your car and test everything out before putting everything back together. Once it all checks out, reinstall your airbox, connect your battery and go for a drive!
Product Review
After driving the car for about two hours with the shifter installed, I can say, overall, it is a huge improvement from stock. Not only is the shift travel cut down quite a bit, the shifts are now much more firm, and the shifter seems to pop into the gears a bit more. There also seems to be a reduced amount of side to side play while in gear.
Here are some before and after photos:

top left: stock in 3rd gear
top right: stock in 4th gear
bottom left: Supertek in 3rd gear
bottom right: Supertek in 4th gear
You can see the in 3rd gear with the short shifter, the shifter is perpendicular to the base ring.
Overall, I am very satisfied with this product. The components being made out of T-6061 billet is a huge plus as well. You know this thing isn't gonna bust on you. And this is all for $70, with the bonus discount for forum members, it is half the price of the TRD. That was very attractive to me.
On top of all this, we also can consider the customer service we can expect from the folks at Supertek. Having just started a company, i am sure they will put in a lot of effort to give us some good customer service. I have had a small conversation with Steven at supertek, and his responses were always quick.
This supertek short shift kit is definitely something i would recommend. Great product at half the price of the TRD short shift kit.
Supertek Short Shift Kit
Parts came in a small box. Here is what was included:
Not pictured is the installation guide brochure. I was surprised at how detailed the guide was. Literally step by step notes. The guide also included pictures with arrows pointing at the part being referred to.
I'll post the steps for those of you that are not sure if you want to install such a part yourself. I really recommend installing it yourself, as the process was very simple, aside from that darn u-clip (read ahead).
Install Notes
To begin, disconnect the negative line from the battery.
10mm socket wrench for that bolt. Remove the bolt and take the clamp off of the post.
Next, remove the factory air box. This part obviously would be different for those of you with aftermarket intakes. But from factory, you need to undo the two clips at front, and unclip the MAF sensor. Also loosen up the hose clamp, 10mm socket (in the second picture down).
Remove the top portion of the airbox, and take out the three 10mm bolts on the bottom.
Remove the bottom, and underneath you will be able to see the shifter cables.
The one on the right is the one we will be adjusting. I imagine the left one is our reverse gear. Anyways, we will not be touching the one on the left.
Remove the little clip (comes off fairly easily. If you are having trouble, a flathead screwdriver will help) and pull the cable off of the post.
next is the toughest part. the removal of the infamous tc2 "u-clip"
It is the piece with the bent lip. People have removed this a couple different ways. Some suggest a large flathead screwdriver, others have mentioned channel lock pliers. I used a combination of the two. I wish i took more pictures to better explain the placement of the tools, but i will do my best with words. Basically, I clamped my pliers onto the small lip, pulled out (towards the front of the car), and while pulling, I started to rotate the clip. I rotated the clip 180 degrees so that the clip was upside down. After that, it was only a matter of placing my flathead on the clip, and hammering it out.
Once the u-clip is off, pull out the shifter cable, grab your relocation bracket, larger bolt (17mm) and washers. Place the bracket like so:
and bolt her in tight. Reinstall the shifter cable in the extended slot. Once in, reinstall the u-clip.
Finally, the short shifter has to be installed. Remember that post that we took the shift cable off of? The short shifter slides right onto that post. It is advised to apply some fresh grease onto the post before putting on the short shifter. I used "superlube" found in most hardware stores.
Once in, screw in the supplied 8mm bolt into the side of the short shifter to clamp it down. Place the shifter cable onto the new post (with grease) and replace the clip.
And that is it! The shifter is completely installed. Hop in your car and test everything out before putting everything back together. Once it all checks out, reinstall your airbox, connect your battery and go for a drive!
Product Review
After driving the car for about two hours with the shifter installed, I can say, overall, it is a huge improvement from stock. Not only is the shift travel cut down quite a bit, the shifts are now much more firm, and the shifter seems to pop into the gears a bit more. There also seems to be a reduced amount of side to side play while in gear.
Here are some before and after photos:
top left: stock in 3rd gear
top right: stock in 4th gear
bottom left: Supertek in 3rd gear
bottom right: Supertek in 4th gear
You can see the in 3rd gear with the short shifter, the shifter is perpendicular to the base ring.
Overall, I am very satisfied with this product. The components being made out of T-6061 billet is a huge plus as well. You know this thing isn't gonna bust on you. And this is all for $70, with the bonus discount for forum members, it is half the price of the TRD. That was very attractive to me.
On top of all this, we also can consider the customer service we can expect from the folks at Supertek. Having just started a company, i am sure they will put in a lot of effort to give us some good customer service. I have had a small conversation with Steven at supertek, and his responses were always quick.
This supertek short shift kit is definitely something i would recommend. Great product at half the price of the TRD short shift kit.
Last edited by Bomino; Jan 30, 2013 at 10:47 PM.


Senior Member
SL Member
Joined: Jul 2012
Posts: 678
I just installed mine on my car too. Their shipping was pretty quick.
The U clip is not a problem if you put the screwdriver under the right edge of that bent lip. then just pull up with some force and it will slide up and towards the left. Then just switch sides and put the screwdriver under the left edge of the bent lip and apply force towards the upper right side and it will slide out. You should not try to pull or apply force near the center of that bent lip because that way you will need a whole lot more force. just to the very edge is enough to loosen it easily.
To clarify, you place the screwdriver under those little cut corners of the lip. first one side (right) then, after it slides out almost all the way do the same to the left side.
Thread Starter
Member
SL Member
Joined: Mar 2012
Posts: 97
When i was trying to get it out, i tried similarly to how you described, with no luck. The clip would not move at all. When i used the pliers to rotate the clip, it came out pretty easily with a few hits on top of the flathead with a hammer.
Thanks for the sticky KJ!
Thanks for the sticky KJ!
Senior Member
SL Member
Joined: Jul 2012
Posts: 678
Well the way you pull up on it will make it rotate on its own to the left as it slips out. I tried every which way and mine wouldn't budge until I did this. You basically pull up on the very edge. Hard to describe but I think you got exactly what I meant. What kind of awesome pliers did you use? because none of mine worked haha! My clip did not rotate when i used pliers unfortunately.
At first I was unsure about that brass hammer they listed in the installation tools section. then I realized i needed that to hammer the U clip back into its new position to secure the shifter cable. I just used pliers to hammer it in lol. I guess you can use the hammer to hammer it out too if you can rotate it.
At first I was unsure about that brass hammer they listed in the installation tools section. then I realized i needed that to hammer the U clip back into its new position to secure the shifter cable. I just used pliers to hammer it in lol. I guess you can use the hammer to hammer it out too if you can rotate it.
Thread Starter
Member
SL Member
Joined: Mar 2012
Posts: 97

Well the way you pull up on it will make it rotate on its own to the left as it slips out. I tried every which way and mine wouldn't budge until I did this. You basically pull up on the very edge. Hard to describe but I think you got exactly what I meant. What kind of awesome pliers did you use? because none of mine worked haha! My clip did not rotate when i used pliers unfortunately.
At first I was unsure about that brass hammer they listed in the installation tools section. then I realized i needed that to hammer the U clip back into its new position to secure the shifter cable. I just used pliers to hammer it in lol. I guess you can use the hammer to hammer it out too if you can rotate it.
At first I was unsure about that brass hammer they listed in the installation tools section. then I realized i needed that to hammer the U clip back into its new position to secure the shifter cable. I just used pliers to hammer it in lol. I guess you can use the hammer to hammer it out too if you can rotate it.

anything similar to these would work. it is a bit tough using them with the limited workspace, but it worked for me.

Senior Member
SL Member
Joined: Oct 2012
Posts: 366
From: West Viginia
WOW this looks awesome this just got added to my future mod list!!! When i had to install a short shift in my old Honda you actually had to remove the shifter this looks so much simpler!!!! I LOVE IT
Last edited by MR_LUV; Apr 17, 2018 at 11:03 PM.


Banned
Joined: Jan 2013
Posts: 49
From: USA
Hi,
We have some bad news:
Our special promotion is ending today.
The Good News:
We are happy to announce that www.TRDSparks.com is now an official distributor of Supertek products!
They will continue to sell our 11-13 TC short shift kit for only $59.99! They sell many great TC parts so take advantage of their shipping offers and save!
Click here to purchase:
http://trdsparks.com/displayparts.ph...&parts_id=4512

Senior Member
SL Member
Joined: Oct 2011
Posts: 743
From: Huntington Beach, CA
Bomino, thanks for this. I couldn't even find the U clip on the instruction booklet pictures, they need to use your pics! (No offense)
Shifter feels awesome with my twm short throw shifter. Now feels like my buddies 350Z.
One note, I have twm transmission cable bushings and I could not get the cable to seat on the shifter when the u clip was on, I had to take it off to get enough play because the stock bushings have rubber inside, mine are all metal so there is no play. Just trying to save some frustration to those with aftermarket bushings

Member
SL Member
Joined: May 2012
Posts: 56
From: Hybla Valley, VA
I am planning to buy this short shifter next week, but I also want to replace the bushings. So what has me confused is which one is it? base bushings or cable bushings? In order to just do one single install all together with the short shifter?
Please respond
Please respond

Junior Member
Joined: Apr 2013
Posts: 5
From: San Diego
Went to http://supertekindustries.com/index.php/ and was about to order. The regular price says $69.99 and is crossed out. Below says Special price: $59.99. I clicked on add to cart and it's trying to charge me $69.99 is there a promo code I need or something? Trying to purchase my first mod here . . .
Update: Emailed Supertek, they responded in 10minutes and resolved the issue. Excellent customer service : )
Update: Emailed Supertek, they responded in 10minutes and resolved the issue. Excellent customer service : )
Last edited by Kakaroto; Apr 10, 2013 at 12:58 AM.
Banned
Joined: Jan 2013
Posts: 49
From: USA
Went to http://supertekindustries.com/index.php/ and was about to order. The regular price says $69.99 and is crossed out. Below says Special price: $59.99. I clicked on add to cart and it's trying to charge me $69.99 is there a promo code I need or something? Trying to purchase my first mod here . . .
Update: Emailed Supertek, they responded in 10minutes and resolved the issue. Excellent customer service : )
Update: Emailed Supertek, they responded in 10minutes and resolved the issue. Excellent customer service : )
Attention all forum members.
Supertek is now offering FREE SHIPPING to USA.
$59.99 promo on our shift kit is going on now.
Thanks
Senior Member
SL Member
Joined: Oct 2011
Posts: 743
From: Huntington Beach, CA
Cable. Base bushing go at the base of your shifter. Cable go on the end of the cables in your engine bay.

Senior Member
SL Member
Joined: Feb 2013
Posts: 203
From: Virginia
Will go on a test drive later, but you could definitely till the difference in the shift throw.
Junior Member
Joined: Apr 2013
Posts: 5
From: San Diego
Installed Supertek short shifter today on my 2012 and wow what a difference! I'm on the gas after a shift so much faster now, it feels like the horrible throttle hang is slightly reduced as well. There is a little more feedback through the shifter which I like. Feels like I have sensitivity and control over each shift.
For 59 bucks free shipping, this mod is a no brainer
For 59 bucks free shipping, this mod is a no brainer
