
DIY In-Dash Aftermarket Speaker Install


Thread Starter
Senior Member
SL Member
Joined: May 2009
Posts: 701
From: San Diego, CA
I thought I would create a DIY for in-dash speakers since I could not find one on ScionLife or Google.
This DIY is for a standard 4" speaker. I happened to use a Pioneer TS-G1043R located at Amazon.com .
At the time of this post, they were $42.03 and free shipping. I noticed a huge improvement over stock speakers.
Time to Complete:
1 Hour - Beginners
30 Minutes - Experienced
Tools:
Phillips Screwdriver
Small Slot Screwdriver
Wire Stripper
Scissors
Step 1:
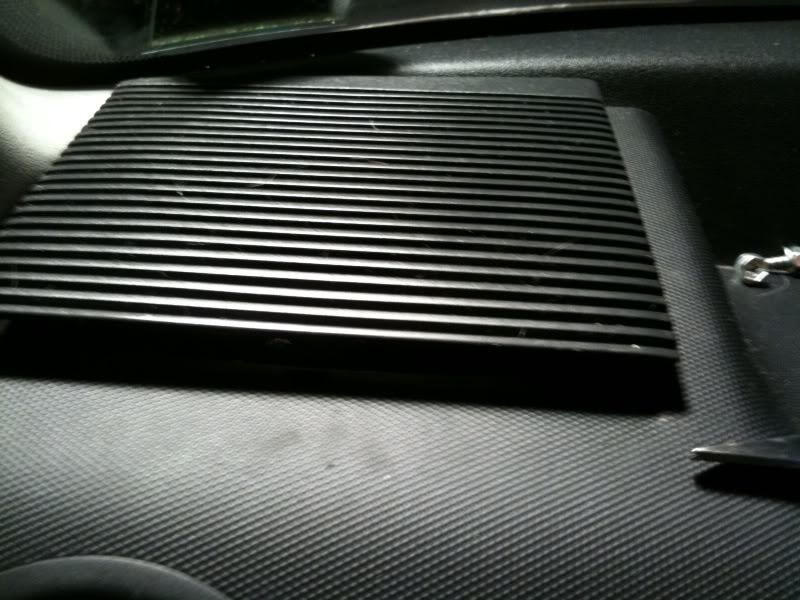
Remove plastic speaker covers by lifting the front with the small slot screwdriver.
Step 2:
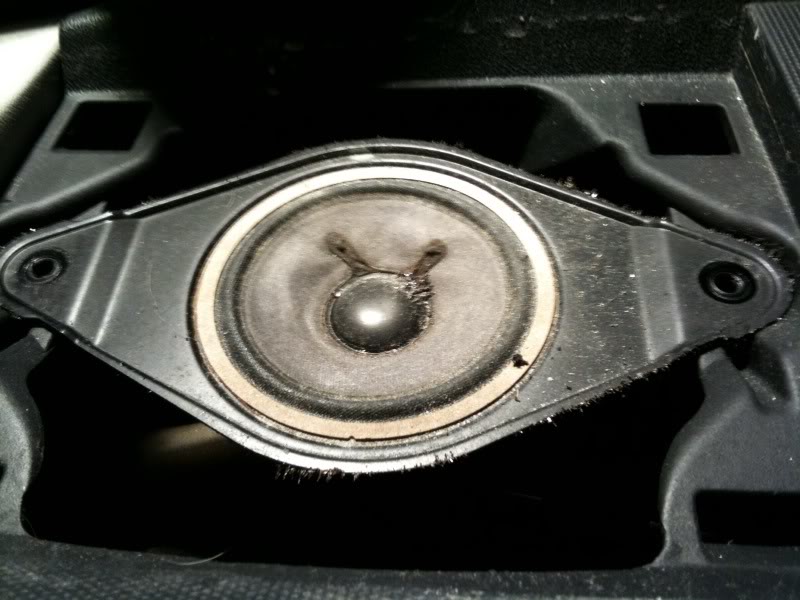
Unscrew the two screws attaching stock speaker to dash using a standard sized Phillips screwdriver.
Step 3:
Remove speaker from dash and cut off the red and black speaker wire as close to the base of speaker as possible.
Step 4:
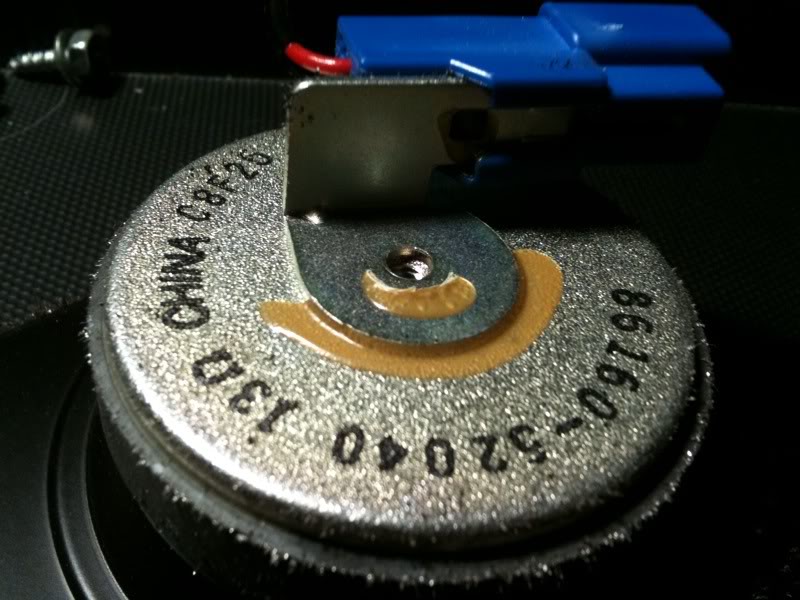
There is a blue module glued to speaker unit.
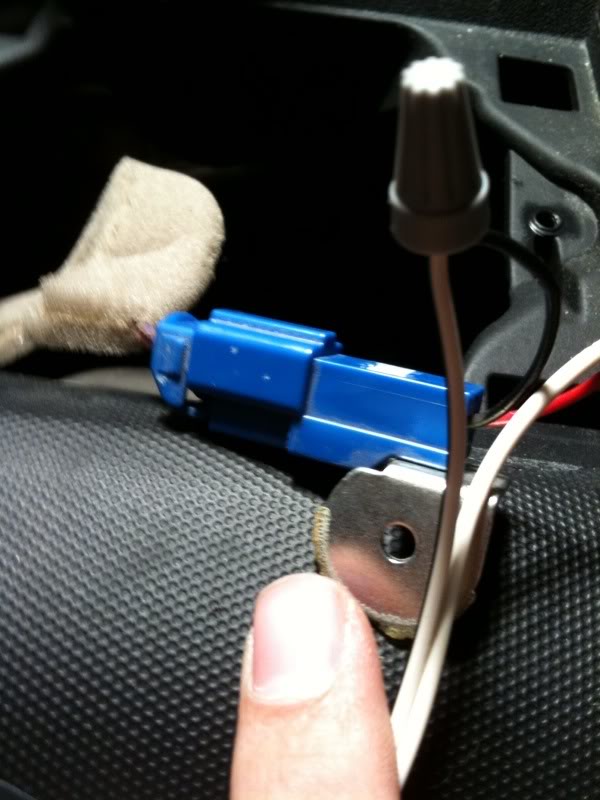
Unplug the connector so that the bottom of the speaker looks like so:
Step 5:
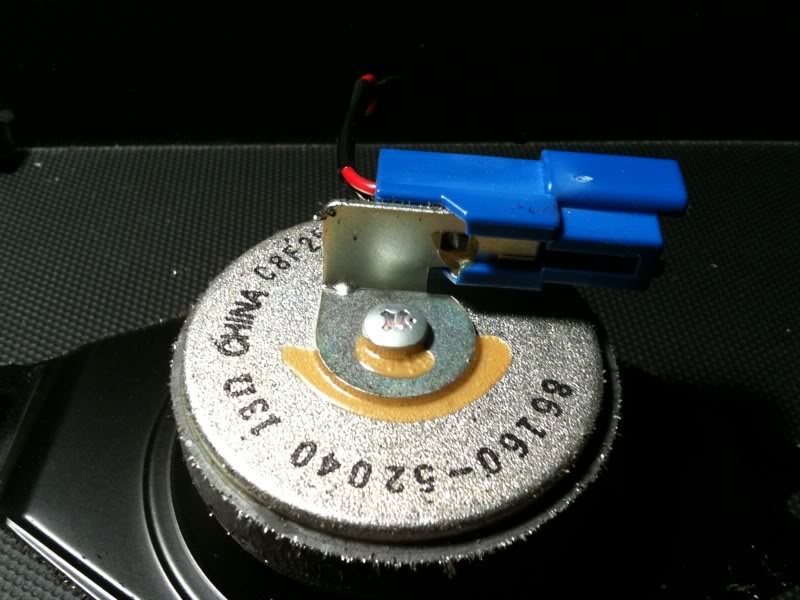
Unscrew the screw located on the underside of speaker. (Warning: there is glue around screw, be careful not to strip the screw)
Step 6:
Detach the blue module unit from the underside of speaker (Warning: there is glue also around metal plate) It should pop off easily w/o issues:
Step 7:
Use wire stripper to expose copper wiring (be careful not to cut the entire wire). (You can also use scissors, but this is much more difficult)

Step 8:
Attach positive (red) and negative (black) wires to the corresponding wires supplied with new speakers.

Step 9:
Plug blue module back into other blue dongle attached to car stereo.
Step 10:
Place speaker in the dash and secure. My set included mounting hardware, but the holes didn't line up at all.
I used some hot glue and it works like a charm!

Step 11:
Place plastic cover back into place over speaker.
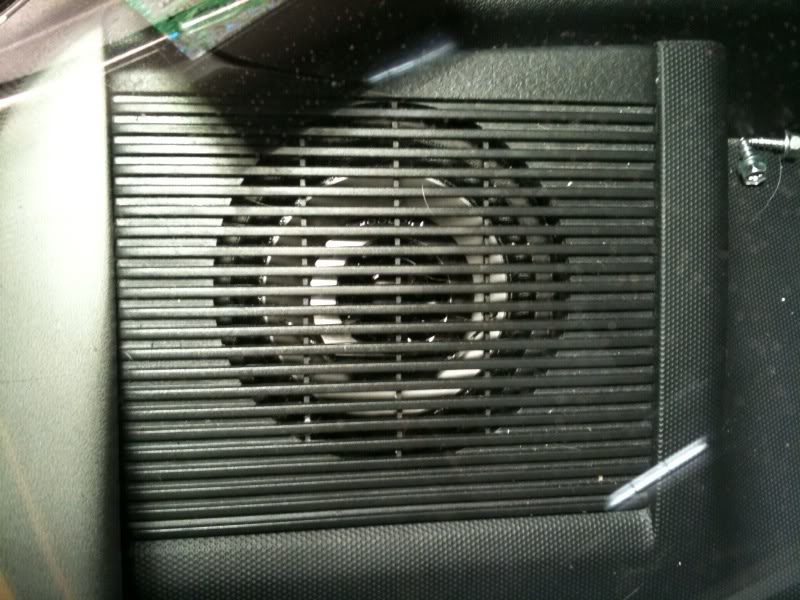
Voila!
You are done, and congrats, you have added another DIY completion to your list!
This DIY is for a standard 4" speaker. I happened to use a Pioneer TS-G1043R located at Amazon.com .
At the time of this post, they were $42.03 and free shipping. I noticed a huge improvement over stock speakers.
Time to Complete:
1 Hour - Beginners
30 Minutes - Experienced
Tools:
Phillips Screwdriver
Small Slot Screwdriver
Wire Stripper
Scissors
Step 1:
Remove plastic speaker covers by lifting the front with the small slot screwdriver.
Step 2:
Unscrew the two screws attaching stock speaker to dash using a standard sized Phillips screwdriver.
Step 3:
Remove speaker from dash and cut off the red and black speaker wire as close to the base of speaker as possible.
Step 4:
There is a blue module glued to speaker unit.
Unplug the connector so that the bottom of the speaker looks like so:
Step 5:
Unscrew the screw located on the underside of speaker. (Warning: there is glue around screw, be careful not to strip the screw)
Step 6:
Detach the blue module unit from the underside of speaker (Warning: there is glue also around metal plate) It should pop off easily w/o issues:
Step 7:
Use wire stripper to expose copper wiring (be careful not to cut the entire wire). (You can also use scissors, but this is much more difficult)
Step 8:
Attach positive (red) and negative (black) wires to the corresponding wires supplied with new speakers.
Step 9:
Plug blue module back into other blue dongle attached to car stereo.
Step 10:
Place speaker in the dash and secure. My set included mounting hardware, but the holes didn't line up at all.
I used some hot glue and it works like a charm!
Step 11:
Place plastic cover back into place over speaker.
Voila!
You are done, and congrats, you have added another DIY completion to your list!
Last edited by MR_LUV; Nov 1, 2017 at 10:05 PM.


Looks good, i did the same upgrade when i had my first gen.
I'd recommend taking out those wire nuts and putting in some crimp caps, or butt connectors. Also, depending on your climate, the hot glue may melt in the summer months, id throw at least one screw in there, if possible.
I'd recommend taking out those wire nuts and putting in some crimp caps, or butt connectors. Also, depending on your climate, the hot glue may melt in the summer months, id throw at least one screw in there, if possible.
Thread Starter
Senior Member
SL Member
Joined: May 2009
Posts: 701
From: San Diego, CA
Looks good, i did the same upgrade when i had my first gen.
I'd recommend taking out those wire nuts and putting in some crimp caps, or butt connectors. Also, depending on your climate, the hot glue may melt in the summer months, id throw at least one screw in there, if possible.
I'd recommend taking out those wire nuts and putting in some crimp caps, or butt connectors. Also, depending on your climate, the hot glue may melt in the summer months, id throw at least one screw in there, if possible.

Thread Starter
Senior Member
SL Member
Joined: May 2009
Posts: 701
From: San Diego, CA
Mine sound much better than stock, but i can definitely see that an amp could improve it even more. I just wanted something more than stock, and this was it. I didnt install resistors with mine.

Thread Starter
Senior Member
SL Member
Joined: May 2009
Posts: 701
From: San Diego, CA
Senior Member
SL Member
Joined: Aug 2007
Posts: 1,267
From: DubV
I just T-tapped these babies in, and it was really easy and they sound amazing. I used one screw and held the other side with electric tape and the speakers fit in snugly anyway. Huge improvement, easy DIY, low cost.
Thread Starter
Senior Member
SL Member
Joined: May 2009
Posts: 701
From: San Diego, CA

Junior Member
Joined: Feb 2009
Posts: 25
From: cooter hills
Good lil write up.
Don't know if others have done this but i remove mine a lot because of messing around lately with stuff under the dash.
But i have found that you can actually bend 2 of the tabs on the aftermarket speaker and make the other to fit in the stock mounting locations so you can just screw them back in.
Not everyone likes to bend or cut (like i do) the tabs.
Great post none the less
Senior Member
SL Member
Joined: Aug 2007
Posts: 1,267
From: DubV
Yeah, I posted a link of them on Amazon and you bought them before me! BTW, using T-taps this mod can be done in under ten minutes. It took me the most time to go inside and look up which wire was + and - .
They sound amazing so I'm happy.
My sound setup is basically complete, door and rear speakers are good enough IMO.
Pioneer AVH P4100DVD
Boss 8" amplified sub under the seat
Pioneer 4" 2 ways in the dash
They sound amazing so I'm happy.
My sound setup is basically complete, door and rear speakers are good enough IMO.
Pioneer AVH P4100DVD
Boss 8" amplified sub under the seat
Pioneer 4" 2 ways in the dash
Senior Member
Fail, INC
SL Member
Scinergy
Joined: Apr 2008
Posts: 956
From: Kansas City, MO
Thanks for the writeup ajcadoo. It helps more people become comfortable with modding their own. There are some changes I would make to the writeup, but they've been mentioned numerous times already.
Senior Member
SL Member
Joined: Aug 2007
Posts: 1,267
From: DubV
In car audio, the front stage is the most important part. If you swap out the door speakers, the improvement may be just as big. However, consider looking for a strong midbass for that location as you have decent low and high already in the front.
Thanks for the writeup ajcadoo. It helps more people become comfortable with modding their own. There are some changes I would make to the writeup, but they've been mentioned numerous times already.
Thanks for the writeup ajcadoo. It helps more people become comfortable with modding their own. There are some changes I would make to the writeup, but they've been mentioned numerous times already.
Thread Starter
Senior Member
SL Member
Joined: May 2009
Posts: 701
From: San Diego, CA
Yeah, I posted a link of them on Amazon and you bought them before me! BTW, using T-taps this mod can be done in under ten minutes. It took me the most time to go inside and look up which wire was + and - .
They sound amazing so I'm happy.
My sound setup is basically complete, door and rear speakers are good enough IMO.
Pioneer AVH P4100DVD
Boss 8" amplified sub under the seat
Pioneer 4" 2 ways in the dash
They sound amazing so I'm happy.
My sound setup is basically complete, door and rear speakers are good enough IMO.
Pioneer AVH P4100DVD
Boss 8" amplified sub under the seat
Pioneer 4" 2 ways in the dash
Thread Starter
Senior Member
SL Member
Joined: May 2009
Posts: 701
From: San Diego, CA
I mainly don't like the taking the door apart aspect of changing the door speakers. I'd imagine installing would be easy, as long as I stick to 6.5"s. But I also run into the problem of looking through the dozens of brands and types of speakers and trying to stick to a price.
Thread Starter
Senior Member
SL Member
Joined: May 2009
Posts: 701
From: San Diego, CA