
Door Panel Inserts


Thread Starter
Senior Member
SL Member
Joined: Mar 2007
Posts: 112
From: Milwaukee, Wisconsin
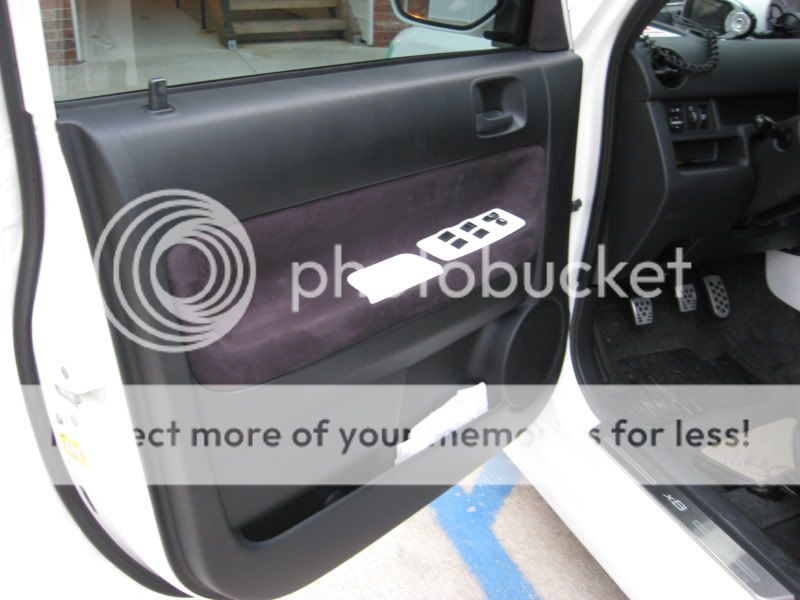
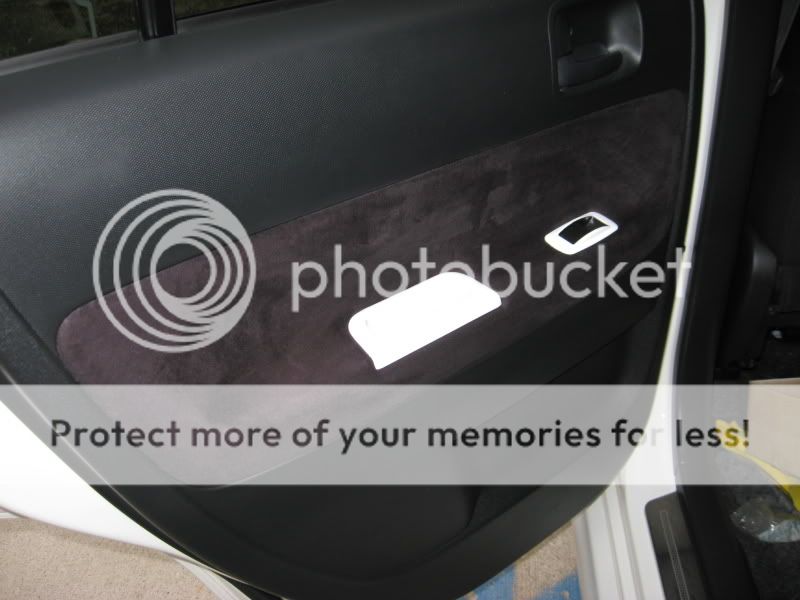
Well, this turned into a much more complicated project than I thought--since the fabric portion of the door panels on the xB aren't easily removable. But, I still like the final look! Three more to go...


Thread Starter
Senior Member
SL Member
Joined: Mar 2007
Posts: 112
From: Milwaukee, Wisconsin
@Metro273: Yes. It's Light Burgundy Upholstery Micro Suede from syfabrics.com. The product is the closest that I could find to the Salsa Red paint color.
@bbszero69: Not only do you have to pull the door, but you have to cut out the fabric area. You end up with a giant hole in the door. Then, you can remove the factory cover, put on the new cover, and reassemble the entire door. It's much more of a pain than I was expecting.
Thanks for the comments all!

looks real sharp
i did mine and i didn't cut any part of the door.
i glued the fabric on and then trimmed around leaving a little less than a 1/4" and then just used a small flat head screw driver to push the edge of the fabric into the channel
worked out perfect.
wow, just went looking for a pic of my doors.......... and i have never taken a pic of just the door pockets. out of the 300 to 400 pics i have in photo bucket, not a single one is of the inside of the doors, thats sad.


Senior Member
SL Member
Joined: Apr 2007
Posts: 219
From: simcoe, Ontario, Canada
Here is the link you are talking about.
http://www.clubxb.com/?p=vB20695
I did this method aswell. It worked out great.

http://www.clubxb.com/?p=vB20695
I did this method aswell. It worked out great.
Thread Starter
Senior Member
SL Member
Joined: Mar 2007
Posts: 112
From: Milwaukee, Wisconsin
I originally tried the "glue on top" approach. But, I couldn't get the fabric to stretch perfectly, and because of how the door is assembled (by sandwiching the scion fabric between the plastic layers of the door), I couldn't get the insert to look factory without removing it entirely.


Junior Member
Joined: Feb 2009
Posts: 25
From: cooter hills
Ok so i need you to go into a lil more detail if you don't mind.
I really wanted to remove the actual insert, and just couldn't seem to see it happening.
When the door panel is off i could find the plastic seem melts in a few spots and the top or bottom (can't rem) had the fabric coming through sandwhiched together like you said but it dosn't run all the way around,
You said replace new insert. Is this the old insert that had the stock fabric on it or did you make new ones?
Man i am sorry for the 20 quetions i just would rather pull the inserts and get a perfect stretch, real seude is a booger, and i am not that patient.
Thanks for any info
Thread Starter
Senior Member
SL Member
Joined: Mar 2007
Posts: 112
From: Milwaukee, Wisconsin
Please don't apologize for asking questions! And, since I'm planning on starting on the next door this weekend, I'll take some pictures.
To answer your specific question, I used a dremel with a cutting wheel to connect the areas where you could see the fabric coming through. Once I had cut around the entire panel, I took it out. Then, I removed the existing fabric, recovered it, and used epoxy to glue the panel back in place.
I hope that this helps! It really resulted in a factory-like finished piece, but it was much more work than I was anticipating.
Junior Member
Joined: Feb 2009
Posts: 25
From: cooter hills
so you cut it with a drimmel, but did you cut it from the outside or inside of the panel? I went out to look at mine and the fabric is only seen on the upper half, then it disapears and the bottom half is solid plastic. And that is why i diddn't end up doing it, i was sitting there scratchin my head like a monkey and started thrown rocks at it.
Thread Starter
Senior Member
SL Member
Joined: Mar 2007
Posts: 112
From: Milwaukee, Wisconsin
I used the dremel to cut the back side of the door. I basically connected the two or three "patches" of fabric around the entire oval of the panel.
What this does is lets you cover the entire panel--and have the fabric go much further into the valley area. I didn't do any cutting on the front of the panel--on the fabric side. Just on the back basically following the hump of plastic all the way around.
What this does is lets you cover the entire panel--and have the fabric go much further into the valley area. I didn't do any cutting on the front of the panel--on the fabric side. Just on the back basically following the hump of plastic all the way around.
Junior Member
Joined: Feb 2009
Posts: 25
From: cooter hills
ok you followed the bump, i was just trying to figure out exactly how you did it. I have done a few panels and have always done the push in method, I have always wanted to do it RIGHT. And this seems the best way (most difficult of corse)
Didn't mean to go so in depth about it, its just cutting plastic, i just wanted to make sure. Seems the weird things cost the most to replace. Outer metal door prob like 50 bucks inner plastic door panel prob like 400 for one. just a guesstomation but you know what i mean. Thanks a lot for the help, If you would post some pics right before you cut and right after that would be awsome.
You da man.
ok, here i got some pics of mine
i still need to do some type of trim to set it apart from the rest of the door
heres a vid also
<object width="425" height="344"><param name="movie" value="http://www.youtube.com/v/3MEWFB_baL0&hl=en&fs=1"></param><param name="allowFullScreen" value="true"></param><param name="allowscriptaccess" value="always"></param><embed src="http://www.youtube.com/v/3MEWFB_baL0&hl=en&fs=1" type="application/x-shockwave-flash" allowscriptaccess="always" allowfullscreen="true" width="425" height="344"></embed></object>

Thread
Thread Starter
Forum
Replies
Last Post
BlingSlade
Scion xB 1st-Gen Owners Lounge
0
Sep 5, 2015 08:52 AM