How-to: Custom oven for xB


Thread Starter
Senior Member


SL Member
Joined: Dec 2004
Posts: 4,971
From: Atlanta, GA
 How-to: Custom oven for xB
Here are the steps I took to create my custom backlit oven door. If you choose to create a similar door, please do so at your own risk. I accept no responsibility for any damage to your car or person. These steps are to be used for reference only.
Materials needed:
Adhesion promoter
White spray paint
Clear spray paint
Rustoleum frosted glass spray paint
Lexan sheet (at least 6"x3")
2-part epoxy
Vinyl SCION letters (purchased through local sign shop)
5' EL wire
Wire ties
800 grit sandpaper
Stainless overlay - I had mine custom cut out of 20ga stainless steel
Tools needed:
Dremel
Drill
Clamps
Steps:
1) Remove the center dash piece. THIS tech article explains how to do this.
2) Remove the oven assembly. It simply pulls out. There will be some wires attached to the cigarette lighter, and if you have fog lights or security, the wires connecting them need to be removed as well. Mine pulled straight out.
3) To remove the oven door itself, pull the hinges out, away from oven towards the sides of the vehicle.
4) Measure and mark where you want to cut the center out of the oven door.
5) Cut out the center of the door with a Dremel or similar tool with a cutoff wheel. It should look like this:

6) Sand the cutout smooth.
If you would like to paint your door, use steps 7-9, otherwise, skip to 10. This is not necessary. I went with white, I like the contrast.
7) Spray the door with adhesion promoter.
8) Spray the door with your choice of color.
9) Clear coat the door.
10) Take the stainless overlay and sand it in one direction with the 800 grit sandpaper to give it a brushed look.
11) Clear coat the stainless, otherwise it will show fingerprints very easily, and they are tough to remove.
12) Once everything is sufficiently dry, clamp the stainless overlay in place on the door. It must be clamped since the door has a slight curve to it.

13) Epoxy the stainless to the door.

14) Let the epoxy dry.
15) Cut the lexan to the proper shape and size to fit in the door, behind the stainless.
16) Place the SCION vinyl letters on the rear of the glass. Be sure to center the letters as there should be little leeway once the lexan is behind the stainless
17) Spray the front and back of the lexan with the frosted glass spray.
18) Set the glass in place and epoxy. Now your door should look like this. Do not attach the door yet.

19) To get the light behind the door, I went with 5' of EL wire. I strung it across the ceiling of the oven. I did the lighting this way, rather than a neon or cold cathode because I wanted a little light, not too much, plus since the whole ceiling is lit, there are no shadows on the window when something is in the oven.
20) Mount the EL wire in rows along the top of the oven by drilling holes and using wire ties. Run the power wire out the bottom. Pictures of the top and inside are shown below.


21) Attach the door.
22) Returning to the vehicle, attach the power to a power source. I connected mine to my interior LEDS, which are on their own switch.
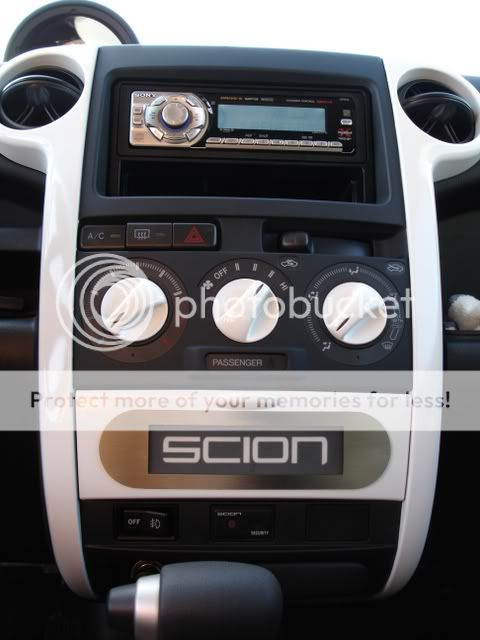
23) Reattach center console and you should look like this:
Materials needed:
Adhesion promoter
White spray paint
Clear spray paint
Rustoleum frosted glass spray paint
Lexan sheet (at least 6"x3")
2-part epoxy
Vinyl SCION letters (purchased through local sign shop)
5' EL wire
Wire ties
800 grit sandpaper
Stainless overlay - I had mine custom cut out of 20ga stainless steel
Tools needed:
Dremel
Drill
Clamps
Steps:
1) Remove the center dash piece. THIS tech article explains how to do this.
2) Remove the oven assembly. It simply pulls out. There will be some wires attached to the cigarette lighter, and if you have fog lights or security, the wires connecting them need to be removed as well. Mine pulled straight out.
3) To remove the oven door itself, pull the hinges out, away from oven towards the sides of the vehicle.
4) Measure and mark where you want to cut the center out of the oven door.
5) Cut out the center of the door with a Dremel or similar tool with a cutoff wheel. It should look like this:
6) Sand the cutout smooth.
If you would like to paint your door, use steps 7-9, otherwise, skip to 10. This is not necessary. I went with white, I like the contrast.
7) Spray the door with adhesion promoter.
8) Spray the door with your choice of color.
9) Clear coat the door.
10) Take the stainless overlay and sand it in one direction with the 800 grit sandpaper to give it a brushed look.
11) Clear coat the stainless, otherwise it will show fingerprints very easily, and they are tough to remove.
12) Once everything is sufficiently dry, clamp the stainless overlay in place on the door. It must be clamped since the door has a slight curve to it.
13) Epoxy the stainless to the door.
14) Let the epoxy dry.
15) Cut the lexan to the proper shape and size to fit in the door, behind the stainless.
16) Place the SCION vinyl letters on the rear of the glass. Be sure to center the letters as there should be little leeway once the lexan is behind the stainless
17) Spray the front and back of the lexan with the frosted glass spray.
18) Set the glass in place and epoxy. Now your door should look like this. Do not attach the door yet.
19) To get the light behind the door, I went with 5' of EL wire. I strung it across the ceiling of the oven. I did the lighting this way, rather than a neon or cold cathode because I wanted a little light, not too much, plus since the whole ceiling is lit, there are no shadows on the window when something is in the oven.
20) Mount the EL wire in rows along the top of the oven by drilling holes and using wire ties. Run the power wire out the bottom. Pictures of the top and inside are shown below.
21) Attach the door.
22) Returning to the vehicle, attach the power to a power source. I connected mine to my interior LEDS, which are on their own switch.
23) Reattach center console and you should look like this:


Senior Member
SL Member
Joined: Jan 2005
Posts: 2,030
From: Wheaton, IL
Got any night time shots yet? I'd like to see what that EL
wire looks like at night.
You might also consider using a 4" or 6" Cold Cathode over
that EL wire. You'll get 10X the light if that's what you are
looking for.
wire looks like at night.
You might also consider using a 4" or 6" Cold Cathode over
that EL wire. You'll get 10X the light if that's what you are
looking for.
Thread Starter
Senior Member
SL Member
Joined: Dec 2004
Posts: 4,971
From: Atlanta, GA
Originally Posted by Lonely Raven
Got any night time shots yet? I'd like to see what that EL
wire looks like at night.
You might also consider using a 4" or 6" Cold Cathode over
that EL wire. You'll get 10X the light if that's what you are
looking for.
wire looks like at night.
You might also consider using a 4" or 6" Cold Cathode over
that EL wire. You'll get 10X the light if that's what you are
looking for.
I considered a cold cathode but wanted a more even light that wouldn't get blocked if something was in the oven, and I didn't want something too bright. I have zero experience with EL, but based on the amount of light I saw in daylight, I think I'll be happy.
Thread Starter
Senior Member
SL Member
Joined: Dec 2004
Posts: 4,971
From: Atlanta, GA
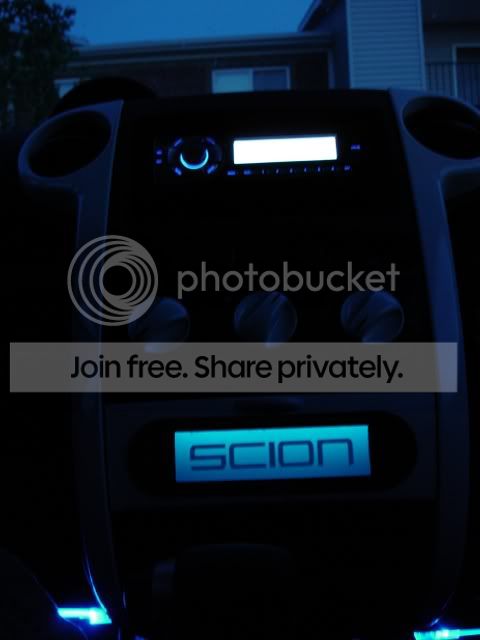
OK I got some night shots up. I just added them to my first post. I must say it looks freakin awesome. The color is very consistent through the frosted Lexan, although a bit more turquoise than I would like, but it looks fine. The nice thing about the location of the lights provised a sweet fade from top to bottom, most evident in the last picture.
Before anyone says anything about the lettering looking crooked in the last pic, look closer and you'll notice the whole picture is. To get down at that angle, I did not have a good eye on the LCD.
I also changed the top picture. I took it with my better digital camera, the same one I use for the night shots. It's a 7.2 megapixel Sony.
Before anyone says anything about the lettering looking crooked in the last pic, look closer and you'll notice the whole picture is. To get down at that angle, I did not have a good eye on the LCD.
I also changed the top picture. I took it with my better digital camera, the same one I use for the night shots. It's a 7.2 megapixel Sony.

Thread Starter
Senior Member
SL Member
Joined: Dec 2004
Posts: 4,971
From: Atlanta, GA
Originally Posted by BlueOnyxxB
hey Max, that looks awsome. about how much money did u invest in parts even with lights.
Lexan: $4
Frosted glass: $5
I had the white and the clear laying around, but they're each about $5
I also used some sand paper, a dremel, and some zip-ties.
Now the stainless piece was custom. I had it drawn up, then had it cut at work. A local metal shop could hook you up. I can get the dimensions. I do have a few more laying around if anyone is interested, but I'd rather not let them all go, so they better go to a good home.
I forgot to mention...I did clear the stainless, since it smudges way too easily. Thanks for all your comments.