
removing center console...


Thread Starter
Junior Member
Joined: Jul 2005
Posts: 27
From: LA
not sure exactly what you call it, but the storage space under the radio that resembles single DIN with the flap... is there a way to remove it for stereo installation?
what i want to do is to install a in-dash touchscreen LCD (xenarc or lilliput?) for my carputer project which hopefully will take off soon. can anyone show me pics if the setup was done before? i tried searching in here but most are in place of where the cd/radio is right now which is double DIN setup.
much appreciated
Senior Member

SL Member
Joined: Nov 2005
Posts: 1,527
From: Surf City SoCal
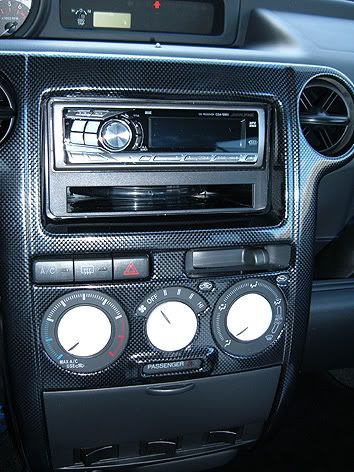
That second glove box sometimes refered to as an "oven" can easily be removed.
First remove the center dash trim piece.
Remove the three AC ***** from the center dash buy simply pulling them out.
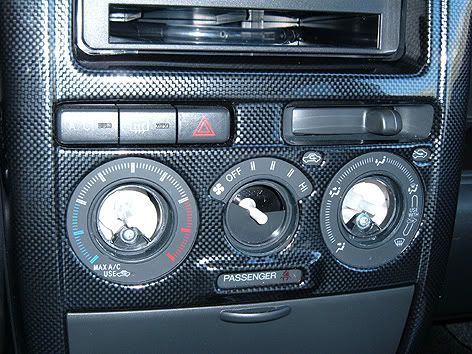
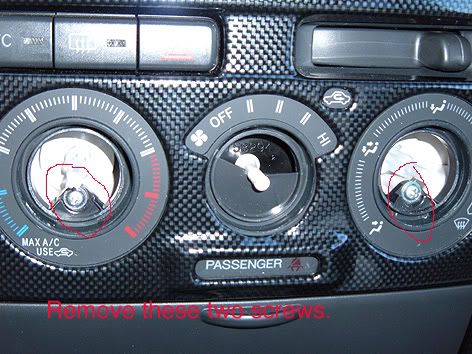
Once the ***** are out, remove the two Phillips head screws.
Then use your fingers or a screwdriver covered with a towel to pull the center trim loose at the bottom.
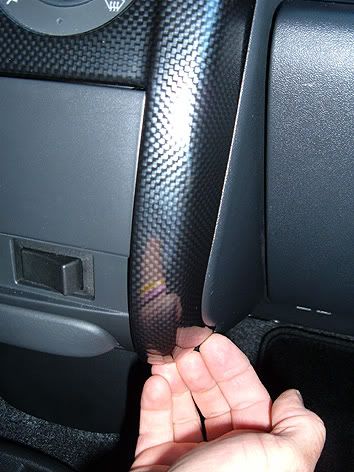
With one side loose, pry the other side loose as well.
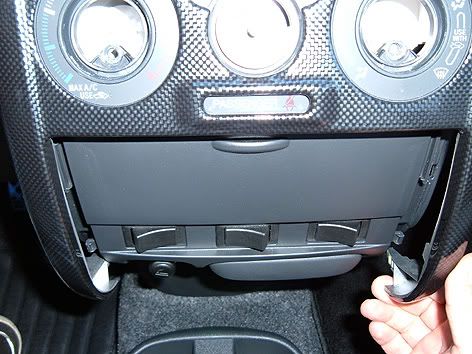
Pull towards yourself up both sides of the center trim piece until you reach the top. Then you will find two tabs that need to be unhooked. I've found that pushing down ahile pulling makes it easier.

Now that the center trim piece is free from the dash, disconnect the three electrical connections for the A/C, rear defroster and the fan/lighting control.

With the center trim piece completely removed now,
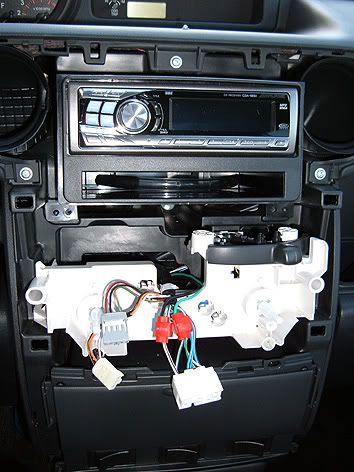
You can grasp both sides of the "oven" and pull towards yourself. There are no screws, just the two pop in tabs.
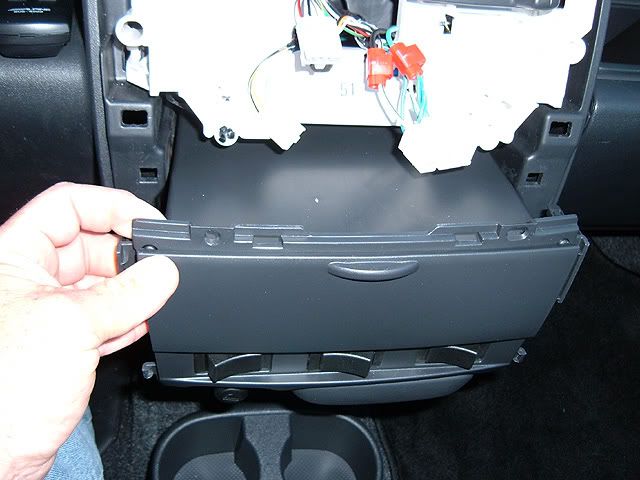
Installation is just the reverse of this process.
Good luck, it's really not hard to do at all.
First remove the center dash trim piece.
Remove the three AC ***** from the center dash buy simply pulling them out.
Once the ***** are out, remove the two Phillips head screws.
Then use your fingers or a screwdriver covered with a towel to pull the center trim loose at the bottom.
With one side loose, pry the other side loose as well.
Pull towards yourself up both sides of the center trim piece until you reach the top. Then you will find two tabs that need to be unhooked. I've found that pushing down ahile pulling makes it easier.
Now that the center trim piece is free from the dash, disconnect the three electrical connections for the A/C, rear defroster and the fan/lighting control.
With the center trim piece completely removed now,
You can grasp both sides of the "oven" and pull towards yourself. There are no screws, just the two pop in tabs.
Installation is just the reverse of this process.
Good luck, it's really not hard to do at all.


Thread Starter
Junior Member
Joined: Jul 2005
Posts: 27
From: LA
GREAT! thank you again 'surfcitylocal'....
very good pic. documentary there
now next question is if anyone has install a flip-up lcd touchscreen in the "oven"...
most i've seen are installed where the OEM radio is...
very good pic. documentary there
now next question is if anyone has install a flip-up lcd touchscreen in the "oven"...
most i've seen are installed where the OEM radio is...

Junior Member
Joined: Feb 2006
Posts: 4
ive seen a 7" flip up touchscreen installed where the "oven" is. the door to that compartment was cut out to fit the unit in flush with the front. i dont think any of the monitors would slide far enough forward to install it in the pocket and just be able to use it whenever you opened the compartment.
Thread Starter
Junior Member
Joined: Jul 2005
Posts: 27
From: LA
'empirescion'..., yea i hear ya. i've seen a few pics of people having stereo in them, some with the oven doors too. but never have i came across with foldable touchscreens in there. so it'll be great to see who has that setup. 

Senior Member
SL Member
Joined: Dec 2005
Posts: 3,270
From: Lost in Tranquility
Nice pics and description of how to take trim bezel off, especially for somone who has never taken there off before. The only problem i have run into taking the dash off(taken off atleast 50 times in 5 months) is after taking the dash off about 5 times one of the screws behind the climate controls would not go in tight at all and would cause the **** to sit funny. Figured out that the white piece that the screw goes into had basically been boared out from the screw being taken out to many times, so i put a thicker screw in and climate **** and dash both sit perfectly. Anybody else had this problem before. But atleast its a warning and or help if anybody else has this problem..

Senior Member
SL Member
Joined: Apr 2005
Posts: 354
From: French Valley, CA
ProShopXB - one the the reasons screws become loose is they are over tightened. When tightening screws into vinyl plastic they should be just barely past finger tight. The problem is, people have a tendancy to crank down on them like they are screwing into metal.
Replacing the screw witha lareger one is one fix. Another is to lightly coat the threads with RTV and let it dry completely then reinstall. If the screw is going into PVC (the plastic found in TV sets, etc.), you could set a piece of zip tie in the hole, tighten the screw and cut off the exposed zip tie.
HTH --

Thread
Thread Starter
Forum
Replies
Last Post