When you click on links to various merchants on this site and make a purchase, this can result in this site earning a commission. Affiliate programs and affiliations include, but are not limited to, the eBay Partner Network.
I know there is an old Install DIY on Sway Bar End Link Bushings already on Scionlife and another Scion website for the xB. I read through those multiple times before doing my install.
There was a ton of different posts with different information. After reading them as well as other research online, I thought it would be good to put what I belief is the correct information for the Scion xA.
Hopefully this helps someone.
My 2006 Scion xA has ~115,000 miles and had the original Sway Bar End Link Bushings. While changing the oil, I noticed the original rubber bushings were cracking. I hadn't noticed anything "wrong" with my car,
but they clearly were worn out. Luckily (thanks Texas weather), mine didn't look as bad as some of the ones in previous threads from much newer cars (a long time ago) and I didn't have corrosion on my originals.
Tools I used:
12 mm Box Wrench (to remove original end links).
10 mm Box Wrench (to remove original end links).
9/16 inch Box Wrench (for new end links).
9/16 inch Deep Socket and Ratchet (for new end links).
15 inch Pry Bar (for both removing original end links and installing new end links).
Car Jack (both for putting the front of the car on Jack Stands and lifting up on the Lower Control Arm to help position the bolt for the end link).
2 Jack Stands.
Blocks for rear tires (to ensure the car didn't roll backwards).
Ramps (to access end link bolts for final tightening).
Stuff to remove/install my wheels (breaker bar, socket, ratchet, Torque Wrench).
Parts Required:
Two 4 inch long Grade 8 Bolts which are 3/8 inch diameter and have -16 Course Threads. Grade 8 is stronger than Grade 5 or standard bolts/fasteners. All information I found suggested using Grade 8 parts. I purchased mine at Home Depot. They were Hillman Part Number 880194. The last little over an inch of the bolt is threaded.
Two Grade 8 Nylon 3/8 inch locking Nuts w/ -16 threads to match the bolts. I got these from Lowe's (Home Depot didn't have Grade 8 Nylon Locking Nuts). Lowe's had them listed as Grade 8. The package actually said they are Grade C. Grade C is supposedly stronger than Grade 5 and similar strength to Grade 8. These should work fine. They were Hillman Part Number 883184. Note: Some people in the old threads uses Stainless Steel Nylon Locking Nuts. I did not because 1) Stainless Steel isn't as strong as Grade 8 and thus the threads wouldn't have been as strong and 2) Stainless Steel in theory can cause corrosion due the bolts and washers not being stainless steel. They would probably work fine, but it made more sense to use Grade 8/C nuts.
Grade 8 3/8 inch Flat Washers. I got these from Home Depot. They are Everbilt Part Number 368310. This is something I used that were not used by anyone in the old threads. I will explain what I used them for later.
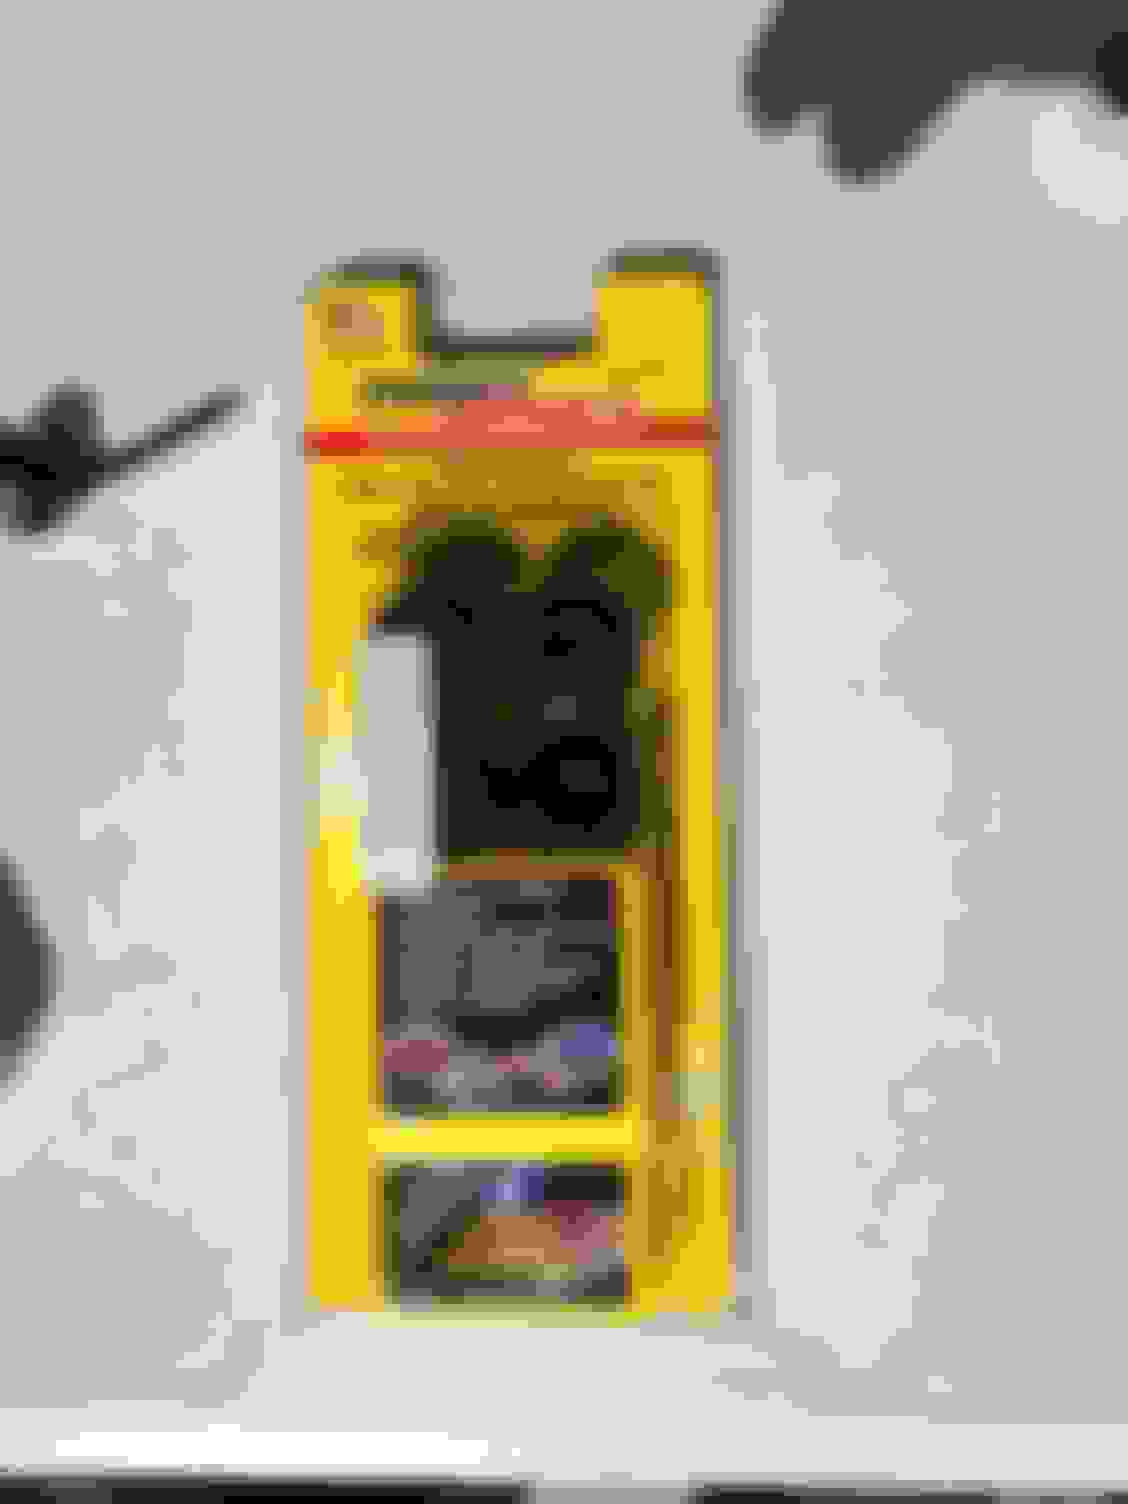
Energy Suspension Part Number 9.8105G. This is the Polyurethane bushings and associated washers that go between them. These are supposed to be much better than the stock rubber bushings and last much longer. Note that this kit has the Black Bushings. There is another kit which is Part Number 9.8105R which has the Red Bushings which seems like what most people use. They are the same thing just different color. I ordered mine from Amazon. You can also order them from Auto Parts stores like Autozone. I think Autozone has the Red ones in stock (I just didn't want Red). Note: Energy Suspension sells a kit for the Scion xB (they don't even have a selection for the Scion xA). This includes the same bushings and washers as the kit I bought plus the bolts (I think 4.5 inch), nuts, and a 1 inch spacer. The OEM end link part numbers for the Scion xA and Scion xB are EXACTLY the same, so the same kit should work for the Scion xA. However, everyone who had used this kit (based on the older threads) had suggested they didn't really work for the Scion xB (I can't say for a fact whether Energy Suspension changed the kit over the years but I think it is still the same part number as people were using years ago which didn't work). The thing that didn't work was that the 1 inch spacer was too large. With the 1 inch spacer, the sway bar and lower control arm were pushed too far apart. Ideally, you want them to maintain the same distance as stock. Also, the bolt was too long if you didn't use the spacer. Thus, most people who bought the kit purchased their own bolts and most simply didn't use the spacer, so there is no reason to pay more for that kit.
Picture of the Energy Suspension Kit:
Things I learned from the old threads and some online research:
The Energy Suspension kit for the Scion xB didn't really work for the Scion xB (and thus wouldn't for the Scion xA). The 1 inch spacer is too long. Most people didn't install the spacer (which made the bolts too long because there wasn't enough thread at the bottom of the bolt to tighten things).
While most people didn't use a spacer at all between the sway bar and the lower control arm, there should be about a 1/2 inch spacer (or maybe a little less). Without any spacer, the lower control arm and the sway bar are closer together than OEM. I used 2 washers to increase the distance but did not use a 1/2 inch spacer because I couldn't get things to install with the 1/2 spacer (I will explain that later). My sway bar and lower control arm are a little too close, but not too bad. While not using a spacer at all does prevent getting things aligned like OEM, it didn't seem like anyone ever had any issues (from the old threads), so it probably would work OK.
The Energy Suspension sway bar end link bushings do NOT need to be greased. Some people on the old threads said they should be greased to prevent squeaks. The Energy Suspension install instructions (from their website) specifically mention to NOT grease them. Sway Bar Bushings (which are a different thing) do require Grease to prevent squeaking (which is probably what confused people).
I am NOT certain exactly how much torque you should use on the nut for the final install. There was nothing definitive in the old threads. The OEM nuts are tightened to 13 lb ft of torque, but I seriously doubt that would apply to the aftermarket solution (everything is different). The Energy Suspension Install Instructions say to tighten until the Bushings just start to bulge. That is somewhat subjective. I tried to do that. Tightening the bolt required force, but I definitely could have tightened more.
You should do the final tightening of the bolts with the car NOT on Jack Stands. The car should have the full weight on the suspension. I jacked everything up and took the wheels off (makes things easier) to get everything installed and just tightened the nut somewhat. I then drove onto jack stands and did the final tightening (you may be able to do it without driving onto jack stands). I doubt this is critical. You could probably tighten the nuts with the wheels off and not have any problems. From the old threads, some did and some didn't. However, some online research suggests you should have the full weight of the car on the suspension when doing the final tightening.
For the install, you can install the bolt from the top or from the bottom. Installing from the bottom should be MUCH easier. However, installing from the bottom means the bolt sticks up higher on the top. The axle is fairly close to the bolt. I think you should install from the top to prevent any possible interference with the axle. The axle being close to the top is what makes it more difficult to install the bolt from the top. The interference with the axle when trying to get everything installed was the only thing that was tough about the install. If there were more space, this would have been incredibly easy.
The Energy Suspension Bushings have a flat side and a side with a little "nipple". The side with the part sticking out a little bit should always go towards the sway bar or lower control arm. It helps center the bushing into the sway bar or control arm. The washers that come with the Energy Suspension Bushings are slightly concave. The washers should be installed so they "cup" the bushing (curve around the bushing slightly). Hopefully that makes sense.
Some things I learned doing the Install:
It makes sense to put both sides of the front on jack stands remove both wheels for the install. I removed the nuts on the original sway bar end links for BOTH sides before removing the original bolts. That allowed the sway bar to be moved more easily and made removing the original components easier.
The pry bar is useful for moving up the sway bar when you are trying to get the original end links out and when trying to get the new bolt and components installed. You can use the pry bar against the lower control arm. Do NOT use it against the axle. That supposedly could hurt the axle.
Using a jack to raise up the lower control arm can be useful in aligning the holes to install the bolt for the new end link. Just position the jack under a portion of the lower control arm that won't be in the way when you install the bolt. I have a rubber thing on my jack to prevent damaging anything (rubber is what touched the lower control arm).
If you use any spacer (I used 2 washers which probably wasn't enough but was the best I could do and get the bolt installed) the bolt may not have enough threads "sticking out" on the bottom to get the nut on. The 4 inch bolt is plenty long once things are compressed, but before anything is compressed, I barely had any threads sticking out below the lower washer. I used a 4 inch C-clamp (top on the top of the flat part of the sway bar) and bottom (part that moves up and down) under the lower control arm. I tightened things to compress things just a little so I could start the nut. This was actually very easy to do.
If you didn't use any spacer, the install would be much easier (or if you install the bolt from the bottom). You wouldn't need to use the C-clamp I previously mentioned (though that wasn't hard), and it would be easier to get the bolt and all the components installed. The hard part was getting the bolt installed from the top and through all of the components which are between the sway bar and the lower control arm (should be sway bar -> bushing -> bushing washer -> spacer -> bushing washer -> bushing -> lower control arm). Because the axle is only a inch or two above the sway bar, you can't install the bolt straight up and down. You have to come in at an angle. All the parts (before they are compressed) will barely fit between the sway bar and the lower control arm with the spacer. That makes it hard to get the bolt installed. I could NOT get the bolt installed with a 1/2 inch spacer. I wanted the 1/2 inch spacer to get as close to the original spacing between the sway bar and lower control arm as possible. I tried for like 30 minutes and couldn't get it aligned. Finding a 1/2 inch spacer wasn't easy. They are not that common. I ended up having to order a package of 5 from Home Depot (they don't carry them in the stores). The only thing I could find was Hillman Part Number 883498, I ended up NOT using them because I couldn't get it installed. The best I could do (and it still took some time because it was tight) was to install 2 washers as spacers (which probably gives me about 1/8 inch). My solution between the sway bar and lower control arm ended up being ( sway bar -> bushing -> bushing washer -> washer -> washer -> bushing washer -> bushing -> lower control arm).
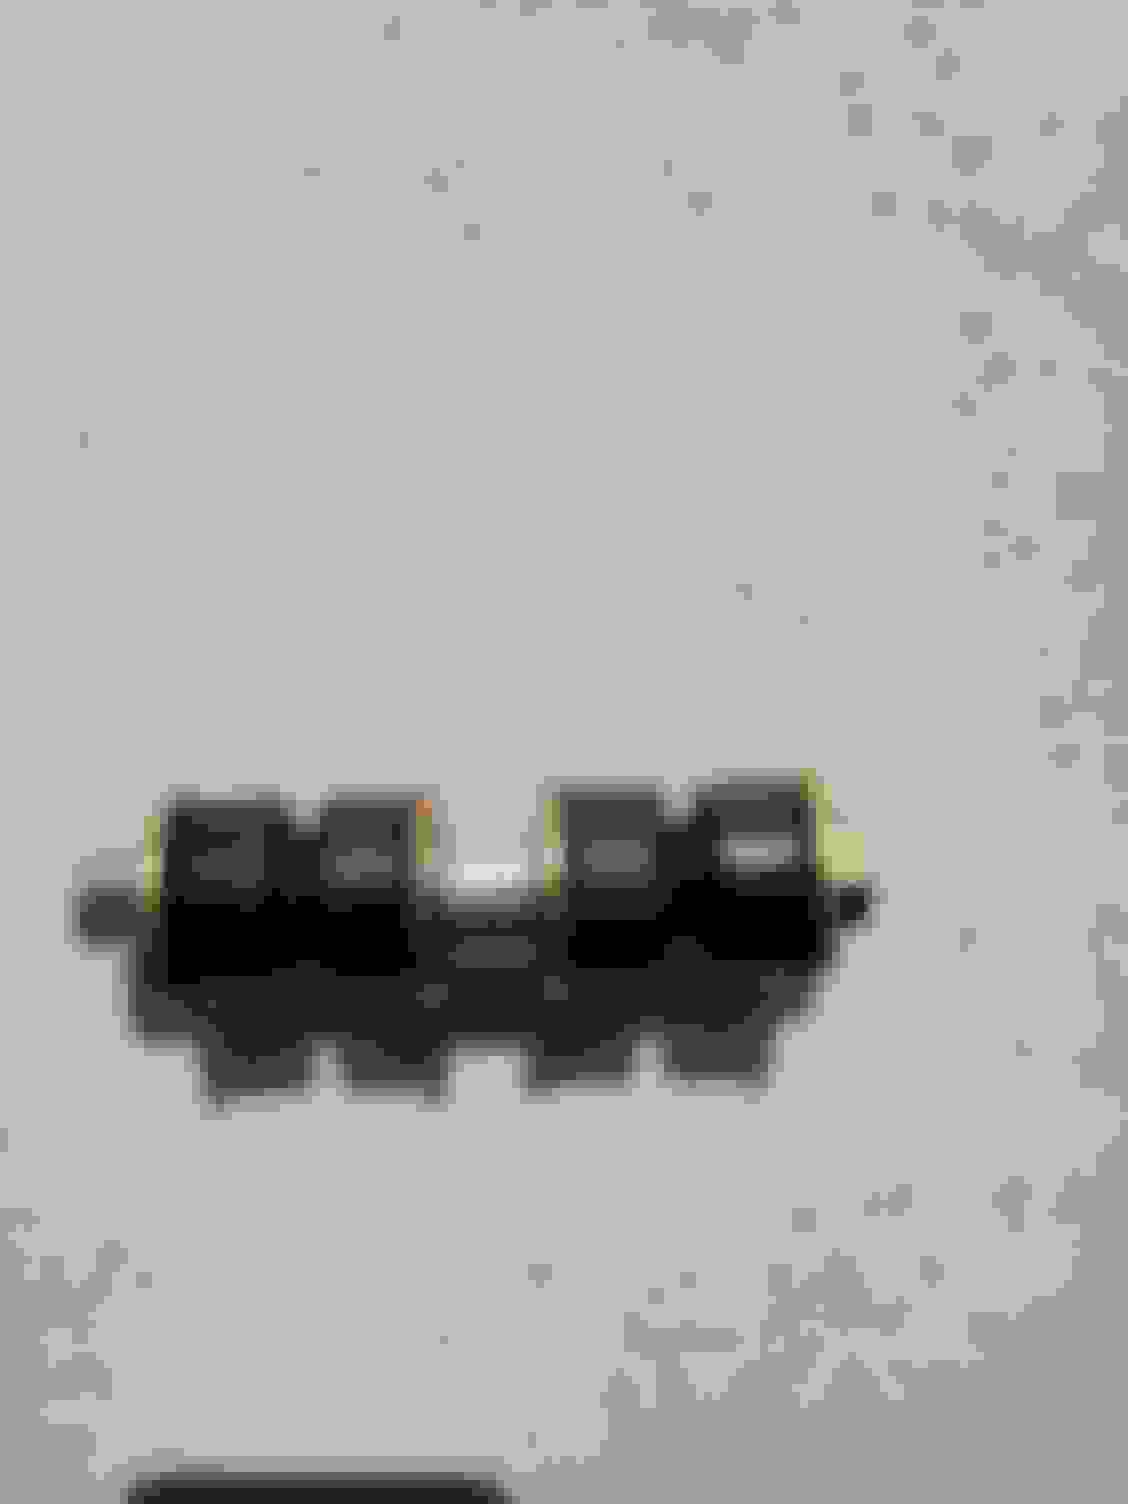
Pictures of original OEM sway bar end links (showing cracking after 14 years):
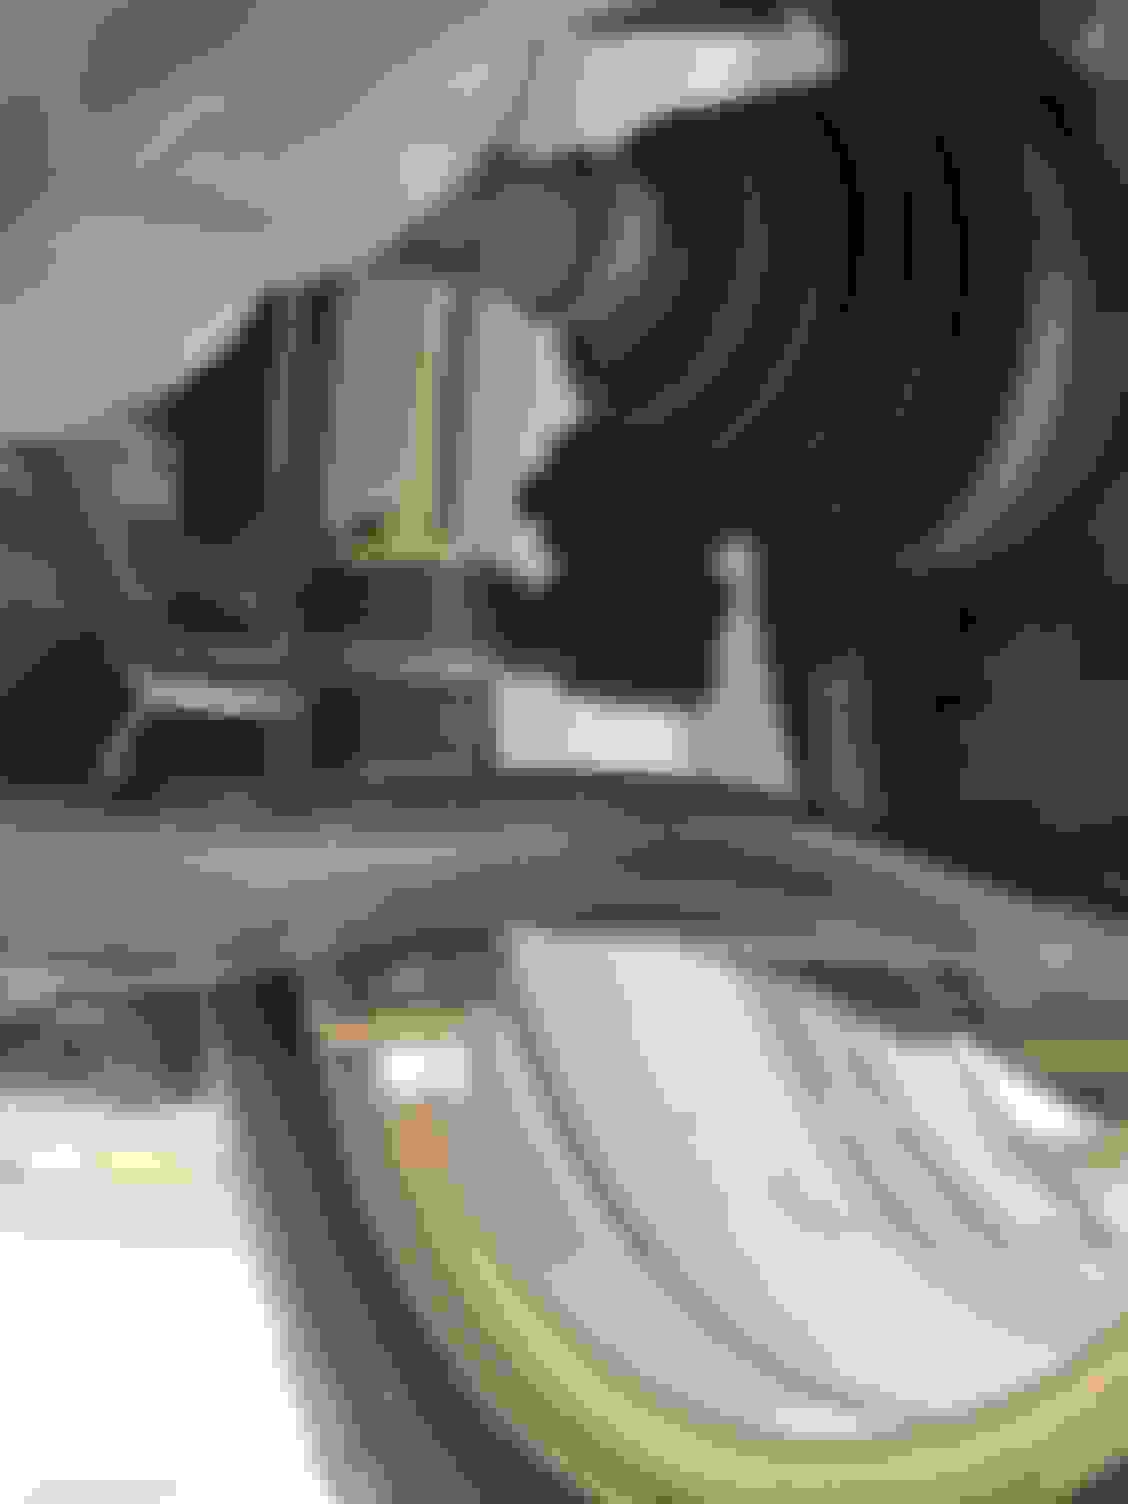
Picture of the new Sway Bar End Links Prior to Installing on the Car (Note: This is with the 1/2 inch spacer which I couldn't get installed and which I replaced with two washers):
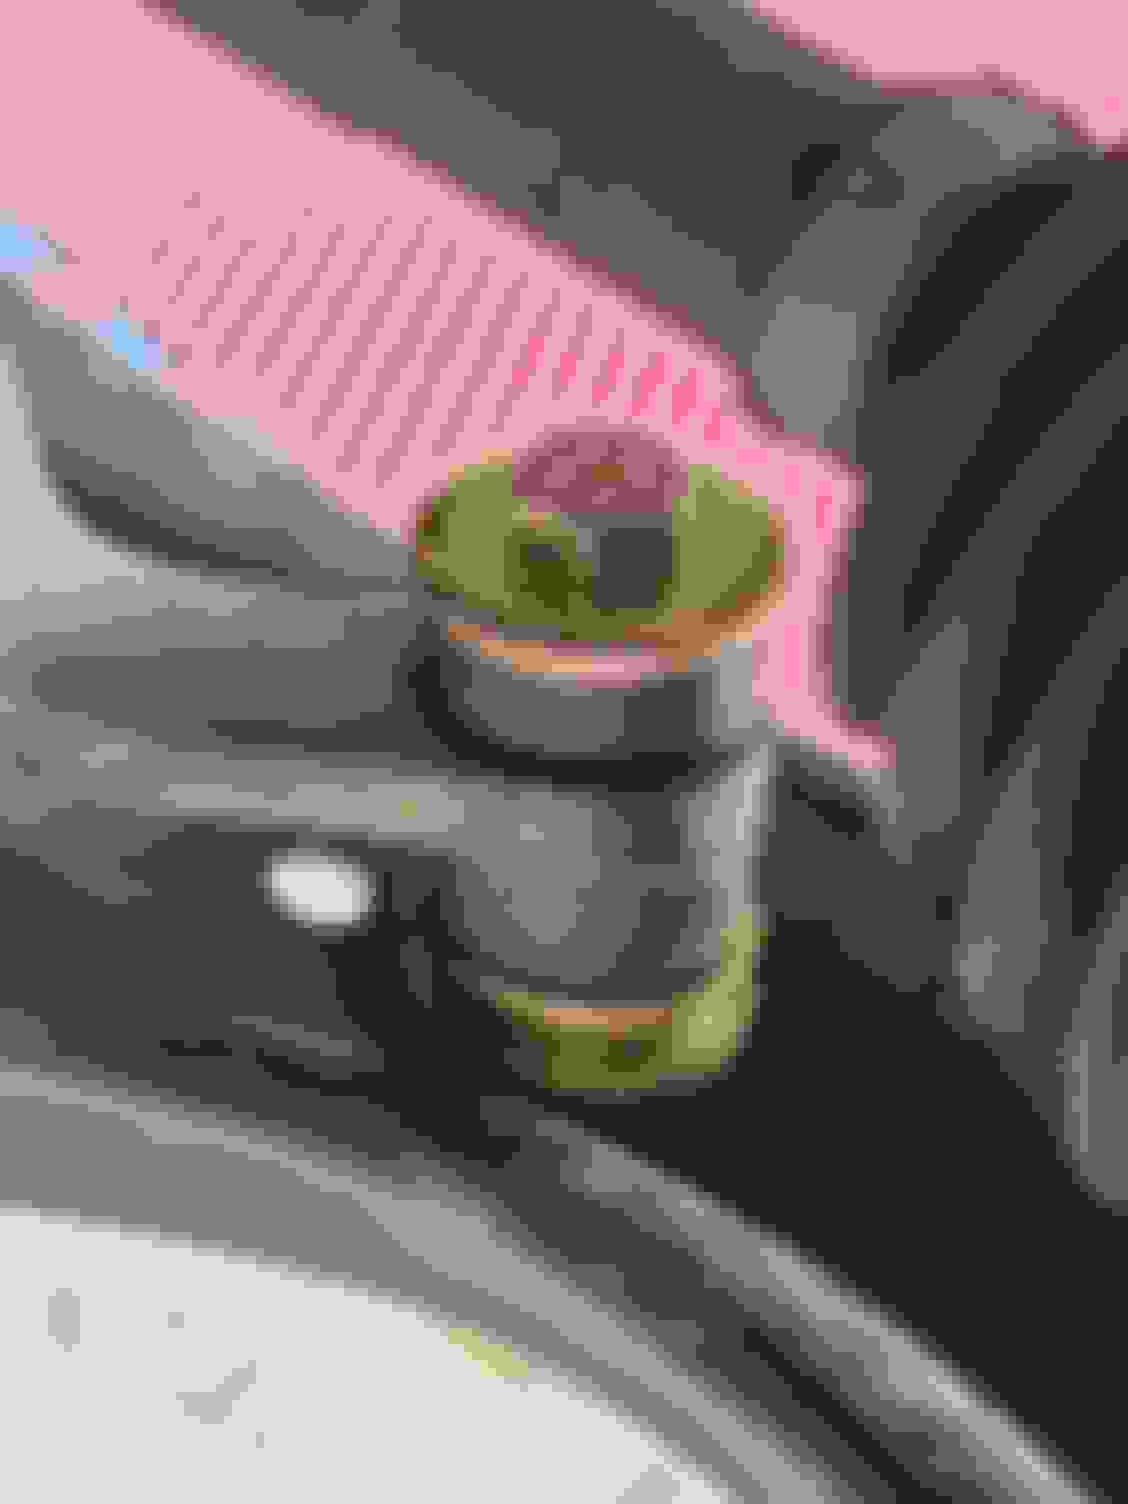
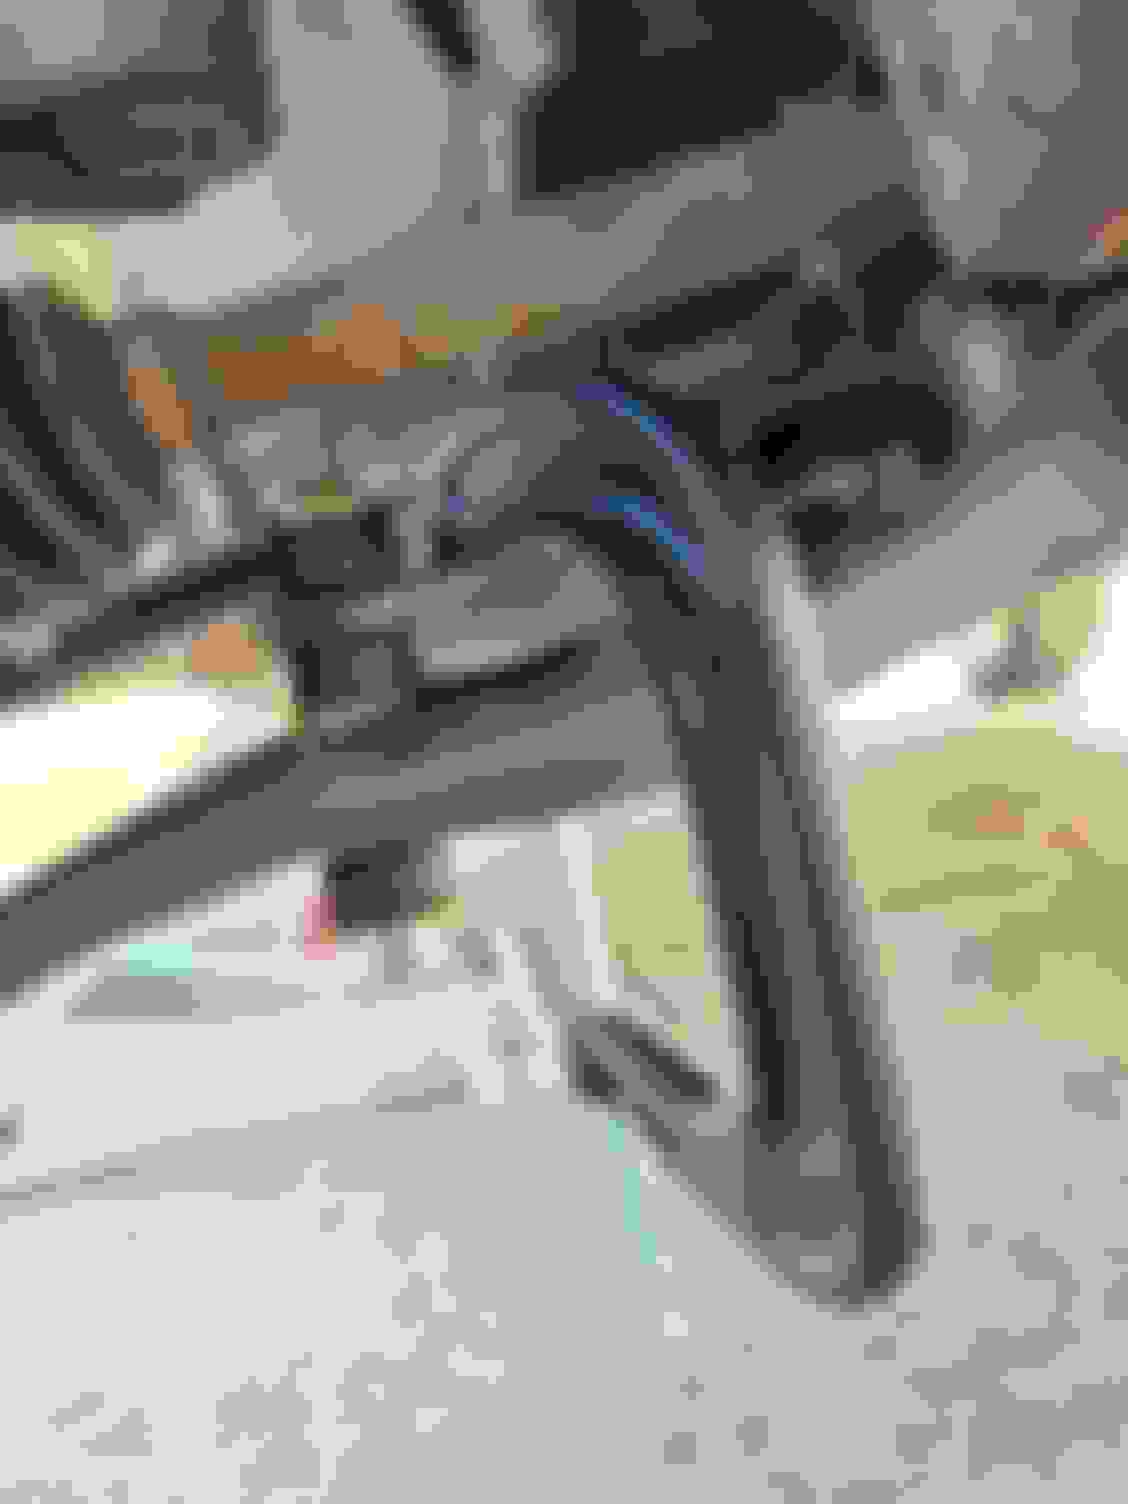
Pictures of the new Sway Bar End Links Installed:
Install Process I used:
Put front of car jacked up on Jack Stands and remove wheels.
Undo top and bottom nut on the original OEM sway bar end links. The nuts need the 12 mm box wrench (you can use a 12 mm ratchet on the bottom if you want). You need to hold the little bar in the middle using the 10 mm box wrench or everything will spin when you try to turn the nuts. Do this on BOTH sides so the sway bar can be moved more easily. Note: On the original OEM "bolt" end link, there is a little part that is square between the sway bar and lower control arm that you put the 10 mm box wrench on. Some people use Vice Grips to hold the middle of the original link/bolt if you don't have a 10 mm box wrench.
Remove the original washers and bushings from the top and bottom (you need them out of the way to get the link/bolt out). Mine were stuck on a little bit. I was able to just pull them off without much work. You might need a screw driver or something to pry them off if yours are really stuck on.
Use the pry bar to lift up the sway bar slightly so you can get the original end link/bolt out.
Put a Bushing Washer and Bushing (as mentioned the bushing washer is slightly concave and should cup the bushing and the Bushing should have the flat side facing the washer) on the end of the bolt.
Position the components which will go between the sway bar and lower control arm where they will go. I found it was much easier to pre-position all them and try to get the bolt to slide down between them than to try to get one piece at a time installed after pushing the bolt through the sway bar. For me, from top to bottom, I had the following between the Sway Bar and Lower Control Arm (Bushing -> Bushing Washer -> Washer (used as spacer) -> Washer (used as spacer) -> Bushing Washer -> Bushing). As mentioned, I wanted to use a 1/2 inch spacer but couldn't get things to work so I used the two washers to at least help the spacing be closer to OEM. Make sure you have the Bushing and Bushing Washers facing the right direction (as mentioned previously).
Install the bolt from the top and down through the sway bar, the components between the sway bar and lower control arm, and lower control arm. You should end up with a bushing washer and bushing above the sway bar and a bushing, bushing washer, washer (if you decide to use them as a spacer), washer (if you decide to use them as a spacer), bushing washer, and bushing between the sway bar and the lower control arm, and the bolt should be sticking out the bottom of the control arm. This is easier said than done. Because the axle is only an inch or two above the sway bar, it takes some work to get the bolt through. The axle is in the way. The pry bar can be used to help move the sway bar to help with alignment. Putting a jack under the lower control arm and lifting can move the axle up a little to give a little more space above the sway bar for clearance (you don't use the jack on the axle but on the control arm and that lifts everything up while the sway bar doesn't move up so much). As mentioned, it would be much easier to install the bolt from the bottom (with the nut being on the top) since the axle wouldn't be in the way and the bolt could be installed straight through. However, that would reduce clearance between the axle and the sway bar end link on the top. There isn't that much clearance, and I was afraid there might be interference in hard cornering. I don't know if it would be a problem or not. Some people on the old threads did install the bolt from the bottom, but others brought up concerns about the clearance.
Install the bushing and the bushing washer on the bottom and then the nylon locking nut. If you don't have enough threads to get the nut started below the bushing washer, you can use a C-Clamp with the top on the flat part of the sway bar and the bottom (the part that goes up and down on the C-clamp) under the sway bar to slightly compress things to allow enough threads to show beneath the bushing washer to get the nut started. That is what I did, and it wasn't hard at all. The 4 inch bolt is plenty long enough after you start tightening things. It is just you might not have enough threads without compressing with the C-clamp before anything is tightened.
Tighten the nylon locking nut on the bottom. You need to hold the bolt on the top with the 9/16 inch box wrench to keep the whole thing from spinning as you tighten the nut. I did not fully tighten it at this point. I just got it fairly tight. You are "supposed" to do the final tightening with the car on the ground and with the full weight on the suspension. I don't know if that is really important or not but I did some online research and that is what you are supposed to do. Note: I used a deep 9/16 inch socket because the exposed left over bolt may get long enough (as you tighten the bolt) that a standard socket won't work.
Do the same sway bar end link install on the other side of the car.
Put the wheels back on and lower the car back to normal (no jack stands or anything).
Drive the car up onto ramps (you don't have to if you can reach everything to tighten the nut when your car is at normal height on the ground).
Do final tightening on the Nylon Lock Nuts for both sides of the car. The Energy Suspension installation instructions (from their website, the kit didn't have any instructions with it) indicate to tighten until the bushings just start to bulge.
The instructions do say not to over-tighten. I'm sure there is some leeway on how tight it needs to be. I expect that they just don't want you to crush the bushings and totally deform them.
Back up off the Ramps.
You are done. There is NOT a need to do an alignment after installing sway bar end link bushings.
Below is a picture of using the C-Clamp to compress things to allow enough bolt threads to install the nylon locking nut.
Hopefully this helps someone. I read through a few long forum posts on Scion websites, watched some Youtube! videos (none were that great), and did some online research to get comfortable doing this. It isn't hard, but there were a few things
that weren't that clear to me and I don't like to do anything on my car until I fully understand what I need to do. I was hoping to combine the research I did plus actually doing it to make things easier for anyone else who may need to do this.
As mentioned, I hadn't noticed any issue with my Scion xA in terms of how it drove. I just noticed the sway bar end link bushings were cracking and looking bad.
After replacing the sway bar end link bushings, it did seem to make the car feel better going over bumps and when backing down out of my driveway. I do think it made a difference.
I recently replaced my original OEM shocks in the rear with Koni STR.T shocks and that made a pretty noticeable difference. I hadn't noticed anything wrong before doing that either,
but I did notice an improvement. My next step is to replace the front struts. I'm sure they need to be replaced (though again, I don't really notice any problems).
____
Last edited by kdepew; Jan 10, 2021 at 05:57 PM.
Reason: Minor typo fixes and a couple of clarifications.
Excellent post.
The only thing I would do differently would be to use 2 plain nuts back to back instead of the nylok nut (not a fan of nylocks)
Tighten the first nut to where you want for compression of the bushings, then add the second nut and tighten against the first nut. Need an open end wrench for that.
You can grease the threads against corrosion too - not so with a nylok.