
Anyone have decent pics of stock projector cutoff with HIDs?


funny....I was told the HIDs in our halogen projectors would not produce good cut offs and would be worse than halogen bulbs in halogen projectors..... funny how things work out.

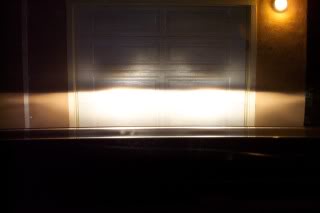
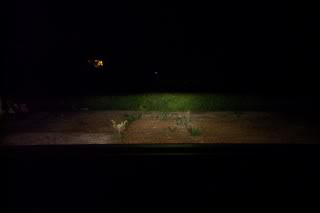
Mine are roughly the same. Not a perfect cut off, but I was impressed with how clean it stayed, with minimal flare.
EDIT: I did adjust my headlights down slightly after installing the HID's.
EDIT: I did adjust my headlights down slightly after installing the HID's.
Last edited by Roller_Toaster; Jan 17, 2012 at 09:12 PM.
You can see in the garage door pics that the light thrown up above the cut-off by the squirrel finders is considerably brighter with the HIDs. I've never had anybody coming towards me flash their brights, but I have had people that I was driving behind at night pull over into the lane next to me instead of staying in front of me.
Exactly what I wanted, thanks CIONIDE. Thinking about doing the BLHM and was curious if it would be worth $300 for this "bolt-in" retrofit HID projector kit:
http://www.theretrofitsource.com/pro...roducts_id=254
http://www.theretrofitsource.com/pro...roducts_id=254

Senior Member
Utah Scions
SL Member
Joined: Aug 2007
Posts: 4,139
From: City of Salt, Utah
Nope. OEM projectors suuuuuck with HID. Period. Hence why I retro'd some S2000's in there. However, I didn't get my cutoff perfect. 
I'm highly considering the RetrofitSource's product. I think it's worth it, 100%. You get low and high beams in that kit. The cut off on those is great.
I'm highly considering the RetrofitSource's product. I think it's worth it, 100%. You get low and high beams in that kit. The cut off on those is great.

Senior Member
SL Member
Joined: Mar 2010
Posts: 469
From: SFV (Northridge)
Exactly what I wanted, thanks CIONIDE. Thinking about doing the BLHM and was curious if it would be worth $300 for this "bolt-in" retrofit HID projector kit:
http://www.theretrofitsource.com/pro...roducts_id=254
http://www.theretrofitsource.com/pro...roducts_id=254
Senior Member
Utah Scions
SL Member
Joined: Aug 2007
Posts: 4,139
From: City of Salt, Utah
No need for RTV at all. After you're done with everything, preheat oven to 200, put both pieces together, throw everything in the oven for 12-15 minutes, pull out, and smash together as hard as you can/feel comfortable. The lenses are pretty tough. I place the headlights on a towel, lens down, and press down pretty hard. Then add all 3 (IIRC) screws and call it a day.
Senior Member
SL Member
Joined: Mar 2010
Posts: 469
From: SFV (Northridge)
yeah i did all that, plus added extra sealant when i did my headlights, i was paranoid of the lens fogging from moisture. i'm wondering if its worth it to spend $300 on that kit for a proper cut off.

No need for RTV at all. After you're done with everything, preheat oven to 200, put both pieces together, throw everything in the oven for 12-15 minutes, pull out, and smash together as hard as you can/feel comfortable. The lenses are pretty tough. I place the headlights on a towel, lens down, and press down pretty hard. Then add all 3 (IIRC) screws and call it a day.
:/

Member
SL Member
Joined: Nov 2011
Posts: 81
From: Santa Rosa, CA
No need for RTV at all. After you're done with everything, preheat oven to 200, put both pieces together, throw everything in the oven for 12-15 minutes, pull out, and smash together as hard as you can/feel comfortable. The lenses are pretty tough. I place the headlights on a towel, lens down, and press down pretty hard. Then add all 3 (IIRC) screws and call it a day.
My ISF headlights didnt re seal after painting them and OMG was that a pain. I had to remove all the old sealant and put new stuff on. It took forever but in the end it was excellent.

Thread
Thread Starter
Forum
Replies
Last Post
jaspercanda
Scion tC 2G Owners Lounge
4
Dec 28, 2014 10:09 AM
minter66
PPC: Vehicles
0
Dec 15, 2014 01:45 PM
darkshadowofxdeath
Scion tC 1G Owners Lounge
2
Dec 3, 2014 06:59 PM
umnitza
Exclusive Sponsored Sales
3
Dec 1, 2014 06:26 PM