
A/C knobs LED swap


Thread Starter
Member
Scikotics
SL Member
SL Member
Joined: Jul 2007
Posts: 62
School has started and it takes some time to take every thing apart for this mod. I don't really have time to take everything apart with out actually doing the mod. It's really not too hard to take every thing apart... the only screw is behind the piece around the radio and A/C vents, every thing else is just pulled out.

Senior Member
SL Member
Joined: Jul 2007
Posts: 967
From: St Louis
ok Rice.......... thanks.. Now I got the led's comming in probally weds or thurs.... now just to practice. I got the unit out & hanging out in the open... thanks for your info so far......... what I nede to know is this.. can you remember how to remove the bulbs for replacement.. Am i right to think that there is only 1 (one) bulb for each of the controls?? AND they are located within easy reach as far as you DO NOT have to dissamble the entire **** assembly??
I am only wanting to do the 'ring of blue light' around the center buttons.. i DO NOT want to change out the center light, just the surrounding lighting.. Is it only one bulb?? & easy to get to?? like swapping without soldering??? thanks for your help, man!!! just this one more thing & I'll be forever in your debt! thanks agian... jh
I am only wanting to do the 'ring of blue light' around the center buttons.. i DO NOT want to change out the center light, just the surrounding lighting.. Is it only one bulb?? & easy to get to?? like swapping without soldering??? thanks for your help, man!!! just this one more thing & I'll be forever in your debt! thanks agian... jh
Thread Starter
Member
Scikotics
SL Member
SL Member
Joined: Jul 2007
Posts: 62
If you look on the back of the unit behind each **** there is a hole in the center. The bulb can be removed from that hole... if I remember correctly, you can put a flat head screw driver in there and turn. The bulb is on a base that locks in, so you just take that one out and pop the new one in and lock it back in.
So to answer your question, you should be able to change the bulb without taking the whole **** apart.
So to answer your question, you should be able to change the bulb without taking the whole **** apart.
Senior Member
SL Member
Joined: Jul 2007
Posts: 967
From: St Louis
Dont Do It Like This!I took out the stock bulbs...

Removed the orange 'slip cover'

painted the bulbs blue with my touch up paint..

Put them back in & WALLAAAAAAA
YOU CAN'T SEE A THING!!!
They are no where nears any bright at all!!! SUPER DIM ! ! !sssssssooooooo.
This is NOT the way to do this..... Iknow.. I tried it.......
I put the Neo Wedge type B's in for now till I can get a brighter soultion!!!..
thanks for reading... jh
PS. I orderd 6 of the neowedges in case I messed any up! Fortunatly, I did ok.. So I have 3 extra.. If you are interested in getting them from me, PM me & you can mail me a 10$ bill & I'll mail them to ya!!!.. (blue)....
Only 2 tools were neded for this swap.. a phillips & a real small straight screwdriver.. thanks agian.. jh
Removed the orange 'slip cover'
painted the bulbs blue with my touch up paint..
Put them back in & WALLAAAAAAA
YOU CAN'T SEE A THING!!!
They are no where nears any bright at all!!! SUPER DIM ! ! !sssssssooooooo.
This is NOT the way to do this..... Iknow.. I tried it.......
I put the Neo Wedge type B's in for now till I can get a brighter soultion!!!..
thanks for reading... jh
PS. I orderd 6 of the neowedges in case I messed any up! Fortunatly, I did ok.. So I have 3 extra.. If you are interested in getting them from me, PM me & you can mail me a 10$ bill & I'll mail them to ya!!!.. (blue)....
Only 2 tools were neded for this swap.. a phillips & a real small straight screwdriver.. thanks agian.. jh
Senior Member
SL Member
Joined: Jul 2007
Posts: 967
From: St Louis
the painted ones are not bright!!! you cant even see them at all....
the neowedges are the best so far.........
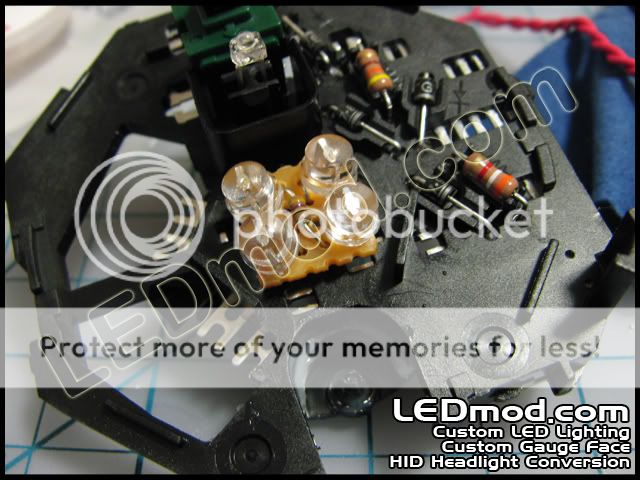
unless you want to pull the ***** apart & solder in LEDMONDS Kit... he wants $45 for (3)-4LED clusters. & they have to be soldered in AFTER you take the **** apart.. The neo wedges you know are just a simple un-screw & replace.. No need to take the **** apart.....

taken just minutes ago!! you be the judge.....
I got 3 more of these bulbs, RT if you want em.. I will stick with these till something else more affordable comes along.. these are more than adequate IMHO.... good luck.. jh
the neowedges are the best so far.........
unless you want to pull the ***** apart & solder in LEDMONDS Kit... he wants $45 for (3)-4LED clusters. & they have to be soldered in AFTER you take the **** apart.. The neo wedges you know are just a simple un-screw & replace.. No need to take the **** apart.....
taken just minutes ago!! you be the judge.....
I got 3 more of these bulbs, RT if you want em.. I will stick with these till something else more affordable comes along.. these are more than adequate IMHO.... good luck.. jh


Senior Member
SL Member
Joined: Jul 2007
Posts: 967
From: St Louis
Originally Posted by ominousinc
lvbitwiz, where do you find ytpe B blue LEDs?
http://autolumination.com/74.htm
Neo - Wedge LED Instrument Panel Bulbs Type A, B & C
about halfway down the page
(Note to choose the correct bulb, measure the diameter of the base)
Type A Type B Type C
8mm= 5/16" 10mm= 3/8" 12mm= 15/32"
Choose type B
I have 3 extras if you want me to mail them to you... PM me... jh
Senior Member
SL Member
Joined: May 2006
Posts: 158
Raaaah!

I used my powers over space and time to make this car american.
Apparently the Japenese get push button start, auto climate control, and a slightly nicer looking radio.
That climate control takes the ugly out of the waterfall for me.
Sorry for the hijack :\
Also, thanks for the walkthrough on the LED Swap! I've been wanting to brighten them LEDs up a bit
As for painting the bulbs i have an easy solution that i used in my 06 xB.
Head over to your crafts store and get some stained glass pens. Just coat your bulb once or twice depending on the color and you're good to go. No fading, no chipping or cracking, and to get it off, you just use draw on it again with the same pen and wipe it off. The pen ink will actually dissolve the dried ink if you do it right

Former Sponsor
SL Member

Joined: Apr 2006
Posts: 2,093
From: Anaheim, CA & Las Vegas
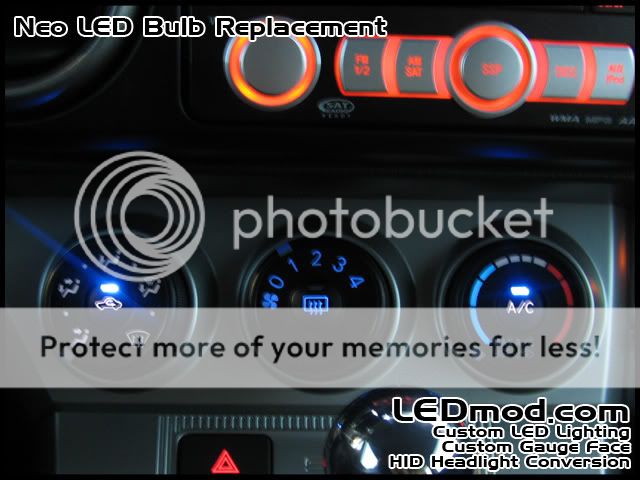
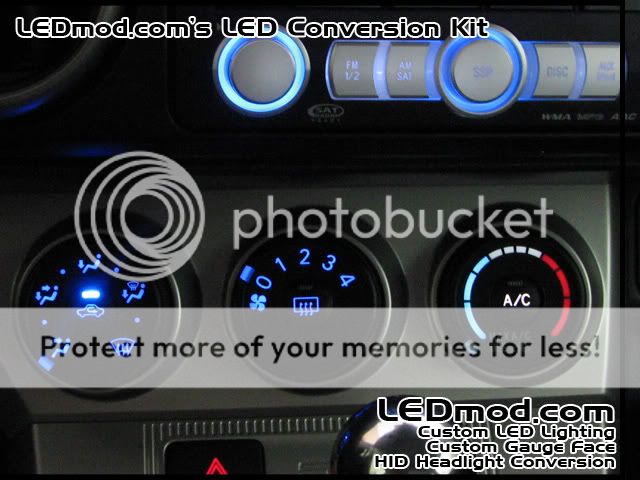
LED Neo bulb seems to work, but doesn't light fully...
It's more of spot light...
If you want it do it right.. this is the way to go...
It's using 4 LED (180 degree viewable LED) in a cluster per control....
That's what make its light up all evenly....
These were taken at daytime.. with some pillows covering up the surrounding...
It's more of spot light...
If you want it do it right.. this is the way to go...
It's using 4 LED (180 degree viewable LED) in a cluster per control....
That's what make its light up all evenly....
These were taken at daytime.. with some pillows covering up the surrounding...
Former Sponsor
SL Member
Joined: Apr 2006
Posts: 2,093
From: Anaheim, CA & Las Vegas
Originally Posted by uberspeed
When are you going to update your site with the xB2 stuff?
Also... it's "Accepted" not Accpeted
Also... it's "Accepted" not Accpeted

Junior Member
Joined: Sep 2007
Posts: 20
From: Las Vegas NV
Are the icons on the gauges actually clear or white? I realize the 3rd *** to the right for the "AC Temp" (dial #3) is colored Red and Blue, but the Icons for vent select(#1) and digits for fan speed(#2)...
AKA can I buy any colored bulb and have the first two dials illuminate that color or will the colored be skewed from the dials plastic...?
worded terribly Im sure.
AKA can I buy any colored bulb and have the first two dials illuminate that color or will the colored be skewed from the dials plastic...?
worded terribly Im sure.