
Turbo / Show Car Part Out Link - ProjectTC2 Build Thread


Senior Member
SL Member
Joined: Sep 2011
Posts: 553

What seat pattern and colors? We can have twins lol.

Thread Starter
Joined: Nov 2011
Posts: 1,267
From: Jacksonville, FL
Thanks everyone! I'm more than happy with the lip, It fit and looks much better than I expected. And thanks about the engine bay! I just wish I had more opprotunities to show it off haha
Scion202 - I'll post more pics as soon as I get a chance! And yea I meant springs, good catch!
Fun173 - They're black leather with white quilted thread, and my boots are Black leather with White Stripe and contrasting threads
Scion202 - I'll post more pics as soon as I get a chance! And yea I meant springs, good catch!
Fun173 - They're black leather with white quilted thread, and my boots are Black leather with White Stripe and contrasting threads

Thread Starter
Joined: Nov 2011
Posts: 1,267
From: Jacksonville, FL
Used a Professional Paint gun. Mixed automotive clear coat with a black base and applied it in thin coats until they were as dark as I wanted them. If you don't know how to do it then ask a body shop, they usually charge like $40-$50 a set
But I finally got a part in today! My shift **** came in today. Install didn't go quite as expected, I kinda had to ghetto rig it. But in the end it looks great and you can't tell.. so whatever! I'll try and get a picture of it tomorrow. (It's sexy)
But I finally got a part in today! My shift **** came in today. Install didn't go quite as expected, I kinda had to ghetto rig it. But in the end it looks great and you can't tell.. so whatever! I'll try and get a picture of it tomorrow. (It's sexy)
Thread Starter
Joined: Nov 2011
Posts: 1,267
From: Jacksonville, FL
Update!
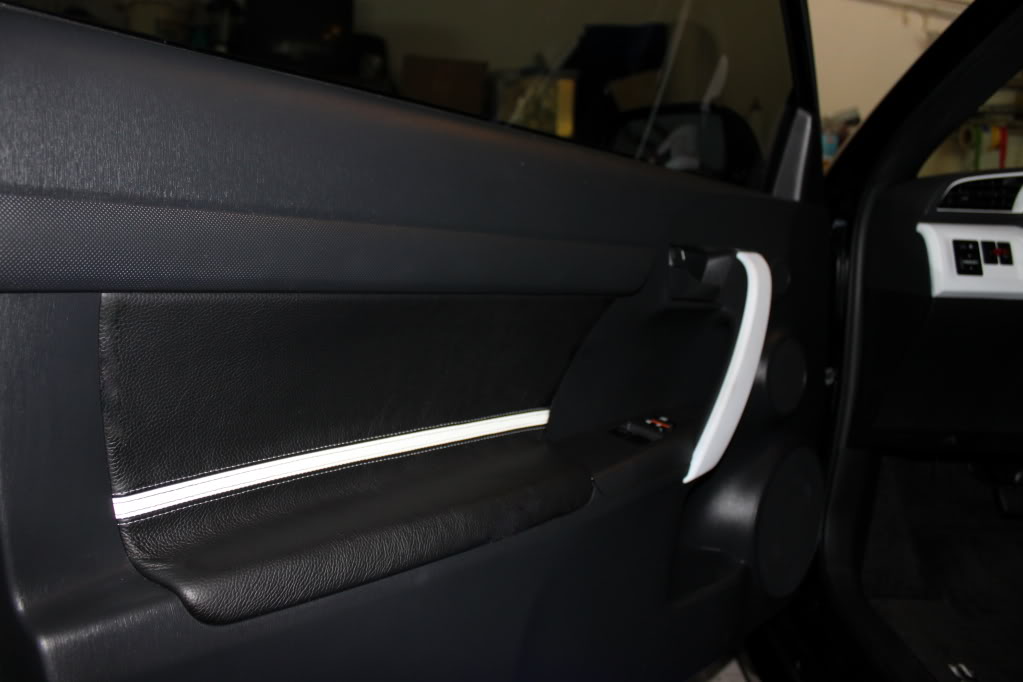
Got my Shift ****, Boots, Door Panel Trim, and Oil Cap installed! Still have my Seat Covers and Ambient Lighting on the way. I'm personally not a fan of the Leather E-Brake Handle Cover so I just ordered my CF E-Brake today!


Got my Shift ****, Boots, Door Panel Trim, and Oil Cap installed! Still have my Seat Covers and Ambient Lighting on the way. I'm personally not a fan of the Leather E-Brake Handle Cover so I just ordered my CF E-Brake today!
Thread Starter
Joined: Nov 2011
Posts: 1,267
From: Jacksonville, FL
There's 5 or 6 different colors to choose from like white, black, blue, chrome, silver, etc
But be warned, they do take a bit of thinking to get them to work. They're not direct bolt on like many other shifters, but once you get it to work it's so worth it. It looks awesome, and it has a built in button on it. It has 2 wires going out of the bottom for the switch, I havent decided what I'm going to hook the switch up to yet

Senior Member
SL Member
Joined: Sep 2011
Posts: 732
From: Washington, DC
http://www.amazon.com/OBX-Super-Whit.../dp/B00415YOFW
There's 5 or 6 different colors to choose from like white, black, blue, chrome, silver, etc
But be warned, they do take a bit of thinking to get them to work. They're not direct bolt on like many other shifters, but once you get it to work it's so worth it. It looks awesome, and it has a built in button on it. It has 2 wires going out of the bottom for the switch, I havent decided what I'm going to hook the switch up to yet
Thread Starter
Joined: Nov 2011
Posts: 1,267
From: Jacksonville, FL
Front lips dont interfere with mud guards because the mud guards go on the side skirts behind the wheel. If you have aftermarket skirts or rear addons then OEM mudguards will not fit without altering them

Thread Starter
Joined: Nov 2011
Posts: 1,267
From: Jacksonville, FL
Just as the Title says! (But I lied about the cookies)
I'm selling my Tein H-Tech Springs and I'm either gonna buy some coilovers or some S-Tech's. The H-Tech's are great springs, but I want to go lower.
Let me know if anyone want's to buy my Tein H-Tech Springs!
I'm selling my Tein H-Tech Springs and I'm either gonna buy some coilovers or some S-Tech's. The H-Tech's are great springs, but I want to go lower.
Let me know if anyone want's to buy my Tein H-Tech Springs!


Member
SL Member
Joined: Feb 2012
Posts: 77
From: Phoenix, AZ
How is the install done for the door panel inserts from redline? I looked on their site but I didn't see a walkthrough on how to do it. I'm very interested in getting some in alcantara because I hate the fabric on there from the factory... so rough and scratchy :/
Thread Starter
Joined: Nov 2011
Posts: 1,267
From: Jacksonville, FL
@Djs1394xd - It's like 5 posts up hahaha
https://www.scionlife.com/forums/sho...&postcount=171
@AZtC89 - Yea Redline doesn't have instructions on this or the auto shift boot. And they're very unclear about the E-Brake boot too. The door panels are definetley the most complicated of the boots.
VERY quick DIY:
How to install Redline Goods Door Panel Inserts
1. Remove the 3 screws holding the door panel to the door. (One behind the door opening handle, Two behind the plastic silver trim on the handle that people paint)
2. Remove the door panel and disconnect all the wiring connectors
3. Using a dremel tool, very carefully dremel out the 13 plastic rivets on the back holding the insert to the door panel and remove the insert
4. Using spray adhesive, adhere the new insert to the existing crappy stock insert
5. Put the insert back into the door panel, ensuring it is lined up correctly
6. Use very small self tapping screws (I dont remember what size) to screw the insert onto the door panel. Screw them through what is left of the plastic rivets on the door panel
7. Connect all wiring connectors and put the door panel back on the door
8. Replace the 3 screws holding the door panel to the door
Repeat for the other side