Notices
Scion tC 2G ICE & Interior In-car entertainment and electronics...

DIY - Interior Trim Removal!

Thread Tools
 
Search this Thread
 
Old Nov 24, 2014 | 05:51 AM
  #61  
Red2014tC's Avatar
Senior Member
5 Year Member
SL Member
 
Joined: Feb 2014
Posts: 195
From: BC, Canada
Default

Did you sand the plastic before applying paint? paint wont stick well to the plastic if you didn't sand it. but yes usually you want to leave it for quite some time before you handle it. Plasti-dip is more forgiving in this manner.
Old Nov 24, 2014 | 09:17 AM
  #62  
zdubbs's Avatar
Junior Member
5 Year Member
 
Joined: Nov 2014
Posts: 7
Default

Originally Posted by Red2014tC
Did you sand the plastic before applying paint? paint wont stick well to the plastic if you didn't sand it. but yes usually you want to leave it for quite some time before you handle it. Plasti-dip is more forgiving in this manner.

Yes, I did sand both pieces. I'll just let them dry mote before touching on the next pieces, thanks.
Old Nov 25, 2014 | 12:50 AM
  #63  
Xversa's Avatar
Member
5 Year Member
SL Member
 
Joined: May 2014
Posts: 92
From: Arizona
Default

Paint will "dry to touch" in 30 minutes, but you need to wait last lest overnight before handling. Sand out you fingerprints, and try again. Take you time, don't rush it.
Old Jul 12, 2015 | 03:55 PM
  #64  
Suburban's Avatar
Member
5 Year Member
SL Member
 
Joined: Jul 2015
Posts: 24
Default


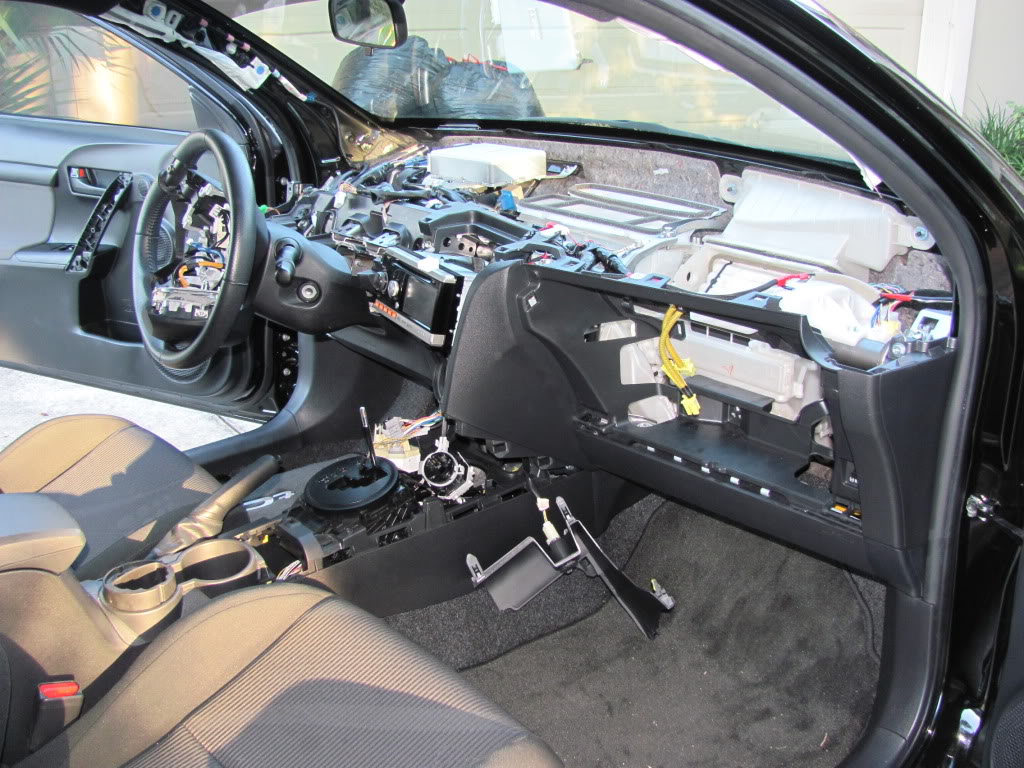
Installation instructions for the stereo upgrade kit. You may not need the specific instructions for installing the stereo, but it does cover how to remove a lot of interior parts and panels.
Old Mar 28, 2016 | 06:27 PM
  #65  
Kar98's Avatar
Member
5 Year Member
SL Member
 
Joined: Mar 2016
Posts: 36
From: DFW, TX
Default

Sweet Jesus, you really went to town there.

Name:  IMG_4494.jpg
Views: 723
Size:  174.0 KB

That is gonna help me a lot replacing the factory stereo in my '11 with a Pioneer touch screen unit. Especially seeing all the nooks and crannies where stuff can be tucked away.

All that stuff, plus the steering wheel controls adapter and the USB/aux in adapter needs to go in there:

Name:  X1Vbh4o.jpg
Views: 115
Size:  503 Bytes
Old Sep 12, 2016 | 02:44 AM
  #66  
ryanbl95's Avatar
Junior Member
 
Joined: Sep 2016
Posts: 3
Smile The paint job on interior

hey man i really wanna know what paint you used and i also had a few other questions for if you could answer them that would be great. thanks
Old Aug 29, 2018 | 12:14 AM
  #67  
cobraboy506's Avatar
Junior Member
SL Member
 
Joined: Aug 2018
Posts: 3
Default


Hey, awesome write up man. Gonna b very usefull in the next week or so. I just got my chameleon pearl pigments in today from dipyourcar.com the Hypershift ZTS. Got all my clear coat for the pearls, clear top coat, high build primer,
black base coat, 800 grit sand paper... gonna use the high build primer to make the textured dash pieces smooth. I'll b painting all the dash trim plus my entire center console. I will post pics when I'm done.

This is a link to the color my dash and center console will b hopefully in the next week

Again, awesome job on explaining everything. I will also take the time to fix my A/C condenser drain line as its been plugged for the last month while my entire dash will be apart and easier access. (keep blowing air up into it and then letting it drain).

*Administrator's Note: If "Video is Unavailable Message". Go Directly and Click Watch on YouTube. (located on Bottom Right Corner)

____

Last edited by MR_LUV; Mar 24, 2021 at 02:35 PM. Reason: Administrator's Note
Old Mar 18, 2019 | 09:40 AM
  #68  
afernandez018's Avatar
Junior Member
SL Member
 
Joined: Mar 2019
Posts: 3
Default Gauge Cluster Trim pieces?

Do anyone know where to purchase the silver gauge trim pieces I’ve searching everywhere. I need a new one as it cracked when I pulled it off.


Last edited by MR_LUV; Mar 24, 2021 at 02:47 PM.
Old Jun 13, 2021 | 07:44 PM
  #69  
lotnik11's Avatar
Member
SL Member
 
Joined: May 2019
Posts: 31
From: Wrocław
Default


Old Oct 12, 2025 | 02:02 PM
  #70  
Adilghani's Avatar
Junior Member
 
Joined: Oct 2025
Posts: 1
Default Superb job

Originally Posted by ProjectTC2
First of all:
I AM NOT RESPONSIBLE FOR ANY DAMAGE TO YOUR VEHICLE. THIS IS SIMPLY THE PROCEDURES THAT I FOLLOWED, IT IS YOUR CHOICE IF YOU WANT TO FOLLOW THIS OR NOT.

This DIY will explain the steps to remove the following trims:
-Door Panel
-Dash
-Steering Wheel
-A/C Vents
-A/C Gauges
-Shifter

Once again.. Please note that is at your own risk


-Tools Needed: Scissors, Large Flat Head Screwdriver, Small Flat Head Screwdriver, Large Phillips Head Screwdriver, Small Phillips Head Screwdriver,
Small Ratchet with 10 and 12mm sockets.. or 10 and 12mm wrenches, Medium Ratchet + extensions with 10 and 12mm sockets.. or use the stated above

Attachment 43822

-Disconnect your battery. I always choose to disconnect the positive AND the negative just cuz.

Attachment 43823

Attachment 43824

-Start with the drivers door. Open the door. Using a large flat head screwdriver, insert it into the slot on the bottom and pull out to release the first clip.

Attachment 43825

-Once the first clip is released, pull the trim away from the door. Don't be afraid to use force.. the clip's are strong and don't break very easily at all

Attachment 43826

-Using the same screwdriver, place it under the radio trim and pull out to pop the first clip.

Attachment 43827

-Once the first clip is released, pull the trim away from the dash. Once again, don't be afraid to use force.

Attachment 43828

-Unplug the clock / security indicator

Attachment 43829

-Remove the LCD and screen from the radio trim by pulling it from the clips. There are a few small clips that can be pulled out with your fingernails, and the screen can then be removed.

Attachment 43830

-Open up your glovebox. Now pull the dash trim above the glovebox out from the dash. There is only a few clips holding this on.

Attachment 43831

-Using the same screwdriver, place it behind the mirror control trim and pull out to pop the first clip. Once this is popped, pull the rest of the mirror control trim out

Attachment 43832

-Unplug the Mirror control trim plus. This will consist of 1-3 plugs.. dependent upon wither you have Fog Lights and Bluetooth.

Attachment 43833

-Remove the Mirror control buttons from the trim. This can be done by pushing in the clips on each side and pushing out the front of the trim

Attachment 43834

-Tilt the steering wheel all the way down and pull all the way away from the dash.

Attachment 43835

-Pull the Speedometer trim out away from the dash. This is just held on by 2 clips

Attachment 43836

-Using a Phillips head screwdriver, remove the 2 screws at the top of the speedometer trim

Attachment 43837

-Remove the aluminum trim from the speedometer trim. This can be done by pulling out the clips around the aluminum trim with your fingernails or a flat head screwdriver

Attachment 43838

-Pull out the dash piece between the steering wheel and the radio. This will be the location of the push start on an RS and the button must be disconnected from the back after the trim has been pulled out. This is just help on by clips and is very easy to pull off

Attachment 43839

-Pull out the Passenger kick panel. This is just held on by a few clips. Pull away from the dash

Attachment 43840

-Pull out the USB / Stick trim. This is held on by only a few clips and can be easily pulled away from the dash.

Attachment 43841

-Unplug the USB and Traction control plugs

Attachment 43842

-Remove the aluminum stick trim from the dash trim. This can be done by just pulling it out

Attachment 43843

-Twist off the shifter ****

Attachment 43844

-Pull off the shifter **** trim from the shifter ****. Simply pull the trim away from the rubber

Attachment 43845

-Pull out the dash piece holding the cigarette lighter. This is only held on by a few clips, just pull away from the dash

Attachment 43846

-You can disconnect the cigarette lighter but I did not, I just let it hang off to the side where it was out of the way.
-Pull the A/C gauge assembly out from the dash. This is held on by a few clips, just pull away from the dash

Attachment 43847

-Remove the A/C Gauges by pulling out the clips from each side of each gauge. Then pull the gauge out of the back

Attachment 43848

-Remove the trim from the gauge. Pull the clip from each corner and pull the trim out the front

Attachment 43849

-Remove the glovebox by pushing in each side and pulling out

Attachment 43850

-Remove the dash piece behind the glove box. Pull it away from the dash

Attachment 43851

-Next we will remove various Phillips head screws from the dash.

Attachment 43852

Attachment 43853

Attachment 43854

-Remove the speedometer by pulling away from the dash and disconnect it from the harness

Attachment 43855

Attachment 43856

-Remove the 2 screws there were behind the speedometer

Attachment 43857

-Remove the 2 airbag plugs and the 3 bolts that were behind the glove box

Attachment 43858

Attachment 43859

-Gently pull the Pillar trim off, this is held on by clips as well as twist clips. The clips must first be popped by pulling away from the wall, then the twist clips must be turned 90 degrees to allow it to be pulled out.

Attachment 43860

Attachment 43861

-Remove the bolt on each side of the vehicle that the pillars were hiding

Attachment 43862

-Pull the whole top dash out, be careful as the passenger airbag will still be attached to the dash. This will come out with the dash

Attachment 43863

Attachment 43864

-Remove the various Phillips head screws holding on the vents and the A/C tubes

Attachment 43865

Attachment 43866

Attachment 43867

Attachment 43868

Attachment 43869

-The drivers vent and the middle vent can be easily taken out the back once these few screws are removed

Attachment 43870

-The aluminum trim can be pulled off of the vents by pulling the multiple clips around them and then pulling the trim off

Attachment 43871

-The passenger vent can be removed by pulling off the 2 clips and pulling the vent out the back

Attachment 43872

-The aluminum trim can be pulled off by pulling the clips up and pulling the trim off the front

Attachment 43873

-Using a small flathead screwdriver, pop out the panel on each side of the steering wheel plastic

Attachment 43874

-A small vertical rod can be seen from each side. Using a screwdriver, push this rod towards the other side to release a locking mechanism. Do this for both sides

Attachment 43875

-Pull the center of the steering wheel out and place it on top of the steering wheel. It can be unplugged and completely removed, but I did not

Attachment 43876

Attachment 43877

-Remove the 4 Phillips head screws in the center of the steering wheel

Attachment 43878

-Using scissors, but the zip tie holding the wires going to the steering wheel controls. Also disconnect the steering wheel controls

Attachment 43879

-Pull the side steering wheel trims out. They are held on by clips and can be removed by pulling away from the dash

Attachment 43880

-Turn the steering wheel upside down as much as possible until it locks up

Attachment 43881

-Directly behind the lower steering wheel trim, push in the plastic enough to expose the hidden Phillips head screw. While pushing in the plastic, remove this screw

Attachment 43882

-With the hidden screw now removed, pull the middle steering wheel trim out away from the dash

Attachment 43883

-Remove the 3 small Phillips head screws holding the steering wheel controls to the steering wheel trim

Attachment 43884

-The controls can now be taken out the back of the trim

Attachment 43885

-Now relax because you have removed a whole _____ ton of trim!!

Attachment 43886

Now Paint and do the exact opposite to reassemble!

Before:

Attachment 43887

During:

Attachment 43888

After:

Attachment 43889

Please let me know if I missed anything, but I believe I got everything. Good luck and let me know if you have any questions! And big shoutout to anyone who answered questions I had while I was removing my trim!


__________________
Just want to say thank you so much. You saved my day, i changed EPS coupler by removing the dashboard top instead of dropping everything from down.
1.5 hours max without breaking my back.

Related Topics
Thread
Thread Starter
Forum
Replies
Last Post
ProjectTC2
tC G2 Tech and DIY
66
Oct 21, 2023 05:11 PM
surfcitylocal
Scion iQ ICE & Interior
10
Oct 28, 2013 01:06 PM
surfcitylocal
Scion iQ Aero & Exterior
2
Jan 22, 2013 01:22 PM
Greg S
Scion xB 2nd-Gen ICE & Interior
11
Mar 8, 2010 02:05 PM
jamesfg49
Scion xA/xB 1st-Gen ICE & Interior
17
Aug 3, 2009 06:14 PM


All times are GMT. The time now is 04:54 AM.