
DIY Tutorial: my xB2 Custom Gauge Face


Thread Starter
Member
SL Member
Joined: Sep 2007
Posts: 72
From: Los Angeles, CA
Been getting some interest in how I did it... and for all the great info I've leeched off Scionlife I'd like to give a little something back.
UNITY303'S QUICK N' DIRTY DIY TUTORIAL TO A SCION xB 08 Custom Gauge Face.
 DISCLAIMER:
This tutorial is meant for informational purposes only. I take no responsibility for any damage done to anything (your printer/scissors/xB) because of this tutorial. Also, please kindly cite/credit this tutorial if you use my photoshop files on your own site, or expand on this.
HOW IT BEGAN?
One day, I was interested in getting my own xB gauge, but nobody offered a cheap method of making custom ones that were of great quality... So I decided to just try for myself.
It came out a lot better than I thought it could. After much trial and error, I got the scanned icons to shine through (well all but the CRUISE, see CAVEATS). I spent a lot of time on this, so I thought I'd share this since there was some interest from others.
WHAT DO YOU NEED?
1. 8" x 11.5" Scrap Papers
2. 8" x 11.5" Standard Glossy Photo/Film Paper (2 per gauge printout)
3. Photo Quality Inkjet Printer
4. Adobe Photoshop CS + my template
5. Microsoft Word
6. Scissors/Exacto knife
 WHERE DO YOU START?
0. Before you get waters deep into the Photoshopping, you can try printing my gauge first. This way you can save time to see if this project is something you even want to do.
Here is the final .DOC printout that I used. Download, then jump to step 7 below.
http://antomic.net/temp_xB/gauges/Un..._TAPT_TREE.doc
TO CUSTOMIZE YOUR OWN:
1. Get my Photoshop template and open it in Photoshop CS.
Download it from the link below. It's 17MB.
http://www.antomic.net/temp_xB/gauge...20Template.zip
2. Inside the "Art" Layer Folder, replace my graphics with your preferred designs. *NOTE: Darker images and images against black will work better because they will CONTRAST against the gray status icons
(BRAKE, MAINT REQD, CHECK, etc will be distinguishable when the LED shines through). You have to edit in the ART LAYER folder, so that the icons always stay on top of your designs, and the background stays behind.
3. Resave the template as a TIFF for printing purposes.
4. Split up the TIFFs in 2 parts. Since the entire gauge will not fit on a single 8" x 11.5", you'll have to separate them into two pages for print.
5. Drag & drop the 2 TIFFs into a new document in Microsoft Word. You can refer to how I did it in my final .DOC. You can download my final .DOC printout here:
http://antomic.net/temp_xB/gauges/Un..._TAPT_TREE.doc
6. Print out the .DOC on SCRAP PAPER, and resize the graphics as necessary to ensure that your printout is exactly the same size as the stock face.
ALMOST THERE:
7. Print out the .DOC on GLOSSY FILM PAPER, on HIGHEST QUALITY SETTING. The black ink will block out all the unintended/messy lights bleeding from the gauge icon LEDs.
8. Carefully use the scissors and exacto knife to cut each printout. Trim it just like the stock face.
9. Install gauge. (Sorry, this DIY tutorial is not meant to teach you how to do this, only how to create the gauge face.)
10. If all went well, enjoy. =) I've been reeeeally happy with mine, despite one caveat...
 CAVEATS?
Unfortunately the Cruise icon is not well visible during the day. NOTE: You may need to change out the LED behind it, from green, to blue/red/amber/etc, that might work but this is just a thought I haven't tried. I'm still driving around unable to tell whether CRUISE is (except at nighttime when the green is observable), but I'm willing to live with that. ;)
LAST, MY THANKS GOES OUT TO...
Not like this is a huge achievement but hell I can give a shout out can't I? I'd like to give credit where it's due.
- Jason Night, first and foremost, for inspiring me work on this project.
- John Rivera (Manhattan Beach Scion in CA), for hands down the best service of all the Scion dealers I met with in the Los Angeles Area. John gave me a lot of good reasons to spice up my car.
- Benjamin Leas, for hooking me up with the aftermarket guys who put the panoramic roof on my xB for a fricken incredible deal. Yes, completely unrelated to this but DAMN i love the mod to my roof. And i had to thank him somewhere.
- Scionlife.com, and all you xB2 owners here, for inspiring me to do things I would have never before done with my car.
If anybody else has improvements or suggestions or comments I'd like to hear.
UNITY303'S QUICK N' DIRTY DIY TUTORIAL TO A SCION xB 08 Custom Gauge Face.
DISCLAIMER: This tutorial is meant for informational purposes only. I take no responsibility for any damage done to anything (your printer/scissors/xB) because of this tutorial. Also, please kindly cite/credit this tutorial if you use my photoshop files on your own site, or expand on this.
HOW IT BEGAN?
One day, I was interested in getting my own xB gauge, but nobody offered a cheap method of making custom ones that were of great quality... So I decided to just try for myself.
It came out a lot better than I thought it could.
WHAT DO YOU NEED?
1. 8" x 11.5" Scrap Papers
2. 8" x 11.5" Standard Glossy Photo/Film Paper (2 per gauge printout)
3. Photo Quality Inkjet Printer
4. Adobe Photoshop CS + my template
5. Microsoft Word
6. Scissors/Exacto knife
WHERE DO YOU START?0. Before you get waters deep into the Photoshopping, you can try printing my gauge first. This way you can save time to see if this project is something you even want to do.
Here is the final .DOC printout that I used. Download, then jump to step 7 below.
http://antomic.net/temp_xB/gauges/Un..._TAPT_TREE.doc
TO CUSTOMIZE YOUR OWN:
1. Get my Photoshop template and open it in Photoshop CS.
Download it from the link below. It's 17MB.
http://www.antomic.net/temp_xB/gauge...20Template.zip
2. Inside the "Art" Layer Folder, replace my graphics with your preferred designs. *NOTE: Darker images and images against black will work better because they will CONTRAST against the gray status icons
(BRAKE, MAINT REQD, CHECK, etc will be distinguishable when the LED shines through). You have to edit in the ART LAYER folder, so that the icons always stay on top of your designs, and the background stays behind.
3. Resave the template as a TIFF for printing purposes.
4. Split up the TIFFs in 2 parts. Since the entire gauge will not fit on a single 8" x 11.5", you'll have to separate them into two pages for print.
5. Drag & drop the 2 TIFFs into a new document in Microsoft Word. You can refer to how I did it in my final .DOC. You can download my final .DOC printout here:
http://antomic.net/temp_xB/gauges/Un..._TAPT_TREE.doc
6. Print out the .DOC on SCRAP PAPER, and resize the graphics as necessary to ensure that your printout is exactly the same size as the stock face.
ALMOST THERE:
7. Print out the .DOC on GLOSSY FILM PAPER, on HIGHEST QUALITY SETTING. The black ink will block out all the unintended/messy lights bleeding from the gauge icon LEDs.
8. Carefully use the scissors and exacto knife to cut each printout. Trim it just like the stock face.
9. Install gauge. (Sorry, this DIY tutorial is not meant to teach you how to do this, only how to create the gauge face.)
10. If all went well, enjoy. =) I've been reeeeally happy with mine, despite one caveat...
CAVEATS?Unfortunately the Cruise icon is not well visible during the day. NOTE: You may need to change out the LED behind it, from green, to blue/red/amber/etc, that might work but this is just a thought I haven't tried. I'm still driving around unable to tell whether CRUISE is (except at nighttime when the green is observable), but I'm willing to live with that. ;)
LAST, MY THANKS GOES OUT TO...
Not like this is a huge achievement but hell I can give a shout out can't I?
- Jason Night, first and foremost, for inspiring me work on this project.
- John Rivera (Manhattan Beach Scion in CA), for hands down the best service of all the Scion dealers I met with in the Los Angeles Area. John gave me a lot of good reasons to spice up my car.
- Benjamin Leas, for hooking me up with the aftermarket guys who put the panoramic roof on my xB for a fricken incredible deal. Yes, completely unrelated to this but DAMN i love the mod to my roof. And i had to thank him somewhere.
- Scionlife.com, and all you xB2 owners here, for inspiring me to do things I would have never before done with my car.
If anybody else has improvements or suggestions or comments I'd like to hear.
Last edited by MR_LUV; Jun 6, 2018 at 12:11 AM. Reason: Updated


Member

SL Member
Joined: Dec 2007
Posts: 85
From: Whiteman AFB, MO
I think I'm going to have to try this, it looks fairly simple...I think i will try to replace the LED's with blue ones too.
Last edited by MR_LUV; Jun 5, 2018 at 04:06 AM. Reason: Awarded USAF icon

Thread Starter
Member
SL Member
Joined: Sep 2007
Posts: 72
From: Los Angeles, CA
Nice, thanks for all the kudos guys I will try to upkeep this tutorial so that when people PM me for clarification, I can update it with more info.
I just realized that I might as well leave my final printout for my own template in case you want to test out the printing quality, without having to make their own design or do any resizing... (This will be updated in the first post as well). This should print to the correct size since I already sized it.
MY WORD .DOC PRINTOUT:
http://antomic.net/temp_xB/gauges/Unity303's_xB_08_Gauge_BOH_TAPT_BASS.doc
I will try to upkeep this tutorial so that when people PM me for clarification, I can update it with more info. I just realized that I might as well leave my final printout for my own template in case you want to test out the printing quality, without having to make their own design or do any resizing... (This will be updated in the first post as well). This should print to the correct size since I already sized it.
MY WORD .DOC PRINTOUT:
http://antomic.net/temp_xB/gauges/Unity303's_xB_08_Gauge_BOH_TAPT_BASS.doc


Thread Starter
Member
SL Member
Joined: Sep 2007
Posts: 72
From: Los Angeles, CA
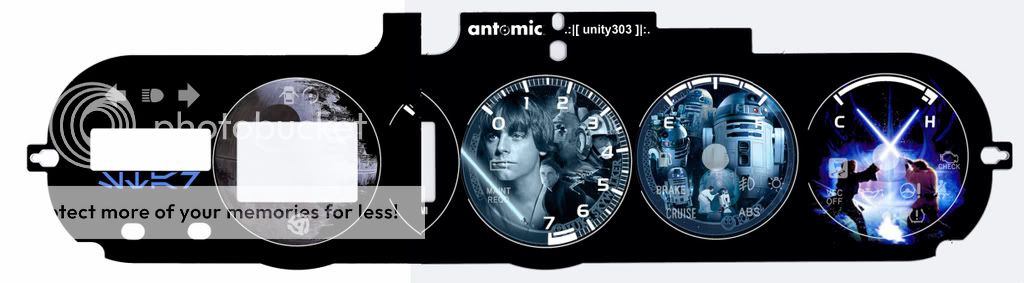
sho0b0x, DUDE that is SIIIICK! =D Great job cropping the graphics, it looks like it was totally meant to be. Watch out for the middle circle cutout on the RPM gauge though, make sure you know where to cut. I'd love to see pics with and w/o flash after you install it
Member
SL Member
Joined: Dec 2007
Posts: 85
From: Whiteman AFB, MO
Thanks man, props go to you more then anything for scanning into Photoshop. I spent 4 hours looking for images that would work,
and I have another circle one of Darth Vader but he doesn't go with blue ya know lol. The overlay for him is red.
I will get some pics soon as i get the LED's in and my soldering tool.
and I have another circle one of Darth Vader but he doesn't go with blue ya know lol. The overlay for him is red.
I will get some pics soon as i get the LED's in and my soldering tool.
Last edited by MR_LUV; Jun 5, 2018 at 04:12 AM.
Thread Starter
Member
SL Member
Joined: Sep 2007
Posts: 72
From: Los Angeles, CA
Originally Posted by sho0b0x
...I have another circle one of darth vader but he doesnt go with blue ya know lol. the overlay for him is red.
Oh and I just realized the graphic on the left was the deathstar, how totally appropriate lol
Member
SL Member
Joined: Dec 2007
Posts: 85
From: Whiteman AFB, MO
yeah i know how to do that, the luke was a green colorize, but i removed it and put the blue from the r2-d2. I just was going with normal colors of the characters. Im going to print it out and see if i like it, if not I will throw darth vader in there and recolor him.

Thread Starter
Member
SL Member
Joined: Sep 2007
Posts: 72
From: Los Angeles, CA
Originally Posted by bb_ist
do you think this will work better on some semi-transparent plastic sheet and print the design with a toner?
Thread Starter
Member
SL Member
Joined: Sep 2007
Posts: 72
From: Los Angeles, CA
Originally Posted by DJ_FroZone
how bout a DJ setup? or a beatboxing one? (blue btw) idk im feeling the blue look but don't wanna bite off the jedi look
http://antomic.net/temp_xB/gauges/dj/dj1.jpg
http://antomic.net/temp_xB/gauges/dj/dj2.jpg
http://antomic.net/temp_xB/gauges/dj/dj3.jpg
http://antomic.net/temp_xB/gauges/dj/dj4.jpg
Combined it looked like this, feel free to reconstruct it yourself using my template if ya like
