
POST Pics of your Engine Bay...!!!!!


Glad to see sexy pics are still being posted up in hurr
I recently made a modified a new engine cover for my bay.

Any of you guys have input on what color overlays I should get for the '16 VALVE' lettering? As you can see my old engine cover had chrome overlays but I was thinking flat gold or flat black could look good on this new one...
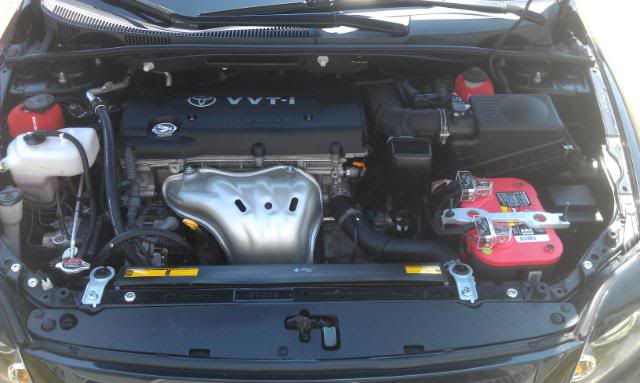
I recently made a modified a new engine cover for my bay.
Any of you guys have input on what color overlays I should get for the '16 VALVE' lettering? As you can see my old engine cover had chrome overlays but I was thinking flat gold or flat black could look good on this new one...

Wire tucked what I could without cutting or extending any wires, just well tucked them and moved them around. Used a s%!t ton of electrical tape to combine wires. Didn't want to go crazy and loose some luxuries like power steering, abs and A/C haha


Do you have a thread?
Senior Member
SL Member
Joined: Jul 2006
Posts: 2,878
From: Central TX
TeeCizzle, which bolt size are you using for the headlamps? Noticed you have the dress-up washers on, I'm DIY'ing it. I have some M6 screws/bolts, just need M8 size for the radiator supports.

Senior Member
SL Member
Joined: Jun 2006
Posts: 7,862
From: Lurking Inside Your Garage!
Hmmm..Dunno what the "M" stands for...I just got the 10mm bolt size. And use the same for the Headlight bracket...Just got a nut to go on the other side and just tightened it down.
When I used PWJDM fender washers to replace my headlight screws I was actually able to just force them to thread into the stock plastic fittings. Not sure how many times they could go in and out like this so might have to do your nut trick in the future.
No i don't :-/ I really wish I would've made one and took pictures while puttin everything together but my buddy and I just kinda went at it one night and knocked the whole project out lol. If you want some details or anything feel free to pm me bout it
Ill try and post up some more pics in my profile or somewhere shortly
Ill try and post up some more pics in my profile or somewhere shortly

this is what it looked like before and then this is what it is now from a top view

Pretty much after putting the battery in the trunk (I previously had subs so all I did was use that power wire and regrounded the original ground) what I did was cut all the stock tape and plastic wrapping off and then I combined what wires I could and taped them together. Had to take alot of plastic mounts out also and there were a couple pieces of metal that were bolted to the engine bay just to hold wires and I took those out too. I had to unbolt alot of stuff and tuck the wires around and under it then rebolt it but didnt relocate anything besides my hid ballasts. The one on the drivers side I put in the hole above the wheel well and just drilled a small hole. The passenger side one I just had to bolt to the side of the engine bay to the left of the windshield wiper fluid holder. The wires coming out of the altinator I just cut the plastic and taped them to some other wires and tucked them under my engine damper then ran the vacuum line from the wastegate where it was.
Thats pretty much all I did that I can think of. It just took alot of time and thinking but wasn't hard otherwise. Just make sure that you don't relocate anything anywhere that it'll get caught in the fans, melt or something else.
Uhmmm if you have any questions or anything like that just message me or post on here idc
If your asking about the wires for subs I currently dont have any but I just ordered the Bazooka sub. If you're asking about where I ran the power wire for my amp that I now use for my battery I just ran it through a preexisting hole in the firewall on the drivers side the down the side of the car under the back seats and out of where the spare tire is. This took me probably a total of about 5-6 hours of actual work. Also make sure you have a secure place for the battery. For a few days i just had it in the styrofoam cubby thing on the passenger side and then used a small box to brace it so it wouldn't slide around lol. It's currently in a legit battery box and I used velcro command strips to hold it to the carpet (they stick really well you would think that its bolted if you pulled on it)

Member
SL Member
Joined: Feb 2010
Posts: 67
From: Neosho, MO
lol. nice. im building a fiberglass box to replace the spare and everything back there so that i can sink two tens in the floor, and i think im gonna run my battery back there while im at it. might as well right? i have more than enough space for the subs. i actually had to put dividers in the box to make them sound decent. ill post pics when everything gets finished.


lol. nice. im building a fiberglass box to replace the spare and everything back there so that i can sink two tens in the floor, and i think im gonna run my battery back there while im at it. might as well right? i have more than enough space for the subs. i actually had to put dividers in the box to make them sound decent. ill post pics when everything gets finished.
Since you're ditching the spar you could probably just sink the battery and make it completely hidden! I kinda wanna do that now :-P lol

